目录
1、在局域网中部署环路规避方案
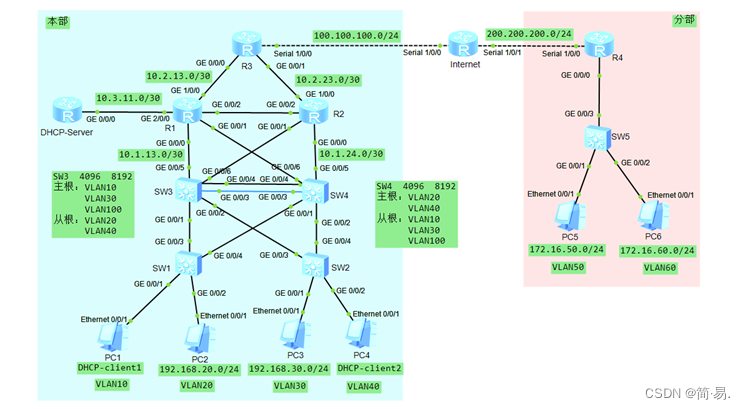
为避免网络接入设备上出现环路,影响全网运行状态。要求在网络接入交换机SW1、SW2上进行防环处理。具体要求如下所示。
(1)在连接PC机端口上开启Portfast和BPDUguard防护功能。
2、部署MSTP及HSRP技术,实现网络冗余。
在校本部的SW1、SW2、SW3、SW4交换机上配置PVST防止二层环路。
(1)在本部的网络中配置PVST,要求来自VLAN10、VLAN30、VLAN100中的数据流经过S3交换机转发,一旦S3交换机失效时,经过S4交换机转发。要求来自VLAN20、VLAN40中的数据流经过S4交换机转发,一旦S4交换机失效时,经过S3交换机转发。
(2)配置本部网络中的SW3交换机作为VLAN10、VLAN30、VLAN100的主根、VLAN20、VLAN40的从根;配置SW4交换机作为VLAN20、VLAN40的主根、VLAN10、VLAN30、VLAN100的从根。其中,主根交换机的优先级为4096;从根交换机的优先级为8192。
(3)在校本部网络中汇聚交换机SW3和SW4上配置HSRP,实现网络中的主机的网关冗余,所配置的参数要求如表1所示。其中,在交换机S3、S4上设置各HSRP组中的高优先级设置为150,低优先级设置为120。
(4)为提升校本部网络的冗余功能,在汇聚交换机SW3与SW4之间部署2条互联链路(Gi0/3、Gi0/4),并采取LACP动态聚合模式配置二层链路聚合。其它接口根据网络互联需要,进行静态链路聚合配置,生成聚合接口1。
表1 交换机SW3和SW4上的VRRP参数
| VLAN | HSRP备份组号 | HSRP虚拟IP |
| VLAN10 | 10 | 192.168.10.254 |
| VLAN20 | 20 | 192.168.20.254 |
| VLAN30 | 30 | 192.168.30.254 |
| VLAN40 | 40 | 192.168.40.254 |
| VLAN100 | 100 | 192.168.100.254 |
3、部署全网路由协议,实现全网的互联互通。
在本部的网络中使用多区域OSPF协议组网(OSPF 100),实现全网的互联互通,具体要求如下。
(1)本部网络的所有设备都在OSPF区域0。
(2)要求业务网段(VLAN 10、VLAN 20、VLAN 30、VLAN40、VLAN100)中不出现协议报文。
(3)优化全网的OSPF配置,尽量加快OSPF路由收敛。
4、部署DHCP服务和DHCP中继。
在DHCP-Server上做DHCP服务,在SW3、SW4的VLAN10、VLAN40上配置DHCP中继,,实现IP地址的自动分配,具体要求如下:
(1)在DHCP-Server上做DHCP服务,能够为VLAN10、VLAN40自动分配IP地址。
5、部署分部
(1)在分部上做单臂路由,使得分部的PC机能够正常上网
6、出口设备上部署NAT,实现远程接入。
出口设备上部署NAT,实现远程接入,具体配置参数如下。
(1)在本部网络中出口路由器R3上,配置NAT,实现本部网络中的所有VLAN都能够访问到1.1.1.1
(2)在分部网络中出口路由器R4上,配置NAT,实现分部网络中的VLAN50能够访问到1.1.1.1
7、远程管理
(1)为本部R3路由器和DHCP服务器开启相应的SSH服务端功能,用户名和密码为admin.
(2)为本部的所有交换机开启Telent功能,对所有的Telent用户采用本地认证的方式,创建本地用户,设定用户名和密码为admin
| 设备 | 接口/VLAN | 二层或三层规划 |
| 设备 | 接口/VLAN | 二层或三层规划 |
| SW1 | VLAN10 | G0/0/1 | SW2 | VLAN10 | G0/0/1 | |
| VLAN20 | G0/0/2 | VLAN20 | G0/0/2 | |||
| VLAN30 | \ | VLAN30 | \ | |||
| VLAN40 | VLAN40 | |||||
| VLAN100 | 192.168.100.1/24 | VLAN100 | 192.168.100.2/24 | |||
| SW3 | VLAN10 | 192.168.10.252/24 | SW4 | VLAN10 | 192.168.10.253/24 | |
| VLAN20 | 192.168.20.252/24 | VLAN20 | 192.168.20.253/24 | |||
| VLAN30 | 192.168.30.252/24 | VLAN30 | 192.168.30.253/24 | |||
| VLAN40 | 192.168.40.252/24 | VLAN40 | 192.168.40.253/24 | |||
| VLAN100 | 192.168.100.252/24 | VLAN100 | 192.168.100.253/24 | |||
| G0/0/5 | 10.1.13.2/30 | G0/0/5 | 10.1.24.1/30 | |||
| G0/0/6 | 10.1.23.1/30 | G0/0/6 | 10.1.14.2/30 | |||
| R1 | G0/0/0 | 10.1.13.1/30 | R2 | G0/0/0 | 10.1.24.2/30 | |
| G0/0/1 | 10.1.14.1/30 | G0/0/1 | 10.1.23.2/30 | |||
| G0/0/2 | 10.2.12.1/30 | G0/0/2 | 10.2.12.2/30 | |||
| G1/0/0 | 10.2.13.1/30 | G1/0/0 | 10.2.23.1/30 | |||
| G2/0/0 | 10.3.11.1/30 | LoopBack0 | 11.11.11.2/32 | |||
| LoopBack0 | 11.11.11.1/32 |
| ||||
| R3 | G0/0/0 | 10.2.13.2/30 | R4 | S1/0/0 | 200.200.200.1/24 | |
| G0/0/1 | 10.2.23.2/30 | G0/0/0.50 | 172.16.50.254/24 | |||
| S1/0/0 | 100.100.100.1/24 | G0/0/0.60 | 172.16.60.254/24 | |||
| LoopBack0 | 11.11.11.3/32 |
| ||||
| Inter | S1/0/0 | 100.100.100.2/24 | SW5 | VLAN50 | G0/0/1 | |
| S1/0/1 | 200.200.200.2/24 | VLAN60 | G0/0/2 | |||
| LoopBack0 | 1.1.1.1/32 |
| ||||
| DHCP-Server | G0/0/0 | 10.3.11.2/30 | ||||
| LoopBack0 | 11.11.11.4/32 | |||||
| PC1 | VLAN10 | DHCP获取 | ||||
| PC2 | VLAN20 | 192.168.20.1/24 | ||||
| PC3 | VLAN30 | 192.168.30.1/24 | ||||
| PC4 | VLAN40 | DHCP获取 | ||||
| PC5 | VLAN50 | 172.16.50.1/24 | ||||
| PC6 | VLAN60 | 172.16.60.1/24 | ||||
| <Huawei>sys [Huawei]un in en Info: Information center is disabled. [Huawei]sysname SW1 [SW1]vlan batch 10 20 30 40 100 [SW1]int vlan 100 [SW1-Vlanif100]ip add 192.168.100.1 24 [SW1-Vlanif100]int g0/0/1 [SW1-GigabitEthernet0/0/1]port link-type access [SW1-GigabitEthernet0/0/1]port default vlan 10 [SW1-GigabitEthernet0/0/1]int g0/0/2 [SW1-GigabitEthernet0/0/2]port link-type access [SW1-GigabitEthernet0/0/2]port default vlan 20 [SW1-GigabitEthernet0/0/2]q [SW1]int g0/0/3 [SW1-GigabitEthernet0/0/3]port link-type trunk [SW1-GigabitEthernet0/0/3]port trunk allow-pass vlan 10 20 30 40 100 [SW1-GigabitEthernet0/0/3]int g0/0/4 [SW1-GigabitEthernet0/0/4]port link-type trunk [SW1-GigabitEthernet0/0/4]port trunk allow-pass vlan 10 20 30 40 100
//开启Portfast和BPDUguard防护功能 [SW1-Vlanif100]int g0/0/1 [SW1-GigabitEthernet0/0/1]stp bpdu-filter enable [SW1-GigabitEthernet0/0/1]stp edged-port enable [SW1-Vlanif100]int g0/0/2 [SW1-GigabitEthernet0/0/2]stp bpdu-filter enable [SW1-GigabitEthernet0/0/2]stp edged-port enable
//telnet [SW1]aaa [SW1-aaa]local-user admin password cipher admin [SW1-aaa]local-user admin privilege level 15 [SW1-aaa]local-user admin service-type telnet [SW1-aaa]q [SW1]user-interface vty 0 4 [SW1-ui-vty0-4]authentication-mode aaa
|
| <Huawei>sys [Huawei]un in en Info: Information center is disabled. [Huawei]sysname SW2 [SW2]vlan batch 10 20 30 40 100 [SW2]int vlan 100 [SW2-Vlanif100]ip add 192.168.100.2 24 [SW2-Vlanif100]int g0/0/1 [SW2-GigabitEthernet0/0/1]port link-type access [SW2-GigabitEthernet0/0/1]port default vlan 30 [SW2-GigabitEthernet0/0/1]int g0/0/2 [SW2-GigabitEthernet0/0/2]port link-type access [SW2-GigabitEthernet0/0/2]port default vlan 40 [SW2-GigabitEthernet0/0/2]q [SW2]int g0/0/3 [SW2-GigabitEthernet0/0/3]port link-type trunk [SW2-GigabitEthernet0/0/3]port trunk allow-pass vlan 10 20 30 40 100 [SW2-GigabitEthernet0/0/3]int g0/0/4 [SW2-GigabitEthernet0/0/4]port link-type trunk [SW2-GigabitEthernet0/0/4]port trunk allow-pass vlan 10 20 30 40 100
//开启Portfast和BPDUguard防护功能 [SW2-Vlanif100]int g0/0/1 [SW2-GigabitEthernet0/0/1]stp bpdu-filter enable [SW2-GigabitEthernet0/0/1]stp edged-port enable [SW2-Vlanif100]int g0/0/2 [SW2-GigabitEthernet0/0/2]stp bpdu-filter enable [SW2-GigabitEthernet0/0/2]stp edged-port enable
//telnet [SW2]aaa [SW2-aaa]local-user admin password cipher admin [SW2-aaa]local-user admin privilege level 15 [SW2-aaa]local-user admin service-type telnet [SW2-aaa]q [SW2]user-interface vty 0 4 [SW2-ui-vty0-4]authentication-mode aaa |
| <Huawei>sys [Huawei]un in en [Huawei]sysname SW3 [SW3]vlan batch 5 6 10 20 30 40 100 [SW3]int vlan 10 [SW3-Vlanif10]ip add 192.168.10.252 24 [SW3-Vlanif10]int vlan 20 [SW3-Vlanif20]ip add 192.168.20.252 24 [SW3-Vlanif20]int vlan 30 [SW3-Vlanif30]ip add 192.168.30.252 24 [SW3-Vlanif30]int vlan 40 [SW3-Vlanif40]ip add 192.168.40.252 24 [SW3-Vlanif40]int vlan 100 [SW3-Vlanif100]ip add 192.168.100.252 24 [SW3-Vlanif100]int vlan 5 [SW3-Vlanif5]ip add 10.1.13.2 30 [SW3-Vlanif5]int vlan 6 [SW3-Vlanif6]ip add 10.1.23.1 30 [SW3-Vlanif6]int g0/0/5 [SW3-GigabitEthernet0/0/5]port link-type access [SW3-GigabitEthernet0/0/5]port default vlan 5 [SW3-GigabitEthernet0/0/5]int g0/0/6 [SW3-GigabitEthernet0/0/6]port link-type access [SW3-GigabitEthernet0/0/6]port default vlan 6 [SW3-GigabitEthernet0/0/6]int g0/0/1 [SW3-GigabitEthernet0/0/1]port link-type trunk [SW3-GigabitEthernet0/0/1]port trunk allow-pass vlan 10 20 30 40 100 [SW3-GigabitEthernet0/0/1]int g0/0/2 [SW3-GigabitEthernet0/0/2]port link-type trunk [SW3-GigabitEthernet0/0/2]port trunk allow-pass vlan 10 20 30 40 100 [SW3-GigabitEthernet0/0/2]q
//VRRP [SW3]int vlan 10 [SW3-Vlanif10]vrrp vrid 10 virtual-ip 192.168.10.254 [SW3-Vlanif10]vrrp vrid 10 priority 150 [SW3-Vlanif10]int vlan 20 [SW3-Vlanif20]vrrp vrid 20 virtual-ip 192.168.20.254 [SW3-Vlanif20]vrrp vrid 20 priority 120 [SW3-Vlanif20]int vlan 30 [SW3-Vlanif30]vrrp vrid 30 virtual-ip 192.168.30.254 [SW3-Vlanif30]vrrp vrid 30 priority 150 [SW3-Vlanif30]int vlan 40 [SW3-Vlanif40]vrrp vrid 40 virtual-ip 192.168.40.254 [SW3-Vlanif40]vrrp vrid 40 priority 120 [SW3-Vlanif40]int vlan 100 [SW3-Vlanif100]vrrp vrid 100 virtual-ip 192.168.100.254 [SW3-Vlanif100]vrrp vrid 100 priority 150 [SW3-Vlanif100]q
// Eth-Trunk [SW3]int Eth-Trunk 1 [SW3-Eth-Trunk1]port link-type trunk [SW3-Eth-Trunk1]port trunk allow-pass vlan 10 20 30 40 100 [SW3-Eth-Trunk1]int g0/0/3 [SW3-GigabitEthernet0/0/3]eth-trunk 1 Info: This operation may take a few seconds. Please wait for a moment...done. [SW3-GigabitEthernet0/0/3]int g0/0/4 [SW3-GigabitEthernet0/0/4]eth-trunk 1 Info: This operation may take a few seconds. Please wait for a moment...done. [SW3-GigabitEthernet0/0/4]q
//MSTP [SW3]stp mode mstp [SW3]stp region-configuration [SW3-mst-region]region-name mstp [SW3-mst-region]instance 1 vlan 10 30 100 [SW3-mst-region]instance 2 vlan 20 40 [SW3-mst-region]active region-configuration Info: This operation may take a few seconds. Please wait for a moment...done. [SW3-mst-region]q [SW3]stp instance 1 priority 4096 [SW3]stp instance 2 priority 8192 [SW3]dhcp enable Info: The operation may take a few seconds. Please wait for a moment.done.
//DHCP中继 [SW3]int vlan 10 [SW3-Vlanif10]dhcp select relay [SW3-Vlanif10]dhcp relay server-ip 10.3.11.2 [SW3-Vlanif10]int vlan 40 [SW3-Vlanif40]dhcp select relay [SW3-Vlanif40]dhcp relay server-ip 10.3.11.2 [SW3-Vlanif40]q
//OSPF [SW3]ospf 100 [SW3-ospf-100]area 0 [SW3-ospf-100-area-0.0.0.0]net 192.168.10.0 0.0.0.255 [SW3-ospf-100-area-0.0.0.0]net 192.168.20.0 0.0.0.255 [SW3-ospf-100-area-0.0.0.0]net 192.168.30.0 0.0.0.255 [SW3-ospf-100-area-0.0.0.0]net 192.168.40.0 0.0.0.255 [SW3-ospf-100-area-0.0.0.0]net 192.168.100.0 0.0.0.255 [SW3-ospf-100-area-0.0.0.0]net 10.1.13.0 0.0.0.3 [SW3-ospf-100-area-0.0.0.0]net 10.1.23.0 0.0.0.3 [SW3]ospf 100 [SW3-ospf-100] silent-interface vlanif 10 [SW3-ospf-100] silent-interface vlanif 20 [SW3-ospf-100] silent-interface vlanif 30 [SW3-ospf-100] silent-interface vlanif 40 [SW3-ospf-100] silent-interface vlanif 100
//优化全网的OSPF配置,尽量加快OSPF路由收敛 [SW3]int vlan 5 [SW3-Vlanif5] ospf network-type p2p [SW3]int vlan 6 [SW3-Vlanif6] ospf network-type p2p
//telnet [SW3]aaa [SW3-aaa]local-user admin password cipher admin [SW3-aaa]local-user admin privilege level 15 [SW3-aaa]local-user admin service-type telnet [SW3-aaa]q [SW3]user-interface vty 0 4 [SW3-ui-vty0-4]authentication-mode aaa |
| <Huawei>sys [Huawei]un in en [Huawei]sysname SW4 [SW4]vlan batch 5 6 10 20 30 40 100 [SW4]int vlan 10 [SW4-Vlanif10]ip add 192.168.10.253 24 [SW4-Vlanif10]int vlan 20 [SW4-Vlanif20]ip add 192.168.20.253 24 [SW4-Vlanif20]int vlan 30 [SW4-Vlanif30]ip add 192.168.30.253 24 [SW4-Vlanif30]int vlan 40 [SW4-Vlanif40]ip add 192.168.40.253 24 [SW4-Vlanif40]int vlan 100 [SW4-Vlanif100]ip add 192.168.100.253 24 [SW4-Vlanif100]int vlan 5 [SW4-Vlanif5]ip add 10.1.24.1 30 [SW4-Vlanif5]int vlan 6 [SW4-Vlanif6]ip add 10.1.14.2 30 [SW4-Vlanif6]int g0/0/5 [SW4-GigabitEthernet0/0/5]port link-type access [SW4-GigabitEthernet0/0/5]port default vlan 5 [SW4-GigabitEthernet0/0/5]int g0/0/6 [SW4-GigabitEthernet0/0/6]port link-type access [SW4-GigabitEthernet0/0/6]port default vlan 6 [SW4-GigabitEthernet0/0/6]int g0/0/1 [SW4-GigabitEthernet0/0/1]port link-type trunk [SW4-GigabitEthernet0/0/1]port trunk allow-pass vlan 10 20 30 40 100 [SW4-GigabitEthernet0/0/1]int g0/0/2 [SW4-GigabitEthernet0/0/2]port link-type trunk [SW4-GigabitEthernet0/0/2]port trunk allow-pass vlan 10 20 30 40 100 [SW4-GigabitEthernet0/0/2]q
//VRRP [SW4]int vlan 10 [SW4-Vlanif10]vrrp vrid 10 virtual-ip 192.168.10.254 [SW4-Vlanif10]vrrp vrid 10 priority 120 [SW4-Vlanif10]int vlan 20 [SW4-Vlanif20]vrrp vrid 20 virtual-ip 192.168.20.254 [SW4-Vlanif20]vrrp vrid 20 priority 150 [SW4-Vlanif20]int vlan 30 [SW4-Vlanif30]vrrp vrid 30 virtual-ip 192.168.30.254 [SW4-Vlanif30]vrrp vrid 30 priority 120 [SW4-Vlanif30]int vlan 40 [SW4-Vlanif40]vrrp vrid 40 virtual-ip 192.168.40.254 [SW4-Vlanif40]vrrp vrid 40 priority 150 [SW4-Vlanif40]int vlan 100 [SW4-Vlanif100]vrrp vrid 100 virtual-ip 192.168.100.254 [SW4-Vlanif100]vrrp vrid 100 priority 120 [SW4-Vlanif100]q
// Eth-Trunk [SW4]int Eth-Trunk 1 [SW4-Eth-Trunk1]port link-type trunk [SW4-Eth-Trunk1]port trunk allow-pass vlan 10 20 30 40 100 [SW4-Eth-Trunk1]int g0/0/3 [SW4-GigabitEthernet0/0/3]eth-trunk 1 Info: This operation may take a few seconds. Please wait for a moment...done. [SW4-GigabitEthernet0/0/3]int g0/0/4 [SW4-GigabitEthernet0/0/4]eth-trunk 1 Info: This operation may take a few seconds. Please wait for a moment...done. [SW4-GigabitEthernet0/0/4]q
//MSTP [SW4]stp mode mstp [SW4]stp region-configuration [SW4-mst-region]region-name mstp [SW4-mst-region]instance 1 vlan 10 30 100 [SW4-mst-region]instance 2 vlan 20 40 [SW4-mst-region]active region-configuration Info: This operation may take a few seconds. Please wait for a moment...done. [SW4-mst-region]q [SW4]stp instance 2 priority 4096 [SW4]stp instance 1 priority 8192
//DHCP中继 [SW4]dhcp enable [SW4]int vlan 10 [SW4-Vlanif10]dhcp select relay [SW4-Vlanif10]dhcp relay server-ip 10.3.11.2 [SW4-Vlanif10]int vlan 40 [SW4-Vlanif40]dhcp select relay [SW4-Vlanif40]dhcp relay server-ip 10.3.11.2 [SW4-Vlanif40]q
//OSPF [SW4]ospf 100 [SW4-ospf-100]area 0 [SW4-ospf-100-area-0.0.0.0]net 192.168.10.0 0.0.0.255 [SW4-ospf-100-area-0.0.0.0]net 192.168.20.0 0.0.0.255 [SW4-ospf-100-area-0.0.0.0]net 192.168.30.0 0.0.0.255 [SW4-ospf-100-area-0.0.0.0]net 192.168.40.0 0.0.0.255 [SW4-ospf-100-area-0.0.0.0]net 192.168.100.0 0.0.0.255 [SW4-ospf-100-area-0.0.0.0]net 10.1.14.0 0.0.0.3 [SW4-ospf-100-area-0.0.0.0]net 10.1.24.0 0.0.0.3 [SW4]ospf 100 [SW4-ospf-100] silent-interface vlanif 10 [SW4-ospf-100] silent-interface vlanif 20 [SW4-ospf-100] silent-interface vlanif 30 [SW4-ospf-100] silent-interface vlanif 40 [SW4-ospf-100] silent-interface vlanif 100
//优化全网的OSPF配置,尽量加快OSPF路由收敛 [SW4]int vlan 5 [SW4-Vlanif5] ospf network-type p2p [SW4]int vlan 6 [SW4-Vlanif6] ospf network-type p2p
//telnet [SW4]aaa [SW4-aaa]local-user admin password cipher admin [SW4-aaa]local-user admin privilege level 15 [SW4-aaa]local-user admin service-type telnet [SW4-aaa]q [SW4]user-interface vty 0 4 [SW4-ui-vty0-4]authentication-mode aaa |
| <R1>sys [R1]int g0/0/0 [R1-GigabitEthernet0/0/0]ip add 10.1.13.1 30 [R1-GigabitEthernet0/0/0]int g0/0/1 [R1-GigabitEthernet0/0/1]ip add 10.1.14.1 30 [R1-GigabitEthernet0/0/1]int g0/0/2 [R1-GigabitEthernet0/0/2]ip add 10.2.12.1 30 [R1-GigabitEthernet0/0/2]int g1/0/0 [R1-GigabitEthernet1/0/0]ip add 10.2.13.1 30 [R1-GigabitEthernet1/0/0]int g2/0/0 [R1-GigabitEthernet2/0/0]ip add 10.3.11.1 30 [R1-GigabitEthernet2/0/0]int loopback 0 [R1-LoopBack0]ip add 11.11.11.1 32 [R1-LoopBack0]q
//优化全网的OSPF配置,尽量加快OSPF路由收敛 [R1]int g0/0/0 [R1-GigabitEthernet0/0/0] ospf network-type p2p [R1]int g0/0/1 [R1-GigabitEthernet0/0/1] ospf network-type p2p [R1]int g0/0/2 [R1-GigabitEthernet0/0/2] ospf network-type p2p [R1]int g1/0/0 [R1-GigabitEthernet1/0/0] ospf network-type p2p [R1]int g2/0/0 [R1-GigabitEthernet2/0/0] ospf network-type p2p
//OSPF [R1]ospf 100 [R1-ospf-100]area 0 [R1-ospf-100-area-0.0.0.0]net 10.1.13.0 0.0.0.3 [R1-ospf-100-area-0.0.0.0]net 10.1.14.0 0.0.0.3 [R1-ospf-100-area-0.0.0.0]net 10.2.12.0 0.0.0.3 [R1-ospf-100-area-0.0.0.0]net 10.2.13.0 0.0.0.3 [R1-ospf-100-area-0.0.0.0]net 10.3.11.0 0.0.0.3 [R1] ssh client first-time enable //SSH客户端
|
| <R2>sys [R2]int g0/0/0 [R2-GigabitEthernet0/0/0]ip add 10.1.24.2 30 [R2-GigabitEthernet0/0/0]int g0/0/1 [R2-GigabitEthernet0/0/1]ip add 10.1.23.2 30 [R2-GigabitEthernet0/0/1]int g0/0/2 [R2-GigabitEthernet0/0/2]ip add 10.2.12.2 30 [R2-GigabitEthernet0/0/2]int g1/0/0 [R2-GigabitEthernet1/0/0]ip add 10.2.23.1 30 [R2-GigabitEthernet1/0/0]int loopback 0 [R2-LoopBack0]ip add 11.11.11.2 32 [R2-LoopBack0]q
//优化全网的OSPF配置,尽量加快OSPF路由收敛 [R2]int g0/0/0 [R2-GigabitEthernet0/0/0] ospf network-type p2p [R2]int g0/0/1 [R2-GigabitEthernet0/0/1] ospf network-type p2p [R2]int g0/0/2 [R2-GigabitEthernet0/0/2] ospf network-type p2p [R2]int g1/0/0 [R2-GigabitEthernet1/0/0] ospf network-type p2p
//OSPF [R2]ospf 100 [R2-ospf-100]area 0 [R2-ospf-100-area-0.0.0.0]net 10.1.23.0 0.0.0.3 [R2-ospf-100-area-0.0.0.0]net 10.1.24.0 0.0.0.3 [R2-ospf-100-area-0.0.0.0]net 10.2.12.0 0.0.0.3 [R2-ospf-100-area-0.0.0.0]net 10.2.23.0 0.0.0.3
|
| <R3>sys [R3]int g0/0/0 [R3-GigabitEthernet0/0/0]ip add 10.2.13.2 30 [R3-GigabitEthernet0/0/0] ospf network-type p2p [R3-GigabitEthernet0/0/0]int g0/0/1 [R3-GigabitEthernet0/0/1]ip add 10.2.23.2 30 [R3-GigabitEthernet0/0/1] ospf network-type p2p [R3-GigabitEthernet0/0/1]int s1/0/0 [R3-Serial1/0/0]ip add 100.100.100.1 24 [R3-Serial1/0/0]int loopback 0 [R3-LoopBack0]ip add 11.11.11.3 32 [R3-LoopBack0]q
//OSPF [R3]ospf 100 [R3-ospf-100]default-route-advertise //下发默认路由 [R3-ospf-100]area 0 [R3-ospf-100-area-0.0.0.0]net 10.2.13.0 0.0.0.3 [R3-ospf-100-area-0.0.0.0]net 10.2.23.0 0.0.0.3
//NAT [R3]acl 2000 [R3-acl-basic-2000]rule permit source any [R3-acl-basic-2000]int s1/0/0 [R3-Serial1/0/0]nat outbound 2000 [R3]ip route-static 0.0.0.0 0.0.0.0 100.100.100.2
//SSH [R3]rsa local-key-pair create The key name will be: Host % RSA keys defined for Host already exist. Confirm to replace them? (y/n)[n]:y The range of public key size is (512 ~ 2048). NOTES: If the key modulus is greater than 512, It will take a few minutes. Input the bits in the modulus[default = 512]:1024 Generating keys... ................................................................................ [R3]user-interface vty 0 4 [R3-ui-vty0-4]authentication-mode aaa [R3-ui-vty0-4]protocol inbound ssh [R3-ui-vty0-4]aaa [R3-aaa] [R3-aaa]local-user admin service-type ssh [R3-aaa]local-user admin password cipher admin [R3-aaa]local-user admin privilege level 15 [R3-aaa]ssh user admin authentication-type password [R3]stelnet server enable Info: Succeeded in starting the STELNET server.
|
| <Huawei>sys [Huawei]un in en Info: Information center is disabled. [Huawei]sysname DHCP-S [DHCP-S]dhcp enable Info: The operation may take a few seconds. Please wait for a moment.done. [DHCP-S]ip pool vlan10 Info: It's successful to create an IP address pool. [DHCP-S-ip-pool-vlan10]gateway-list 192.168.10.254 [DHCP-S-ip-pool-vlan10]network 192.168.10.0 mask 255.255.255.0 [DHCP-S-ip-pool-vlan10]dns-list 8.8.8.8 [DHCP-S-ip-pool-vlan10]excluded-ip-address 192.168.10.252 192.168.10.253 [DHCP-S-ip-pool-vlan10]q [DHCP-S]ip pool vlan40 Info: It's successful to create an IP address pool. [DHCP-S-ip-pool-vlan40]gateway-list 192.168.40.254 [DHCP-S-ip-pool-vlan40]network 192.168.40.0 mask 255.255.255.0 [DHCP-S-ip-pool-vlan40]dns-list 8.8.8.8 [DHCP-S-ip-pool-vlan40]excluded-ip-address 192.168.40.252 192.168.40.253 [DHCP-S-ip-pool-vlan40]q [DHCP-S]int g0/0/0 [DHCP-S-GigabitEthernet0/0/0]ip add 10.3.11.2 30 [DHCP-S-GigabitEthernet0/0/0]dhcp select global [DHCP-S-GigabitEthernet0/0/0]int loopback 0 [DHCP-S-LoopBack0]ip add 11.11.11.4 32 [DHCP-S-LoopBack0]q
//OSPF [DHCP-S]ospf 100 [DHCP-S-ospf-100]area 0 [DHCP-S-ospf-100-area-0.0.0.0]net 10.3.11.0 0.0.0.3
//SSH [DHCP-S]rsa local-key-pair create The key name will be: Host % RSA keys defined for Host already exist. Confirm to replace them? (y/n)[n]:y The range of public key size is (512 ~ 2048). NOTES: If the key modulus is greater than 512, It will take a few minutes. Input the bits in the modulus[default = 512]:1024 Generating keys... ................................................................................ [DHCP-S]user-interface vty 0 4 [DHCP-S-ui-vty0-4]authentication-mode aaa [DHCP-S-ui-vty0-4]protocol inbound ssh [DHCP-S-ui-vty0-4]aaa [DHCP-S-aaa] [DHCP-S-aaa]local-user admin service-type ssh [DHCP-S-aaa]local-user admin password cipher admin [DHCP-S-aaa]local-user admin privilege level 15 [DHCP-S-aaa]ssh user admin authentication-type password [DHCP-S]stelnet server enable Info: Succeeded in starting the STELNET server.
|
| <Huawei>sys [Huawei]un in en Info: Information center is disabled. [Huawei]sysname R4 [R4]int s1/0/0 [R4-Serial1/0/0]ip add 200.200.200.1 24
//单臂路由 [R4-Serial1/0/0]int g0/0/0.50 [R4-GigabitEthernet0/0/0.50]ip add 172.16.50.254 24 [R4-GigabitEthernet0/0/0.50]dot1q termination vid 50 [R4-GigabitEthernet0/0/0.50]arp broadcast enable [R4-GigabitEthernet0/0/0.50]int g0/0/0.60 [R4-GigabitEthernet0/0/0.60]ip add 172.16.60.254 24 [R4-GigabitEthernet0/0/0.60]dot1q termination vid 60 [R4-GigabitEthernet0/0/0.60]arp broadcast enable [R4-GigabitEthernet0/0/0.60]q
//NAT [R4]acl 2000 [R4-acl-basic-2000]rule 5 permit source 172.16.50.0 0.0.0.255 [R4-acl-basic-2000]rule deny source any [R4-acl-basic-2000]int s1/0/0 [R4-Serial1/0/0]nat outbound 2000 [R4] ip route-static 0.0.0.0 0.0.0.0 200.200.200.2
|
| <Huawei>sys [Huawei]un in en Info: Information center is disabled. [Huawei]sysname SW5 [SW5]vlan batch 50 60 Info: This operation may take a few seconds. Please wait for a moment...done. [SW5]int g0/0/3 [SW5-GigabitEthernet0/0/3]port link-type trunk [SW5-GigabitEthernet0/0/3]port trunk allow-pass vlan 50 60 [SW5-GigabitEthernet0/0/3]int g0/0/1 [SW5-GigabitEthernet0/0/1]port link-type access [SW5-GigabitEthernet0/0/1]port default vlan 50 [SW5-GigabitEthernet0/0/1]int g0/0/2 [SW5-GigabitEthernet0/0/2]port link-type access [SW5-GigabitEthernet0/0/2]port default vlan 60
|
一个比较简单的实验,图太多我就不贴了,赶时间啊哈哈哈哈
最后感谢指正。
我尝试使用不同的ssh_options在同一阶段运行capistranov.3任务。我的production.rb说:set:stage,:productionset:user,'deploy'set:ssh_options,{user:'deploy'}通过此配置,capistrano与用户deploy连接,这对于其余的任务是正确的。但是我需要将它连接到服务器中配置良好的an_other_user以完成一项特定任务。然后我的食谱说:...taskswithoriginaluser...task:my_task_with_an_other_userdoset:user,'an_othe
在previousquestion中我想出了如何在多个服务器上启动经过密码验证的sshsession来运行单个命令。现在我需要能够执行“sudo”命令。问题是,net-ssh-multi没有分配sudo需要运行的伪终端(pty),导致以下错误:[127.0.0.1:stderr]sudo:sorry,youmusthaveattytorunsudo根据documentation,可以通过调用channel对象的方法来分配伪终端,但是,以下代码不起作用:它会生成上面的“notty”错误:require'net/ssh'require'net/ssh/multi'Net::SSH::Mul
第一步,先创建一个回环端口,不要用自己的网卡,很不稳定,会断的。①先找到“设备管理器”,点击②进入设备管理器点击“操作”,然后再点击“添加过时硬盘”,记得点击“操作”前先随便在空白处点击一下,不然点击“点击操作”会出现第二张图的内容。 ③点击“下一页”④点击“手动”,然后再点击下一页。 ⑤点击“网络适配器”,点击下一页 ⑥点击“Microsoft”,然后点击“环回适配器”。 创建完成后,在下图中会有一个“环回适配器”, 第二步,ensp和真机进行桥接①打开ensp,并且配置一个“云”②先添加一个内网接口,点击添加③选择“绑定信息”中的以太网2,点击“增加”,添加外网。如果找不到你的环回网卡
Linux操作系统——网络配置与SSH远程安装完VMware与系统后,需要进行网络配置。第一个目标为进行SSH连接,可以从本机到VMware进行文件传送,首先需要进行网络配置。1.下载远程软件首先需要先下载安装一款远程软件:FinalShell或者xhell7FinalShellxhell7FinalShell下载:Windows下载http://www.hostbuf.com/downloads/finalshell_install.exemacOS下载http://www.hostbuf.com/downloads/finalshell_install.pkg2.配置CentOS网络安装好
我一直在尝试使用Thor编写一个小型库,以帮助我快速创建新项目和站点。我写了这个小方法:defssh(cmd)Net::SSH.start(server_ip,user,:port=>port)do|session|session.execcmdendend只是协助我在需要时在远程服务器上运行快速命令。问题是当我需要在远程端的sudo下运行命令时,脚本似乎卡在我身上。例如当执行这个...ssh("sudocp#{file_from_path}#{file_to_path}")脚本会提示我输入密码[sudo]passwordforuser:但是在输入之后整个事情就挂起。有人会碰巧知道它为
我正在尝试弄清楚如何在Ruby中的sudosu-#{su_user}之后发送多个net-ssh命令链。我当前的代码在下面,并且挂起sudosu命令,即使在send_data"#{password}\n"之后也是如此。同时,在系统上,手动执行sudosu-admin2不需要输入密码。如有任何帮助,我们将不胜感激!require'rubygems'require'net/ssh'host='hostA'user='admin'password='hostA_pwd'su_user='Admin2'Net::SSH.start(host,user,:password=>password)do
目录一、安装包链接二、安装详细步骤1.安装Wireshark和WinPcap2.安装OracleVMVirtualBox3.安装ensp三、安装后注册四、启动路由器出现40错误怎么解决一、安装包链接二、安装详细步骤链接:https://pan.baidu.com/s/1QbUUYMOMIV2oeIKHWP1SpA?pwd=xftx提取码:xftx1.安装Wireshark和WinPcap找到Wireshark安装包所在文件夹,双击它,按照以下步骤安装。2.安装OracleVMVirtualBox找到OracleVMVirtualBox安装包所在文件夹,双击它,按照以下步骤安装。注:可自定义安装
有什么方法可以使用net-ssh在ruby中获取登录shell?这可能吗?我所说的登录shell是指源/etc/profile.. 最佳答案 Net-SSH级别太低,无法简单地预先提供(无论如何,现在是这样)。您可以查看基于Net-SSH构建的Net-SSH-Shell以添加登录shell功能:https://github.com/mitchellh/net-ssh-shell该实现可靠且有效,但我发现它不太有用,因为您无法专门提取诸如stderr或退出状态之类的内容,因为这些命令在子shell中运行,因此您只能获取stdout
我已经阅读了net-ssh文档,但我仍然感到困惑。我可以手动进行身份验证(使用ssh-i...),也可以将key放在文件中并使用:keys参数。但是,我不想使用:keys参数,我想使用:key_data参数。任何人都可以举一个工作的例子吗?出于某种原因,直接将字符串输入:key_data是行不通的,它给出了错误:“既不是PUBkey也不是PRIVkey::嵌套的asn1错误”。当然,我用谷歌搜索了一下,它基本上告诉我要确保key是PEM格式。而且,当然是。有任何想法吗?如果需要,我可以提供更详细的信息... 最佳答案 我看到这个问题
一、网络环境及TOP1.1R1相当于内网的一台PC, IP:192.168.1.10 网关为 192.168.1.254[R1]iproute-static0.0.0.00192.168.1.254#R1配置默认路由(网关)1.2R2为出口路由器,分别连接内网R1及外网R31)R2 内网接口IP:192.168.1.2542)R2外网接口IP:100.1.1.102)R2NAT地址为:100.1.1.11-100.1.1.14二、静态NAT配置1.1静态NAT(一对一双向)R2配置静态NAT,将公网IP100.1.1.11映射到内网R1 192.168.1.10[R2]intg0/0/1[R2