Net net = readNet(model);
net = cv.dnn.readNet(model)
blobFromImage(frame, blob, 1.0, Size(inpWidth, inpHeight), Scalar(123.68, 116.78, 103.94), true, false);
blob = cv.dnn.blobFromImage(frame, 1.0, (inpWidth, inpHeight), (123.68, 116.78, 103.94), True, False)
std::vector<String> outputLayers(2);

outputLayers[0] = "feature_fusion/Conv_7/Sigmoid";

outputLayers[1] = "feature_fusion/concat_3";
outputLayers = []

outputLayers.append("feature_fusion/Conv_7/Sigmoid")

outputLayers.append("feature_fusion/concat_3")
std::vector<Mat> output;

net.setInput(blob);

net.forward(output, outputLayers);

Mat scores = output[0];

Mat geometry = output[1];
net.setInput(blob)

output = net.forward(outputLayers)

scores = output[0]

geometry = output[1]
std::vector<RotatedRect> boxes;

std::vector<float> confidences;

decode(scores, geometry, confThreshold, boxes, confidences);
[boxes, confidences] = decode(scores, geometry, confThreshold)
std::vector<int> indices;

NMSBoxes(boxes, confidences, confThreshold, nmsThreshold, indices);
indices = cv.dnn.NMSBoxesRotated(boxes, confidences, confThreshold, nmsThreshold)
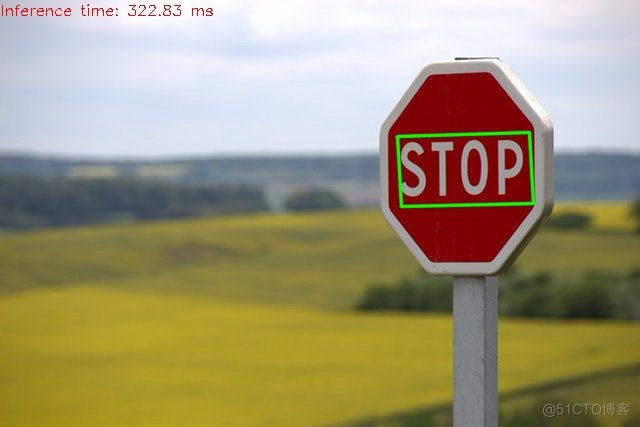
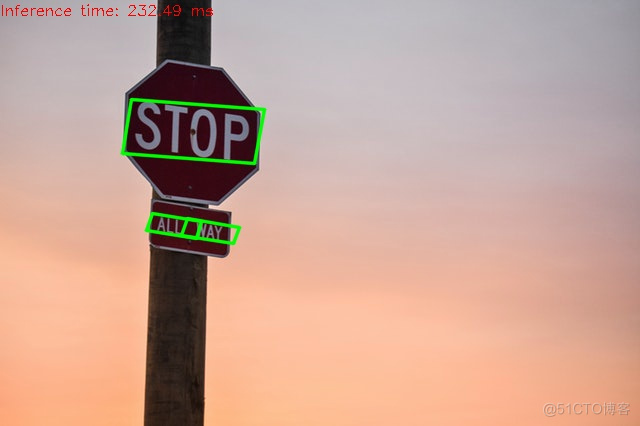
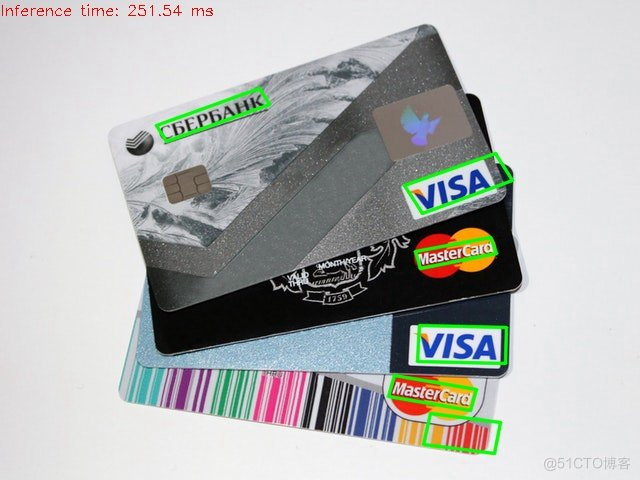
// text_detection.cpp : 此文件包含 "main" 函数。程序执行将在此处开始并结束。
//

#include "pch.h"
#include <iostream>
#include <opencv2/opencv.hpp>

using namespace std;
using namespace cv;
using namespace cv::dnn;

//解码
void decode(const Mat &scores, const Mat &geometry, float scoreThresh,
    std::vector<RotatedRect> &detections, std::vector<float> &confidences);

/**
 * @brief
 *
 * @param srcImg 检测图像
 * @param inpWidth 深度学习图像输入宽
 * @param inpHeight 深度学习图像输入高
 * @param confThreshold 置信度
 * @param nmsThreshold 非极大值抑制算法阈值
 * @param net
 * @return Mat
 */
Mat text_detect(Mat srcImg, int inpWidth, int inpHeight, float confThreshold, float nmsThreshold, Net net)
{
    //输出
    std::vector<Mat> output;
    std::vector<String> outputLayers(2);
    outputLayers[0] = "feature_fusion/Conv_7/Sigmoid";
    outputLayers[1] = "feature_fusion/concat_3";

    //检测图像
    Mat frame, blob;
    frame = srcImg.clone();
    //获取深度学习模型的输入
    blobFromImage(frame, blob, 1.0, Size(inpWidth, inpHeight), Scalar(123.68, 116.78, 103.94), true, false);
    net.setInput(blob);
    //输出结果
    net.forward(output, outputLayers);

    //置信度
    Mat scores = output[0];
    //位置参数
    Mat geometry = output[1];

    // Decode predicted bounding boxes, 对检测框进行解码,获取文本框位置方向
    //文本框位置参数
    std::vector<RotatedRect> boxes;
    //文本框置信度
    std::vector<float> confidences;
    decode(scores, geometry, confThreshold, boxes, confidences);

    // Apply non-maximum suppression procedure, 应用非极大性抑制算法
    //符合要求的文本框
    std::vector<int> indices;
    NMSBoxes(boxes, confidences, confThreshold, nmsThreshold, indices);

    // Render detections. 输出预测
    //缩放比例
    Point2f ratio((float)frame.cols / inpWidth, (float)frame.rows / inpHeight);
    for (size_t i = 0; i < indices.size(); ++i)
    {
        RotatedRect &box = boxes[indices[i]];

        Point2f vertices[4];
        box.points(vertices);
        //还原坐标点
        for (int j = 0; j < 4; ++j)
        {
            vertices[j].x *= ratio.x;
            vertices[j].y *= ratio.y;
        }
        //画框
        for (int j = 0; j < 4; ++j)
        {
            line(frame, vertices[j], vertices[(j + 1) % 4], Scalar(0, 255, 0), 2, LINE_AA);
        }
    }

    // Put efficiency information. 时间
    std::vector<double> layersTimes;
    double freq = getTickFrequency() / 1000;
    double t = net.getPerfProfile(layersTimes) / freq;
    std::string label = format("Inference time: %.2f ms", t);
    putText(frame, label, Point(0, 15), FONT_HERSHEY_SIMPLEX, 0.5, Scalar(0, 255, 0));

    return frame;
}

//模型地址
auto model = "./model/frozen_east_text_detection.pb";
//检测图像
auto detect_image = "./image/patient.jpg";
//输入框尺寸
auto inpWidth = 320;
auto inpHeight = 320;
//置信度阈值
auto confThreshold = 0.5;
//非极大值抑制算法阈值
auto nmsThreshold = 0.4;

int main()
{
    //读取模型
    Net net = readNet(model);
    //读取检测图像
    Mat srcImg = imread(detect_image);
    if (!srcImg.empty())
    {
        cout << "read image success!" << endl;
    }
    Mat resultImg = text_detect(srcImg, inpWidth, inpHeight, confThreshold, nmsThreshold, net);
    imshow("result", resultImg);
    waitKey();
    return 0;
}

/**
 * @brief 输出检测到的文本框相关信息
 *
 * @param scores 置信度
 * @param geometry 位置信息
 * @param scoreThresh 置信度阈值
 * @param detections 位置
 * @param confidences 分类概率
 */
void decode(const Mat &scores, const Mat &geometry, float scoreThresh,
    std::vector<RotatedRect> &detections, std::vector<float> &confidences)
{
    detections.clear();
    //判断是不是符合提取要求
    CV_Assert(scores.dims == 4);
    CV_Assert(geometry.dims == 4);
    CV_Assert(scores.size[0] == 1);
    CV_Assert(geometry.size[0] == 1);
    CV_Assert(scores.size[1] == 1);
    CV_Assert(geometry.size[1] == 5);
    CV_Assert(scores.size[2] == geometry.size[2]);
    CV_Assert(scores.size[3] == geometry.size[3]);

    const int height = scores.size[2];
    const int width = scores.size[3];
    for (int y = 0; y < height; ++y)
    {
        //识别概率
        const float *scoresData = scores.ptr<float>(0, 0, y);
        //文本框坐标
        const float *x0_data = geometry.ptr<float>(0, 0, y);
        const float *x1_data = geometry.ptr<float>(0, 1, y);
        const float *x2_data = geometry.ptr<float>(0, 2, y);
        const float *x3_data = geometry.ptr<float>(0, 3, y);
        //文本框角度
        const float *anglesData = geometry.ptr<float>(0, 4, y);
        //遍历所有检测到的检测框
        for (int x = 0; x < width; ++x)
        {
            float score = scoresData[x];
            //低于阈值忽略该检测框
            if (score < scoreThresh)
            {
                continue;
            }

            // Decode a prediction.
            // Multiple by 4 because feature maps are 4 time less than input image.
            float offsetX = x * 4.0f, offsetY = y * 4.0f;
            //角度及相关正余弦计算
            float angle = anglesData[x];
            float cosA = std::cos(angle);
            float sinA = std::sin(angle);
            float h = x0_data[x] + x2_data[x];
            float w = x1_data[x] + x3_data[x];

            Point2f offset(offsetX + cosA * x1_data[x] + sinA * x2_data[x],
                offsetY - sinA * x1_data[x] + cosA * x2_data[x]);
            Point2f p1 = Point2f(-sinA * h, -cosA * h) + offset;
            Point2f p3 = Point2f(-cosA * w, sinA * w) + offset;
            //旋转矩形,分别输入中心点坐标,图像宽高,角度
            RotatedRect r(0.5f * (p1 + p3), Size2f(w, h), -angle * 180.0f / (float)CV_PI);
            //保存检测框
            detections.push_back(r);
            //保存检测框的置信度
            confidences.push_back(score);
        }
    }
}
# Import required modules
import cv2 as cv
import math
import argparse

parser = argparse.ArgumentParser(description='Use this script to run text detection deep learning networks using OpenCV.')
# Input argument
parser.add_argument('--input', help='Path to input image or video file. Skip this argument to capture frames from a camera.')
# Model argument
parser.add_argument('--model', default="./model/frozen_east_text_detection.pb",
                    help='Path to a binary .pb file of model contains trained weights.'
                    )
# Width argument
parser.add_argument('--width', type=int, default=320,
                    help='Preprocess input image by resizing to a specific width. It should be multiple by 32.'
                   )
# Height argument
parser.add_argument('--height',type=int, default=320,
                    help='Preprocess input image by resizing to a specific height. It should be multiple by 32.'
                   )
# Confidence threshold
parser.add_argument('--thr',type=float, default=0.5,
                    help='Confidence threshold.'
                   )
# Non-maximum suppression threshold
parser.add_argument('--nms',type=float, default=0.4,
                    help='Non-maximum suppression threshold.'
                   )

args = parser.parse_args()

############ Utility functions ############
def decode(scores, geometry, scoreThresh):
    detections = []
    confidences = []

    ############ CHECK DIMENSIONS AND SHAPES OF geometry AND scores ############
    assert len(scores.shape) == 4, "Incorrect dimensions of scores"
    assert len(geometry.shape) == 4, "Incorrect dimensions of geometry"
    assert scores.shape[0] == 1, "Invalid dimensions of scores"
    assert geometry.shape[0] == 1, "Invalid dimensions of geometry"
    assert scores.shape[1] == 1, "Invalid dimensions of scores"
    assert geometry.shape[1] == 5, "Invalid dimensions of geometry"
    assert scores.shape[2] == geometry.shape[2], "Invalid dimensions of scores and geometry"
    assert scores.shape[3] == geometry.shape[3], "Invalid dimensions of scores and geometry"
    height = scores.shape[2]
    width = scores.shape[3]
    for y in range(0, height):

        # Extract data from scores
        scoresData = scores[0][0][y]
        x0_data = geometry[0][0][y]
        x1_data = geometry[0][1][y]
        x2_data = geometry[0][2][y]
        x3_data = geometry[0][3][y]
        anglesData = geometry[0][4][y]
        for x in range(0, width):
            score = scoresData[x]

            # If score is lower than threshold score, move to next x
            if(score < scoreThresh):
                continue

            # Calculate offset
            offsetX = x * 4.0
            offsetY = y * 4.0
            angle = anglesData[x]

            # Calculate cos and sin of angle
            cosA = math.cos(angle)
            sinA = math.sin(angle)
            h = x0_data[x] + x2_data[x]
            w = x1_data[x] + x3_data[x]

            # Calculate offset
            offset = ([offsetX + cosA * x1_data[x] + sinA * x2_data[x], offsetY - sinA * x1_data[x] + cosA * x2_data[x]])

            # Find points for rectangle
            p1 = (-sinA * h + offset[0], -cosA * h + offset[1])
            p3 = (-cosA * w + offset[0],  sinA * w + offset[1])
            center = (0.5*(p1[0]+p3[0]), 0.5*(p1[1]+p3[1]))
            detections.append((center, (w,h), -1*angle * 180.0 / math.pi))
            confidences.append(float(score))

    # Return detections and confidences
    return [detections, confidences]

if __name__ == "__main__":
    # Read and store arguments
    confThreshold = args.thr
    nmsThreshold = args.nms
    inpWidth = args.width
    inpHeight = args.height
    model = args.model

    # Load network
    net = cv.dnn.readNet(model)

    # Create a new named window
    kWinName = "EAST: An Efficient and Accurate Scene Text Detector"
    outputLayers = []
    outputLayers.append("feature_fusion/Conv_7/Sigmoid")
    outputLayers.append("feature_fusion/concat_3")

    # Read frame
    frame = cv.imread("./image/stop1.jpg")

    # Get frame height and width
    height_ = frame.shape[0]
    width_ = frame.shape[1]
    rW = width_ / float(inpWidth)
    rH = height_ / float(inpHeight)

    # Create a 4D blob from frame.
    blob = cv.dnn.blobFromImage(frame, 1.0, (inpWidth, inpHeight), (123.68, 116.78, 103.94), True, False)

    # Run the model
    net.setInput(blob)
    output = net.forward(outputLayers)
    t, _ = net.getPerfProfile()
    label = 'Inference time: %.2f ms' % (t * 1000.0 / cv.getTickFrequency())

    # Get scores and geometry
    scores = output[0]
    geometry = output[1]
    [boxes, confidences] = decode(scores, geometry, confThreshold)
    # Apply NMS
    indices = cv.dnn.NMSBoxesRotated(boxes, confidences, confThreshold,nmsThreshold)
    for i in indices:
        # get 4 corners of the rotated rect
        vertices = cv.boxPoints(boxes[i[0]])
        # scale the bounding box coordinates based on the respective ratios
        for j in range(4):
            vertices[j][0] *= rW
            vertices[j][1] *= rH
        for j in range(4):
            p1 = (vertices[j][0], vertices[j][1])
            p2 = (vertices[(j + 1) % 4][0], vertices[(j + 1) % 4][1])
            cv.line(frame, p1, p2, (0, 255, 0), 2, cv.LINE_AA);
            # cv.putText(frame, "{:.3f}".format(confidences[i[0]]), (vertices[0][0], vertices[0][1]), cv.FONT_HERSHEY_SIMPLEX, 0.5, (255, 0, 0), 1, cv.LINE_AA)

    # Put efficiency information
    cv.putText(frame, label, (0, 15), cv.FONT_HERSHEY_SIMPLEX, 0.5, (0, 0, 255))

    # Display the frame
    cv.imshow("result",frame)
    cv.waitKey(0)
我想将html转换为纯文本。不过,我不想只删除标签,我想智能地保留尽可能多的格式。为插入换行符标签,检测段落并格式化它们等。输入非常简单,通常是格式良好的html(不是整个文档,只是一堆内容,通常没有anchor或图像)。我可以将几个正则表达式放在一起,让我达到80%,但我认为可能有一些现有的解决方案更智能。 最佳答案 首先,不要尝试为此使用正则表达式。很有可能你会想出一个脆弱/脆弱的解决方案,它会随着HTML的变化而崩溃,或者很难管理和维护。您可以使用Nokogiri快速解析HTML并提取文本:require'nokogiri'h
我收到这个错误:RuntimeError(自动加载常量Apps时检测到循环依赖当我使用多线程时。下面是我的代码。为什么会这样?我尝试多线程的原因是因为我正在编写一个HTML抓取应用程序。对Nokogiri::HTML(open())的调用是一个同步阻塞调用,需要1秒才能返回,我有100,000多个页面要访问,所以我试图运行多个线程来解决这个问题。有更好的方法吗?classToolsController0)app.website=array.join(',')putsapp.websiteelseapp.website="NONE"endapp.saveapps=Apps.order("
导读:随着叮咚买菜业务的发展,不同的业务场景对数据分析提出了不同的需求,他们希望引入一款实时OLAP数据库,构建一个灵活的多维实时查询和分析的平台,统一数据的接入和查询方案,解决各业务线对数据高效实时查询和精细化运营的需求。经过调研选型,最终引入ApacheDoris作为最终的OLAP分析引擎,Doris作为核心的OLAP引擎支持复杂地分析操作、提供多维的数据视图,在叮咚买菜数十个业务场景中广泛应用。作者|叮咚买菜资深数据工程师韩青叮咚买菜创立于2017年5月,是一家专注美好食物的创业公司。叮咚买菜专注吃的事业,为满足更多人“想吃什么”而努力,通过美好食材的供应、美好滋味的开发以及美食品牌的孵
之前在培训新生的时候,windows环境下配置opencv环境一直教的都是网上主流的vsstudio配置属性表,但是这个似乎对新生来说难度略高(虽然个人觉得完全是他们自己的问题),加之暑假之后对cmake实在是爱不释手,且这样配置确实十分简单(其实都不需要配置),故斗胆妄言vscode下配置CV之法。其实极为简单,图比较多所以很长。如果你看此文还配不好,你应该思考一下是不是自己的问题。闲话少说,直接开始。0.CMkae简介有的人到大二了都不知道cmake是什么,我不说是谁。CMake是一个开源免费并且跨平台的构建工具,可以用简单的语句来描述所有平台的编译过程。它能够根据当前所在平台输出对应的m
C#实现简易绘图工具一.引言实验目的:通过制作窗体应用程序(C#画图软件),熟悉基本的窗体设计过程以及控件设计,事件处理等,熟悉使用C#的winform窗体进行绘图的基本步骤,对于面向对象编程有更加深刻的体会.Tutorial任务设计一个具有基本功能的画图软件**·包括简单的新建文件,保存,重新绘图等功能**·实现一些基本图形的绘制,包括铅笔和基本形状等,学习橡皮工具的创建**·设计一个合理舒适的UI界面**注明:你可能需要先了解一些关于winform窗体应用程序绘图的基本知识,以及关于GDI+类和结构的知识二.实验环境Windows系统下的visualstudio2017C#窗体应用程序三.
目录前言滤波电路科普主要分类实际情况单位的概念常用评价参数函数型滤波器简单分析滤波电路构成低通滤波器RC低通滤波器RL低通滤波器高通滤波器RC高通滤波器RL高通滤波器部分摘自《LC滤波器设计与制作》,侵权删。前言最近需要学习放大电路和滤波电路,但是由于只在之前做音乐频谱分析仪的时候简单了解过一点点运放,所以也是相当从零开始学习了。滤波电路科普主要分类滤波器:主要是从不同频率的成分中提取出特定频率的信号。有源滤波器:由RC元件与运算放大器组成的滤波器。可滤除某一次或多次谐波,最普通易于采用的无源滤波器结构是将电感与电容串联,可对主要次谐波(3、5、7)构成低阻抗旁路。无源滤波器:无源滤波器,又称
最近在学习CAN,记录一下,也供大家参考交流。推荐几个我觉得很好的CAN学习,本文也是在看了他们的好文之后做的笔记首先是瑞萨的CAN入门,真的通透;秀!靠这篇我竟然2天理解了CAN协议!实战STM32F4CAN!原文链接:https://blog.csdn.net/XiaoXiaoPengBo/article/details/116206252CAN详解(小白教程)原文链接:https://blog.csdn.net/xwwwj/article/details/105372234一篇易懂的CAN通讯协议指南1一篇易懂的CAN通讯协议指南1-知乎(zhihu.com)视频推荐CAN总线个人知识总
深度学习部署:Windows安装pycocotools报错解决方法1.pycocotools库的简介2.pycocotools安装的坑3.解决办法更多Ai资讯:公主号AiCharm本系列是作者在跑一些深度学习实例时,遇到的各种各样的问题及解决办法,希望能够帮助到大家。ERROR:Commanderroredoutwithexitstatus1:'D:\Anaconda3\python.exe'-u-c'importsys,setuptools,tokenize;sys.argv[0]='"'"'C:\\Users\\46653\\AppData\\Local\\Temp\\pip-instal
@作者:SYFStrive @博客首页:HomePage📜:微信小程序📌:个人社区(欢迎大佬们加入)👉:社区链接🔗📌:觉得文章不错可以点点关注👉:专栏连接🔗💃:感谢支持,学累了可以先看小段由小胖给大家带来的街舞👉微信小程序(🔥)目录自定义组件-behaviors 1、什么是behaviors 2、behaviors的工作方式 3、创建behavior 4、导入并使用behavior 5、behavior中所有可用的节点 6、同名字段的覆盖和组合规则总结最后自定义组件-behaviors 1、什么是behaviorsbehaviors是小程序中,用于实现
需求:要创建虚拟机,就需要给他提供一个虚拟的磁盘,我们就在/opt目录下创建一个10G大小的raw格式的虚拟磁盘CentOS-7-x86_64.raw命令格式:qemu-imgcreate-f磁盘格式磁盘名称磁盘大小qemu-imgcreate-f磁盘格式-o?1.创建磁盘qemu-imgcreate-fraw/opt/CentOS-7-x86_64.raw10G执行效果#ls/opt/CentOS-7-x86_64.raw2.安装虚拟机使用virt-install命令,基于我们提供的系统镜像和虚拟磁盘来创建一个虚拟机,另外在创建虚拟机之前,提前打开vnc客户端,在创建虚拟机的时候,通过vnc
