WeGameCanvas为父控件所实现,展示图片使用Image,Path当作上方的蒙版;Canvas:主要用途方便移动Image,设置ClipToBounds="True"裁剪为一个正方形200x200做为主要展示区域;Image:展示需要裁剪的图片;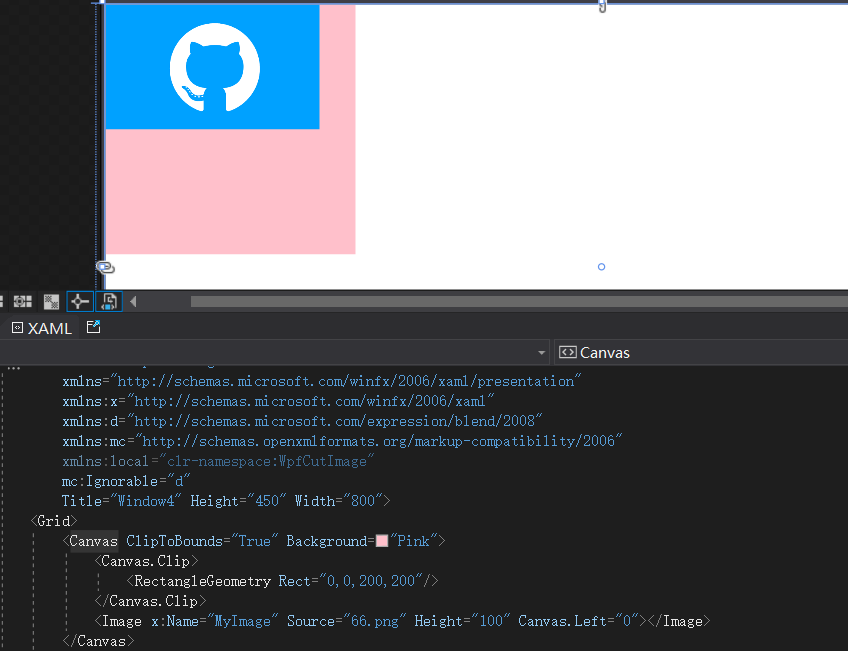
Path:CombinedGeometry绘制蒙版大小200x200效果如下;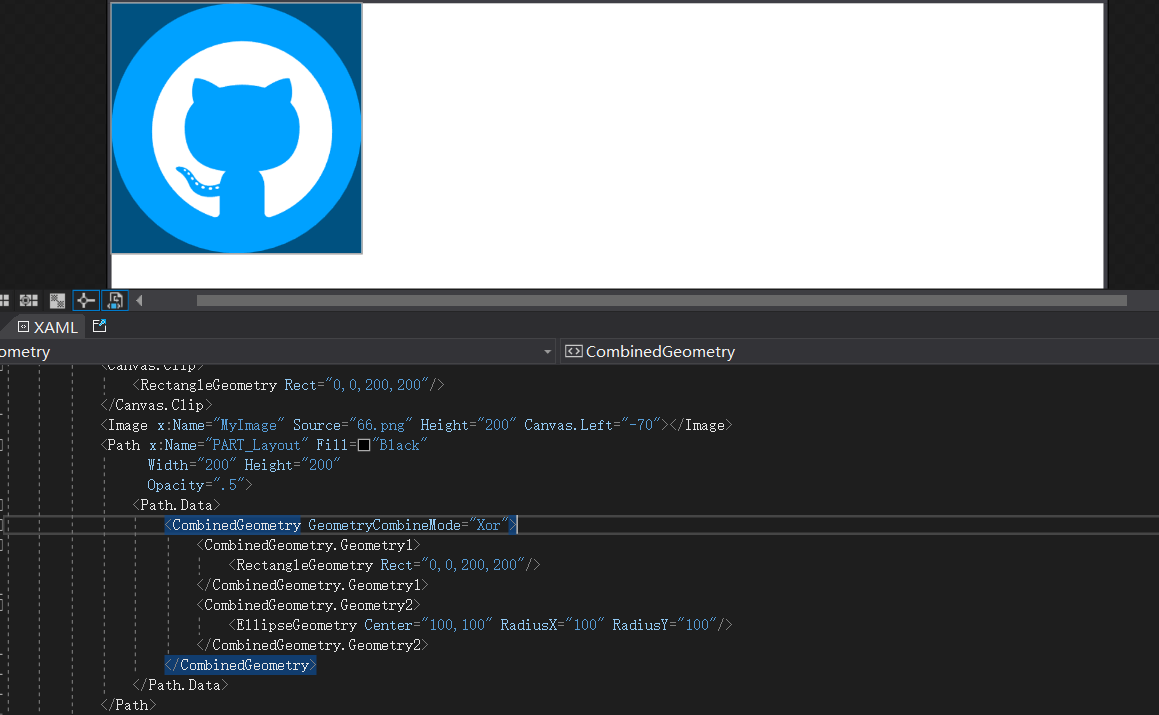
200 ,另一边做等比缩放后给到DrawingVisual绘制一个新的BitmapFrame给Image控件做展示;
1)CropAvatar.xaml 代码如下;
<ResourceDictionary xmlns="http://schemas.microsoft.com/winfx/2006/xaml/presentation"
                    xmlns:x="http://schemas.microsoft.com/winfx/2006/xaml"
                    xmlns:controls="clr-namespace:WPFDevelopers.Controls">
    <ResourceDictionary.MergedDictionaries>
        <ResourceDictionary Source="Basic/ControlBasic.xaml"/>
    </ResourceDictionary.MergedDictionaries>

    <Style TargetType="controls:CropAvatar" BasedOn="{StaticResource ControlBasicStyle}">
        <Setter Property="Template">
            <Setter.Value>
                <ControlTemplate TargetType="{x:Type controls:CropAvatar}">
                    <Canvas x:Name="PART_Canvas" ClipToBounds="True">
                        <Image x:Name="PART_Image" Cursor="SizeAll" ></Image>
                        <Path x:Name="PART_Layout"
                              Fill="{DynamicResource BlackSolidColorBrush}"
                              Width="200" Height="200"
                              Opacity=".5">
                            <Path.Data>
                                <CombinedGeometry GeometryCombineMode="Xor">
                                    <CombinedGeometry.Geometry1>
                                        <RectangleGeometry Rect="0,0,200,200"/>
                                    </CombinedGeometry.Geometry1>
                                    <CombinedGeometry.Geometry2>
                                        <EllipseGeometry Center="100,100" RadiusX="100" RadiusY="100"/>
                                    </CombinedGeometry.Geometry2>
                                </CombinedGeometry>
                            </Path.Data>
                        </Path>
                        <Grid x:Name="PART_Grid" Width="200" Height="200">
                            <Button x:Name="PART_ReplaceButton" Style="{StaticResource PathButton}"
                                    HorizontalAlignment="Right"
                                    VerticalAlignment="Top"
                                    Width="40" Height="40" ToolTip="更换图片"
                                    Visibility="Collapsed">
                                <Button.Content>
                                    <Path Data="{StaticResource PathReplace}"
                                          Fill="{StaticResource PrimaryNormalSolidColorBrush}"
                                          Height="15"
                                          Width="15"
                                          Stretch="Fill" />
                                </Button.Content>
                            </Button>
                            <Button x:Name="PART_AddButton" Style="{StaticResource PathButton}"
                                    Width="40" Height="40" ToolTip="选择图片">
                                <Button.Content>
                                    <Path Data="{StaticResource PathAdd}"
                                          Fill="{StaticResource PrimaryNormalSolidColorBrush}"
                                          Height="20"
                                          Width="20"
                                          Stretch="Fill"
                                          RenderTransformOrigin="0.5,0.5" IsHitTestVisible="False">
                                        <Path.RenderTransform>
                                            <RotateTransform Angle="45"/>
                                        </Path.RenderTransform>
                                    </Path>
                                </Button.Content>
                            </Button>
                        </Grid>
                    </Canvas>
                </ControlTemplate>
            </Setter.Value>
        </Setter>
    </Style>

</ResourceDictionary>
2)CropAvatar.cs 代码如下;
using System;
using System.Windows;
using System.Windows.Controls;
using System.Windows.Input;
using System.Windows.Media;
using System.Windows.Media.Imaging;
using System.Windows.Shapes;
using WPFDevelopers.Helpers;

namespace WPFDevelopers.Controls
{
    [TemplatePart(Name = CanvasTemplateName, Type = typeof(Canvas))]
    [TemplatePart(Name = ImageTemplateName, Type = typeof(Image))]
    [TemplatePart(Name = PathTemplateName, Type = typeof(Path))]
    [TemplatePart(Name = GridTemplateName, Type = typeof(Grid))]
    [TemplatePart(Name = ReplaceButtonTemplateName, Type = typeof(Button))]
    [TemplatePart(Name = AddButtonTemplateName, Type = typeof(Button))]
    public partial class CropAvatar : Control
    {
        private const string CanvasTemplateName = "PART_Canvas";
        private const string ImageTemplateName = "PART_Image";
        private const string PathTemplateName = "PART_Layout";
        private const string GridTemplateName = "PART_Grid";
        private const string ReplaceButtonTemplateName = "PART_ReplaceButton";
        private const string AddButtonTemplateName = "PART_AddButton";
        private Point point;
        private const int _size = 200;
        private bool isDown;
        private bool isLeft;
        private CroppedBitmap crop;
        private Canvas canvas;
        private Image image;
        private Path path;
        private Grid grid;
        private Button replaceButton, addButton;
        private int initialX, initialY, voffsetX, voffsetY;
        private double vNewStartX, vNewStartY, _StartX, _StartY, centerX, centerY;
        private BitmapFrame bitmapFrame;

        public ImageSource OutImageSource
        {
            get { return (ImageSource)GetValue(OutImageSourceProperty); }
            set { SetValue(OutImageSourceProperty, value); }
        }

        public static readonly DependencyProperty OutImageSourceProperty =
            DependencyProperty.Register("OutImageSource", typeof(ImageSource), typeof(CropAvatar), new PropertyMetadata(null));


        static CropAvatar()
        {
            DefaultStyleKeyProperty.OverrideMetadata(typeof(CropAvatar), new FrameworkPropertyMetadata(typeof(CropAvatar)));
        }
        public override void OnApplyTemplate()
        {
            base.OnApplyTemplate();
            canvas = GetTemplateChild(CanvasTemplateName) as Canvas;
            canvas.Loaded += Canvas_Loaded;
            grid = GetTemplateChild(GridTemplateName) as Grid;
            image = GetTemplateChild(ImageTemplateName) as Image;
            image.MouseDown += Image_MouseDown;
            image.MouseMove += Image_MouseMove;
            image.MouseUp += Image_MouseUp;
            image.MouseLeave += Image_MouseLeave;
            path = GetTemplateChild(PathTemplateName) as Path;
            replaceButton = GetTemplateChild(ReplaceButtonTemplateName) as Button;
            replaceButton.Click += ReplaceButton_Click;
            addButton = GetTemplateChild(AddButtonTemplateName) as Button;
            addButton.Click += AddButton_Click;
        }

        private void Canvas_Loaded(object sender, RoutedEventArgs e)
        {
            if (sender is Canvas canvas)
            {
                var width = canvas.ActualWidth;
                var height = canvas.ActualHeight;
                centerX = (width - path.Width) / 2.0d;
                centerY = (height - path.Height) / 2.0d;
                canvas.Clip = new RectangleGeometry(new Rect(centerX, centerY, 200, 200));
                Canvas.SetLeft(path, centerX);
                Canvas.SetTop(path, centerY);
                Canvas.SetLeft(grid, centerX);
                Canvas.SetTop(grid, centerY);
            }
        }

        private void Image_MouseLeave(object sender, MouseEventArgs e)
        {
            isDown = false;
            if (isLeft)
                _StartX = Canvas.GetLeft(image);
            else
                _StartY = Canvas.GetTop(image);
        }

        private void Image_MouseUp(object sender, MouseButtonEventArgs e)
        {
            if (isDown)
            {
                var vPoint = e.GetPosition(this);
                if (isLeft)
                {
                    _StartX = Canvas.GetLeft(image);
                    initialX = voffsetX;
                }

                else
                {
                    _StartY = Canvas.GetTop(image);
                    initialY = voffsetY;
                }
            }
        }

        private void Image_MouseMove(object sender, MouseEventArgs e)
        {
            if (e.LeftButton == MouseButtonState.Pressed && isDown)
            {
                var vPoint = e.GetPosition(this);
                if (isLeft)
                {
                    var voffset = vPoint.X - point.X;
                    vNewStartX = _StartX + voffset;
                    var xPath = Canvas.GetLeft(path);
                    if (vNewStartX <= xPath && vNewStartX >= -(bitmapFrame.Width - 200 - xPath))
                    {
                        Canvas.SetLeft(image, vNewStartX);
                        voffsetX = initialX - (int)voffset;
                        voffsetX = voffsetX < 0 ? 0 : voffsetX;
                        crop = new CroppedBitmap(bitmapFrame, new Int32Rect(voffsetX, 0, _size, _size));

                    }
                }
                else
                {
                    var voffset = vPoint.Y - point.Y;
                    vNewStartY = _StartY + voffset;
                    var yPath = Canvas.GetTop(path);
                    if (vNewStartY <= yPath && vNewStartY >= -(bitmapFrame.Height - 200 - yPath))
                    {
                        Canvas.SetTop(image, vNewStartY);
                        voffsetY = initialY - (int)voffset;
                        voffsetY = voffsetY < 0 ? 0 : voffsetY;
                        crop = new CroppedBitmap(bitmapFrame, new Int32Rect(0, voffsetY, _size, _size));
                    }
                }
                OutImageSource = crop;
            }
        }

        private void Image_MouseDown(object sender, MouseButtonEventArgs e)
        {
            isDown = true;
            point = e.GetPosition(this);
        }

        private void ReplaceButton_Click(object sender, RoutedEventArgs e)
        {
            InitialImage();
        }

        private void AddButton_Click(object sender, RoutedEventArgs e)
        {
            InitialImage();
        }

        void InitialImage()
        {
            vNewStartX = 0;
            vNewStartY = 0;
            var uri = ControlsHelper.ImageUri();
            if (uri == null) return;
            var bitmap = new BitmapImage(uri);
            if (bitmap.Height > bitmap.Width)
            {
                double scale = (double)bitmap.Width / (double)path.Width;
                image.Width = _size;
                image.Height = (double)bitmap.Height / scale;
                isLeft = false;
            }
            else if (bitmap.Width > bitmap.Height)
            {
                double scale = (double)bitmap.Height / (double)path.Height;
                image.Width = (double)bitmap.Width / scale;
                image.Height = _size;
                isLeft = true;
            }
            bitmapFrame = ControlsHelper.CreateResizedImage(bitmap, (int)image.Width, (int)image.Height, 0);
            image.Source = bitmapFrame;
            if (image.Source != null)
            {
                replaceButton.Visibility = Visibility.Visible;
                addButton.Visibility = Visibility.Collapsed;
            }
            Canvas.SetLeft(grid, centerX);
            Canvas.SetTop(grid, centerY);
            _StartX = (canvas.ActualWidth - image.Width) / 2.0d;
            _StartY = (canvas.ActualHeight - image.Height) / 2.0d;
            Canvas.SetLeft(image, _StartX);
            Canvas.SetTop(image, _StartY);
            if (isLeft)
            {
                initialX = (int)(image.Width - 200) / 2;
                initialY = 0;
                crop = new CroppedBitmap(bitmapFrame, new Int32Rect(initialX, 0, _size, _size));

            }
            else
            {
                initialY = (int)(image.Height - 200) / 2;
                initialX = 0;
                crop = new CroppedBitmap(bitmapFrame, new Int32Rect(0, initialY, _size, _size));
            }
            OutImageSource = crop;
        }

    }
}
3)CropAvatarWindow.xaml使用如下;
<ws:Window x:Class="WPFDevelopers.Samples.ExampleViews.CropAvatarWindow"
        xmlns="http://schemas.microsoft.com/winfx/2006/xaml/presentation"
        xmlns:x="http://schemas.microsoft.com/winfx/2006/xaml"
        xmlns:d="http://schemas.microsoft.com/expression/blend/2008"
        xmlns:mc="http://schemas.openxmlformats.org/markup-compatibility/2006"
        xmlns:wpfdev="https://github.com/WPFDevelopersOrg/WPFDevelopers"
        xmlns:ws="https://github.com/WPFDevelopersOrg.WPFDevelopers.Minimal"
        mc:Ignorable="d"  WindowStyle="ToolWindow" ResizeMode="NoResize"
        WindowStartupLocation="CenterScreen"
        Title="WPF 开发者-头像选择器" Height="450" Width="800">
    <Grid>
        <Grid.ColumnDefinitions>
            <ColumnDefinition/>
            <ColumnDefinition/>
        </Grid.ColumnDefinitions>
        <Grid.RowDefinitions>
            <RowDefinition/>
            <RowDefinition Height="Auto"/>
        </Grid.RowDefinitions>
        <wpfdev:CropAvatar x:Name="MyCropAvatar"/>
        <Image Grid.Column="1" Name="CropAvatarImage" Source="{Binding ElementName=MyCropAvatar,Path=OutImageSource}"
               Stretch="Fill" Width="200" Height="200">
            <Image.Clip>
                <EllipseGeometry Center="100,100" RadiusX="100" RadiusY="100"/>
            </Image.Clip>
        </Image>
        <UniformGrid Grid.Row="1" Grid.ColumnSpan="2"
                     HorizontalAlignment="Center"
                     VerticalAlignment="Center">
            <Button  Content="保存" Click="btnSave_Click" Style="{StaticResource PrimaryButton}" Margin="4,0"/>
            <Button  Content="关闭" Click="btnClose_Click" Margin="4,0"/>
        </UniformGrid>
    </Grid>
</ws:Window>
4) CropAvatarWindow.xaml.cs 代码如下;
using System.Windows;

namespace WPFDevelopers.Samples.ExampleViews
{
    /// <summary>
    /// CropAvatarWindow.xaml 的交互逻辑
    /// </summary>
    public partial class CropAvatarWindow
    {
        public CropAvatarWindow()
        {
            InitializeComponent();
        }

        private void btnSave_Click(object sender, RoutedEventArgs e)
        {
            DialogResult = true;
        }

        private void btnClose_Click(object sender, RoutedEventArgs e)
        {
            DialogResult = false;
        }
    }
}
5) CropAvatarExample.xaml 使用如下;
<UserControl x:Class="WPFDevelopers.Samples.ExampleViews.CropAvatarExample"
             xmlns="http://schemas.microsoft.com/winfx/2006/xaml/presentation"
             xmlns:x="http://schemas.microsoft.com/winfx/2006/xaml"
             xmlns:mc="http://schemas.openxmlformats.org/markup-compatibility/2006"
             xmlns:d="http://schemas.microsoft.com/expression/blend/2008"
             xmlns:wpfdev="https://github.com/WPFDevelopersOrg/WPFDevelopers"
             xmlns:local="clr-namespace:WPFDevelopers.Samples.ExampleViews"
             mc:Ignorable="d"
             d:DesignHeight="450" d:DesignWidth="800">
    <Grid>
        <Grid.ColumnDefinitions>
            <ColumnDefinition/>
            <ColumnDefinition/>
        </Grid.ColumnDefinitions>
        <Button Content="图像选择器" VerticalAlignment="Center" HorizontalAlignment="Center" Click="Button_Click"/>
        <Image Grid.Column="1" Name="MyImage"
               Stretch="Fill" Width="200" Height="200">
            <Image.Clip>
                <EllipseGeometry Center="100,100" RadiusX="100" RadiusY="100"/>
            </Image.Clip>
        </Image>
    </Grid>
</UserControl>
6) CropAvatarExample.xaml.cs 代码如下;
using System.Windows.Controls;

namespace WPFDevelopers.Samples.ExampleViews
{
    /// <summary>
    /// CropAvatarExample.xaml 的交互逻辑
    /// </summary>
    public partial class CropAvatarExample : UserControl
    {
        public CropAvatarExample()
        {
            InitializeComponent();
        }

        private void Button_Click(object sender, System.Windows.RoutedEventArgs e)
        {
            var cropAvatarWindow = new CropAvatarWindow();
            if (cropAvatarWindow.ShowDialog() == true)
            {
                MyImage.Source = cropAvatarWindow.CropAvatarImage.Source;
            }
        }
    }
}
状态:我正在构建一个应用程序,其中需要一个可供用户选择颜色的字段,该字段将包含RGB颜色代码字符串。我已经测试了一个看起来很漂亮但效果不佳的。它是“挑剔的颜色”,并托管在此存储库中:https://github.com/Astorsoft/picky-color.在这里我打开一个关于它的一些问题的问题。问题:请建议我在Rails3应用程序中使用一些颜色选择器。 最佳答案 也许页面上的列表jQueryUIDevelopment:ColorPicker为您提供开箱即用的产品。原因是jQuery现在包含在Rails3应用程序中,因此使用基
说在前面这部分我本来是合为一篇来写的,因为目的是一样的,都是通过独立按键来控制LED闪灭本质上是起到开关的作用,即调用函数和中断函数。但是写一篇太累了,我还是决定分为两篇写,这篇是调用函数篇。在本篇中你主要看到这些东西!!!1.调用函数的方法(主要讲语法和格式)2.独立按键如何控制LED亮灭3.程序中的一些细节(软件消抖等)1.调用函数的方法思路还是比较清晰地,就是通过按下按键来控制LED闪灭,即每按下一次,LED取反一次。重要的是,把按键与LED联系在一起。我打算用K1来作为开关,看了一下开发板原理图,K1连接的是单片机的P31口,当按下K1时,P31是与GND相连的,也就是说,当我按下去时
我完全不是程序员,正在学习使用Ruby和Rails框架进行编程。我目前正在使用Ruby1.8.7和Rails3.0.3,但我想知道我是否应该升级到Ruby1.9,因为我真的没有任何升级的“遗留”成本。缺点是什么?我是否会遇到与普通gem的兼容性问题,或者甚至其他我不太了解甚至无法预料的问题? 最佳答案 你应该升级。不要坚持从1.8.7开始。如果您发现不支持1.9.2的gem,请避免使用它们(因为它们很可能不被维护)。如果您对gem是否兼容1.9.2有任何疑问,您可以在以下位置查看:http://www.railsplugins.or
我希望用户从一个模型的三个选项中选择一个。即我有一个模型视频,可以被评为正面/负面/未知目前我有三列bool值(pos/neg/unknown)。这是处理这种情况的最佳方式吗?为此,表单应该是什么样的?目前我有类似的东西但显然它允许多项选择,而我试图将它限制为只有一个..怎么办? 最佳答案 如果要使用字符串列,让我们说rating。然后在你的表单中:#...#...它只允许一个选择编辑完全相同但使用radio_button_tag: 关于ruby-on-rails-Rails单选按钮-模
我的Rails应用程序中安装了carrierwave。但是,当用户上传多页pdf时,我只希望应用程序获取文档中的第一页并将其转换为jpeg。这可能吗?用什么命令?这是我的uploader。#encoding:utf-8classImageUploader[200,300]##defscale(width,height)##dosomething#end#Createdifferentversionsofyouruploadedfiles:version:thumbdoprocess:resize_to_fill=>[150,210]process:convert=>:jpgdefful
对于用户模型,我有一个过滤器来检查用户的预订状态,该状态由整数值(0、1或2)表示。UserActiveAdmin索引页上的过滤器是通过以下代码实现的:filter:booking_status,as::select然而,这会导致下拉选项为0、1或2。当管理员用户从下拉列表中选择它们时,我更愿意自己将它们命名为“未完成”、“待定”和“已确认”之类的名称。有没有办法在不改变booking_status在模型中的表示方式的情况下做到这一点? 最佳答案 假设booking_status是模型中的枚举字段,您可以使用:过滤器:booking
这个问题在这里已经有了答案:关闭10年前。PossibleDuplicate:HowdoIgeneratealistofnuniquerandomnumbersinRuby?我想做的事:Random.rand(0..10).timesdoputsRandom.rand(0..10)end但如果随机数已经显示过,则无法再次显示。如何最轻松地做到这一点?
当你在类中包含方法名冲突的模块时,它会使用类定义的方法。有没有办法选择我想运行的?moduleBdefself.hello"helloB"endendclassAincludeBdefself.hello"helloA"endendA.hello#=>thisprints"helloA",whatifIwant"helloB"? 最佳答案 Ben,当你在Ruby中调用一个方法(比如hello)时,会发生以下情况:如果接收者的特征类有一个名为hello的方法,它将被调用。如果不是:如果接收者的类有一个名为hello的实例方法,它将被调
在尝试解决“网格上的路径”问题时,我编写了代码defpaths(n,k)p=(1..n+k).to_ap.combination(n).to_a.sizeend代码工作正常,例如ifn==8andk==2代码返回45,这是正确的路径数。但是,当使用较大的数字时,代码非常慢,我正在努力想出如何加快这个过程。 最佳答案 与其构建组合数组只是为了计算它,不如编写function定义组合的数量。我敢肯定还有包含此功能和许多其他组合函数的gem。请注意,我使用的是gemDistribution对于Math.factorial方法,但这是另一种
基本上我想选择一个节点(div),其中它的子节点(h1,b,h3)包含指定的文本。Childtext1Childtext2...Childtext3我期待的是/html/div/而不是/html/div/h1我在下面有这个,但不幸的是返回了child,而不是div的xpath。expression="//div[contains(text(),'Childtext1')]"doc.xpath(expression)我期待的是/html/div/而不是/html/div/h1那么有没有一种方法可以简单地使用xpath语法来做到这一点? 最佳答案