一、本文主要内容介绍:
0、先附上工程源码下载链接(资源包括qt的vs2019所有库文件,免积分):https://download.csdn.net/download/qq_39660930/85135035
1、从零开始搭建一份Qt项目开发工程,只需安装了vs即可打开工程进行编译。原理:使用C++调用Qt lib库的形式进行开发,不使用任何插件,不使用QtCreator。
2、vs配置项目教程。
3、注意点:对于C++开发者来讲,就是写cpp代码,然后进行编译,链接来生成可执行程序。而Qt只是提供了一些自动生成cpp代码的功能而已。比如使用Qt的uic.exe即可将它的.ui文件生成我们的.h文件。
4、Qt开发一个简易视频播放器,支持拖拽文件进行打开、双击全屏等功能。软件界面如下:

二、项目开始
1、下载vs,本文使用的是 vs2019。
2、下载vs对应的Qt lib库,包括Qt的一些应用程序(本文附带的工程源码里有,包括win32和x64的debug及release),如图:

3、项目框架搭建

BaseFunc模块提供一些编码转换函数及获取可执行程序绝对路径函数。
GuiMediaPlayer模块进行界面设计及功能实现。
MediaPlayer主函数模块负责链接库生成可执行程序。
vs2019工程配置文件夹则是vs配置工程时自动生成的,接下来详细介绍如何配置项目工程。
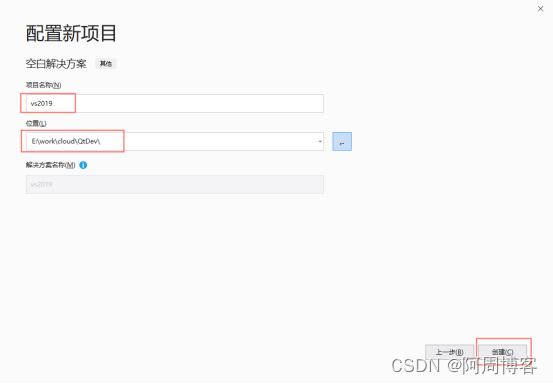
4、打开vs,创建新项目,选择空白解决方案:


5、创建BaseFunc工程


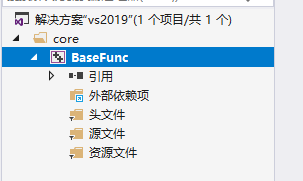
将BaseFunc的头文件及源文件添加到工程里:

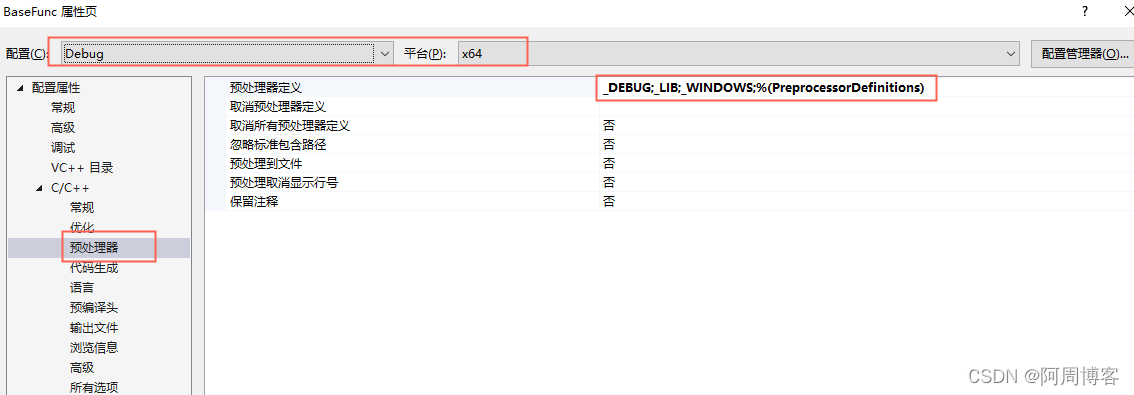
设置工程属性(输出目录、中间目录、配置类型、字符集、附加包含目录、预处理器):


生成项目即可看到对应的lib库:
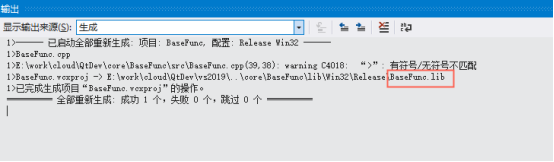
至此BaseFunc项目配置完成。
6、创建GuiMediaPlayer工程


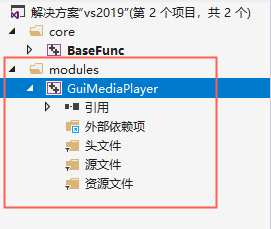
拖拽头文件、源文件、资源文件到工程里:

这里需要注意的是:qrc和ui文件创建时只需要按照qt语法写一个最简单的就行,后面使用qt对应的程序来进行设计即可。
接下来设置工程属性(输出目录、中间目录、配置类型、字符集、附加包含目录、预处理器):


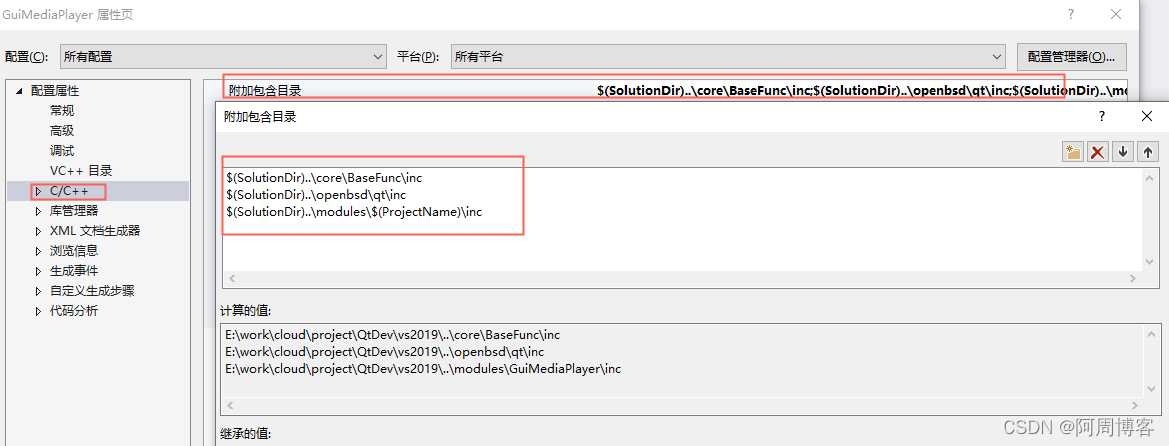
预处理器:和BaseFunc项目一样。
Qt项目和普通的项目配置不同的地方就是要配置生成前事件,来使用Qt的exe来处理资源文件生成c++源码文件,配置如下:

命令行代码:
$(SolutionDir)..\openbsd\qt\lib\$(Platform)\Release\uic.exe $(SolutionDir)..\modules\$(ProjectName)\src\GuiMediaPlayer.ui -o $(SolutionDir)..\modules\$(ProjectName)\inc\ui_GuiMediaPlayer.h
$(SolutionDir)..\openbsd\qt\lib\$(Platform)\Release\moc.exe $(SolutionDir)..\modules\$(ProjectName)\inc\GuiMediaPlayer.h -o $(SolutionDir)..\modules\$(ProjectName)\src\moc_GuiMediaPlayer.cpp
$(SolutionDir)..\openbsd\qt\lib\$(platform)\Release\rcc.exe -binary $(SolutionDir)..\modules\$(ProjectName)\src\GuiMediaPlayer.qrc -o $(SolutionDir)..\modules\$(ProjectName)\src\GuiMediaPlayer.rcc
然后生成项目:

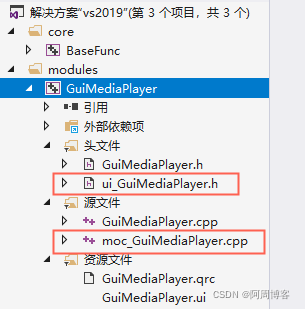
第一次生成项目后,需要把自动生成的源码文件添加到工程里,然后重新生成:
接下来配置如何编辑qrc和ui文件,右击qrc文件,选择打开方式,点击添加,选择QrcEditor.exe(Qt库文件里有),并且设置为默认值:
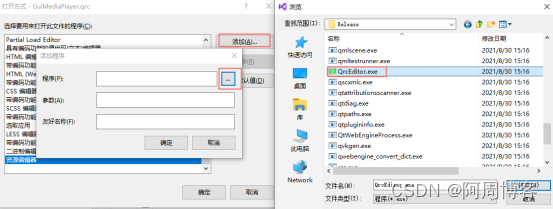

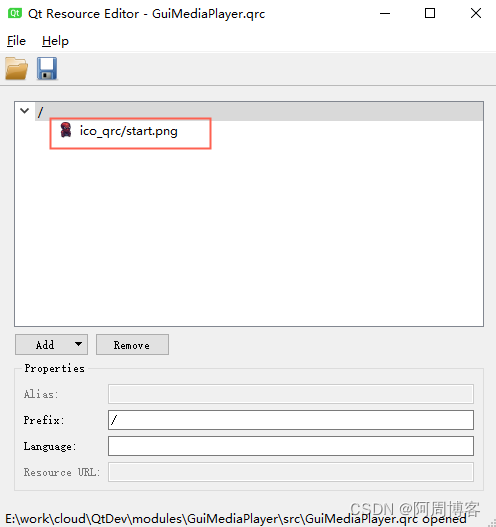
这样以后双击qrc文件就会自动使用QrcEditor来打开了:
同样右击ui文件,设置designer.exe来默认打开该文件:
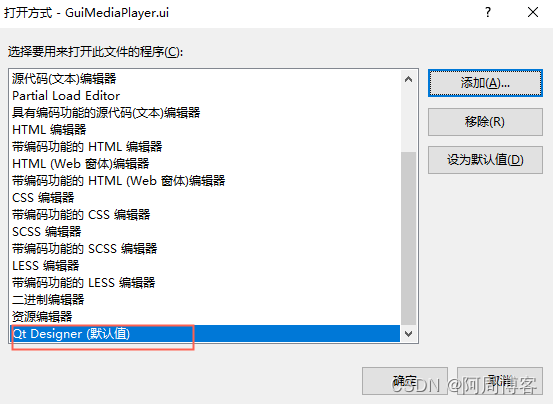

这样就可以使用Qt Designer来设计我们的ui了,每次修改ui文件后,重新生成该项目即可。
至此GuiMediaPlayer项目配置完成。
7、创建主项目工程
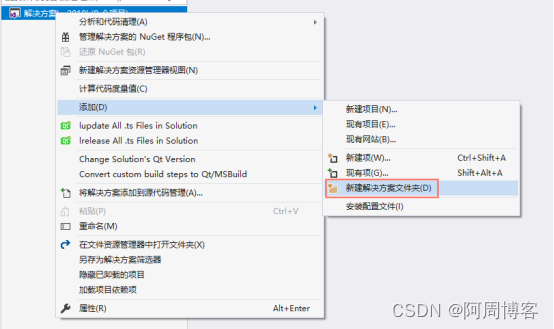
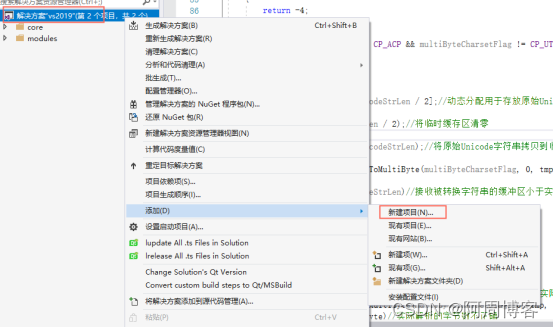
右击解决方案,添加项目


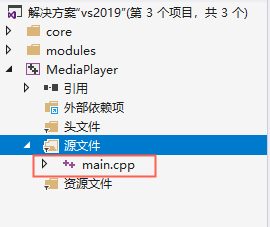
将源文件替换为我们的main.cpp
右击该项目设为启动项目,并且设置依赖项目:


接下来设置工程属性(输出目录、中间目录、字符集、附加包含目录、预处理器、附加库目录)


预处理器:和BaseFunc项目相同。

接下来需要设置生成后事件,程序运行时需要拷贝一些资源文件及dll到对应目录:

命令行代码如下:
Copy /D "$(Solutiondir)..\openbsd\qt\lib\$(Platform)\$(Configuration)\Qt5Core.dll"  "$(TargetDir)"
Copy /D "$(Solutiondir)..\openbsd\qt\lib\$(Platform)\$(Configuration)\Qt5Gui.dll"  "$(TargetDir)"
Copy /D "$(Solutiondir)..\openbsd\qt\lib\$(Platform)\$(Configuration)\Qt5Widgets.dll"  "$(TargetDir)"
Copy /D "$(Solutiondir)..\openbsd\qt\lib\$(Platform)\$(Configuration)\Qt5Multimedia.dll"  "$(TargetDir)"
Copy /D "$(Solutiondir)..\openbsd\qt\lib\$(Platform)\$(Configuration)\Qt5MultimediaWidgets.dll"  "$(TargetDir)"
Copy /D "$(Solutiondir)..\openbsd\qt\lib\$(Platform)\$(Configuration)\Qt5Network.dll"  "$(TargetDir)"
Copy /D "$(Solutiondir)..\openbsd\qt\lib\$(Platform)\$(Configuration)\Qt5OpenGL.dll"  "$(TargetDir)"
mkdir "$(TargetDir)platforms\"
Copy /D "$(Solutiondir)..\openbsd\qt\lib\$(Platform)\$(Configuration)\plugins\platforms\qwindows.dll"  "$(TargetDir)platforms\"
XCopy /D /i /e "$(Solutiondir)..\openbsd\qt\lib\$(Platform)\$(Configuration)\plugins\mediaservice"  "$(TargetDir)mediaservice"

Copy /D "$(Solutiondir)..\modules\GuiMediaPlayer\src\GuiMediaPlayer.rcc"  "$(TargetDir)"
Copy /D "$(Solutiondir)..\modules\GuiMediaPlayer\src\GuiMediaPlayer.rcc"  "$(ProjectDir)"
XCopy /D /i /e "$(Solutiondir)..\modules\GuiMediaPlayer\src\ico"  "$(TargetDir)ico"
XCopy /D /i /e "$(Solutiondir)..\modules\GuiMediaPlayer\src\ico"  "$(ProjectDir)ico"

命令行代码如下:
Copy /D "$(Solutiondir)..\openbsd\qt\lib\$(Platform)\$(Configuration)\Qt5Cored.dll"  "$(TargetDir)"
Copy /D "$(Solutiondir)..\openbsd\qt\lib\$(Platform)\$(Configuration)\Qt5Guid.dll"  "$(TargetDir)"
Copy /D "$(Solutiondir)..\openbsd\qt\lib\$(Platform)\$(Configuration)\Qt5Widgetsd.dll"  "$(TargetDir)"
Copy /D "$(Solutiondir)..\openbsd\qt\lib\$(Platform)\$(Configuration)\Qt5Multimediad.dll"  "$(TargetDir)"
Copy /D "$(Solutiondir)..\openbsd\qt\lib\$(Platform)\$(Configuration)\Qt5MultimediaWidgetsd.dll"  "$(TargetDir)"
Copy /D "$(Solutiondir)..\openbsd\qt\lib\$(Platform)\$(Configuration)\Qt5Networkd.dll"  "$(TargetDir)"
Copy /D "$(Solutiondir)..\openbsd\qt\lib\$(Platform)\$(Configuration)\Qt5OpenGLd.dll"  "$(TargetDir)"
mkdir "$(TargetDir)platforms\"
Copy /D "$(Solutiondir)..\openbsd\qt\lib\$(Platform)\$(Configuration)\plugins\platforms\qwindowsd.dll"  "$(TargetDir)platforms\"
XCopy /D /i /e "$(Solutiondir)..\openbsd\qt\lib\$(Platform)\$(Configuration)\plugins\mediaservice"  "$(TargetDir)mediaservice"

Copy /D "$(Solutiondir)..\modules\GuiMediaPlayer\src\GuiMediaPlayer.rcc"  "$(TargetDir)"
Copy /D "$(Solutiondir)..\modules\GuiMediaPlayer\src\GuiMediaPlayer.rcc"  "$(ProjectDir)"
XCopy /D /i /e "$(Solutiondir)..\modules\GuiMediaPlayer\src\ico"  "$(TargetDir)ico"
XCopy /D /i /e "$(Solutiondir)..\modules\GuiMediaPlayer\src\ico"  "$(ProjectDir)ico"
然后生成该项目后运行即可看到界面:

可以看到程序没有图标,接下来进行设置:
在MediaPlayer主工程目录下放一个ico,并且创建rc文件及修改MediaPlayer.vcxproj如下:

生成并启动项目后可以看到图标:

至此项目开发环境搭建完成。
8、ui界面设计,及功能实现
开发环境搭建好以后,我们就可以双击ui文件来进行设计界面了,我们的这个界面比较简单,菜单里增加一个文件打开按钮,并且设置该按钮的ico图标为qrc里的。中央布局背景通过styleSheet来直接使用ico路径,这样我们可以在程序发布后灵活替换背景图片。

9、播放功能实现,代码比较简单,请直接看代码:
GuiMediaPlayer.h:
#pragma once

#include <QtCore/qthread.h>
#include <QtCore/qfile.h>
#include <QtCore/qdebug.h>
#include <QtCore/QVariant>

#include <QtGui/QMouseEvent>
#include <QtGui/QImage>

#include <QtWidgets/qmessagebox.h>
#include <QtWidgets/QPushButton>
#include <QtWidgets/qfiledialog.h>
#include <QtWidgets/QAction>
#include <QtWidgets/QApplication>
#include <QtWidgets/QButtonGroup>
#include <QtWidgets/QHeaderView>
#include <QtWidgets/QMainWindow>
#include <QtWidgets/QMenuBar>
#include <QtWidgets/QStatusBar>
#include <QtWidgets/QWidget>
#include <QtWidgets/QLabel>
#include <QtWidgets/QtWidgets>
#include <QtWidgets/qfiledialog.h>

#include <QtMultimedia/qmediaplayer.h>
#include <QtMultimedia/qmediaplaylist.h>
#include <QtMultimediaWidgets/QVideoWidget>

#include "ui_GuiMediaPlayer.h"

typedef enum enThreadState
{
	THREAD_STATE_E_Start = 0,
	THREAD_STATE_E_PrepareStop,
	THREAD_STATE_E_Stop
}THREAD_STATE_E;

class GuiMediaPlayer;
class GuiMediaPlayerThread :public QThread
{
	Q_OBJECT
public:
	GuiMediaPlayerThread(QObject* parent, GuiMediaPlayer* gui);
	~GuiMediaPlayerThread();

	void run();//线程入口函数(工作线程的主函数)

private:
	GuiMediaPlayer* m_gui;
};

class GuiMediaPlayer : public QMainWindow
{
	Q_OBJECT

public:
    static GuiMediaPlayer* instance();

	GuiMediaPlayer(QWidget* parent = Q_NULLPTR);
	~GuiMediaPlayer();

	THREAD_STATE_E	getThreadState() { return m_thread_state; };
	int				setThreadState(THREAD_STATE_E state) { return m_thread_state = state; };
	void			startThread();
	void			stopThread();

protected:
	//拖动进入事件
	void dragEnterEvent(QDragEnterEvent* event);

	//放下事件
	void dropEvent(QDropEvent* event);

	//关闭按钮触发
	void closeEvent(QCloseEvent* event);

	//鼠标按下
	void mousePressEvent(QMouseEvent* e);

	//鼠标移动
	void mouseMoveEvent(QMouseEvent* e);

	//鼠标释放
	void mouseReleaseEvent(QMouseEvent* e);

	//鼠标进入
	void enterEvent(QEvent* e);

	//鼠标离开
	void leaveEvent(QEvent* e);

	//窗口缩放
	void resizeEvent(QResizeEvent* event);

	//键盘按下
	void keyPressEvent(QKeyEvent* event);

	//事件捕获
	bool eventFilter(QObject* obj, QEvent* event);

private:
	void playFile(QString filename);

signals:
	void sigUpdateState();

private slots:
	void on_m_openFile_button_triggered();
	void updateState();

private:
	Ui::GuiMediaPlayerClass ui;
	THREAD_STATE_E			m_thread_state;
	GuiMediaPlayerThread*	m_thread;
	QMediaPlayer*			m_player;
	QVideoWidget*			m_playerWidget;
	int						m_twopress;
};
GuiMediaPlayer.cpp:
#include <string.h>
#include <atlconv.h>

#include "GuiMediaPlayer.h"

#include "BaseFunc.h"

GuiMediaPlayerThread::GuiMediaPlayerThread(QObject* parent, GuiMediaPlayer* gui)
	:QThread(parent)
{
	m_gui = NULL;

	if (gui == NULL)
		return;

	m_gui = gui;

	start();
}

GuiMediaPlayerThread::~GuiMediaPlayerThread()
{
}

void GuiMediaPlayerThread::run()
{
	while (1)
	{
		//程序退出时终止线程
		if (m_gui->getThreadState() == THREAD_STATE_E_PrepareStop)
		{
			m_gui->setThreadState(THREAD_STATE_E_Stop);
			return;
		}

		emit m_gui->sigUpdateState();

		QThread::msleep(1000);
	}
}

GuiMediaPlayer* GuiMediaPlayer::instance()
{
	static GuiMediaPlayer* _ins = NULL;
	if ( _ins == NULL )
	{
		_ins = new GuiMediaPlayer();
	}

	return _ins;
}

GuiMediaPlayer::GuiMediaPlayer(QWidget* parent)
	: QMainWindow(parent)
{
    char path[1024] = {0};
    char processname[1024] = {0};
    GetExecutablePath(path, processname, sizeof(path));

    QString rcc = path;
	rcc += "GuiMediaPlayer.rcc";

	QResource::registerResource(rcc);

	ui.setupUi(this);

    //启用控件的放下操作
	setAcceptDrops(true);

	m_player = NULL;
	m_playerWidget = NULL;

	m_twopress = 0;

	m_thread = NULL;

	connect(this, SIGNAL(sigUpdateState()), this, SLOT(updateState()));

	startThread();
}

GuiMediaPlayer::~GuiMediaPlayer()
{
	stopThread();
	if (m_player != NULL)
	{
		delete m_player;
		m_player = NULL;
	}
	if (m_playerWidget != NULL)
	{
		delete m_playerWidget;
		m_playerWidget = NULL;
	}
}

void GuiMediaPlayer::startThread()
{
	m_thread_state = THREAD_STATE_E_Start;
	m_thread = new GuiMediaPlayerThread(NULL, this);
}

void GuiMediaPlayer::stopThread()
{
	if (m_thread)
	{
		//设置准备停止状态
		m_thread_state = THREAD_STATE_E_PrepareStop;
		//一直等到停止
		while (1)
		{
			//printf("wait show img thread stop\n");
			if (m_thread_state == THREAD_STATE_E_Stop)
				break;
			QThread::msleep(100);
		}
		QThread::msleep(50);
		delete m_thread;
		m_thread = NULL;
	}
}

void GuiMediaPlayer::updateState()
{
	if (m_player)
	{
		if (m_player->mediaStatus() == QMediaPlayer::EndOfMedia)
		{
			if (m_playerWidget != NULL)
			{
				delete m_playerWidget;
				m_playerWidget = NULL;
			}

			delete m_player;
			m_player = NULL;
		}
	}
}

void GuiMediaPlayer::playFile(QString filename)
{
	if (m_playerWidget != NULL)
	{
		delete m_playerWidget;
		m_playerWidget = NULL;
	}

	if (m_player != NULL)
	{
		delete m_player;
		m_player = NULL;
	}

	m_playerWidget = new QVideoWidget;
	if (m_playerWidget == NULL)
	{
		return;
	}
	m_playerWidget->setObjectName(QString::fromUtf8("play_widget"));
	ui.verticalLayout->addWidget(m_playerWidget);
	m_playerWidget->installEventFilter(this);

	m_player = new QMediaPlayer;
	if (m_player == NULL)
	{
		return;
	}

	m_player->setVideoOutput(m_playerWidget);
	m_player->setMedia(QUrl::fromLocalFile(filename));
	m_player->play();
}

void GuiMediaPlayer::on_m_openFile_button_triggered()
{
	QString filename = QFileDialog::getOpenFileName();
	if (filename.toStdString() == "")
		return;

	playFile(filename);

    return ;
}

/*拖放分为拖动(Drag)和放下(Drop)两种操作。数据拖动时会被存储为MIME(Multipurpose-
 * Internet Mail Extensions)类型,在Qt使用QMimeData类来表示MIME类型数据,并还用
 * QDrag类来完成数据的转换,而整个拖放操作都是在几个鼠标事件和拖放事件中完成.
*/
void GuiMediaPlayer::dragEnterEvent(QDragEnterEvent* event)//拖动事件
{
	//可打开.txt,.h,.cpp文件
	if (event->mimeData()->hasUrls())   //数据中是否包含URL
		event->acceptProposedAction(); //如果是则接受动作
	else
		event->ignore();
}

void GuiMediaPlayer::dropEvent(QDropEvent* event)//放下事件
{
	const QMimeData* mineData = event->mimeData();//获取MIME数据
	if (mineData->hasUrls())                     //如数据中包含URL
	{
		QList<QUrl>urlList = mineData->urls();    //获取URL列表
		if (urlList.isEmpty())
			return;
		//将其中第一个URL表示为本地文件路径
		QString filename = urlList.at(0).toLocalFile();
		if (filename.isEmpty())
			return;

		playFile(filename);
	}
}

void GuiMediaPlayer::closeEvent(QCloseEvent* event)
{
	if (1)
	{
		stopThread();
		event->accept();
	}
	else
	{
		event->ignore();
	}
}

void GuiMediaPlayer::mousePressEvent(QMouseEvent* e)
{
	QPoint lastPoint = e->globalPos();
	//printf("%d %d\n", lastPoint.x(), lastPoint.y());
}

void GuiMediaPlayer::mouseMoveEvent(QMouseEvent* e)
{
	//printf("%d %d\n", e->globalX(), e->globalY());
}

void GuiMediaPlayer::mouseReleaseEvent(QMouseEvent* e)
{
	//printf("%d %d\n", e->globalX(), e->globalY());
}

void GuiMediaPlayer::enterEvent(QEvent* e)
{
}

void GuiMediaPlayer::leaveEvent(QEvent* e)
{
}

void GuiMediaPlayer::resizeEvent(QResizeEvent* event)
{
}

void GuiMediaPlayer::keyPressEvent(QKeyEvent* event)
{
	if (event->key() == Qt::Key_Q)
	{
	}
	else if (event->key() == Qt::Key_Left)
	{
	}
	else if (event->key() == Qt::Key_Right)
	{
	}
	else if (event->key() == Qt::Key_Up)
	{
	}
	else if (event->key() == Qt::Key_Down)
	{
	}
	else if (event->key() == Qt::Key_Backspace)
	{
	}
	else if (event->key() == Qt::Key_Enter || event->key() == Qt::Key_Return)
	{
	}
	else
	{
	}
}

bool GuiMediaPlayer::eventFilter(QObject* obj, QEvent* event)
{
	if (event->type() == QEvent::KeyPress)
	{
		QKeyEvent* keyEvent = static_cast<QKeyEvent*>(event);
		if (keyEvent->key() == Qt::Key_Backspace)
		{
		}
	}

	if (obj == m_playerWidget)
	{
		if (event->type() == QEvent::MouseButtonDblClick)
		{
			m_twopress++;
			if (m_twopress % 2)
				m_playerWidget->setFullScreen(true);
			else
				m_playerWidget->setFullScreen(false);
		}
	}

	return QWidget::eventFilter(obj, event);
}
10、其他注意项
依赖库输入直接在main.cpp里指定的:

关闭打开控制台代码也在main.cpp里:

程序运行后如果播放视频没图像,则需要安装解码器,安装包在openbsd\qt\lib\LAVFilters-0.76.1-Installer.exe。
在railstutorial中,作者为什么选择使用这个(代码list10.25):http://ruby.railstutorial.org/chapters/updating-showing-and-deleting-usersnamespace:dbdodesc"Filldatabasewithsampledata"task:populate=>:environmentdoRake::Task['db:reset'].invokeUser.create!(:name=>"ExampleUser",:email=>"example@railstutorial.org",:passwo
如何在buildr项目中使用Ruby?我在很多不同的项目中使用过Ruby、JRuby、Java和Clojure。我目前正在使用我的标准Ruby开发一个模拟应用程序,我想尝试使用Clojure后端(我确实喜欢功能代码)以及JRubygui和测试套件。我还可以看到在未来的不同项目中使用Scala作为后端。我想我要为我的项目尝试一下buildr(http://buildr.apache.org/),但我注意到buildr似乎没有设置为在项目中使用JRuby代码本身!这看起来有点傻,因为该工具旨在统一通用的JVM语言并且是在ruby中构建的。除了将输出的jar包含在一个独特的、仅限ruby
我在我的Rails项目中使用Pow和powifygem。现在我尝试升级我的ruby版本(从1.9.3到2.0.0,我使用RVM)当我切换ruby版本、安装所有gem依赖项时,我通过运行railss并访问localhost:3000确保该应用程序正常运行以前,我通过使用pow访问http://my_app.dev来浏览我的应用程序。升级后,由于错误Bundler::RubyVersionMismatch:YourRubyversionis1.9.3,butyourGemfilespecified2.0.0,此url不起作用我尝试过的:重新创建pow应用程序重启pow服务器更新战俘
我已经像这样安装了一个新的Rails项目:$railsnewsite它执行并到达:bundleinstall但是当它似乎尝试安装依赖项时我得到了这个错误Gem::Ext::BuildError:ERROR:Failedtobuildgemnativeextension./System/Library/Frameworks/Ruby.framework/Versions/2.0/usr/bin/rubyextconf.rbcheckingforlibkern/OSAtomic.h...yescreatingMakefilemake"DESTDIR="cleanmake"DESTDIR="
假设我有这个范围:("aaaaa".."zzzzz")如何在不事先/每次生成整个项目的情况下从范围中获取第N个项目? 最佳答案 一种快速简便的方法:("aaaaa".."zzzzz").first(42).last#==>"aaabp"如果出于某种原因你不得不一遍又一遍地这样做,或者如果你需要避免为前N个元素构建中间数组,你可以这样写:moduleEnumerabledefskip(n)returnto_enum:skip,nunlessblock_given?each_with_indexdo|item,index|yieldit
在前面两节的例子中,主界面窗口的尺寸和标签控件显示的矩形区域等,都是用C++代码编写的。窗口和控件的尺寸都是预估的,控件如果多起来,那就不好估计每个控件合适的位置和大小了。用C++代码编写图形界面的问题就是不直观,因此Qt项目开发了专门的可视化图形界面编辑器——QtDesigner(Qt设计师)。通过QtDesigner就可以很方便地创建图形界面文件*.ui,然后将ui文件应用到源代码里面,做到“所见即所得”,大大方便了图形界面的设计。本节就演示一下QtDesigner的简单使用,学习拖拽控件和设置控件属性,并将ui文件应用到Qt程序代码里。使用QtDesigner设计界面在开始菜单中找到「Q
动漫制作技巧是很多新人想了解的问题,今天小编就来解答与大家分享一下动漫制作流程,为了帮助有兴趣的同学理解,大多数人会选择动漫培训机构,那么今天小编就带大家来看看动漫制作要掌握哪些技巧?一、动漫作品首先完成草图设计和原型制作。设计草图要有目的、有对象、有步骤、要形象、要简单、符合实际。设计图要一致性,以保证制作的顺利进行。二、原型制作是根据设计图纸和制作材料,可以是手绘也可以是3d软件创建。在此步骤中,要注意的问题是色彩和平面布局。三、动漫制作制作完成后,加工成型。完成不同的表现形式后,就要对设计稿进行加工处理,使加工的难易度降低,并得到一些基本准确的概念,以便于后续的大样、准确的尺寸制定。四、
2022/8/4更新支持加入水印水印必须包含透明图像,并且水印图像大小要等于原图像的大小pythonconvert_image_to_video.py-f30-mwatermark.pngim_dirout.mkv2022/6/21更新让命令行参数更加易用新的命令行使用方法pythonconvert_image_to_video.py-f30im_dirout.mkvFFMPEG命令行转换一组JPG图像到视频时,是将这组图像视为MJPG流。我需要转换一组PNG图像到视频,FFMPEG就不认了。pyav内置了ffmpeg库,不需要系统带有ffmpeg工具因此我使用ffmpeg的python包装p
Transformers开始在视频识别领域的“猪突猛进”,各种改进和魔改层出不穷。由此作者将开启VideoTransformer系列的讲解,本篇主要介绍了FBAI团队的TimeSformer,这也是第一篇使用纯Transformer结构在视频识别上的文章。如果觉得有用,就请点赞、收藏、关注!paper:https://arxiv.org/abs/2102.05095code(offical):https://github.com/facebookresearch/TimeSformeraccept:ICML2021author:FacebookAI一、前言Transformers(VIT)在图
我正在尝试创建一个带有项目符号字符的Ruby1.9.3字符串。str="•"+"helloworld"但是,当我输入它时,我收到有关非ASCII字符的语法错误。我该怎么做? 最佳答案 你可以把Unicode字符放在那里。str="\u2022"+"helloworld" 关于ruby-如何在Ruby字符串中插入项目符号字符?,我们在StackOverflow上找到一个类似的问题: https://stackoverflow.com/questions/1195