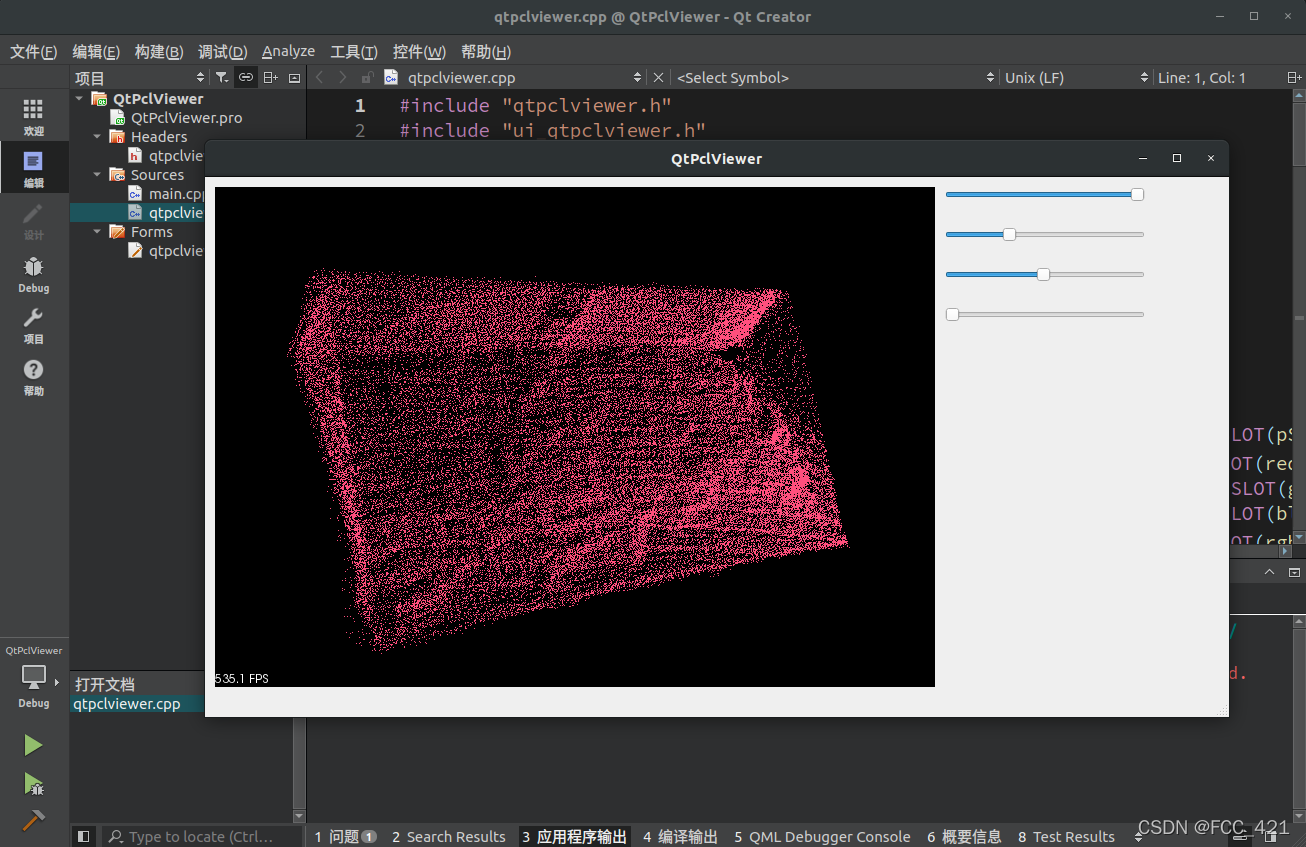
Qt 调用 Pcl库,在Widget中显示点云
下面介绍具体原理和实现步骤。
其实核心就是这一行代码
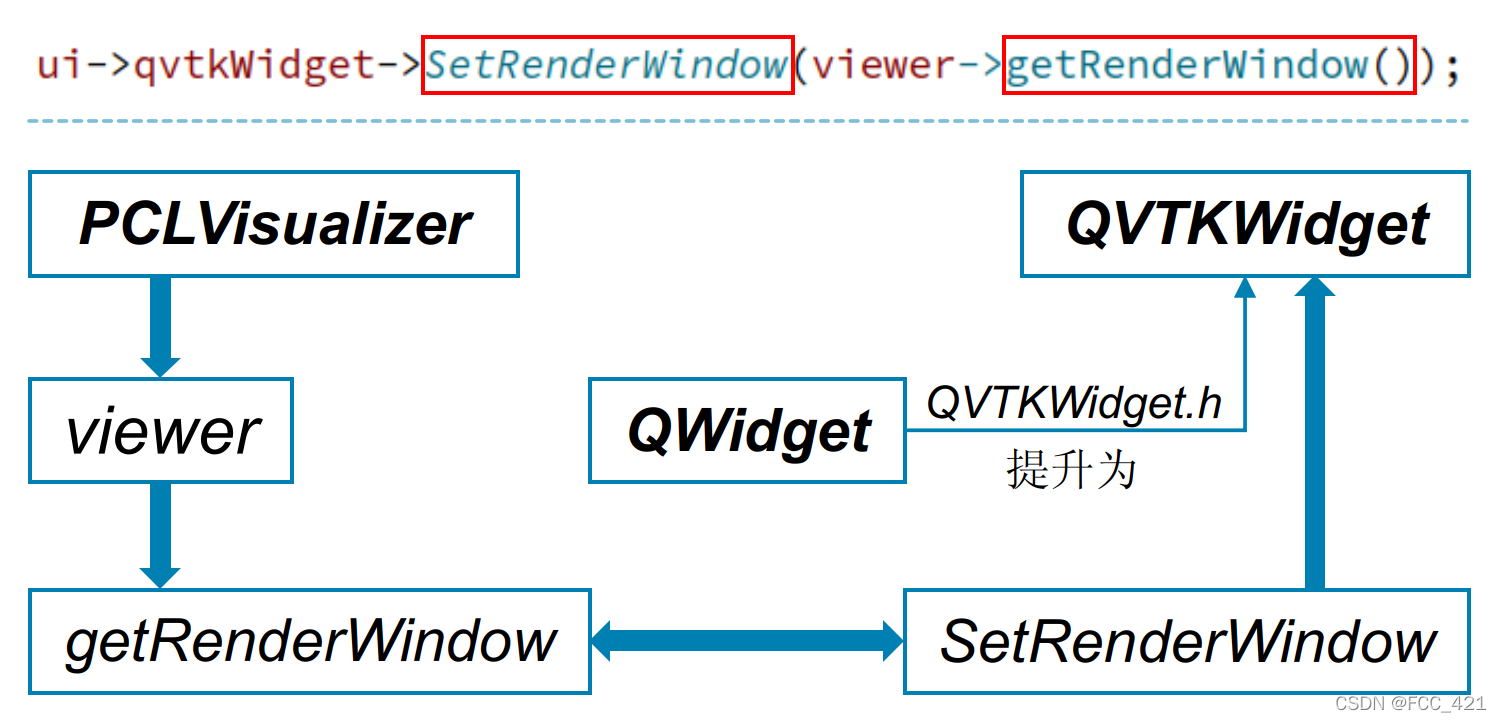
将数据从pclviewer 传输到 QVTKWidget。
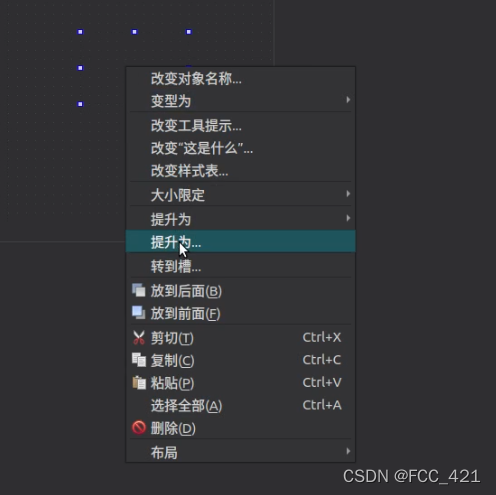
插入一个QWidget,然后右键QWidget => 提升为 => QVTKWidget (注意QVTKWidget.h区分大小写!!)
 再新建四个horizontalSlider,分别命名为horizontalSlider_Red,horizontalSlider_Green,horizontalSlider_Blue,horizontalSlider_Size。用于控制点云的颜色和大小。
QT       += core gui

greaterThan(QT_MAJOR_VERSION, 4): QT += widgets

CONFIG += c++11

# 主要需要修改的部分在下方,注意库的地址!
# -------------------------------------------------------
INCLUDEPATH += /usr/include/eigen3								#注意路径可能不一样

INCLUDEPATH += /usr/include/vtk-6.3
LIBS += /usr/lib/x86_64-linux-gnu/libvtk*.so					#注意路径可能不一样

INCLUDEPATH += /usr/include/boost								#注意路径可能不一样
LIBS += /usr/lib/x86_64-linux-gnu/libboost_*.so

INCLUDEPATH += /usr/include/pcl-1.8								#注意路径可能不一样
LIBS += /usr/lib/x86_64-linux-gnu/libpcl_*.so
# -------------------------------------------------------

DEFINES += QT_DEPRECATED_WARNINGS

SOURCES += \
    main.cpp \
    qtpclviewer.cpp

HEADERS += \
    qtpclviewer.h

FORMS += \
    qtpclviewer.ui

# Default rules for deployment.
qnx: target.path = /tmp/$${TARGET}/bin
else: unix:!android: target.path = /opt/$${TARGET}/bin
!isEmpty(target.path): INSTALLS += target
#ifndef QTPCLVIEWER_H
#define QTPCLVIEWER_H

#include <QMainWindow>
#include "ui_qtpclviewer.h"

#ifndef INITIAL_OPENGL
#define INITIAL_OPENGL
#include <vtkAutoInit.h>
VTK_MODULE_INIT(vtkRenderingOpenGL)
VTK_MODULE_INIT(vtkInteractionStyle)
#endif

#include <QFileDialog>
#include <vtkRenderWindow.h>
#include <pcl/io/pcd_io.h>
#include <pcl/point_types.h>
#include <pcl/visualization/pcl_visualizer.h>

//QT_BEGIN_NAMESPACE
//namespace Ui { class QtPclViewer; }
//QT_END_NAMESPACE

class QtPclViewer : public QMainWindow
{
    Q_OBJECT

public:
    QtPclViewer(QWidget *parent = nullptr);
    ~QtPclViewer();

private:
    Ui::QtPclViewer *ui;
    // Ui::QtPclViewerClass ui;

    pcl::PointCloud<pcl::PointXYZ>::Ptr cloud;
    boost::shared_ptr<pcl::visualization::PCLVisualizer> viewer;
    void initialVtkWidget();

protected:
    unsigned red;
    unsigned green;
    unsigned blue;
    double size;

    private slots :

       void onOpen();
       void rgbSliderReleased( );
       void pSliderValueChangeed(int value);
       void redSliderValueChangeed(int value);
       void greenSliderValueChangeed(int value);
       void blueSliderValueChangeed(int value);
};
#endif // QTPCLVIEWER_H
#include "qtpclviewer.h"

#include <QApplication>

int main(int argc, char *argv[])
{
    QApplication a(argc, argv);
    QtPclViewer w;
    w.show();
    return a.exec();
}
#include "qtpclviewer.h"
#include "ui_qtpclviewer.h"

QtPclViewer::QtPclViewer(QWidget *parent)
    : QMainWindow(parent)
    , ui(new Ui::QtPclViewer)
{
    ui->setupUi(this);

    initialVtkWidget();
    onOpen();

//    connect(ui.actionOpen, SIGNAL(triggered()), this, SLOT(onOpen()));
    connect(ui->horizontalSlider_Size, SIGNAL(valueChanged(int)), this, SLOT(pSliderValueChangeed(int)));//改变大小
    connect(ui->horizontalSlider_Red, SIGNAL(valueChanged(int)), this, SLOT(redSliderValueChangeed(int)));//颜色改变
    connect(ui->horizontalSlider_Green, SIGNAL(valueChanged(int)), this, SLOT(greenSliderValueChangeed(int)));
    connect(ui->horizontalSlider_Blue, SIGNAL(valueChanged(int)), this, SLOT(blueSliderValueChangeed(int)));
    connect(ui->horizontalSlider_Red, SIGNAL(sliderReleased( )), this, SLOT(rgbSliderReleased( )));//slider滑动
    connect(ui->horizontalSlider_Green, SIGNAL(sliderReleased( )), this, SLOT(rgbSliderReleased( )));
    connect(ui->horizontalSlider_Blue, SIGNAL(sliderReleased( )), this, SLOT(rgbSliderReleased( )));
}

QtPclViewer::~QtPclViewer()
{
    delete ui;
}

void QtPclViewer::initialVtkWidget()
{
    //初始化颜色及大小信息
    red = 255;
    green = 255;
    blue = 255;
    size = 1.0;
    //点云加载
    cloud.reset(new pcl::PointCloud<pcl::PointXYZ>);
    viewer.reset(new pcl::visualization::PCLVisualizer("viewer", false));
    //viewer->addPointCloud(cloud, "cloud");
    pcl::visualization::PointCloudColorHandlerCustom<pcl::PointXYZ> single_color(cloud, red, green, blue);//自定义点云颜色
    viewer->addPointCloud<pcl::PointXYZ>(cloud, single_color, "cloud");
    viewer->setPointCloudRenderingProperties(pcl::visualization::PCL_VISUALIZER_POINT_SIZE, size, "cloud");//设置点云单个点的大小
    ui->qvtkWidget->SetRenderWindow(viewer->getRenderWindow());
    viewer->setupInteractor(ui->qvtkWidget->GetInteractor(), ui->qvtkWidget->GetRenderWindow());
    ui->qvtkWidget->update();
}
void QtPclViewer::onOpen()
{
    QString fileName = QFileDialog::getOpenFileName(this, "Open PointCloud", ".", "Open PCD files(*.pcd)");
    if (!fileName.isEmpty())
    {
        std::string file_name = fileName.toStdString();
        //sensor_msgs::PointCloud2 cloud2;
        pcl::PCLPointCloud2 cloud2;
        //pcl::PointCloud<Eigen::MatrixXf> cloud2;
        Eigen::Vector4f origin;
        Eigen::Quaternionf orientation;
        int pcd_version;
        int data_type;
        unsigned int data_idx;
        int offset = 0;
        pcl::PCDReader rd;
        rd.readHeader(file_name, cloud2, origin, orientation, pcd_version, data_type, data_idx);
        if (data_type == 0)
        {
            pcl::io::loadPCDFile(fileName.toStdString(),*cloud);
        }
        else if (data_type == 2)
        {
            pcl::PCDReader reader;
            reader.read<pcl::PointXYZ>(fileName.toStdString(), *cloud);
        }

        // pcl::io::loadPCDFile("1_over.pcd",*cloud);
        qDebug("cloud->points.size: %ld", cloud->points.size());
        //重新加载点云
        //viewer->updatePointCloud(cloud, "cloud");
        pcl::visualization::PointCloudColorHandlerCustom<pcl::PointXYZ> single_color(cloud, red, green, blue);//自定义点云颜色
        viewer->updatePointCloud<pcl::PointXYZ>(cloud, single_color, "cloud");
        viewer->resetCamera();
        ui->qvtkWidget->update();
    }
}
void QtPclViewer::rgbSliderReleased()
{
    //更新点云颜色
    pcl::visualization::PointCloudColorHandlerCustom<pcl::PointXYZ> single_color(cloud, red, green, blue);
    viewer->updatePointCloud<pcl::PointXYZ>(cloud, single_color, "cloud");
    ui->qvtkWidget->update();
}

void QtPclViewer::redSliderValueChangeed(int value)
{
    red= value;
}
void QtPclViewer::greenSliderValueChangeed(int value)
{
    green= value;
}
void QtPclViewer::blueSliderValueChangeed(int value)
{
    blue= value;
}

void QtPclViewer::pSliderValueChangeed(int value)
{
    size=double(10+value)/10;
    viewer->setPointCloudRenderingProperties(pcl::visualization::PCL_VISUALIZER_POINT_SIZE, size, "cloud");//设置点云单个点的大小
    pcl::visualization::PointCloudColorHandlerCustom<pcl::PointXYZ>single_color(cloud, red, green, blue);
    viewer->updatePointCloud<pcl::PointXYZ>(cloud,single_color, "cloud");
    ui->qvtkWidget->update();
}
我得到了一个包含嵌套链接的表单。编辑时链接字段为空的问题。这是我的表格:Editingkategori{:action=>'update',:id=>@konkurrancer.id})do|f|%>'Trackingurl',:style=>'width:500;'%>'Editkonkurrence'%>|我的konkurrencer模型:has_one:link我的链接模型:classLink我的konkurrancer编辑操作:defedit@konkurrancer=Konkurrancer.find(params[:id])@konkurrancer.link_attrib
我主要使用Ruby来执行此操作,但到目前为止我的攻击计划如下:使用gemsrdf、rdf-rdfa和rdf-microdata或mida来解析给定任何URI的数据。我认为最好映射到像schema.org这样的统一模式,例如使用这个yaml文件,它试图描述数据词汇表和opengraph到schema.org之间的转换:#SchemaXtoschema.orgconversion#data-vocabularyDV:name:namestreet-address:streetAddressregion:addressRegionlocality:addressLocalityphoto:i
所以我在关注Railscast,我注意到在html.erb文件中,ruby代码有一个微弱的背景高亮效果,以区别于其他代码HTML文档。我知道Ryan使用TextMate。我正在使用SublimeText3。我怎样才能达到同样的效果?谢谢! 最佳答案 为SublimeText安装ERB包。假设您安装了SublimeText包管理器*,只需点击cmd+shift+P即可获得命令菜单,然后键入installpackage并选择PackageControl:InstallPackage获取包管理器菜单。在该菜单中,键入ERB并在看到包时选择
我试图在索引页中创建一个超链接,但它没有显示,也没有给出任何错误。这是我的index.html.erb代码。ListingarticlesTitleTextssss我检查了我的路线,我认为它们也没有问题。PrefixVerbURIPatternController#Actionwelcome_indexGET/welcome/index(.:format)welcome#indexarticlesGET/articles(.:format)articles#indexPOST/articles(.:format)articles#createnew_articleGET/article
我是rails的新手,想在form字段上应用验证。myviewsnew.html.erb.....模拟.rbclassSimulation{:in=>1..25,:message=>'Therowmustbebetween1and25'}end模拟Controller.rbclassSimulationsController我想检查模型类中row字段的整数范围,如果不在范围内则返回错误信息。我可以检查上面代码的范围,但无法返回错误消息提前致谢 最佳答案 关键是您使用的是模型表单,一种显示ActiveRecord模型实例属性的表单。c
我正在尝试编写一个将文件上传到AWS并公开该文件的Ruby脚本。我做了以下事情:s3=Aws::S3::Resource.new(credentials:Aws::Credentials.new(KEY,SECRET),region:'us-west-2')obj=s3.bucket('stg-db').object('key')obj.upload_file(filename)这似乎工作正常,除了该文件不是公开可用的,而且我无法获得它的公共(public)URL。但是当我登录到S3时,我可以正常查看我的文件。为了使其公开可用,我将最后一行更改为obj.upload_file(file
如何在ruby中调用C#dll? 最佳答案 我能想到几种可能性:为您的DLL编写(或找人编写)一个COM包装器,如果它还没有,则使用Ruby的WIN32OLE库来调用它;看看RubyCLR,其中一位作者是JohnLam,他继续在Microsoft从事IronRuby方面的工作。(估计不会再维护了,可能不支持.Net2.0以上的版本);正如其他地方已经提到的,看看使用IronRuby,如果这是您的技术选择。有一个主题是here.请注意,最后一篇文章实际上来自JohnLam(看起来像是2009年3月),他似乎很自在地断言RubyCL
我正在尝试使用boilerpipe来自JRuby。我看过guide从JRuby调用Java,并成功地将它与另一个Java包一起使用,但无法弄清楚为什么同样的东西不能用于boilerpipe。我正在尝试基本上从JRuby中执行与此Java等效的操作:URLurl=newURL("http://www.example.com/some-location/index.html");Stringtext=ArticleExtractor.INSTANCE.getText(url);在JRuby中试过这个:require'java'url=java.net.URL.new("http://www
我需要一些关于TDD概念的帮助。假设我有以下代码defexecute(command)casecommandwhen"c"create_new_characterwhen"i"display_inventoryendenddefcreate_new_character#dostufftocreatenewcharacterenddefdisplay_inventory#dostufftodisplayinventoryend现在我不确定要为什么编写单元测试。如果我为execute方法编写单元测试,那不是几乎涵盖了我对create_new_character和display_invent
目前,Itembelongs_toCompany和has_manyItemVariants。我正在尝试使用嵌套的fields_for通过Item表单添加ItemVariant字段,但是使用:item_variants不显示该表单。只有当我使用单数时才会显示。我检查了我的关联,它们似乎是正确的,这可能与嵌套在公司下的项目有关,还是我遗漏了其他东西?提前致谢。注意:下面的代码片段中省略了不相关的代码。编辑:不知道这是否相关,但我正在使用CanCan进行身份验证。routes.rbresources:companiesdoresources:itemsenditem.rbclassItemi