影院订票系统前端页面
引言:
大家好,欢迎来到我的博客。五一假期就快到了,你们准备怎么安排假期活动呢?要不去看一场电影来缓解一下枯燥的学习生活?😝说起电影,就离不开中国内地电影票房冠军《长津湖》。那么今天,我们就来制作一个影院订票系统前端页面,如有错误之处,欢迎大家指正。😊


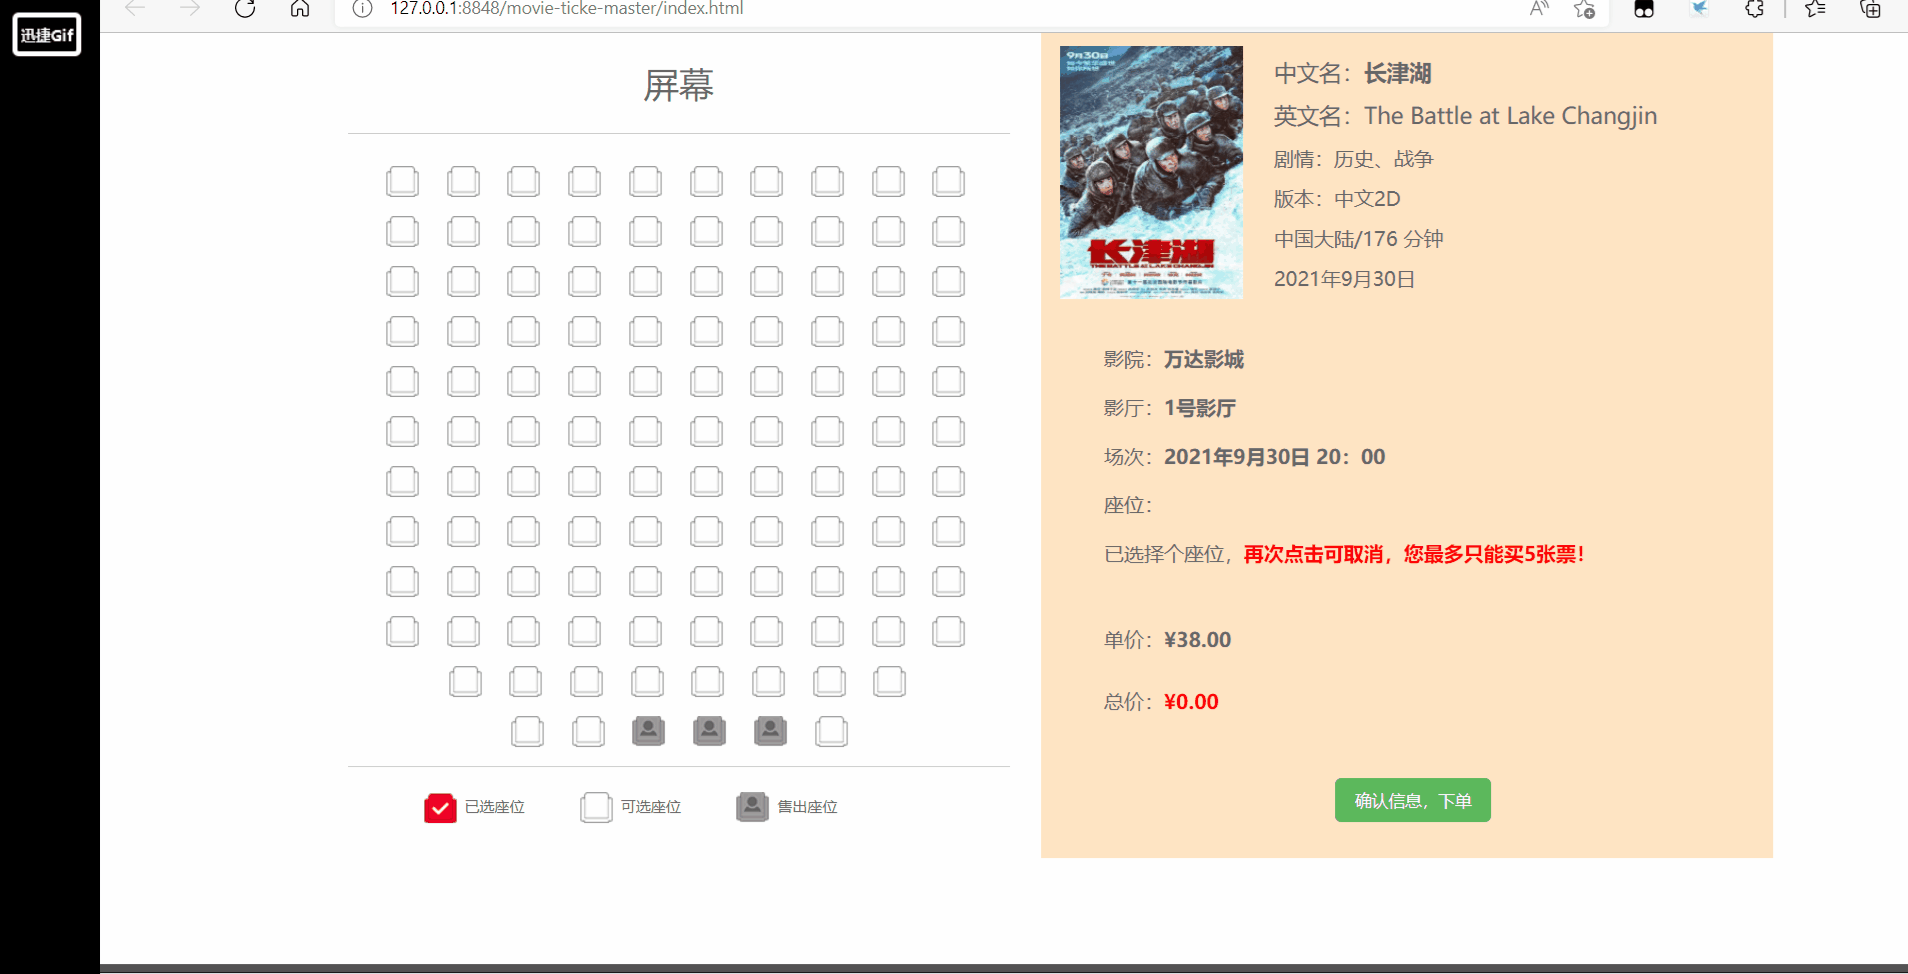
影院订票系统是电影院进行电影票销售非常重要的一个环节,直接影响到用户的操作是否方便、界面是否直观。该系统包括用户注册、影片信息管理、订票信息管理、站内新闻管理等模块。本节仅对其中的订票前端页面进行阐述,目的是让读者能对本书前期学习的知识进行综合运用,本节完成的前端页面如图1所示,可点击效果动图查看完成效果。

该页面要求用图形方式进行座位的选择,也就是能够单击图1左边的可选座位来选中想购买的座位,单击可选座位之后,该座位会变成已选座位状态;单击已选座位后,该座位会重新回到可选座位状态;图中灰色的座位表示已是售出座位的状态。
另外,选中或取消某一个座位之后,在图1的右边会自动显示出已选座位是“几排几号”,并能根据用户所选择的电影票张数,自动计算出本次购票的总价,同时还能限制用户最多一次只能购买五张电影票,当票数达到上限时,动态提示用户,此时不能再选择新的可选座位,但可以取消已选座位。
由图1可以看出该页面分为左右两个部分,采用Bootstrap栅格布局实现,即左右各占12等份的一半,其中左半部分又分成两行(座位行和座位提示行),右半部分也分成两行(电影信息行和影票购买信息行),其实现代码如下所示:

<div  class="container" id="app">
    <div  class="row">
        <div  class="col-md-6">
             <div  class="row">
                <!--左上半部分:座位行-->
             </div>
             <div class="row">
                 <!--左下半部分:座位提示行-->
             </div>
    </div>
    <div class="col-md-6  sceenRight">
        <div class="row">
            <!--右上半部分:电影信息行-->
        </div>
        <div class="row">
             <!--右下半部分:影票购买信息行-->
        </div>
    </div>
  </div>
</div>
座位数据是通过在<li></li>标记中使用背景图片,背景图片有四种座位样式:无座位(空白)、可选座位(白色)、选中座位(红色)、售出座位(灰色),在数组中定义的数值如下:
-1:无座位0:可选座位1:选中座位2:售出座位
例如,在Vue.js中定义一个11行10列的座位,每个座位用一个数字来表示,数字含义如上所示,定义的数组语句如下所示(其在浏览器中对应如图1左上半部分的座位图):

seatflag:[
		0, 0, 0, 0, 0, 0, 0, 0, 0, 0,
		0, 0, 0, 0, 0, 0, 0, 0, 0, 0,
		0, 0, 0, 0, 0, 0, 0, 0, 0, 0,
		0, 0, 0, 0, 0, 0, 0, 0, 0, 0,
	    0, 0, 0, 0, 0, 0, 0, 0, 0, 0,
		0, 0, 0, 0, 0, 0, 0, 0, 0, 0,
		0, 0, 0, 0, 0, 0, 0, 0, 0, 0,
		0, 0, 0, 0, 0, 0, 0, 0, 0, 0,
		0, 0, 0, 0, 2, 2, 0, 0, 0, 0,
		0, 0, 0, 2, 2, 0, 2, 2, 0, 0,
		-1, 0, 0, 0, 0, 0, 0, 0, 0, -1,
		-1, -1, 0, 0, 0, 0, 0, 0, -1, -1,
	]
从定义的seatfage数组可以看出这是一维数组,让其变成能够显示行列的二维数组的方法是:定义一行有多少座位的数据seatCol,用户单击某一个座位后,在程序中可以得到该座位在数组中的序号,该序号整除seatCol得到的商就是行号,对seatCol取余数就是相对应的列号。
在CSS中对座位<li>元素的样式定义是通过四个座位的背景图(如图2所示)完成,通过上下移动该背景图使用户在<li>元素的窗口中看到不同的座位样式,其样式定义如下所示:

.seat{
			float: left;
			width: 30px;
			height: 30px;
			background-color: bisque;
			margin: 5px 10px;
			cursor: pointer;
			list-style: none;
		}
.seatActive{
			background: url(img/bg.png) 1px 0px;
		}
.seatSpace{
			background: url(img/bg.png) 1px -29px;
		}
.seatNoUse{
			background: url(img/bg.png) 1px -56px;
		}
.noSeat{
			background: url(img/bg.png) 1px -84px;
		}
使用Vue中的v-for命令对上面的数据动态生成多个座位的<li>元素。每个座位都有“seat”样式类,然后根据每个座位对应的数据来显示其对应的样式图片,当对应座位的数据是-1时,添加“noSeat”样式类,即没有该座位;当对应座位数据是0时,添加“seatSpace”样式类,即该座位是可选座位;当对应座位数据是1时,添加“ seatActive ”样式类,即该座位是已选座位;当对应座位数据是2时,添加“seatNoUse”样式类,即该座位是售出座位。HTML中的语句如下所示:
<li class="seat seatSpace" v-for="(item,index) in seatflag"
							:key="index"
		   :class="{'noSeat':seatflag[index]==-1,
							'seatActive':seatflag[index]==1,
							'seatSpace':seatflag[index]==0,
							'seatNoUse':seatflag[index]==2,
							}",
							@click="handleClick(index)"
							></li>
行和列是由单击座位对应序号和数据seatCol来确定的,但在浏览器中的显示是由<li>的父级元素来确定的,也就是<ul>元素的宽度,这些数据以后都可以通过后台服务器动态获取。该<ul>元素的样式定义如下所示:
 #app ul{
		list-style: none;/*去除列表样式*/
		width: 550px;/*设定宽度,目的是一行显示多少座位,其他座位另起新行*/
  }
用户单击某个座位后,会执行相应座位的单击事件处理函数handleClick(index),处理函数的入口参数index是用户单击某个座位在一维数组seatflag中的位置值,利用Vue中的数据绑定,当用户修改了数组seatflag的数据值,会自动刷新相对应的座位图片。该函数的实现方式如下所示:
handleClick:function(index){
					if (vm.seatflag[index]==1){
						vm.$set(vm.seatflag,index,0);
						//console.log(this.curSeat.findIndex(item=>item.id===index));
						this.curSeat.splice(this.curSeat.findIndex(item=>item===index),1);
					}
					else
					if (vm.seatflag[index]==0 && this.count<5){
						vm.$set(vm.seatflag,index,1);
						this.curSeat.push(index);
					}
					//设置当前选中的座位
					this.curSeatDisp=[];
					for(let item of this.curSeat){
						this.curSeatDisp.push((Math.floor(item/this.seatCol)+1)+"行"+(item%this.seatCol+1)+"列");
					}
					//计数已经选择了多少个座位
					var mySeat=vm.seatflag.filter(item=>{//item为数组当前的元素
						return item==1;
					})
					this.count=mySeat.length;
					//判断达到购买上限,设置数据maxFlag,并显示提示语句,并显示提示语句“您一次最多仅能买五张票”
					if (this.count>=5)this.maxFlag=true;
					else this.maxFlag=false;
				}
说明如下:
(1)显示已选座位“几排几列”是根据
curSeatDisp数组确定,在HTML中通过v-for指令实现,其代码如下所示:
 <p id="seatSelect">
    座位:
    <span v-for="(item,index) in curSeatDisp" :key="index">
    {{item}}
    </span>
 </p>
(2)显示已选择多少个座位是根据count数据确定,在HTML中的实现代码如下所示:
<p>已选择
      <strong style="color: red;">{{count}}</strong>个座位,
 </p>
(3)判断达到购买票数上限后,是否显示“您一次最多仅能买五张票”的提示语句,通过数据maxFlag的值确定。在HTML中的语句如下所示:
<strong style="color: red;">再次单击座位可取消。
		<span v-if="maxFlag">您一次最多只能买五张票!</span>
</strong>
在Vue中通过监听count数据的变化,可以重新计算总价。在Vue实例中的语句如下所示:
computed:{
		totalPrice:function(){
		return this.count * this.filmInfo.unitPrice;
	}
},
显示电影票单价和总价通过Vue的全局过滤器实现,让其保留两位小数点,并在金额前面加上人民币符号。在Vue实例中的语句如下所示:
Vue.filter('numberFormat',function(value){
			return '¥'+value.toFixed(2)
		})
在HTML中使用过滤器是通过管道符实现的,其代码如下所示:
<p>单价:
       <strong>{{filmInfo.unitPrice|numberFormat}}</strong>
</p>
<p>总价:
      <strong style="color: red;">{{totalPrice|numberFormat}}</strong>
 </p>
图1的右上半部分是电影海报和电影的部分相关信息,这部分是通过调用Vue实例的filmInfo对象中的相关数据来显示信息。flmInfo对象在Vue的data中的定义如下:
fileInfo:{
			name:'长津湖',
			nameEnglish:'The Battle at Lake Changjin',
			copyRight:'中文2D',
			filmImg:'img/1.png',
			storyType:'历史、战争',
			place:'中国大陆',
			timeLength:'176 分钟',
			timeShow:'2021年9月30日',
			cinema:'万达影城',
			room:'1号影厅',
			time:'2021年9月30日  20:00',
			unitPrice:38,
				}
此处HTML的实现方式是使用Bootstrap提供的媒体对象组件,代码如下所示:
注:可在bootstrap官网直接映入媒体对象组件。操作方式:打开bootstrap官网(https://www.bootcss.com/),点击页面最中心Bootstrap3中文文档(v3.4.1),选择右侧列表中的“媒体对象”,复制代码即可。
<div class="row">
		            <!--右上半部分:电影信息行-->
					<div class="media">
					  <div class="media-left">
					    <a href="#">
					      <img class="media-object" :src="filmInfo.filmImg" alt="..."  height="200px">
					    </a>
					  </div>
					  <div class="media-body">
					    <h4 class="media-heading">中文名:<strong>{{filmInfo.name}}</strong></h4>
						<h4 class="media-heading">英文名:<strong>{{filmInfo.nameEnglish}}</strong></h4>
						<p>剧情:{{filmInfo.storyType}}</p>
						<p>版本:{{filmInfo.copyType}}</p>
						<p>{{filmInfo.place}}/{{filmInfo.timeLength}}</p>
						<p>{{filmInfo.timeShow}}</p>
					  </div>
					</div>
		        </div>
这里在HTML中进行数据绑定时使用了两种方式,一种是双大括号的数据绑定方式,即“{{数据}}”;另一种是属性绑定方式,
即“:src='filmInfo.film Img”。
总结:本章主要讲解了影院订票系统前端页面的综合案例,重点是使用Vue. js的特性结合Bootstrap的排版功能实现,该案例要求具有较高的 JavaScript 程序的编程能力和对Vue. js进行网页行为的控制能力。通过这个案例的学习,读者不仅可以更进一步、更深刻地理解前面章节学过的所有知识,而且能够体会到最新前端框架Vue. js的数据渲染、事件触发响应、监听属性、计算属性、各种指令等在实际项目中的灵活应用,以及Bootstrap的简便布局排版能力。

<!DOCTYPE html>
<html>
	<head>
		<meta charset="utf-8">
		<title></title>
		<link href="./css/bootstrap.min.css" rel="stylesheet">
		<script src="js/vue.min.js"> </script>
		<style>
		#app{
			margin: 50px auto;
		}
		#app ul{
			list-style: none;
			width: 550px;
		}
		#app ul #screen{
			text-align: center;
			letter-spacing: 30px;
		}
		.seat{
			float: left;
			width: 30px;
			height: 30px;
			background-color: bisque;
			margin: 5px 10px;
			cursor: pointer;
			list-style: none;
		}
		.seatActive{
			background: url(img/bg.png) 1px 0px;
		}
		.seatSpace{
			background: url(img/bg.png) 1px -29px;
		}
		.seatNoUse{
			background: url(img/bg.png) 1px -56px;
		}
		.noSeat{
			background: url(img/bg.png) 1px -84px;
		}
		.notice{
			float: left;
			height: 30px;
			line-height: 30px;
			margin-right: 70px;
		}
		</style>
	</head>
	<body>
		<div  class="container" id="app">
		    <div  class="row">
		        <div  class="col-md-6">
		             <div  class="row">
		                <!--左上半部分:座位行-->
						<ul>
							<li id="screen">
								<h1>屏幕</h1>
							</li>
							<hr>
							<!--<li class="seat seatActive"></li>-->
							<li class="seat seatSpace" v-for="(item,index) in seatflag"
							:key="index" :class="{'noSeat':seatflag[index]==-1,
							'seatActive':seatflag[index]==1,
							'seatSpace':seatflag[index]==0,
							'seatNoUse':seatflag[index]==2,
							}",@click="handleClick(index)"
							></li>
							<!--<li class="seat seatNoUse"></li>-->
							<!--<li class="seat noSeat" ></li>-->
						</ul>
		             </div>
		             <div class="row">
		                 <!--左下半部分:座位提示行-->
						 <hr>
						 <li class="seat seatActive"></li>
						 <span class="notice">已选座位</span>
						 <li class="seat seatSpace"></li>
						 <span class="notice">可选座位</span>
						 <li class="seat seatNoUse"></li>
						 <span class="notice">售出座位</span>
		             </div>
		    </div>
		    <div class="col-md-6  sceenRight">
		        <div class="row">
		            <!--右上半部分:电影信息行-->
					<div class="media">
					  <div class="media-left">
					    <a href="#">
					      <img class="media-object" :src="filmInfo.filmImg" alt="..."  height="200px">
					    </a>
					  </div>
					  <div class="media-body">
					    <h4 class="media-heading">中文名:<strong>{{filmInfo.name}}</strong></h4>
						<h4 class="media-heading">英文名:<strong>{{filmInfo.nameEnglish}}</strong></h4>
						<p>剧情:{{filmInfo.storyType}}</p>
						<p>版本:{{filmInfo.copyType}}</p>
						<p>{{filmInfo.place}}/{{filmInfo.timeLength}}</p>
						<p>{{filmInfo.timeShow}}</p>
					  </div>
					</div>
		        </div>
		        <div class="row">
		             <!--右下半部分:影票购买信息行-->
					 <p>影院:<strong>{{filmInfo.ciname}}</strong></p>
					 <p>影厅:<strong>{{filmInfo.room}}</strong></p>
					 <p>场次:<strong>{{filmInfo.time}}</strong></p>
					 <p id="seatSelect">座位:<span v-for="(item,index) in curSeatDisp" :key="index">{{item}}</span></p>
					 <p>已选择<strong style="color: red;">{{count}}</strong>个座位,<strong style="color: red;">再次单击座位可取消。
					 <span v-if="maxFlag">您一次最多只能买五张票!</span></strong></p>
					 <hr>
					 <p>单价:<strong>{{filmInfo.unitPrice|numberFormat}}</strong></p>
					 <p>总价:<strong style="color: red;">{{totalPrice|numberFormat}}</strong></p>
					 <hr>
					 <button type="button" class="btn btn-success" style="margin: 0 200px;"
					 @click="filmSubmit">确认信息,下单</button>
		        </div>
		    </div>
		  </div>
		</div>
		<script>
		Vue.filter('numberFormat',function(value){
			return '¥'+value.toFixed(2)
		})
		var vm=new  Vue({
			el:'#app',
			data:{
				curSeat:[],//选中座位数组
				curSeatDisp:[],//选中座位展示数组
				count:0,//当前已选中票的个数
				maxLength:5,//一次最多可购买的张数
				maxFlag:false,//是否允许再选择票数
				seatCol:10,//一行的座位列数,当前是10列
				seatflag:[
				     0, 0, 0, 0, 0, 0, 0, 0, 0, 0,
				     0, 0, 0, 0, 0, 0, 0, 0, 0, 0,
				     0, 0, 0, 0, 0, 0, 0, 0, 0, 0,
				     0, 0, 0, 0, 0, 0, 0, 0, 0, 0,
				     0, 0, 0, 0, 0, 0, 0, 0, 0, 0,
				     0, 0, 0, 0, 0, 0, 0, 0, 0, 0,
				     0, 0, 0, 0, 0, 0, 0, 0, 0, 0,
				     0, 0, 0, 0, 0, 0, 0, 0, 0, 0,
				     0, 0, 0, 0, 2, 2, 0, 0, 0, 0,
				     0, 0, 0, 2, 2, 0, 2, 2, 0, 0,
				     -1, 0, 0, 0, 0, 0, 0, 0, 0, -1,
				     -1, -1, 0, 0, 0, 0, 0, 0, -1, -1,
				],
				filmInfo:{
					name:'长津湖',
					nameEnglish:'The Battle at Lake Changjin',
					copyRight:'中文2D',
					filmImg:'img/1.png',
					storyType:'历史、战争',
					place:'中国大陆',
					timeLength:'176 分钟',
					timeShow:'2021年9月30日',
					cinema:'万达影城',
					room:'1号影厅',
					time:'2021年9月30日  20:00',
					unitPrice:38,
				}
			},
			computed:{
				totalPrice:function(){
					return this.count * this.filmInfo.unitPrice;
				}
			},
			methods:{
				handleClick:function(index){
					if (vm.seatflag[index]==1){
						vm.$set(vm.seatflag,index,0);
						//console.log(this.curSeat.findIndex(item=>item.id===index));
						this.curSeat.splice(this.curSeat.findIndex(item=>item===index),1);
					}
					else
					if (vm.seatflag[index]==0 && this.count<5){
						vm.$set(vm.seatflag,index,1);
						this.curSeat.push(index);
					}
					//设置当前选中的座位
					this.curSeatDisp=[];
					for(let item of this.curSeat){
						this.curSeatDisp.push((Math.floor(item/this.seatCol)+1)+"行"+(item%this.seatCol+1)+"列");
					}
					//计数已经选择了多少个座位
					var mySeat=vm.seatflag.filter(item=>{//item为数组当前的元素
						return item==1;
					})
					this.count=mySeat.length;
					//判断达到购买上限,设置数据maxFlag,并显示提示语句,并显示提示语句“您一次最多仅能买五张票”
					if (this.count>=5)this.maxFlag=true;
					else this.maxFlag=false;
				}
			}
		})
		</script>
	</body>
</html>
图片:

谢谢大家,请多多支持!
设置:狂欢ruby1.9.2高线(1.6.13)描述:我已经相当习惯在其他一些项目中使用highline,但已经有几个月没有使用它了。现在,在Ruby1.9.2上全新安装时,它似乎不允许在同一行回答提示。所以以前我会看到类似的东西:require"highline/import"ask"Whatisyourfavoritecolor?"并得到:Whatisyourfavoritecolor?|现在我看到类似的东西:Whatisyourfavoritecolor?|竖线(|)符号是我的终端光标。知道为什么会发生这种变化吗? 最佳答案
我在我的Rails项目中使用Pow和powifygem。现在我尝试升级我的ruby版本(从1.9.3到2.0.0,我使用RVM)当我切换ruby版本、安装所有gem依赖项时,我通过运行railss并访问localhost:3000确保该应用程序正常运行以前,我通过使用pow访问http://my_app.dev来浏览我的应用程序。升级后,由于错误Bundler::RubyVersionMismatch:YourRubyversionis1.9.3,butyourGemfilespecified2.0.0,此url不起作用我尝试过的:重新创建pow应用程序重启pow服务器更新战俘
HashMap中为什么引入红黑树,而不是AVL树呢1.概述开始学习这个知识点之前我们需要知道,在JDK1.8以及之前,针对HashMap有什么不同。JDK1.7的时候,HashMap的底层实现是数组+链表JDK1.8的时候,HashMap的底层实现是数组+链表+红黑树我们要思考一个问题,为什么要从链表转为红黑树呢。首先先让我们了解下链表有什么不好???2.链表上述的截图其实就是链表的结构,我们来看下链表的增删改查的时间复杂度增:因为链表不是线性结构,所以每次添加的时候,只需要移动一个节点,所以可以理解为复杂度是N(1)删:算法时间复杂度跟增保持一致查:既然是非线性结构,所以查询某一个节点的时候
Unity自动旋转动画1.开门需要门把手先动,门再动2.关门需要门先动,门把手再动3.中途播放过程中不可以再次进行操作觉得太复杂?查看我的文章开关门简易进阶版效果:如果这个门可以直接打开的话,就不需要放置"门把手"如果门把手还有钥匙需要旋转,那就可以把钥匙放在门把手的"门把手",理论上是可以无限套娃的可调整参数有:角度,反向,轴向,速度运行时点击Test进行测试自己写的代码比较垃圾,命名与结构比较拉,高手轻点喷,新手有类似的需求可以拿去做参考上代码usingSystem.Collections;usingSystem.Collections.Generic;usingUnityEngine;u
动漫制作技巧是很多新人想了解的问题,今天小编就来解答与大家分享一下动漫制作流程,为了帮助有兴趣的同学理解,大多数人会选择动漫培训机构,那么今天小编就带大家来看看动漫制作要掌握哪些技巧?一、动漫作品首先完成草图设计和原型制作。设计草图要有目的、有对象、有步骤、要形象、要简单、符合实际。设计图要一致性,以保证制作的顺利进行。二、原型制作是根据设计图纸和制作材料,可以是手绘也可以是3d软件创建。在此步骤中,要注意的问题是色彩和平面布局。三、动漫制作制作完成后,加工成型。完成不同的表现形式后,就要对设计稿进行加工处理,使加工的难易度降低,并得到一些基本准确的概念,以便于后续的大样、准确的尺寸制定。四、
我遇到了一个非常奇怪的问题,我很难解决。在我看来,我有一个与data-remote="true"和data-method="delete"的链接。当我单击该链接时,我可以看到对我的Rails服务器的DELETE请求。返回的JS代码会更改此链接的属性,其中包括href和data-method。再次单击此链接后,我的服务器收到了对新href的请求,但使用的是旧的data-method,即使我已将其从DELETE到POST(它仍然发送一个DELETE请求)。但是,如果我刷新页面,HTML与"new"HTML相同(随返回的JS发生变化),但它实际上发送了正确的请求类型。这就是这个问题令我困惑的
如果names为nil,则以下中断。我怎样才能让这个map只有在它不是nil时才执行?self.topics=names.split(",").mapdo|n|Topic.where(name:n.strip).first_or_create!end 最佳答案 其他几个选项:选项1(在其上执行map时检查split的结果):names_list=names.try(:split,",")self.topics=names_list.mapdo|n|Topic.where(name:n.strip).first_or_create!e
我有可变数量的表格和可变数量的行,我想让它们一个接一个地显示,但如果表格不适合当前页面,请将其放在下一页,然后继续。我已将表格放入事务中,以便我可以回滚然后打印它(如果高度适合当前页面),但我如何获得表格高度?我现在有这段代码pdf.transactiondopdf.table@data,:font_size=>12,:border_style=>:grid,:horizontal_padding=>10,:vertical_padding=>3,:border_width=>2,:position=>:left,:row_colors=>["FFFFFF","DDDDDD"]pdf.
什么是测试格式验证的最佳方法让我们说一个用户名,使用字母数字的正则表达式,但不是纯数字?我一直在我的模型中使用以下验证validates:username,:format=>{:with=>/^[a-z0-9]+[-a-z0-9]*[a-z0-9]+$/i}数字用户名(例如“342”)通过了验证,这是我不想要的。 最佳答案 您想“向前看”一封信:/\A(?=.*[a-z])[a-z\d]+\Z/i 关于ruby-on-rails-Rails格式验证——字母数字,但不是纯数字,我们在Sta
我要下载http://foobar.com/song.mp3作为song.mp3,而不是让Chrome在其native中打开它浏览器中的播放器。我怎样才能做到这一点? 最佳答案 您只需要确保发送这些header:Content-Disposition:attachment;filename=song.mp3;Content-Type:application/octet-streamContent-Transfer-Encoding:binarysend_file方法为您完成:get'/:file'do|file|file=File.