目录
TFT 一般指薄膜晶体管。 薄膜晶体管(Thin Film Transistor,简称TFT)是一种器件。
ZJY154T-PG04厚.pdf
ST7789VW芯片手册.pdf
(见资料下载处)
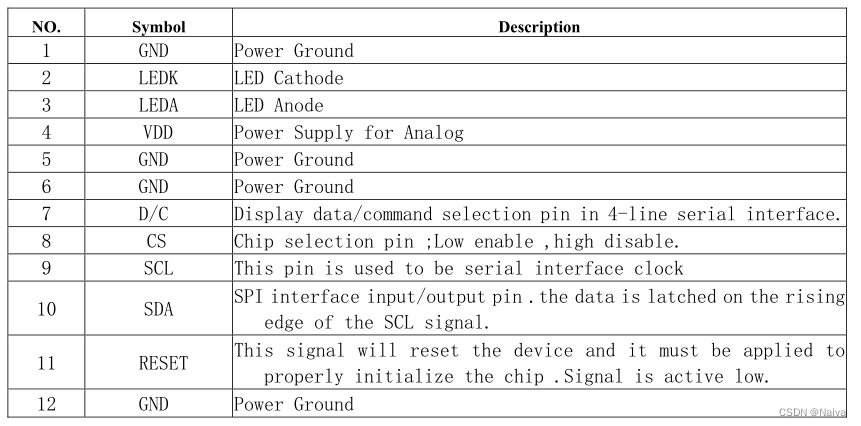
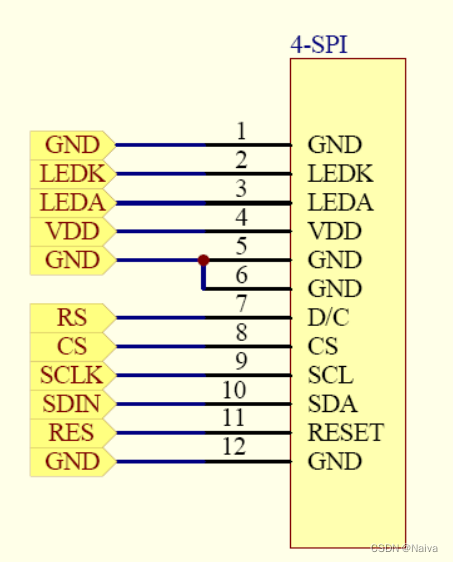
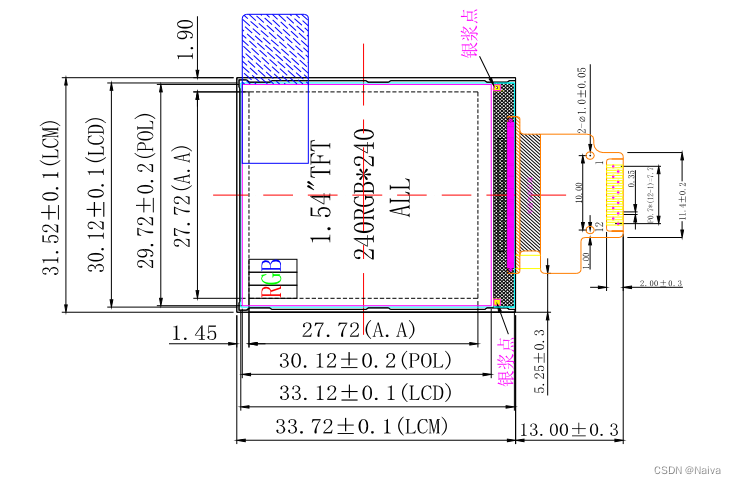
ST7789屏幕驱动电路图
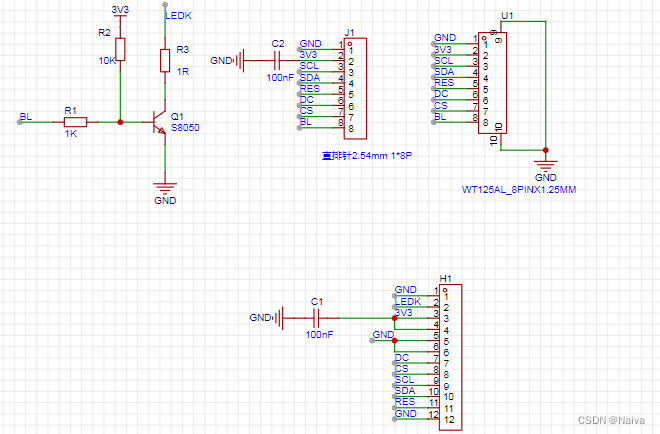
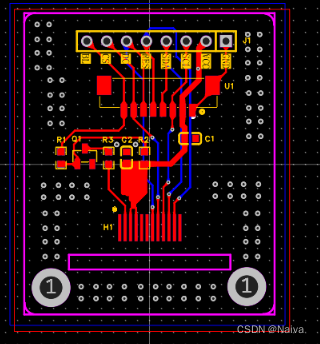
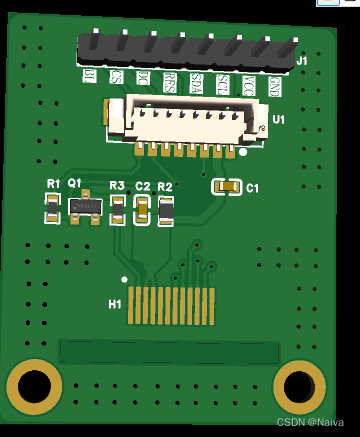
参考:ESP32 入门笔记01:乐鑫ESP32-DevKitC开发板信息、开发环境搭建以及学资料准备
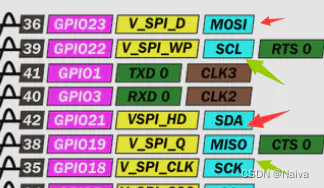
/***************************************************
  1.3TFT  ST7789 IPS SPI display.
  接线
 TFT_DC    15
 TFT_RST   17
 TFT_SDA   23
 TFT_SCL   18
 GND
 VCC   5V/3.3V 都行
 BLK   不用接
 ****************************************************/

#include <Adafruit_GFX.h>    // Core graphics library by Adafruit
#include <Arduino_ST7789.h> // Hardware-specific library for ST7789 (with or without CS pin)
#include <SPI.h>

#define TFT_DC    15
#define TFT_RST   17
#define TFT_CS    4   // only for displays with CS pin
#define TFT_MOSI  23   // for hardware SPI data pin (all of available pins)
#define TFT_SCLK  18   // for hardware SPI sclk pin (all of available pins)

//You can use different type of hardware initialization
//using hardware SPI (11, 13 on UNO; 51, 52 on MEGA; ICSP-4, ICSP-3 on DUE and etc)
//Arduino_ST7789 tft = Arduino_ST7789(TFT_DC, TFT_RST); //for display without CS pin
//Arduino_ST7789 tft = Arduino_ST7789(TFT_DC, TFT_RST, TFT_CS); //for display with CS pin
//or you can use software SPI on all available pins (slow)
Arduino_ST7789 tft = Arduino_ST7789(TFT_DC, TFT_RST, TFT_MOSI, TFT_SCLK); //for display without CS pin
//Arduino_ST7789 tft = Arduino_ST7789(TFT_DC, TFT_RST, TFT_MOSI, TFT_SCLK, TFT_CS); //for display with CS pin

float p = 3.1415926;

void setup(void) {
  Serial.begin(9600);
  Serial.print("Hello! ST7789 TFT Test");

  tft.init(240, 240);   // initialize a ST7789 chip, 240x240 pixels

  Serial.println("Initialized");

  /*9uint16_t time = millis();
  tft.fillScreen(BLACK);
  time = millis() - time;

  /*Serial.println(time, DEC);
  delay(500);

  // large block of text
  tft.fillScreen(BLACK);
  testdrawtext("Lorem ipsum dolor sit amet, consectetur adipiscing elit. Curabitur adipiscing ante sed nibh tincidunt feugiat. Maecenas enim massa, fringilla sed malesuada et, malesuada sit amet turpis. Sed porttitor neque ut ante pretium vitae malesuada nunc bibendum. Nullam aliquet ultrices massa eu hendrerit. Ut sed nisi lorem. In vestibulum purus a tortor imperdiet posuere. ", WHITE);
  delay(1000);

  // tft print function
  tftPrintTest();
  delay(4000);

  // a single pixel
  tft.drawPixel(tft.width()/2, tft.height()/2, GREEN);
  delay(500);

  // line draw test
  testlines(YELLOW);
  delay(500);

  // optimized lines
  testfastlines(RED, BLUE);
  delay(500);

  testdrawrects(GREEN);
  delay(500);

  testfillrects(YELLOW, MAGENTA);
  delay(500);

  tft.fillScreen(BLACK);
  testfillcircles(10, BLUE);
  testdrawcircles(10, WHITE);
  delay(500);

  testroundrects();
  delay(500);

  testtriangles();
  delay(500);*/

  /*mediabuttons();
  delay(500);

  Serial.println("done");
  delay(1000);*/
}

void loop() {

  //tft.fillScreen(BLACK);
  testfillcircles(10, BLUE);
  testdrawcircles(10, WHITE);
  testfillrects(YELLOW, MAGENTA);
  delay(500);
  tft.invertDisplay(true);
  delay(500);
  tft.invertDisplay(false);
  delay(500);
  tftPrintTest();
  delay(500);
  mediabuttons();
  delay(500);
}

void testlines(uint16_t color) {
  tft.fillScreen(BLACK);
  for (int16_t x=0; x < tft.width(); x+=6) {
    tft.drawLine(0, 0, x, tft.height()-1, color);
  }
  for (int16_t y=0; y < tft.height(); y+=6) {
    tft.drawLine(0, 0, tft.width()-1, y, color);
  }

  tft.fillScreen(BLACK);
  for (int16_t x=0; x < tft.width(); x+=6) {
    tft.drawLine(tft.width()-1, 0, x, tft.height()-1, color);
  }
  for (int16_t y=0; y < tft.height(); y+=6) {
    tft.drawLine(tft.width()-1, 0, 0, y, color);
  }

  tft.fillScreen(BLACK);
  for (int16_t x=0; x < tft.width(); x+=6) {
    tft.drawLine(0, tft.height()-1, x, 0, color);
  }
  for (int16_t y=0; y < tft.height(); y+=6) {
    tft.drawLine(0, tft.height()-1, tft.width()-1, y, color);
  }

  tft.fillScreen(BLACK);
  for (int16_t x=0; x < tft.width(); x+=6) {
    tft.drawLine(tft.width()-1, tft.height()-1, x, 0, color);
  }
  for (int16_t y=0; y < tft.height(); y+=6) {
    tft.drawLine(tft.width()-1, tft.height()-1, 0, y, color);
  }
}

void testdrawtext(char *text, uint16_t color) {
  tft.setCursor(0, 0);
  tft.setTextColor(color);
  tft.setTextWrap(true);
  tft.print(text);
}

void testfastlines(uint16_t color1, uint16_t color2) {
  tft.fillScreen(BLACK);
  for (int16_t y=0; y < tft.height(); y+=5) {
    tft.drawFastHLine(0, y, tft.width(), color1);
  }
  for (int16_t x=0; x < tft.width(); x+=5) {
    tft.drawFastVLine(x, 0, tft.height(), color2);
  }
}

void testdrawrects(uint16_t color) {
  tft.fillScreen(BLACK);
  for (int16_t x=0; x < tft.width(); x+=6) {
    tft.drawRect(tft.width()/2 -x/2, tft.height()/2 -x/2 , x, x, color);
  }
}

void testfillrects(uint16_t color1, uint16_t color2) {
  tft.fillScreen(BLACK);
  for (int16_t x=tft.width()-1; x > 6; x-=6) {
    tft.fillRect(tft.width()/2 -x/2, tft.height()/2 -x/2 , x, x, color1);
    tft.drawRect(tft.width()/2 -x/2, tft.height()/2 -x/2 , x, x, color2);
  }
}

void testfillcircles(uint8_t radius, uint16_t color) {
  for (int16_t x=radius; x < tft.width(); x+=radius*2) {
    for (int16_t y=radius; y < tft.height(); y+=radius*2) {
      tft.fillCircle(x, y, radius, color);
    }
  }
}

void testdrawcircles(uint8_t radius, uint16_t color) {
  for (int16_t x=0; x < tft.width()+radius; x+=radius*2) {
    for (int16_t y=0; y < tft.height()+radius; y+=radius*2) {
      tft.drawCircle(x, y, radius, color);
    }
  }
}

void testtriangles() {
  tft.fillScreen(BLACK);
  int color = 0xF800;
  int t;
  int w = tft.width()/2;
  int x = tft.height()-1;
  int y = 0;
  int z = tft.width();
  for(t = 0 ; t <= 15; t++) {
    tft.drawTriangle(w, y, y, x, z, x, color);
    x-=4;
    y+=4;
    z-=4;
    color+=100;
  }
}

void testroundrects() {
  tft.fillScreen(BLACK);
  int color = 100;
  int i;
  int t;
  for(t = 0 ; t <= 4; t+=1) {
    int x = 0;
    int y = 0;
    int w = tft.width()-2;
    int h = tft.height()-2;
    for(i = 0 ; i <= 16; i+=1) {
      tft.drawRoundRect(x, y, w, h, 5, color);
      x+=2;
      y+=3;
      w-=4;
      h-=6;
      color+=1100;
    }
    color+=100;
  }
}

void tftPrintTest() {
  tft.setTextWrap(false);
  tft.fillScreen(BLACK);
  tft.setCursor(0, 30);
  tft.setTextColor(RED);
  tft.setTextSize(1);
  tft.println("Hello World!");
  tft.setTextColor(YELLOW);
  tft.setTextSize(2);
  tft.println("Hello World!");
  tft.setTextColor(GREEN);
  tft.setTextSize(3);
  tft.println("Hello World!");
  tft.setTextColor(BLUE);
  tft.setTextSize(4);
  tft.print(1234.567);
  delay(1500);
  tft.setCursor(0, 0);
  tft.fillScreen(BLACK);
  tft.setTextColor(WHITE);
  tft.setTextSize(0);
  tft.println("Hello World!");
  tft.setTextSize(1);
  tft.setTextColor(GREEN);
  tft.print(p, 6);
  tft.println(" Want pi?");
  tft.println(" ");
  tft.print(8675309, HEX); // print 8,675,309 out in HEX!
  tft.println(" Print HEX!");
  tft.println(" ");
  tft.setTextColor(WHITE);
  tft.println("Sketch has been");
  tft.println("running for: ");
  tft.setTextColor(MAGENTA);
  tft.print(millis() / 1000);
  tft.setTextColor(WHITE);
  tft.print(" seconds.");
}

void mediabuttons() {
  // play
  tft.fillScreen(BLACK);
  tft.fillRoundRect(25, 10, 78, 60, 8, WHITE);
  tft.fillTriangle(42, 20, 42, 60, 90, 40, RED);
  delay(500);
  // pause
  tft.fillRoundRect(25, 90, 78, 60, 8, WHITE);
  tft.fillRoundRect(39, 98, 20, 45, 5, GREEN);
  tft.fillRoundRect(69, 98, 20, 45, 5, GREEN);
  delay(500);
  // play color
  tft.fillTriangle(42, 20, 42, 60, 90, 40, BLUE);
  delay(50);
  // pause color
  tft.fillRoundRect(39, 98, 20, 45, 5, RED);
  tft.fillRoundRect(69, 98, 20, 45, 5, RED);
  // play color
  tft.fillTriangle(42, 20, 42, 60, 90, 40, GREEN);
}
参考:使用DOIT ESP32 DEVKIT V1驱动屏幕ST7789
配置TFT_eSPI,作者分了4个部分。
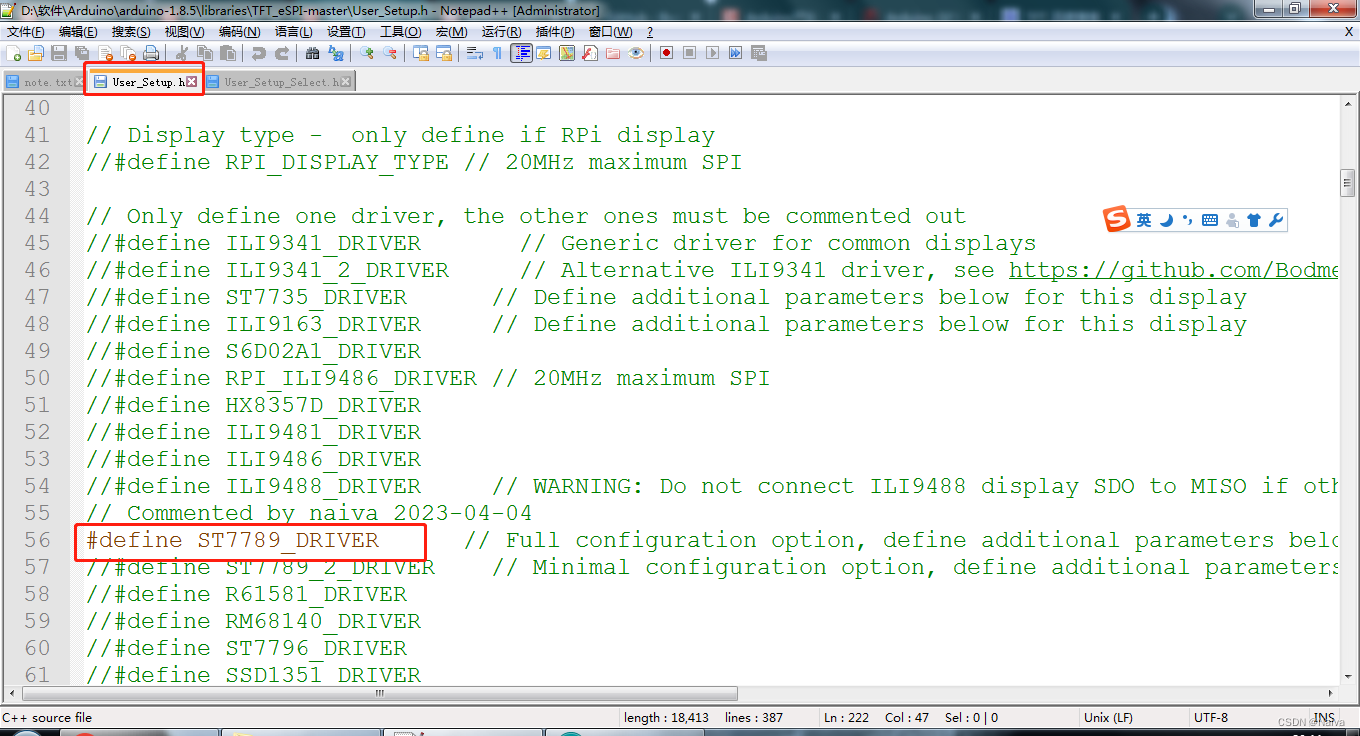
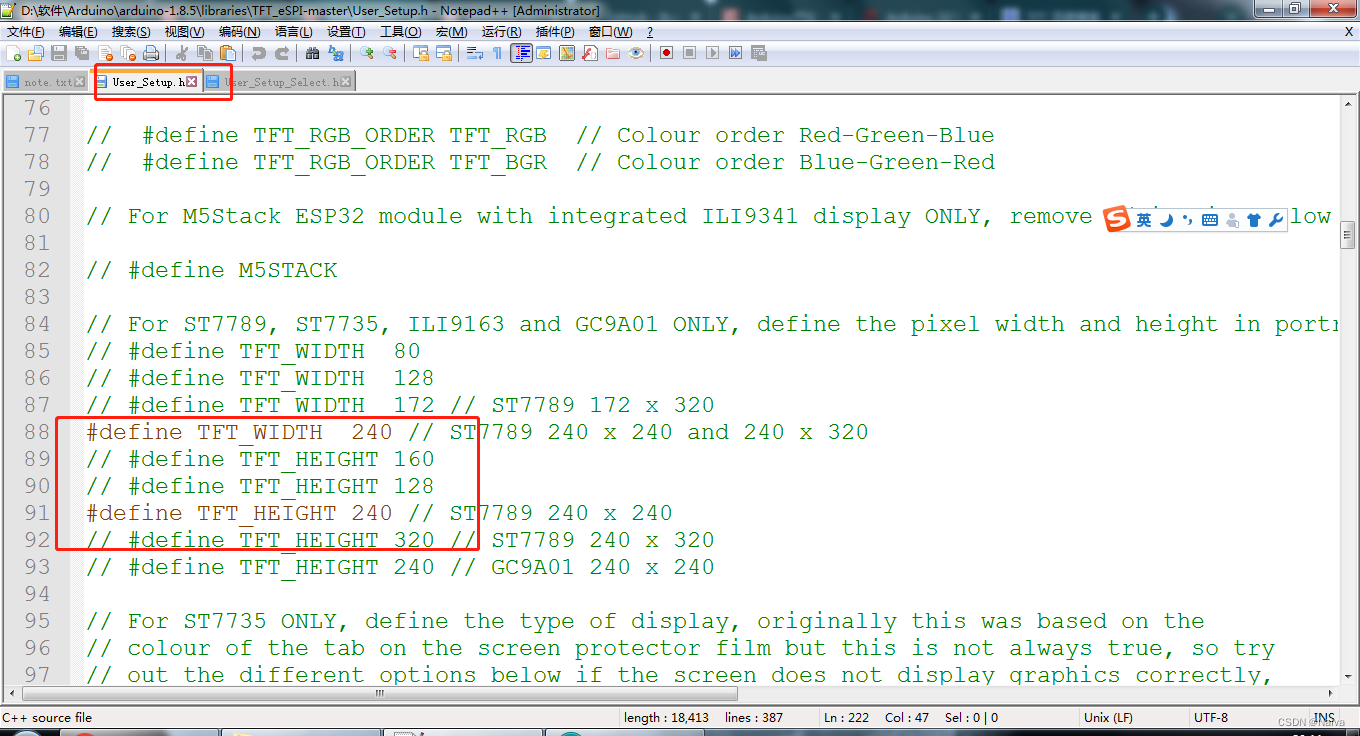
非常重要,之前一直没有点亮屏幕而改用Adafruit库,就是因为引脚定义的问题。
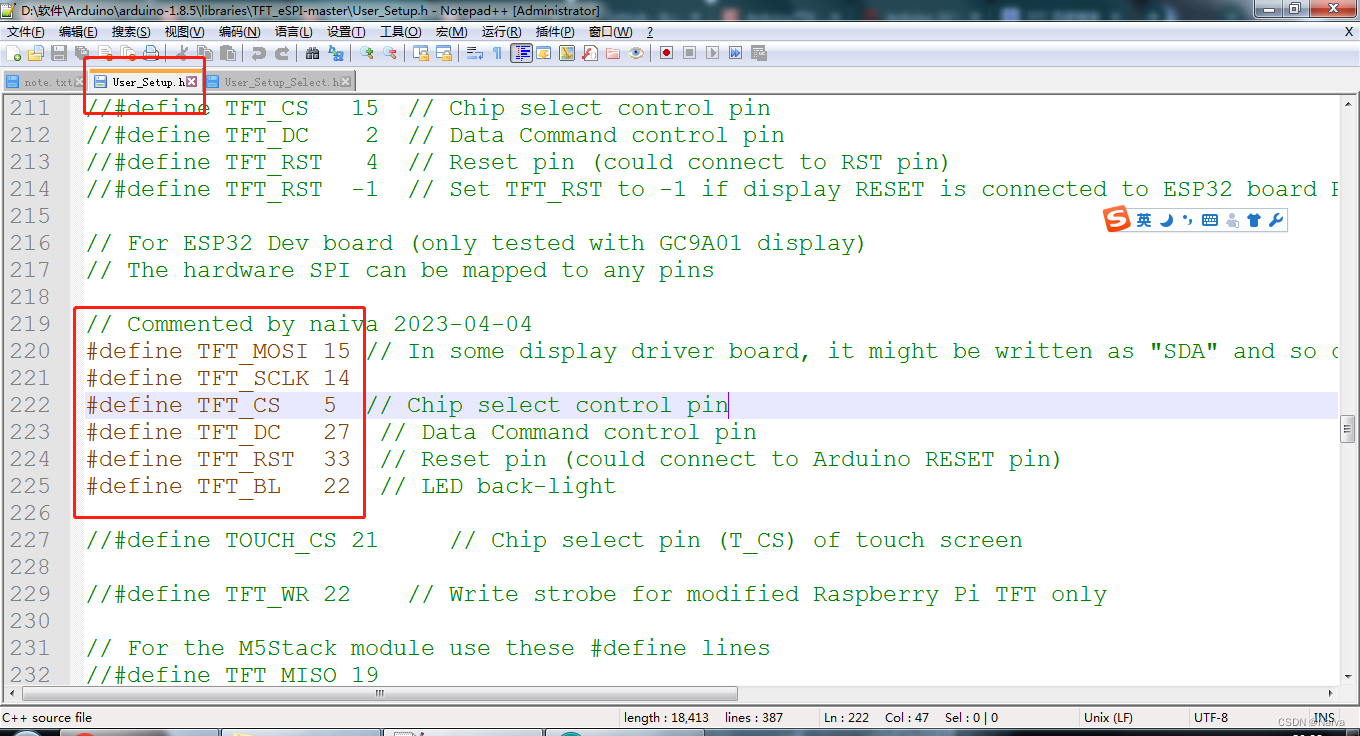
// TFT官方配置
#define TFT_MOSI 15 // In some display driver board, it might be written as "SDA" and so on.
#define TFT_SCLK 14
#define TFT_CS   5  // Chip select control pin
#define TFT_DC   27  // Data Command control pin
#define TFT_RST  33  // Reset pin (could connect to Arduino RESET pin)
#define TFT_BL   22  // LED back-light

//配置1,完全按照引脚图来配置
#define TFT_MOSI 21
#define TFT_SCLK 22
#define TFT_DC   4
#define TFT_RST  23
//#define TFT_CS   34  // 没有CS引脚
//#define TFT_BL   35  // 背光不需要设置

//配置2,根据官方使用修改而来
#define TFT_MOSI 5   //官方使用15,对应HSPI CS0引脚,这里用VSPI CS0,其中V指virtual
#define TFT_SCLK 18  //官方使用14,对应HSPI CLK,这里用VSPI CLK
#define TFT_DC   4
#define TFT_RST  22
//#define TFT_CS   34  // 没有CS引脚
//#define TFT_BL   35  // 背光不需要设置
没特别的需求就别动配置,关掉某些字体可以节省存储空间。

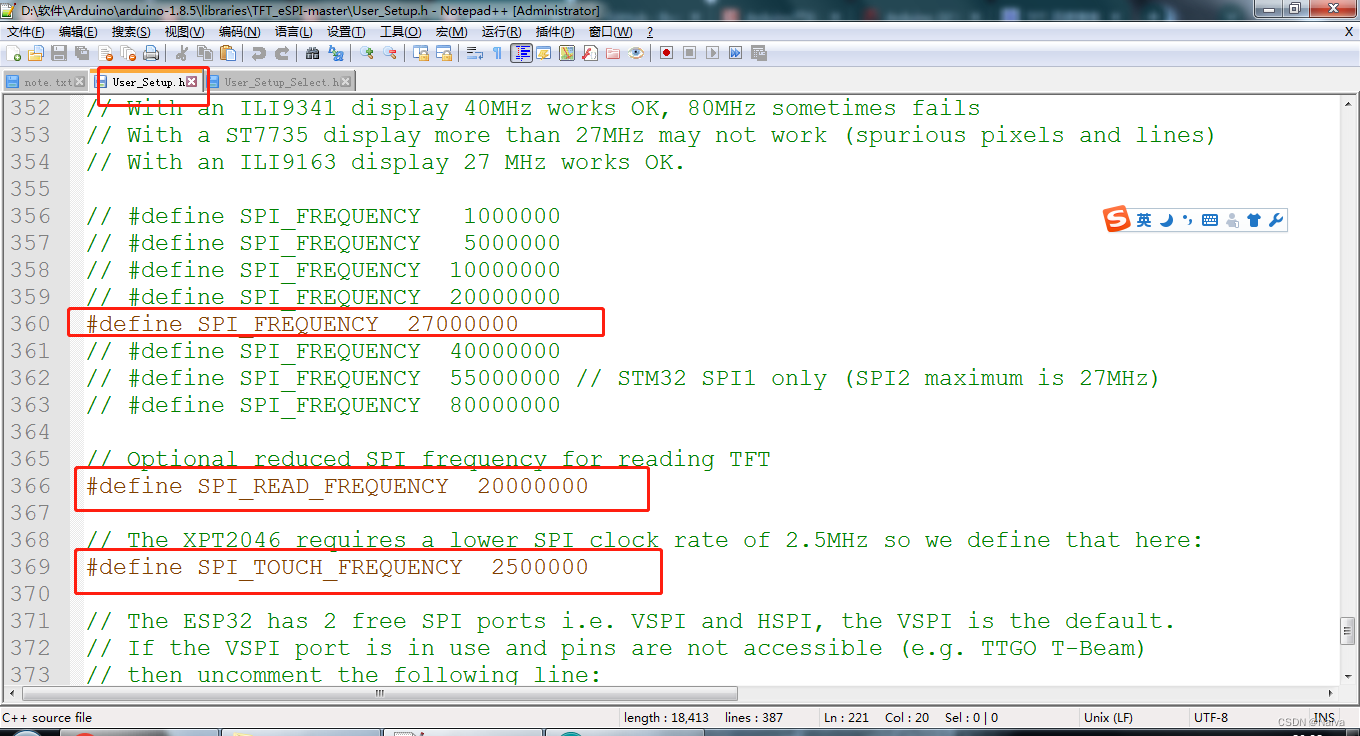
主要是控制SPI协议的频率,没事别动
参考资料:
main.c
#include <TFT_eSPI.h>
#include <SPI.h>
#include <Wire.h>
#include "bmp.h"

#ifndef TFT_DISPOFF
#define TFT_DISPOFF 0x28
#endif

#ifndef TFT_SLPIN
#define TFT_SLPIN   0x10
#endif

TFT_eSPI tft = TFT_eSPI(240, 240); // Invoke custom library

void showImage(int32_t x, int32_t y, int32_t w, int32_t h, const uint16_t *data);

void setup()
{
    Serial.begin(9600);
    Serial.println("Start");
    tft.init();
  // 设置屏幕显示的旋转角度,参数为:0, 1, 2, 3
    tft.setRotation(2); // 分别代表 0°、90°、180°、270°
    tft.fillScreen(TFT_BLACK);// //屏幕填充颜色,如果没有设置,没有显示的区域会发现花屏
    tft.setTextSize(2);
    tft.setTextColor(TFT_MAGENTA);
    tft.setCursor(0, 0);
    tft.setTextDatum(MC_DATUM);
    tft.setTextSize(1);

    if (TFT_BL > 0) { // TFT_BL has been set in the TFT_eSPI library in the User Setup file TTGO_T_Display.h
         //显示屏背光
      ledcSetup(10, 5000/*freq*/, 10 /*resolution*/);//信号频率 5000 Hz  占空比分辨率 10位
      ledcAttachPin(TFT_BL, 10);// LEDC_CHANNEL_10
      analogReadResolution(10);
      ledcWrite(10,1023); // //  1023 = 2 ^ 10 - 1
    }
}

void loop()
{
//    tft.fillScreen(TFT_WHITE);
//    tft.setSwapBytes(true);
    showImage(0, 0,  240, 160, bmp1);
//    delay(1000);
}

#define PI_BUF_SIZE 128
void showImage(int32_t x, int32_t y, int32_t w, int32_t h, const uint16_t *data){
  int32_t dx = 0;
  int32_t dy = 0;
  int32_t dw = w;
  int32_t dh = h*2;

  if (x < 0) { dw += x; dx = -x; x = 0; }
  if (y < 0) { dh += y; dy = -y; y = 0; }

  if (dw < 1 || dh < 1) return;

  CS_L;

  data += dx + dy * w;

  uint16_t  buffer[PI_BUF_SIZE];
  uint16_t* pix_buffer = buffer;
  uint16_t  high,low;

  tft.setWindow(x, y, x + dw - 1, y + dh - 1);

  // Work out the number whole buffers to send
  uint16_t nb = (dw * dh) / (2 * PI_BUF_SIZE);

  // Fill and send "nb" buffers to TFT
  for (int32_t i = 0; i < nb; i++) {
    for (int32_t j = 0; j < PI_BUF_SIZE; j++) {
      high = pgm_read_word(&data[(i * 2 * PI_BUF_SIZE) + 2 * j + 1]);
      low = pgm_read_word(&data[(i * 2 * PI_BUF_SIZE) + 2 * j ]);
      pix_buffer[j] = (high<<8)+low;
    }
    tft.pushPixels(pix_buffer, PI_BUF_SIZE);
  }

  // Work out number of pixels not yet sent
  uint16_t np = (dw * dh) % (2 * PI_BUF_SIZE);

  // Send any partial buffer left over
  if (np) {
    for (int32_t i = 0; i < np; i++)
    {
      high = pgm_read_word(&data[(nb * 2 * PI_BUF_SIZE) + 2 * i + 1]);
      low = pgm_read_word(&data[(nb * 2 * PI_BUF_SIZE) + 2 * i ]);
      pix_buffer[i] = (high<<8)+low;
    }
    tft.pushPixels(pix_buffer, np);
  }

  CS_H;
}
LCD全彩图片时取模软件 Image2Lcd 2.9(破解版)。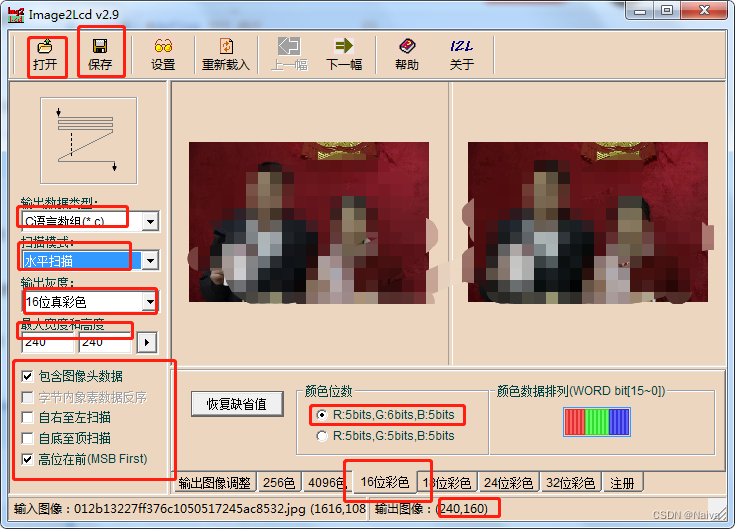
bmp.h
const unsigned short bmp1[] PROGMEM = { 0X10,0X10,0X00,0XF0,0X00,0XA0,0X01,0X1B,};
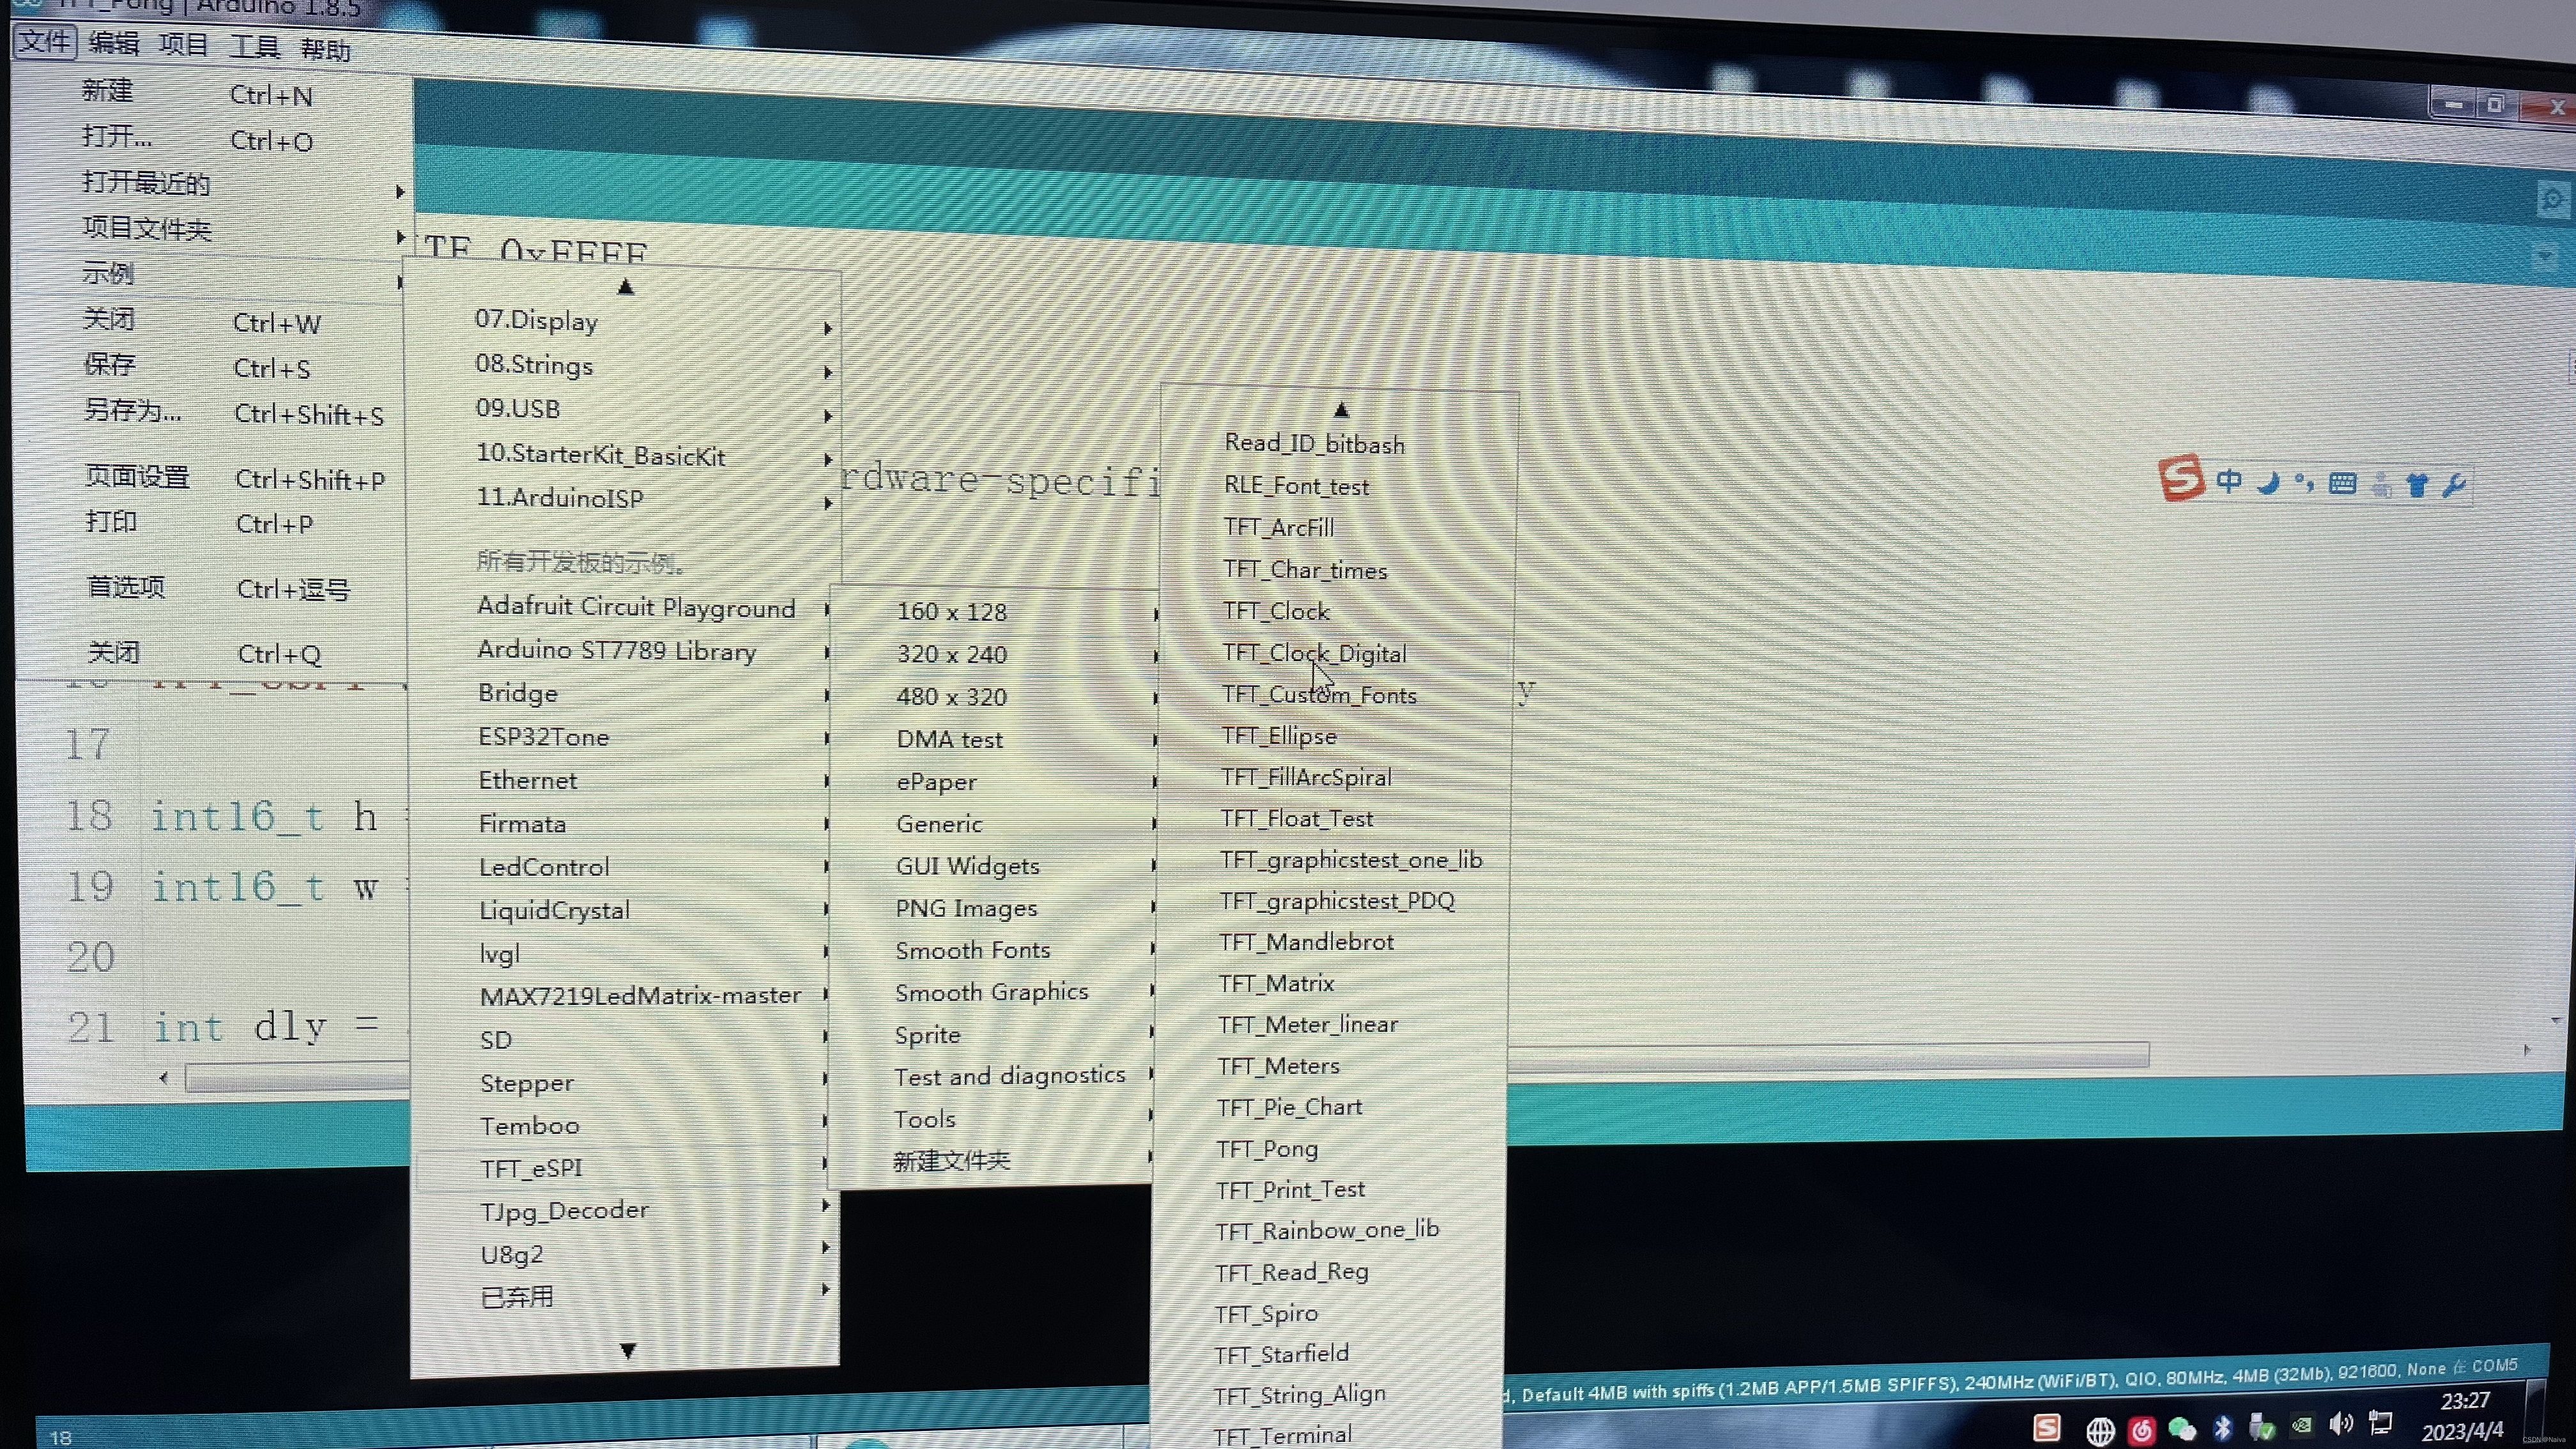
在【文件】-【示例】-【TFT_eSPI】-【320x240】中找一个示例程序演示。
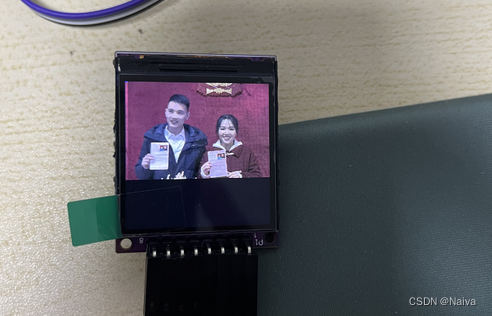
ESP32 驱动ST7789液晶屏效果展示
目录前言滤波电路科普主要分类实际情况单位的概念常用评价参数函数型滤波器简单分析滤波电路构成低通滤波器RC低通滤波器RL低通滤波器高通滤波器RC高通滤波器RL高通滤波器部分摘自《LC滤波器设计与制作》,侵权删。前言最近需要学习放大电路和滤波电路,但是由于只在之前做音乐频谱分析仪的时候简单了解过一点点运放,所以也是相当从零开始学习了。滤波电路科普主要分类滤波器:主要是从不同频率的成分中提取出特定频率的信号。有源滤波器:由RC元件与运算放大器组成的滤波器。可滤除某一次或多次谐波,最普通易于采用的无源滤波器结构是将电感与电容串联,可对主要次谐波(3、5、7)构成低阻抗旁路。无源滤波器:无源滤波器,又称
@作者:SYFStrive @博客首页:HomePage📜:微信小程序📌:个人社区(欢迎大佬们加入)👉:社区链接🔗📌:觉得文章不错可以点点关注👉:专栏连接🔗💃:感谢支持,学累了可以先看小段由小胖给大家带来的街舞👉微信小程序(🔥)目录自定义组件-behaviors 1、什么是behaviors 2、behaviors的工作方式 3、创建behavior 4、导入并使用behavior 5、behavior中所有可用的节点 6、同名字段的覆盖和组合规则总结最后自定义组件-behaviors 1、什么是behaviorsbehaviors是小程序中,用于实现
遍历文件夹我们通常是使用递归进行操作,这种方式比较简单,也比较容易理解。本文为大家介绍另一种不使用递归的方式,由于没有使用递归,只用到了循环和集合,所以效率更高一些!一、使用递归遍历文件夹整体思路1、使用File封装初始目录,2、打印这个目录3、获取这个目录下所有的子文件和子目录的数组。4、遍历这个数组,取出每个File对象4-1、如果File是否是一个文件,打印4-2、否则就是一个目录,递归调用代码实现publicclassSearchFile{publicstaticvoidmain(String[]args){//初始目录Filedir=newFile("d:/Dev");Datebeg
ES一、简介1、ElasticStackES技术栈:ElasticSearch:存数据+搜索;QL;Kibana:Web可视化平台,分析。LogStash:日志收集,Log4j:产生日志;log.info(xxx)。。。。使用场景:metrics:指标监控…2、基本概念Index(索引)动词:保存(插入)名词:类似MySQL数据库,给数据Type(类型)已废弃,以前类似MySQL的表现在用索引对数据分类Document(文档)真正要保存的一个JSON数据{name:"tcx"}二、入门实战{"name":"DESKTOP-1TSVGKG","cluster_name":"elasticsear
文章目录1.任务背景2.任务目标3.相关知识点4.任务实操4.1安装配置JDK4.2启动FISCOBCOS4.3下载解压WeBASE-Front4.4拷贝sdk证书文件4.5启动节点4.6访问节点4.7检查运行状态5.任务总结1.任务背景FISCOBCOS其实是有控制台管理工具,用来对区块链系统进行各种管理操作。但是对于初学者来说,还是可视化界面更友好,本节就来介绍WeBASE管理平台,这是一款微众银行开源的自研区块链中间件平台,可以降低区块链使用的门槛,大幅提高区块链应用的开发效率。微众银行是腾讯牵头设立的民营银行,在国内民营银行里还是比较出名的。微众银行参与FISCOBCOS生态建设,一定
写在之前Shader变体、Shader属性定义技巧、自定义材质面板,这三个知识点任何一个单拿出来都是一套知识体系,不能一概而论,本文章目的在于将学习和实际工作中遇见的问题进行总结,类似于网络笔记之用,方便后续回顾查看,如有以偏概全、不祥不尽之处,还望海涵。1、Shader变体先看一段代码......Properties{ [KeywordEnum(on,off)]USL_USE_COL("IsUseColorMixTex?",int)=0 [Toggle(IS_RED_ON)]_IsRed("IsRed?",int)=0}......//中间省略,后续会有完整代码 #pragmamulti_c
TCL脚本语言简介•TCL(ToolCommandLanguage)是一种解释执行的脚本语言(ScriptingLanguage),它提供了通用的编程能力:支持变量、过程和控制结构;同时TCL还拥有一个功能强大的固有的核心命令集。TCL经常被用于快速原型开发,脚本编程,GUI和测试等方面。•实际上包含了两个部分:一个语言和一个库。首先,Tcl是一种简单的脚本语言,主要使用于发布命令给一些互交程序如文本编辑器、调试器和shell。由于TCL的解释器是用C\C++语言的过程库实现的,因此在某种意义上我们又可以把TCL看作C库,这个库中有丰富的用于扩展TCL命令的C\C++过程和函数,所以,Tcl是
文章目录一、项目场景二、基本模块原理与调试方法分析——信源部分:三、信号处理部分和显示部分:四、基本的通信链路搭建:四、特殊模块:interpretedMATLABfunction:五、总结和坑点提醒一、项目场景 最近一个任务是使用simulink搭建一个MIMO串扰消除的链路,并用实际收到的数据进行测试,在搭建的过程中也遇到了不少的问题(当然这比vivado里面的debug好不知道多少倍)。准备趁着这个机会,先以一个很基本的通信链路对simulink基础和相关的debug方法进行总结。 在本篇中,主要记录simulink的基本原理和基本的SISO通信传输链路(QPSK方式),计划在下篇记
目录一、ESP32简单介绍二、ESP32Wi-Fi模块介绍三、ESP32Wi-Fi编程模型四、ESP32Wi-Fi事件处理流程 五、ESP32Wi-Fi开发环境六、ESP32Wi-Fi具体代码七、ESP32Wi-Fi代码解读6.1主程序app_main7.2自定义代码wifi_init_sta()八、ESP32Wi-Fi连接验证8.1测试方法8.2服务器模拟工具sscom58.3测试代码8.4测试结果前言为了开发一款亚马逊物联网产品,开始入手ESP32模块。为了能够记录自己的学习过程,特记录如下操作过程。一、ESP32简单介绍ESP32是一套Wi-Fi(2.4GHz)和蓝牙(4.2)双模解决方
TCP是面向连接的协议,连接的建立和释放是每一次面向连接的通信中必不可少的过程。TCP连接的管理就是使连接的建立和释放都能正常地进行。三次握手TCP连接的建立—三次握手建立TCP连接①若主机A中运行了一个客户进程,当它需要主机B的服务时,就发起TCP连接请求,并在所发送的分段中用SYN=1表示连接请求,并产生一个随机发送序号x,如果连接成功,A将以x作为其发送序号的初始值:seq=x。主机B收到A的连接请求报文,就完成了第一次握手。客户端发送SYN=1表示连接请求客户端发送一个随机发送序号x,如果连接成功,A将以x作为其发送序号的初始值:seq=x②主机B如果同意建立连接,则向主机A发送确认报
