4个步骤
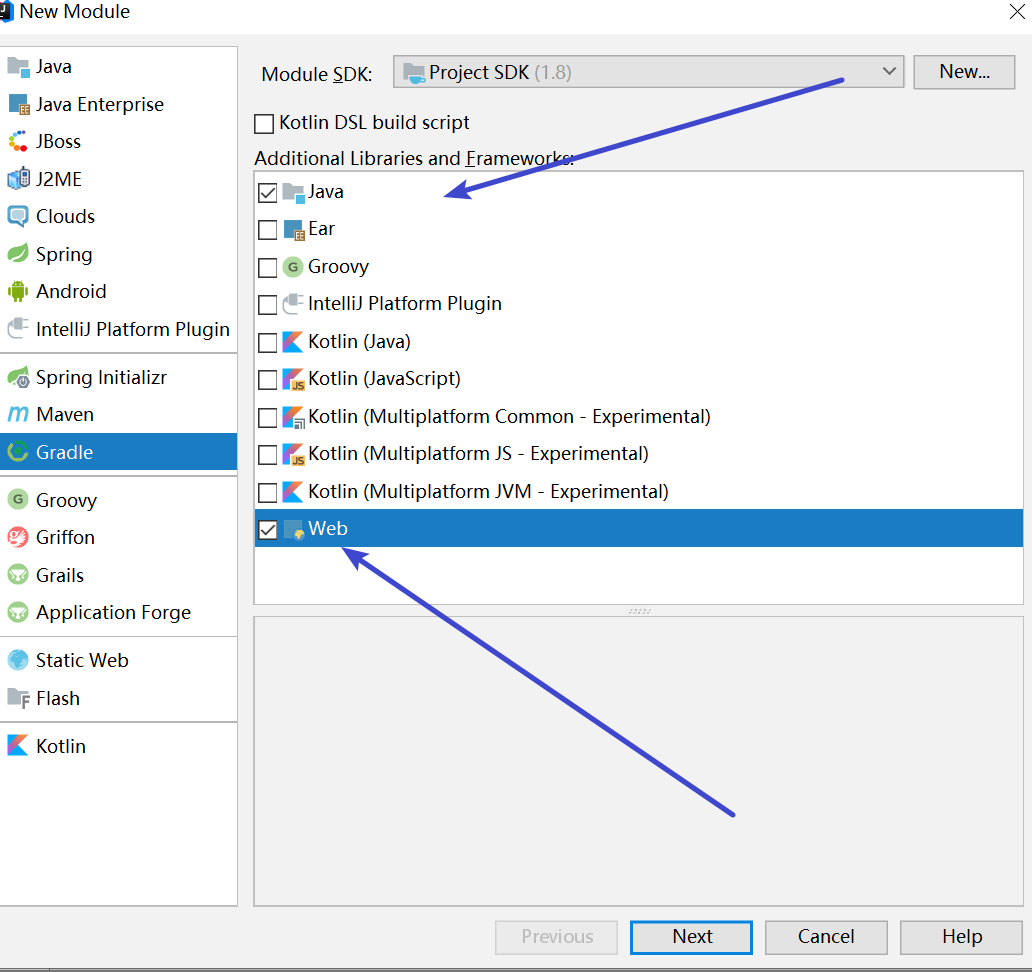
1、File-New-Module
选择java和web
2、填写包信息
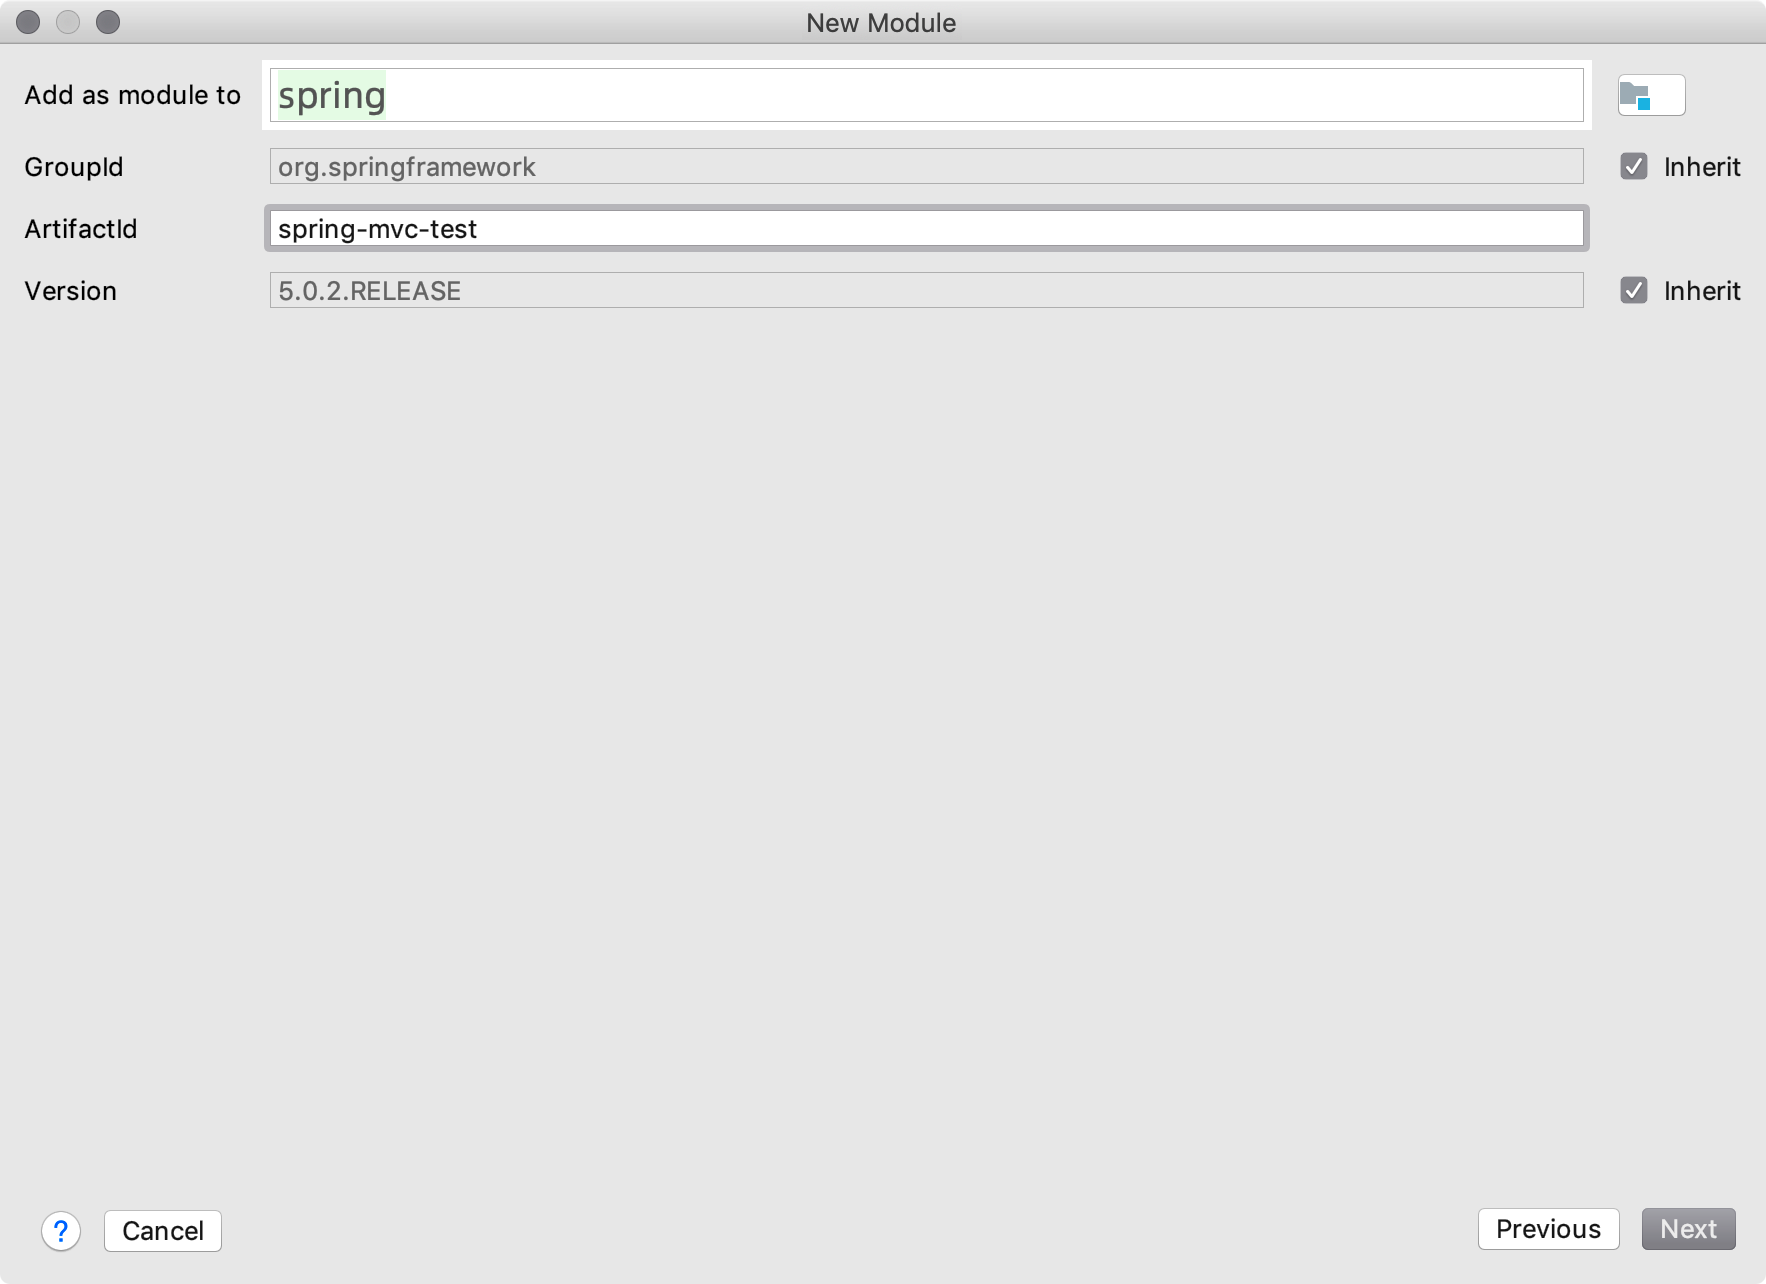
3、存储路径

依赖的项目,直接复制粘贴上去
1、对spring的依赖
2、对MVC的依赖
3、对Tomcat插件的依赖
build.gradle
group 'com.spring.test'
version '5.0.2.RELEASE'

apply plugin: 'java'
apply plugin: 'war'
apply plugin: 'com.bmuschko.tomcat' //tomcat: 插件
// tomcat: 以下配置会在第一次启动时下载插件二进制文件
//在项目根目录中执行gradle tomcatRun
buildscript {
    repositories {
        jcenter()
    }

    dependencies {
        classpath 'com.bmuschko:gradle-tomcat-plugin:2.5'
    }
}
// 配置阿里源
allprojects {
    repositories {
        maven{ url 'http://maven.aliyun.com/nexus/content/groups/public/'}
    }
}


dependencies {
    testCompile group: 'org.testng', name: 'testng', version: '6.14.3'
    runtime 'javax.servlet:jstl:1.1.2' // Servlet容器必需
    compile(project(':spring-context'))
    compile(project(':spring-web'))
    compile(project(':spring-webmvc'))

    // tomcat: 将Tomcat运行时库添加到配置tomcat中: (此处为Tomcat9)
    def tomcatVersion = '9.0.1'
    tomcat "org.apache.tomcat.embed:tomcat-embed-core:${tomcatVersion}",
            "org.apache.tomcat.embed:tomcat-embed-logging-juli:9.0.0.M6",
            "org.apache.tomcat.embed:tomcat-embed-jasper:${tomcatVersion}"
}

// tomcat: 一些协议设置(注意,这里必须加上,不然会抛tomcat的异常,仅限tomcat9)
tomcat {
    httpProtocol = 'org.apache.coyote.http11.Http11Nio2Protocol'
    ajpProtocol  = 'org.apache.coyote.ajp.AjpNio2Protocol'
}


// UTF-8
tasks.withType(JavaCompile) {
    options.encoding = "UTF-8"
}
前提:
增加WEB-INF目录和Web.xml
1、打开File - Proect Structrue
2、选中刚才的mvc项目,展开,选中web gradle , 到右边 点击加号
3、确认路径
spring-mvc-test\src\main\webapp\WEB-INF\web.xml
WEB-INF和xml创建完毕

webapp/WEB-INF/web.xml
<?xml version="1.0" encoding="UTF-8"?>
<web-app xmlns="http://xmlns.jcp.org/xml/ns/javaee"
         xmlns:xsi="http://www.w3.org/2001/XMLSchema-instance"
         xsi:schemaLocation="http://xmlns.jcp.org/xml/ns/javaee http://xmlns.jcp.org/xml/ns/javaee/web-app_4_0.xsd"
         version="4.0">

	<!-- Spring MVC配置 -->
	<servlet>
		<servlet-name>mvc</servlet-name>
		<servlet-class>org.springframework.web.servlet.DispatcherServlet</servlet-class>
		<init-param>
			<param-name>contextConfigLocation</param-name>
			<param-value>classpath:mvc-servlet.xml</param-value>
			<!--<param-value>/WEB-INF/mvc-servlet.xml</param-value>-->
		</init-param>
		<!-- load-on-startup元素标记容器是否在启动的时候就加载这个servlet(实例化并调用其init()方法) -->
		<load-on-startup>1</load-on-startup>
	</servlet>
	<servlet-mapping>
		<servlet-name>mvc</servlet-name>
		<url-pattern>/</url-pattern>
	</servlet-mapping>

</web-app>
resources/mvc-servlet.xml
<beans xmlns="http://www.springframework.org/schema/beans"
	   xmlns:mvc="http://www.springframework.org/schema/mvc"
	   xmlns:context="http://www.springframework.org/schema/context"
	   xmlns:xsi="http://www.w3.org/2001/XMLSchema-instance"
	   xsi:schemaLocation="
        http://www.springframework.org/schema/beans
        http://www.springframework.org/schema/beans/spring-beans.xsd
        http://www.springframework.org/schema/mvc
        http://www.springframework.org/schema/mvc/spring-mvc.xsd
        http://www.springframework.org/schema/context
        http://www.springframework.org/schema/context/spring-context.xsd">

	<!-- 开启注解扫描 -->
	<context:component-scan base-package="com.spring.mvc.test"/>
	<!-- 视图解析器对象 -->
	<bean id="internalResourceViewResolver" class="org.springframework.web.servlet.view.InternalResourceViewResolver">
		<property name="prefix" value="/"/>
		<!--<property name = "prefix" value="/WEB-INF/"></property>-->
		<property name="suffix" value=".jsp"/>
	</bean>
	<!-- 开启SpringMVC框架注解的支持 -->
	<mvc:annotation-driven/>
	<!--静态资源(js、image等)的访问-->
	<mvc:default-servlet-handler/>

</beans>
webapp/index.jsp
<%@ page contentType="text/html;charset=UTF-8" language="java" %>
<html>
  <head>
    <title>SpringMvc源码深入剖析</title>
  </head>
  <body>
  Gradle构建Spring MVC例子....
  </body>
</html>
MvcController.java
package com.spring.mvc.test;

import org.springframework.stereotype.Controller;
import org.springframework.web.bind.annotation.RequestMapping;
import org.springframework.web.bind.annotation.ResponseBody;
import org.springframework.web.servlet.ModelAndView;

@Controller
public class MvcController {

	@RequestMapping("/index")
	public ModelAndView getModeAndView() {
		//创建一个模型视图对象
		ModelAndView mav = new ModelAndView("index");
		return mav;
	}
	@RequestMapping("/text")
	@ResponseBody
	public String text() {
		return "Text...";
	}

}
两种启动方式
方式一:外挂启动
idea环境外面启动(项目根目录下运行 gradle + task name)
| Task Name | Depends On | Type | Description |
|---|---|---|---|
| tomcatRun | - | TomcatRun | 启动Tomcat实例并将Web应用程序部署到该实例。 |
| tomcatRunWar | - | TomcatRunWar | 启动Tomcat实例并将WAR部署 |
| tomcatStop | - | TomcatStop | 停止Tomcat实例 |
| tomcatJasper | - | TomcatJasper | 运行JSP编译器并使用Jasper将JSP页面转换为Java源代码。 |
在项目根目录中执行gradle tomcatRun
#动Tomcat实例并将Web应用程序部署到该实例
gradle  tomcatRun
#停止Tomcat实例
gradle tomcatStop
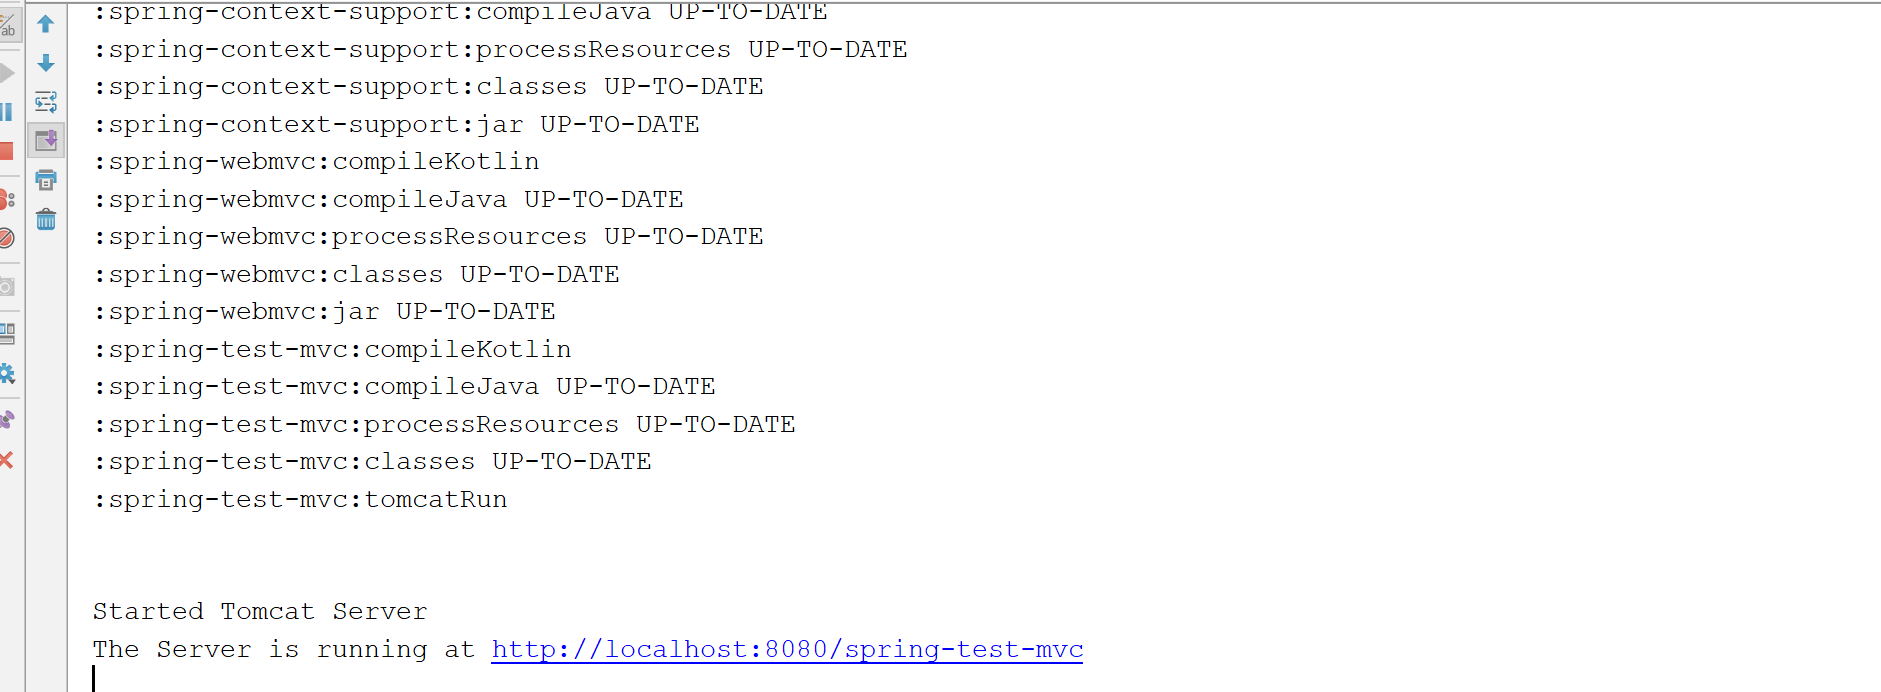
控制台正常输出

方式二:集成到idea中启动
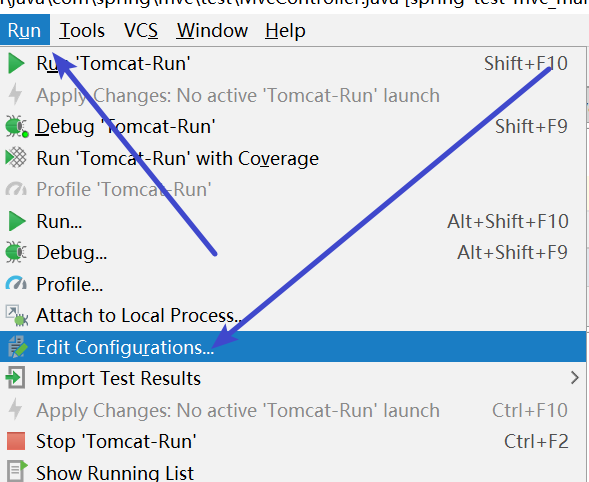
设置
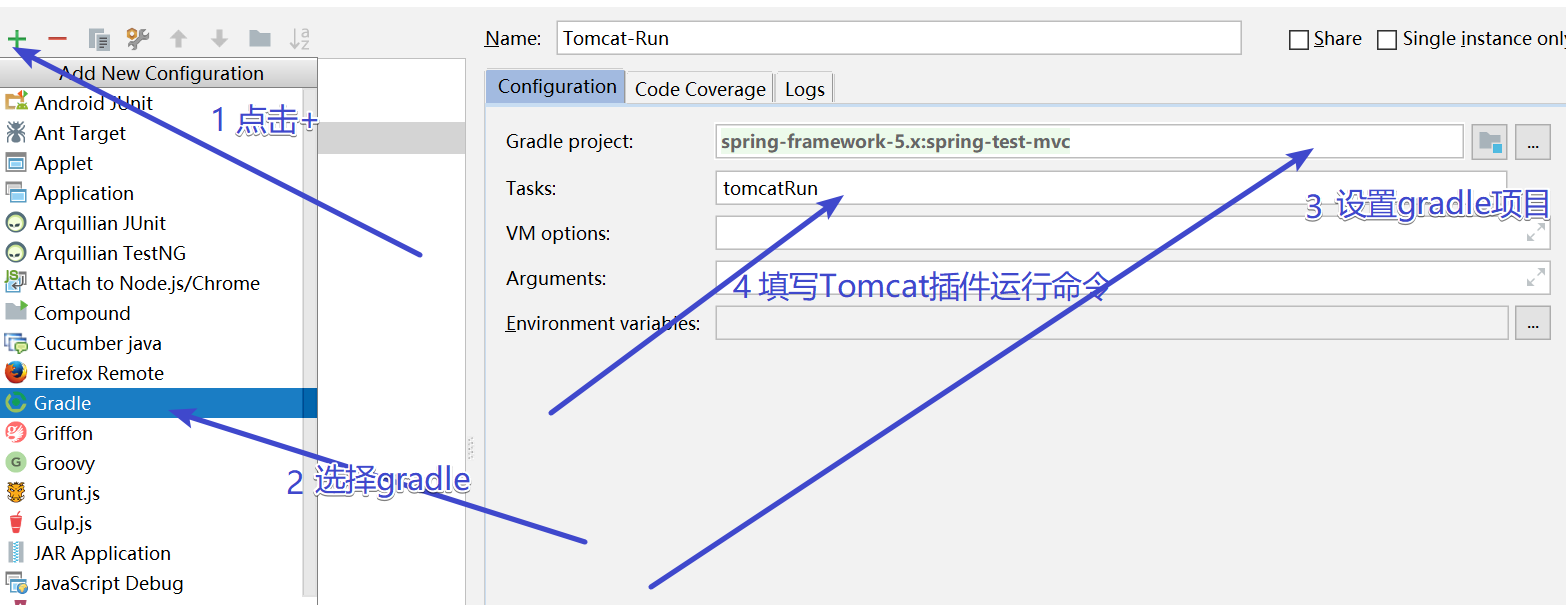
即可点击运行

运行成功
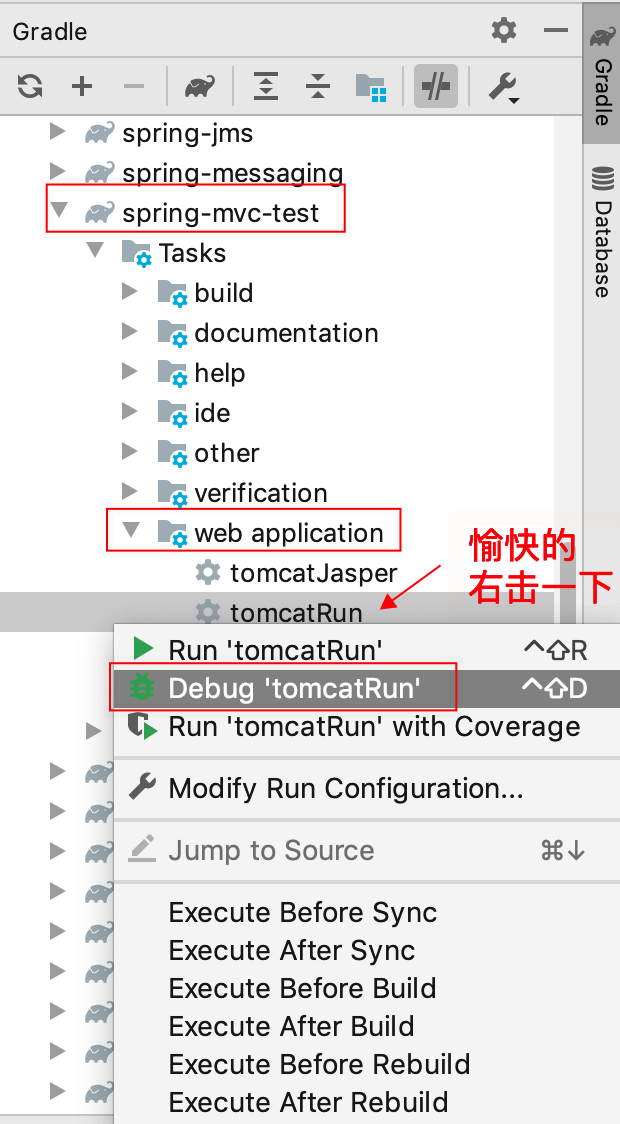
方式三:
idea右边找到gradle的task,直接双击,这个爽~

访问MVC项目
注意:spring-test-mvc是项目的名称
http://localhost:8080/spring-test-mvc/index
效果如下

idea里的调试
简单,debug模式启动tomcat即可
远程调试模式
重要
想要远程debug,需要使用上面的方法二,因为debug启动需要设置gradle的环境变量,
即运行gradle命令的时候插入一些参数命令。
增加debug参数,对外暴露5005端口,即监听5005端口。
-Xrunjdwp:transport=dt_socket,server=y,suspend=n,address=5005
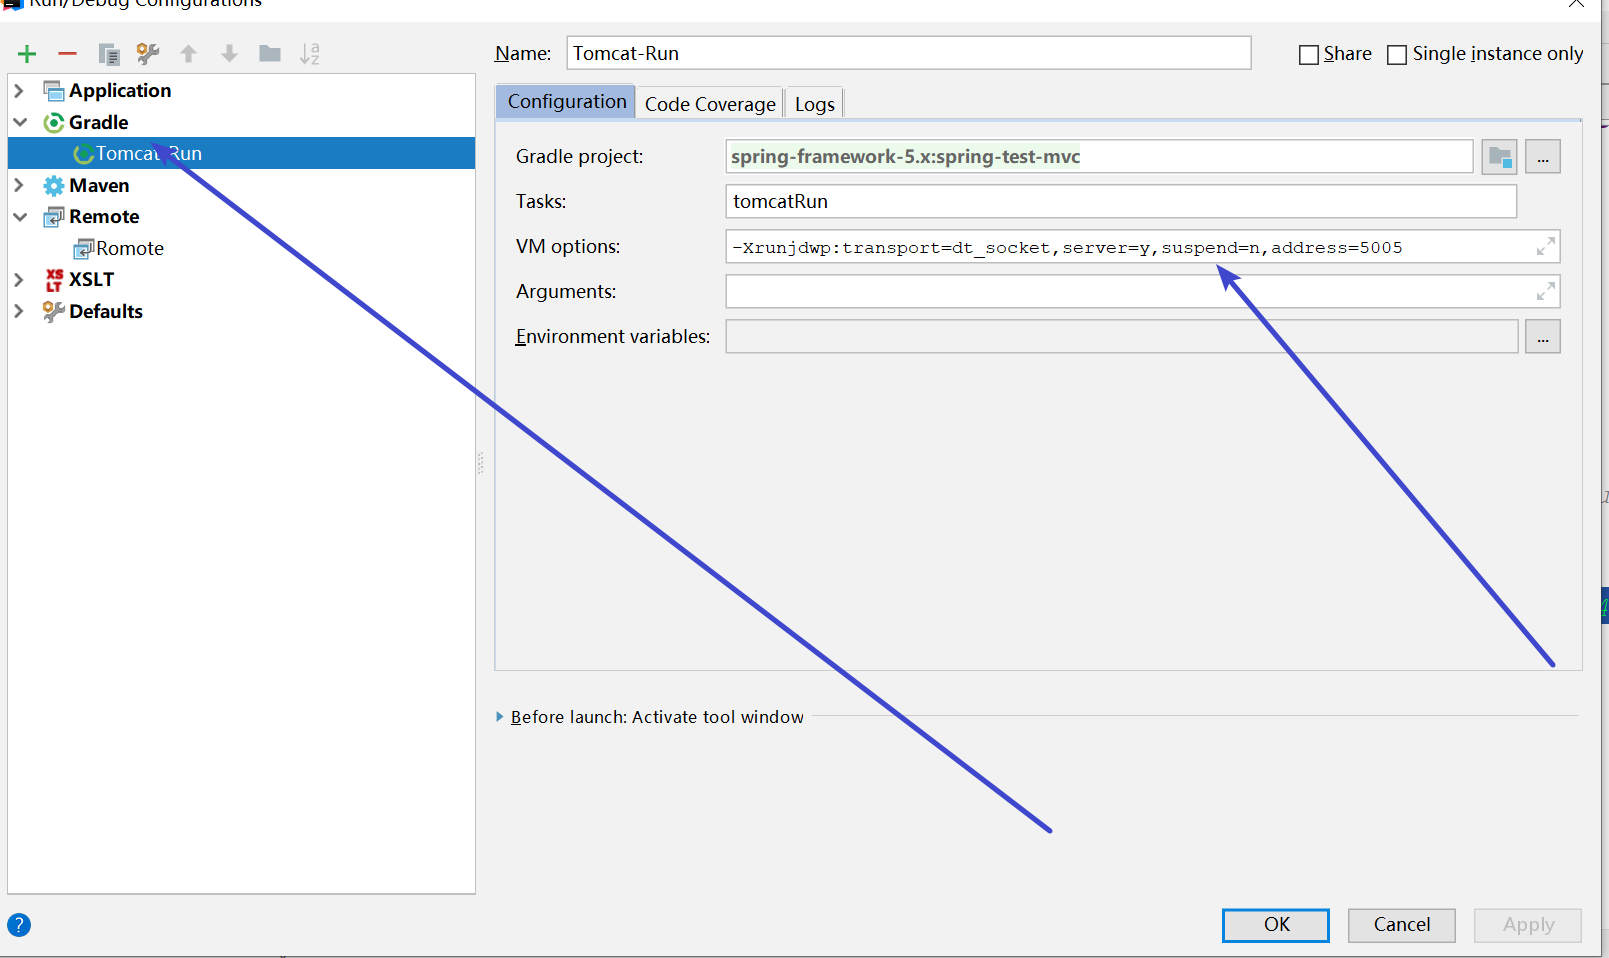
在配置Remote;监听5005端口
点击+号,创建Remote;默认配置即可

最后一步
1、先运行tomcat
2、再运行remote
http://localhost:8080/spring-test-mvc/index
打上断点试试!
包括我们之前ioc里的bean创建等地方,随便打。
目标:认识SpringMVC的工作原理(对照源码),如何找到对应的Controller,进行页面渲染的
步骤:11步
源头:http://localhost:8080/spring-test-mvc/index
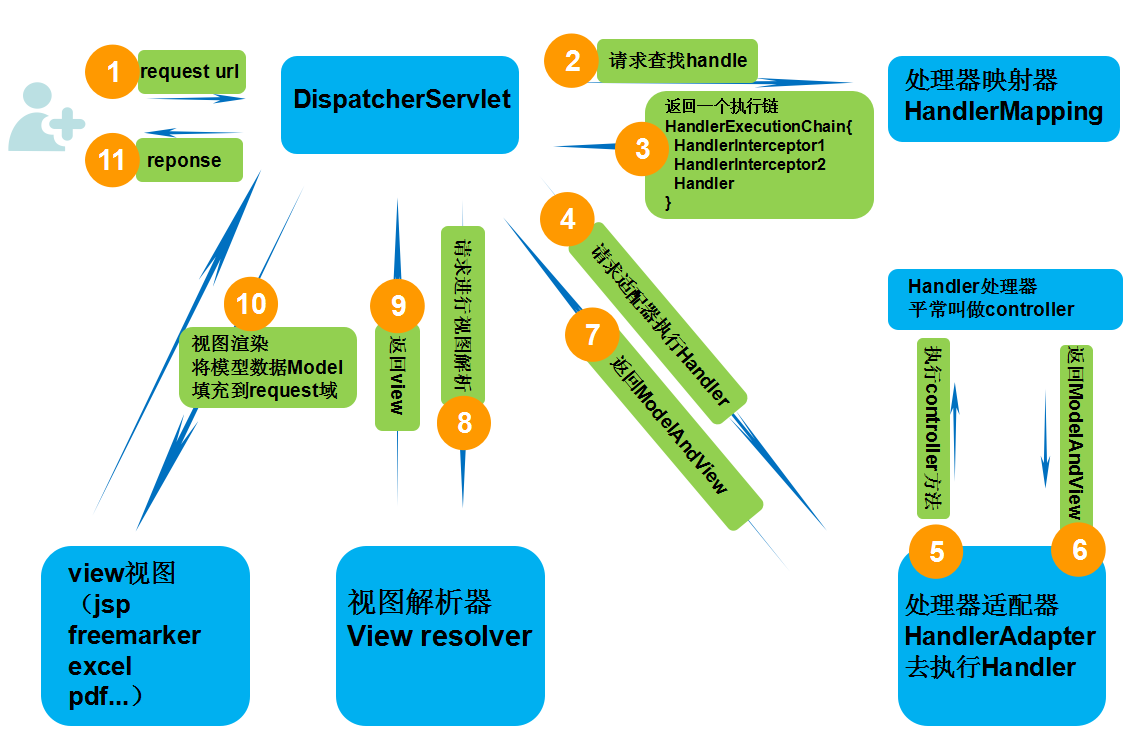
SpringMVC工作原理
1、DispatcherServlet(前端控制器) 是个servlet,负责接收Request 并将Request 转发给对应的处理组件。
2、 HanlerMapping (处理器映射器)是SpringMVC 中完成url 到Controller 映射的组件。DispatcherServlet 从HandlerMapping 查找处理Request 的Controller,
3、HanlerMapping 返回一个执行器链(url 到Controller 映射的组件)给DispatcherServlet
4、DispatcherServlet请求处理器适配器HandlerAdapter
5、处理器适配器HandlerAdapter去访问我们的handler(controller)
6、handler(controller)返回ModelAndView给处理器适配器HandlerAdapter
7、处理器适配器HandlerAdapter返回ModelAndView给DispatcherServlet
8、DispatcherServlet请求ViewResolver视图解析器
9、ViewResolver视图解析器返回view给DispatcherServlet
10、DispatcherServlet请求view做页面解析和渲染
11、view将渲染好的数据返回给DS,DS将渲染好的字符流给client,看到了页面!
目标:简单认识MVC的继承关系
tips
不要求记住

DispatcherServlet 前端总控制器(webmvc源码)
FrameworkServlet (webmvc源码)
HttpServletBean 是的一个简单扩展类((webmvc源码)
HttpServlet(servlet API , 已经离开了spring mvc的控制范围)
引言:
当前源码讲解思路
1、断点调试
2、流程图对照
3、继承关系对照
注意,这个阶段没法debug,我们从servlet规范去直接看源码
下面的请求阶段,再详细debug请求链路的完整过程
web.xml回顾
<?xml version="1.0" encoding="UTF-8"?>
<web-app xmlns="http://xmlns.jcp.org/xml/ns/javaee"
         xmlns:xsi="http://www.w3.org/2001/XMLSchema-instance"
         xsi:schemaLocation="http://xmlns.jcp.org/xml/ns/javaee http://xmlns.jcp.org/xml/ns/javaee/web-app_4_0.xsd"
         version="4.0">

	<!-- Spring MVC配置 -->
	<servlet>
		<servlet-name>mvc</servlet-name>
		<servlet-class>org.springframework.web.servlet.DispatcherServlet</servlet-class>
		<init-param>
			<param-name>contextConfigLocation</param-name>
			<param-value>classpath:mvc-servlet.xml</param-value>
			<!--<param-value>/WEB-INF/mvc-servlet.xml</param-value>-->
		</init-param>
		<!-- load-on-startup元素标记容器是否在启动的时候就加载这个servlet(实例化并调用其init()方法) -->
		<load-on-startup>1</load-on-startup>
	</servlet>
	<servlet-mapping>
		<servlet-name>mvc</servlet-name>
		<url-pattern>/</url-pattern>
	</servlet-mapping>


	 <!--初始化Spring icC容器-->
	<!--<context-param>-->
		<!--<param-name>contextConfigLocation</param-name>-->
	<!--默认的路径是/WEB-INF/applicationontext.xml,下面多个xml使用,分割-->
		<!--<param-value>classpath: applicationContext-ZH.xml</param-value>-->
	<!--</context-param>-->
	<!--要使用Spring的IoC容器-->
	<!--<listener>-->
		<!--<listener-class>org.springframework.web.context.ContextLoaderListener</listener-class>-->
	<!--</listener>-->

</web-app>
从上面的配置,我们可以看出,web.xml中的DS是一个servlet,那就从java web的servlet规范说起
上面类关系,我们说过,springmvc的范畴里,最顶层的是 HttpServletBean 继承的 标准 HttpServlet
1、ioC Bean初始化
org.springframework.web.servlet.HttpServletBean#init
2、9大组件初始化(ioC)
org.springframework.web.servlet.HttpServletBean#init
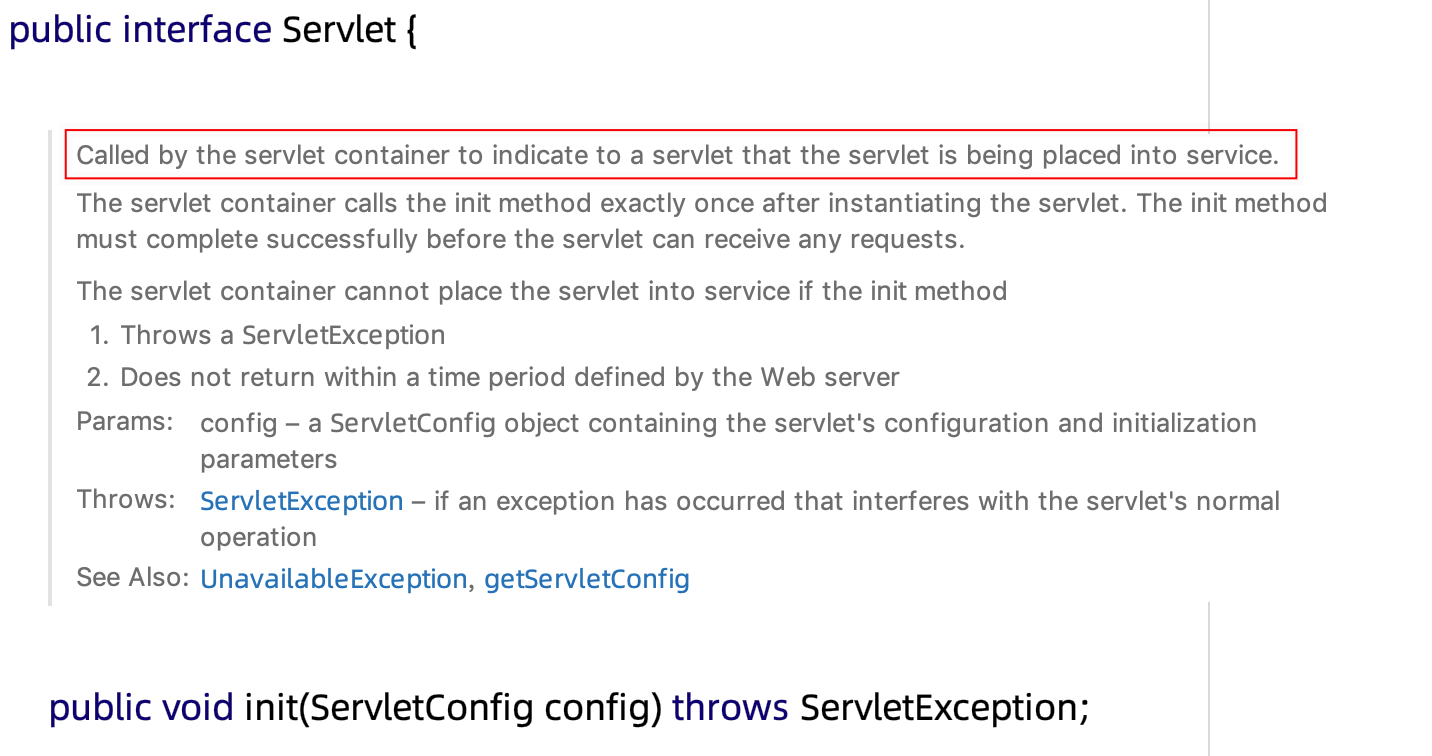
启动:servlet规范,init方法被容器调用
在servlet实例化后,被容器调用一次init方法,所以启动我们找到mvc里的父类从init看起
总结:方法调用关系(伪代码)
HttpServletBean{
  init(){
    protected initServletBean();
  }
}

FrameworkServlet extends HttpServletBean{
  @Override
  initServletBean(){
    initWebApplicationContext(){
      WebApplicationContext wac = createWebApplicationContext(rootContext);
      protected onRefresh(wac);
    }
  }
}

DispatcherServlet extends FrameworkServlet{
  onRefresh(wac){
    initStrategies(wac){
      	//多文件上传的组件
        initMultipartResolver(context);
        //初始化本地语言环境
        initLocaleResolver(context);
        //初始化模板处理器
        initThemeResolver(context);
        //初始化处理器映射器
        initHandlerMappings(context);
        //初始化处理器适配器
        initHandlerAdapters(context);
        //初始化异常拦截器
        initHandlerExceptionResolvers(context);
        //初始化视图预处理器
        initRequestToViewNameTranslator(context);
        //初始化视图转换器
        initViewResolvers(context);
        //FlashMap 管理器
        initFlashMapManager(context);
    }
  }
}
需求:我们在浏览器输入http://localhost:8080/spring-test-mvc/index,背后到底做了哪些事情
目标:MVC如何通过一个url就能找到我们的controller,并返回数据
1、断点调试
2、流程图对照
3、继承关系对照
流程图解:
标准Servlet(回顾tomcat源码里,容器最后调的是wrapper的 service 方法)
伪代码
interface Servlet{
	service()  // 1  , 标准servlet规范的入口
}

HttpServlet implements Servlet{
	public service(ServletRequest req, ServletResponse res){
		//转成 HttpServletRequest
		protected service(req,res);  // 2
	}
	protected service(HttpServletRequest req, HttpServletResponse resp){
		if(isGet){
			protected doGet()  // 4
		}
	}
	protected void doGet(HttpServletRequest req, HttpServletResponse resp);  // 5
}

//spring mvc

FrameworkServlet extends HttpServlet{
	@Override
	service(){
		super.service();  // 3
	}

	protected void doGet(HttpServletRequest req, HttpServletResponse resp){
		processRequest(request, response){
			protected doService(request, response); // 6
		}
	}
}

DispatcherServlet extends FrameWorkServlet{
	protected doService(request, response);  //  7  , here!
}
代码查找的路径:
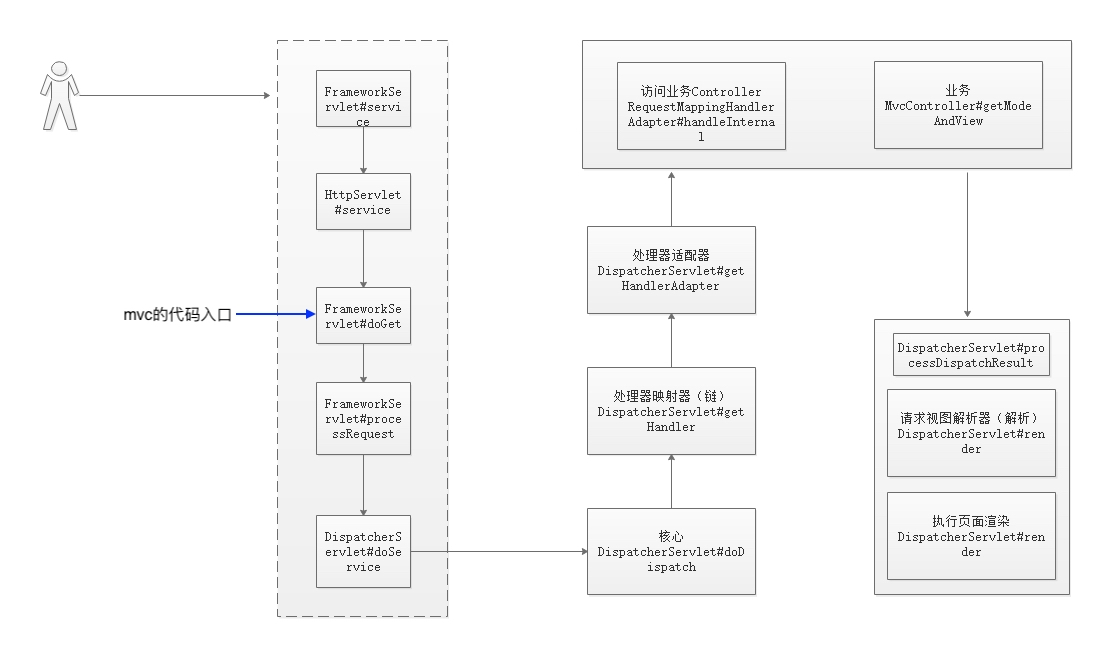
tips:
spring mvc的 FrameworkServlet ,这是我们源码跟踪的入口
项目启动
访问
http://localhost:8080/spring-test-mvc/index
上图的初始化流程在源码中是怎么流转的呢?
入口:开启请求的大门
org.springframework.web.servlet.FrameworkServlet:
java web标准告诉我们,request的get会交给标准 HttpServlet的doGet方法
而这个类FrameworkServlet,是HttpServlet的子类,覆盖了上述的doGet,
所以,请求进入spring的第一入口,就在这里!!!
1)org.springframework.web.servlet.FrameworkServlet#doGet
调用到了org.springframework.web.servlet.FrameworkServlet#doGet
	//get请求调用
	@Override
	protected final void doGet(HttpServletRequest request, HttpServletResponse response)
			throws ServletException, IOException {
		processRequest(request, response);
	}
2)org.springframework.web.servlet.FrameworkServlet#processRequest
//	重点关注:doService
	protected final void processRequest(HttpServletRequest request, HttpServletResponse response)
			throws ServletException, IOException {

		long startTime = System.currentTimeMillis();
		Throwable failureCause = null;

		LocaleContext previousLocaleContext = LocaleContextHolder.getLocaleContext();
		LocaleContext localeContext = buildLocaleContext(request);

		RequestAttributes previousAttributes = RequestContextHolder.getRequestAttributes();
		ServletRequestAttributes requestAttributes = buildRequestAttributes(request, response, previousAttributes);

		WebAsyncManager asyncManager = WebAsyncUtils.getAsyncManager(request);
		asyncManager.registerCallableInterceptor(FrameworkServlet.class.getName(), new RequestBindingInterceptor());

		initContextHolders(request, localeContext, requestAttributes);

		try {
			//重点查看,跳到DispatcherServlet 类中(子类重写)
			doService(request, response);
		} catch (ServletException | IOException ex) {
			failureCause = ex;
			throw ex;
		} catch (Throwable ex) {
			failureCause = ex;
			throw new NestedServletException("Request processing failed", ex);
		} finally {
			resetContextHolders(request, previousLocaleContext, previousAttributes);
			if (requestAttributes != null) {
				requestAttributes.requestCompleted();
			}

			if (logger.isDebugEnabled()) {
				if (failureCause != null) {
					this.logger.debug("Could not complete request", failureCause);
				} else {
					if (asyncManager.isConcurrentHandlingStarted()) {
						logger.debug("Leaving response open for concurrent processing");
					} else {
						this.logger.debug("Successfully completed request");
					}
				}
			}

			publishRequestHandledEvent(request, response, startTime, failureCause);
		}
	}
3)org.springframework.web.servlet.DispatcherServlet#doService
	//重写父类
	//重点关注  doDispatch(request, response);
	@Override
	protected void doService(HttpServletRequest request, HttpServletResponse response) throws Exception {
		if (logger.isDebugEnabled()) {
			String resumed = WebAsyncUtils.getAsyncManager(request).hasConcurrentResult() ? " resumed" : "";
			logger.debug("DispatcherServlet with name '" + getServletName() + "'" + resumed +
					" processing " + request.getMethod() + " request for [" + getRequestUri(request) + "]");
		}

		// Keep a snapshot of the request attributes in case of an include,
		// to be able to restore the original attributes after the include.
		Map<String, Object> attributesSnapshot = null;
		if (WebUtils.isIncludeRequest(request)) {
			attributesSnapshot = new HashMap<>();
			Enumeration<?> attrNames = request.getAttributeNames();
			while (attrNames.hasMoreElements()) {
				String attrName = (String) attrNames.nextElement();
				if (this.cleanupAfterInclude || attrName.startsWith(DEFAULT_STRATEGIES_PREFIX)) {
					attributesSnapshot.put(attrName, request.getAttribute(attrName));
				}
			}
		}

		// Make framework objects available to handlers and view objects.
		request.setAttribute(WEB_APPLICATION_CONTEXT_ATTRIBUTE, getWebApplicationContext());
		request.setAttribute(LOCALE_RESOLVER_ATTRIBUTE, this.localeResolver);
		request.setAttribute(THEME_RESOLVER_ATTRIBUTE, this.themeResolver);
		request.setAttribute(THEME_SOURCE_ATTRIBUTE, getThemeSource());

		if (this.flashMapManager != null) {
			FlashMap inputFlashMap = this.flashMapManager.retrieveAndUpdate(request, response);
			if (inputFlashMap != null) {
				request.setAttribute(INPUT_FLASH_MAP_ATTRIBUTE, Collections.unmodifiableMap(inputFlashMap));
			}
			request.setAttribute(OUTPUT_FLASH_MAP_ATTRIBUTE, new FlashMap());
			request.setAttribute(FLASH_MAP_MANAGER_ATTRIBUTE, this.flashMapManager);
		}

		try {
			//重点关注
			doDispatch(request, response);
		}
		finally {
			if (!WebAsyncUtils.getAsyncManager(request).isConcurrentHandlingStarted()) {
				// Restore the original attribute snapshot, in case of an include.
				if (attributesSnapshot != null) {
					restoreAttributesAfterInclude(request, attributesSnapshot);
				}
			}
		}
	}
进入核心
4)org.springframework.web.servlet.DispatcherServlet#doDispatch
//	Spring MVC的最核心代码
	protected void doDispatch(HttpServletRequest request, HttpServletResponse response) throws Exception {
		HttpServletRequest processedRequest = request;
		HandlerExecutionChain mappedHandler = null;
		boolean multipartRequestParsed = false;

		WebAsyncManager asyncManager = WebAsyncUtils.getAsyncManager(request);

		try {
			//创建视图对象
			ModelAndView mv = null;
			Exception dispatchException = null;

			try {
				//请求检查,是否文件上传请求(二进制请求)
				processedRequest = checkMultipart(request);
				multipartRequestParsed = (processedRequest != request);

//				根据当前的请求去拿一个Handler.这个Handler其实就是我们的控制器,进入!!!!!
				mappedHandler = getHandler(processedRequest);
				if (mappedHandler == null) {
					noHandlerFound(processedRequest, response);
					return;
				}

				// 处理器适配器,9大组件初始化
				HandlerAdapter ha = getHandlerAdapter(mappedHandler.getHandler());

				// Process last-modified header, if supported by the handler.
				String method = request.getMethod();
				//get方法为true
				boolean isGet = "GET".equals(method);
				//method为get
				if (isGet || "HEAD".equals(method)) {
					long lastModified = ha.getLastModified(request, mappedHandler.getHandler());
					if (logger.isDebugEnabled()) {
						logger.debug("Last-Modified value for [" + getRequestUri(request) + "] is: " + lastModified);
					}
					if (new ServletWebRequest(request, response).checkNotModified(lastModified) && isGet) {
						return;
					}
				}

				if (!mappedHandler.applyPreHandle(processedRequest, response)) {
					return;
				}

				// 执行我们的业务控制器方法,com.spring.mvc.test.MvcController.getModeAndView
				mv = ha.handle(processedRequest, response, mappedHandler.getHandler());

				if (asyncManager.isConcurrentHandlingStarted()) {
					return;
				}
           //视图解析器
				applyDefaultViewName(processedRequest, mv);
				mappedHandler.applyPostHandle(processedRequest, response, mv);
			}
			catch (Exception ex) {
				dispatchException = ex;
			}
			catch (Throwable err) {
				// As of 4.3, we're processing Errors thrown from handler methods as well,
				// making them available for @ExceptionHandler methods and other scenarios.
				dispatchException = new NestedServletException("Handler dispatch failed", err);
			}
			//视图渲染
			processDispatchResult(processedRequest, response, mappedHandler, mv, dispatchException);
		}
		catch (Exception ex) {
			triggerAfterCompletion(processedRequest, response, mappedHandler, ex);
		}
		catch (Throwable err) {
			triggerAfterCompletion(processedRequest, response, mappedHandler,
					new NestedServletException("Handler processing failed", err));
		}
		finally {
			if (asyncManager.isConcurrentHandlingStarted()) {
				// Instead of postHandle and afterCompletion
				if (mappedHandler != null) {
					mappedHandler.applyAfterConcurrentHandlingStarted(processedRequest, response);
				}
			}
			else {
				// Clean up any resources used by a multipart request.
				if (multipartRequestParsed) {
					cleanupMultipart(processedRequest);
				}
			}
		}
	}
5)org.springframework.web.servlet.DispatcherServlet#getHandler
	@Nullable
	protected HandlerExecutionChain getHandler(HttpServletRequest request) throws Exception {
		//不止一个,比如BeanNameHandlerMapping、SimpleUrlHandlerMapping,还有我们需要的RequestHandlerMapping
		//在9个组件初始化的时候赋值
		if (this.handlerMappings != null) {
			for (HandlerMapping hm : this.handlerMappings) {
				if (logger.isTraceEnabled()) {
					logger.trace(
							"Testing handler map [" + hm + "] in DispatcherServlet with name '" + getServletName() + "'");
				}
				//这个就是执行器链
				HandlerExecutionChain handler = hm.getHandler(request);
				if (handler != null) {
					return handler;
				}
			}
		}
		return null;
	}
org.springframework.web.servlet.DispatcherServlet#getHandlerAdapter
	protected HandlerAdapter getHandlerAdapter(Object handler) throws ServletException {
		if (this.handlerAdapters != null) {
			for (HandlerAdapter ha : this.handlerAdapters) {
				if (logger.isTraceEnabled()) {
					logger.trace("Testing handler adapter [" + ha + "]");
				}
				if (ha.supports(handler)) {
					return ha;
				}
			}
		}
		throw new ServletException("No adapter for handler [" + handler +
				"]: The DispatcherServlet configuration needs to include a HandlerAdapter that supports this handler");
	}
6) 调用业务Controller
// 执行我们的业务控制器方法,com.spring.mvc.test.MvcController.getModeAndView
mv = ha.handle(processedRequest, response, mappedHandler.getHandler());
org.springframework.web.servlet.mvc.method.annotation.RequestMappingHandlerAdapter#handleInterna
	@Override
	protected boolean supportsInternal(HandlerMethod handlerMethod) {
		return true;
	}

	@Override
	protected ModelAndView handleInternal(HttpServletRequest request,
			HttpServletResponse response, HandlerMethod handlerMethod) throws Exception {

		ModelAndView mav;
		checkRequest(request);

		// Execute invokeHandlerMethod in synchronized block if required.
		if (this.synchronizeOnSession) {
			HttpSession session = request.getSession(false);
			if (session != null) {
				Object mutex = WebUtils.getSessionMutex(session);
				synchronized (mutex) {
					mav = invokeHandlerMethod(request, response, handlerMethod);
				}
			}
			else {
				// No HttpSession available -> no mutex necessary
				mav = invokeHandlerMethod(request, response, handlerMethod);
			}
		}
		else {
			// No synchronization on session demanded at all...
			mav = invokeHandlerMethod(request, response, handlerMethod);
		}

		if (!response.containsHeader(HEADER_CACHE_CONTROL)) {
			if (getSessionAttributesHandler(handlerMethod).hasSessionAttributes()) {
				applyCacheSeconds(response, this.cacheSecondsForSessionAttributeHandlers);
			}
			else {
				prepareResponse(response);
			}
		}

		return mav;
	}
7)org.springframework.web.servlet.DispatcherServlet#processDispatchResult
//1、请求视图解析器,解析成view
	//2、执行页面渲染
	private void processDispatchResult(HttpServletRequest request, HttpServletResponse response,
			@Nullable HandlerExecutionChain mappedHandler, @Nullable ModelAndView mv,
			@Nullable Exception exception) throws Exception {

		boolean errorView = false;
       //如果异常不为空
		if (exception != null) {
			if (exception instanceof ModelAndViewDefiningException) {
				logger.debug("ModelAndViewDefiningException encountered", exception);
				mv = ((ModelAndViewDefiningException) exception).getModelAndView();
			}
			else {
				Object handler = (mappedHandler != null ? mappedHandler.getHandler() : null);
				mv = processHandlerException(request, response, handler, exception);
				errorView = (mv != null);
			}
		}

		//视图渲染,响应视图
		if (mv != null && !mv.wasCleared()) {
			//执行渲染
			render(mv, request, response);
			if (errorView) {
				WebUtils.clearErrorRequestAttributes(request);
			}
		}
		else {
			if (logger.isDebugEnabled()) {
				logger.debug("Null ModelAndView returned to DispatcherServlet with name '" + getServletName() +
						"': assuming HandlerAdapter completed request handling");
			}
		}

		if (WebAsyncUtils.getAsyncManager(request).isConcurrentHandlingStarted()) {
			// Concurrent handling started during a forward
			return;
		}

		if (mappedHandler != null) {
			mappedHandler.triggerAfterCompletion(request, response, null);
		}
	}
本文由
传智教育博学谷教研团队发布。如果本文对您有帮助,欢迎
关注和点赞;如果您有任何建议也可留言评论或私信,您的支持是我坚持创作的动力。转载请注明出处!
一、引擎主循环UE版本:4.27一、引擎主循环的位置:Launch.cpp:GuardedMain函数二、、GuardedMain函数执行逻辑:1、EnginePreInit:加载大多数模块int32ErrorLevel=EnginePreInit(CmdLine);PreInit模块加载顺序:模块加载过程:(1)注册模块中定义的UObject,同时为每个类构造一个类默认对象(CDO,记录类的默认状态,作为模板用于子类实例创建)(2)调用模块的StartUpModule方法2、FEngineLoop::Init()1、检查Engine的配置文件找出使用了哪一个GameEngine类(UGame
1.回顾.TransportServicepublicclassTransportServiceextendsAbstractLifecycleComponentTransportService:方法:1publicfinalTextendsTransportResponse>voidsendRequest(finalTransport.Connectionconnection,finalStringaction,finalTransportRequestrequest,finalTransportRequestOptionsoptions,TransportResponseHandlerT>
参考文章搭建文章gitte源码在线体验可以注册两个号来测试演示图:一.整体介绍 介绍SignalR一种通讯模型Hub(中心模型,或者叫集线器模型),调用这个模型写好的方法,去发送消息。 内容有: ①:Hub模型的方法介绍 ②:服务器端代码介绍 ③:前端vue3安装并调用后端方法 ④:聊天室样例整体流程:1、进入网站->调用连接SignalR的方法2、与好友发送消息->调用SignalR的自定义方法 前端通过,signalR内置方法.invoke() 去请求接口3、监听接受方法(渲染消息)通过new signalR.HubConnectionBuilder().on
快速导航(持续更新中…)Cesium源码解析一(terrain文件的加载、解析与渲染全过程梳理)Cesium源码解析二(metadataAvailability的含义)Cesium源码解析三(metadata元数据拓展中行列号的分块规则解析)Cesium源码解析四(Quantized-Mesh(.terrain)格式文件在CesiumJS和UE中加载情况的对比)目录1.前言2.本篇的由来3.terrain文件的加载3.1更新环境3.2更新和执行渲染命令3.3数据优化3.4结束当前帧4.总结1.前言 目前市场上三维比较火的实现方案主要有两种,b/s的方案主要是Cesium,c/s的方案主要是u
Iparking停车收费管理系统-可商用介绍Iparking是一款基于springBoot的停车收费管理系统,支持封闭车场和路边车场,支持微信支付宝多种支付渠道,支持多种硬件,涵盖了停车场管理系统的所有基础功能。技术栈Springboot,MybatisPlus,Beetl,Mysql,Redis,RabbitMQ,UniApp功能云端功能序号模块功能描述1系统管理菜单管理配置系统菜单2系统管理组织管理管理组织机构3系统管理角色管理配置系统角色,包含数据权限和功能权限配置4系统管理用户管理管理后台用户5系统管理租户管理多租户管理6系统管理公众号配置租户公众号配置7系统管理操作日志审计日志8系统
大家好,我叫胡飞虎,花名虎仔,目前负责云效旗下产品Codeup代码托管的设计与开发。代码作为企业最核心的数据资产,除了被构建、部署之外还有更大的价值。为了帮助企业和团队挖掘更多源代码价值以赋能日常代码研发、运维等工作,云效代码团队在大数据和智能化方向进行了一系列的探索和实践(例如代码搜索与推荐),本文主要介绍我们如何通过直接打通源代码来提高研发与运维效率。随着微服务架构的流行,一个业务流程需要多个微服务共同完成。一旦出现问题,运维人员在面对数量多、调用链路复杂的情况下,很难快速锁定导致问题发生的罪魁祸首:代码。为了提高排查效率,目前常见的解决方案是:链路跟踪+日志分析工具相结合。即通过链路跟踪
解开谜团:深入探索ChatGPT的技术奇迹。ChatGpt无处不在,无论是在播客、博客、YouTube还是社交媒体上。当我注意到这项新技术如此受欢迎时,我决定试一试,我被震惊了!有很多关于ChatGpt及其魔力的博客,但在这篇博客中,我将深入探讨其内部技术及其工作原理!ChatGpt简介根据OpenAI,ChatGpt被描述为:“我们训练了一个名为ChatGpt的模型,它以对话方式进行交互。对话格式使ChatGpt可以回答后续问题、承认错误、挑战不正确的前提并拒绝不适当的请求。ChatGPT是InstructGPT的兄弟模型,它经过训练可以按照提示中的说明进行操作并提供详细的响应。”OpenA
运行有问题或需要源码请点赞关注收藏后评论区留言一、利用ContentResolver读写联系人在实际开发中,普通App很少会开放数据接口给其他应用访问。内容组件能够派上用场的情况往往是App想要访问系统应用的通讯数据,比如查看联系人,短信,通话记录等等,以及对这些通讯数据及逆行增删改查。首先要给AndroidMaifest.xml中添加响应的权限配置 下面是往手机通讯录添加联系人信息的例子效果如下分成三个步骤先查出联系人的基本信息,然后查询联系人号码,再查询联系人邮箱代码 ContactAddActivity类packagecom.example.chapter07;importandroid
信息数智化招采系统服务框架:SpringCloud、SpringBoot2、Mybatis、OAuth2、Security前端架构:VUE、Uniapp、Layui、Bootstrap、H5、CSS3涉及技术:Eureka、Config、Zuul、OAuth2、Security、OSS、Turbine、Zipkin、Feign、Monitor、Stream、ElasticSearch等企业电子化采购系统企业电子化采购系统是明理公司在多家大、中、小型企业采购需求的分析与实际应用的基础上,结合企业采购流程优化再造理念开发的一体化电子招标采购平台,对于招标项目提供交易过程的全流程电子化、规范化管
近期,以“生成式人工智能”(GenerativeAI)为核心技术的聊天机器人ChatGPT火爆全球。百度、阿里巴巴、科大讯飞、360等国内企业纷纷抛出ChatGPT相关进展,打造中国版的ChatGPT。科大讯飞此前在投资者互动平台表示,ChatGPT主要涉及到自然语言处理相关技术,属于认知智能领域的应用之一,公司在该方向技术和应用具备长期深厚的积累。并称2022年12月已进一步启动生成式预训练大模型任务攻关,类ChatGPT技术将在今年5月率先落地科大讯飞AI学习机产品。近日,科大讯飞副总裁、研究院执行院长刘聪围绕什么是ChatGPT,它强在哪里?会对未来世界带来哪些颠覆性影响?进一步阐述Ch