文章目录
刚入门卷积神经网络,在cifar-10数据集上复现了LeNet、AlexNet和VGG-16网络,发现VGG-16网络分类准确率最高,之后以VGG-16网络为基础疯狂调参,最终达到了90.97%的准确率。(继续进行玄学调参,可以更高)
VGGNet是牛津大学视觉几何组(Visual Geometry Group)提出的模型,原文链接:VGG-16论文 该模型在2014年的ILSVRC中取得了分类任务第二、定位任务第一的优异成绩。

整体架构上,VGG的一大特点是在卷积层中统一使用了3×3的小卷积核和2×2大小的小池化核,层数更深,特征图更宽,证明了多个小卷积核的堆叠比单一大卷积核带来了精度提升,同时也降低了计算量。
在论文中,作者给出了5种VGGNet模型,层数分别是11,11,13,16,19,最后两种卷积神经网络即是常见的VGG-16以及VGG-19.该模型的主要缺点在于参数量有140M之多,需要更大的存储空间。

搭建VGG-16网络,代码如下:
import torch
import torchvision
import torchvision.transforms as transforms
import torch.nn as nn
import torch.optim as optim
import torch.nn.functional as F
import numpy as np
import matplotlib.pyplot as plt

transform_train = transforms.Compose(
    [transforms.Pad(4),
     transforms.ToTensor(),
     transforms.Normalize((0.485, 0.456, 0.406), (0.229, 0.224, 0.225)),
     transforms.RandomHorizontalFlip(),
     transforms.RandomGrayscale(),
     transforms.RandomCrop(32, padding=4),
])

transform_test = transforms.Compose(
    [
     transforms.ToTensor(),
     transforms.Normalize((0.485, 0.456, 0.406), (0.229, 0.224, 0.225))]
)

device = torch.device("cuda:0" if torch.cuda.is_available() else "cpu")

trainset = torchvision.datasets.CIFAR10(root='dataset_method_1', train=True, download=True, transform=transform_train)
trainLoader = torch.utils.data.DataLoader(trainset, batch_size=24, shuffle=True)

testset = torchvision.datasets.CIFAR10(root='dataset_method_1', train=False, download=True, transform=transform_test)
testLoader = torch.utils.data.DataLoader(testset, batch_size=24, shuffle=False)

vgg = [96, 96, 'M', 128, 128, 'M', 256, 256, 256, 'M', 512, 512, 512, 'M', 512, 512, 512, 'M']


class VGG(nn.Module):
    def __init__(self, vgg):
        super(VGG, self).__init__()
        self.features = self._make_layers(vgg)
        self.dense = nn.Sequential(
            nn.Linear(512, 4096),
            nn.ReLU(inplace=True),
            nn.Dropout(0.4),
            nn.Linear(4096, 4096),
            nn.ReLU(inplace=True),
            nn.Dropout(0.4),
        )
        self.classifier = nn.Linear(4096, 10)

    def forward(self, x):
        out = self.features(x)
        out = out.view(out.size(0), -1)
        out = self.dense(out)
        out = self.classifier(out)
        return out

    def _make_layers(self, vgg):
        layers = []
        in_channels = 3
        for x in vgg:
            if x == 'M':
                layers += [nn.MaxPool2d(kernel_size=2, stride=2)]
            else:
                layers += [nn.Conv2d(in_channels, x, kernel_size=3, padding=1),
                           nn.BatchNorm2d(x),
                           nn.ReLU(inplace=True)]
                in_channels = x

        layers += [nn.AvgPool2d(kernel_size=1, stride=1)]
        return nn.Sequential(*layers)
(1)前两层卷积神经网络中把通道数从64改为了96。(玄学调参,准确率有一丁点的提升)
(2)在全连接层中把每一层的神经元Dropout概率从0.5调成了0.4。对于Dropout的概率值,个人感觉在该数据集中设为0.5并不是一个较好的选择,这会使得最后训练过程中的running_loss卡在400-500之间,无论把学习率调得多小也学不动了。在准确率上的体现就是,Dropout设为0.5时模型在测试集上的分类准确率一直在卡在89%左右,无法突破90%,而设为0.4之后就立刻提升到了接近91%,running_loss最终降到300左右。据此推测,继续调整Dropout参数可以让该模型的准确率在此基础上进一步提升(在此并没有尝试)。
在搭建该网络的过程中总结出的一些心得体会:
(1)对图像的预处理、数据增强的工作要做好。这可以让训练集更丰富,就像在五年高考真题中又衍生出了三年模拟题让神经网络学习,可以让模型更具有泛化能力,防止过拟合。根据原数据集的特点进行合适的数据增强(并不是所有的数据增强操作都可以提升准确率,有些操作加了反而会使得准确率下降),对分类准确率的提升是立竿见影的。
(2)batch_size不要设得太小。一开始的时候batch_size的值设成了4,结果一轮epoch需要训练12000次,即使用GPU跑也很耗时间。设成了24就比之前的快得多了(当然还可以设得更大一些)
代码如下:
model = VGG(vgg)
# model.load_state_dict(torch.load('CIFAR-model/VGG16.pth'))
optimizer = optim.SGD(model.parameters(), lr=0.01, weight_decay=5e-3)
loss_func = nn.CrossEntropyLoss()
scheduler = optim.lr_scheduler.StepLR(optimizer, step_size=5, gamma=0.4, last_epoch=-1)


total_times = 40
total = 0
accuracy_rate = []


def test():
    model.eval()
    correct = 0  # 预测正确的图片数
    total = 0  # 总共的图片数
    with torch.no_grad():
        for data in testLoader:
            images, labels = data
            images = images.to(device)
            outputs = model(images).to(device)
            outputs = outputs.cpu()
            outputarr = outputs.numpy()
            _, predicted = torch.max(outputs, 1)
            total += labels.size(0)
            correct += (predicted == labels).sum()
    accuracy = 100 * correct / total
    accuracy_rate.append(accuracy)
    print(f'准确率为:{accuracy}%'.format(accuracy))


for epoch in range(total_times):
    model.train()
    model.to(device)
    running_loss = 0.0
    total_correct = 0
    total_trainset = 0

    for i, (data, labels) in enumerate(trainLoader, 0):
        data = data.to(device)
        outputs = model(data).to(device)
        labels = labels.to(device)
        loss = loss_func(outputs, labels).to(device)
        optimizer.zero_grad()
        loss.backward()
        optimizer.step()
        running_loss += loss.item()
        _, pred = outputs.max(1)
        correct = (pred == labels).sum().item()
        total_correct += correct
        total_trainset += data.shape[0]
        running_loss += loss.item()
        if i % 1000 == 0 and i > 0:
            print(f"正在进行第{i}次训练, running_loss={running_loss}".format(i, running_loss))
            running_loss = 0.0
    test()
    scheduler.step()


# torch.save(model.state_dict(), 'CIFAR-model/VGG16.pth')
accuracy_rate = np.array(accuracy_rate)
times = np.linspace(1, total_times, total_times)
plt.xlabel('times')
plt.ylabel('accuracy rate')
plt.plot(times, accuracy_rate)
plt.show()

print(accuracy_rate)
在训练网络的过程中总结出的一些心得体会:
(1)优化器使用SGD更好些,Adam一开始收敛速度确实较快,但是后期可能会出现模型难以收敛的情况。
(2)引入scheduler对学习率进行动态调整非常有效。训练初期为了加速收敛,可以把学习率设得大一些,在此设成了0.01,running_loss下降得很快;而在训练中后期,需要使用更小的学习率来一点点地推进。为了实现这种效果,第一种方案是不断保存模型的参数,之后修手动修改学习率再加载参数继续训练,第二种方案是使用lr_scheduler提供的各种动态调整方案进行动态调整。在此使用StepLR等间隔调整学习率,总的epoch是40次,每隔5次将学习率调整为原来的0.4(玄学调参)。在训练过程中可以很明显地看到,每隔5个epoch调整学习率之后,分类准确率相比上一个epoch突然有了很大的提升。
完整代码如下:
import torch
import torchvision
import torchvision.transforms as transforms
import torch.nn as nn
import torch.optim as optim
import torch.nn.functional as F
import numpy as np
import matplotlib.pyplot as plt

transform_train = transforms.Compose(
    [transforms.Pad(4),
     transforms.ToTensor(),
     transforms.Normalize((0.485, 0.456, 0.406), (0.229, 0.224, 0.225)),
     transforms.RandomHorizontalFlip(),
     transforms.RandomGrayscale(),
     transforms.RandomCrop(32, padding=4),
])

transform_test = transforms.Compose(
    [
     transforms.ToTensor(),
     transforms.Normalize((0.485, 0.456, 0.406), (0.229, 0.224, 0.225))]
)

device = torch.device("cuda:0" if torch.cuda.is_available() else "cpu")

trainset = torchvision.datasets.CIFAR10(root='dataset_method_1', train=True, download=True, transform=transform_train)
trainLoader = torch.utils.data.DataLoader(trainset, batch_size=24, shuffle=True)

testset = torchvision.datasets.CIFAR10(root='dataset_method_1', train=False, download=True, transform=transform_test)
testLoader = torch.utils.data.DataLoader(testset, batch_size=24, shuffle=False)

vgg = [96, 96, 'M', 128, 128, 'M', 256, 256, 256, 'M', 512, 512, 512, 'M', 512, 512, 512, 'M']


class VGG(nn.Module):
    def __init__(self, vgg):
        super(VGG, self).__init__()
        self.features = self._make_layers(vgg)
        self.dense = nn.Sequential(
            nn.Linear(512, 4096),
            nn.ReLU(inplace=True),
            nn.Dropout(0.4),
            nn.Linear(4096, 4096),
            nn.ReLU(inplace=True),
            nn.Dropout(0.4),
        )
        self.classifier = nn.Linear(4096, 10)

    def forward(self, x):
        out = self.features(x)
        out = out.view(out.size(0), -1)
        out = self.dense(out)
        out = self.classifier(out)
        return out

    def _make_layers(self, vgg):
        layers = []
        in_channels = 3
        for x in vgg:
            if x == 'M':
                layers += [nn.MaxPool2d(kernel_size=2, stride=2)]
            else:
                layers += [nn.Conv2d(in_channels, x, kernel_size=3, padding=1),
                           nn.BatchNorm2d(x),
                           nn.ReLU(inplace=True)]
                in_channels = x

        layers += [nn.AvgPool2d(kernel_size=1, stride=1)]
        return nn.Sequential(*layers)


model = VGG(vgg)
# model.load_state_dict(torch.load('CIFAR-model/VGG16.pth'))
optimizer = optim.SGD(model.parameters(), lr=0.01, weight_decay=5e-3)
loss_func = nn.CrossEntropyLoss()
scheduler = optim.lr_scheduler.StepLR(optimizer, step_size=5, gamma=0.4, last_epoch=-1)


total_times = 40
total = 0
accuracy_rate = []


def test():
    model.eval()
    correct = 0  # 预测正确的图片数
    total = 0  # 总共的图片数
    with torch.no_grad():
        for data in testLoader:
            images, labels = data
            images = images.to(device)
            outputs = model(images).to(device)
            outputs = outputs.cpu()
            outputarr = outputs.numpy()
            _, predicted = torch.max(outputs, 1)
            total += labels.size(0)
            correct += (predicted == labels).sum()
    accuracy = 100 * correct / total
    accuracy_rate.append(accuracy)
    print(f'准确率为:{accuracy}%'.format(accuracy))


for epoch in range(total_times):
    model.train()
    model.to(device)
    running_loss = 0.0
    total_correct = 0
    total_trainset = 0

    for i, (data, labels) in enumerate(trainLoader, 0):
        data = data.to(device)
        outputs = model(data).to(device)
        labels = labels.to(device)
        loss = loss_func(outputs, labels).to(device)
        optimizer.zero_grad()
        loss.backward()
        optimizer.step()
        running_loss += loss.item()
        _, pred = outputs.max(1)
        correct = (pred == labels).sum().item()
        total_correct += correct
        total_trainset += data.shape[0]
        running_loss += loss.item()
        if i % 1000 == 0 and i > 0:
            print(f"正在进行第{i}次训练, running_loss={running_loss}".format(i, running_loss))
            running_loss = 0.0
    test()
    scheduler.step()


# torch.save(model.state_dict(), 'CIFAR-model/VGG16.pth')
accuracy_rate = np.array(accuracy_rate)
times = np.linspace(1, total_times, total_times)
plt.xlabel('times')
plt.ylabel('accuracy rate')
plt.plot(times, accuracy_rate)
plt.show()

print(accuracy_rate)
下面附上运行上述代码在测试集上得到的分类准确率变化折线图:
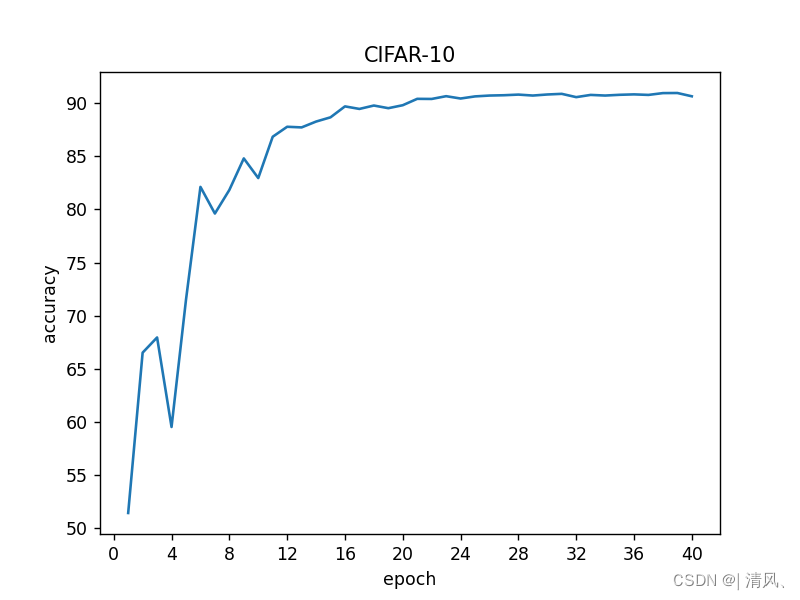
VGG网络确实算是古董了,如果想进一步提升准确率,可以考虑使用ResNet之类的结构。2022年发表的论文里把cifar-10分类的准确率做到了99.612%,实在是太猛了......
深度学习12.CNN经典网络VGG16一、简介1.VGG来源2.VGG分类3.不同模型的参数数量4.3x3卷积核的好处5.关于学习率调度6.批归一化二、VGG16层分析1.层划分2.参数展开过程图解3.参数传递示例4.VGG16各层参数数量三、代码分析1.VGG16模型定义2.训练3.测试一、简介1.VGG来源VGG(VisualGeometryGroup)是一个视觉几何组在2014年提出的深度卷积神经网络架构。VGG在2014年ImageNet图像分类竞赛亚军,定位竞赛冠军;VGG网络采用连续的小卷积核(3x3)和池化层构建深度神经网络,网络深度可以达到16层或19层,其中VGG16和VGG
当我将项目添加到我的Postgres数据库时,一切似乎都运行良好。在不做任何更改的情况下,只要在我的应用程序中的任何位置启动Madeleine,我的Rails应用程序就会开始失败:EncodingErrorinEventsController#updateinvalidencodingsymbolapp/controllers/events_controller.rb:137:in`update'137是问题行:135defupdate136@event=Event.find(params[:id])137m=SnapshotMadeleine.new("bayes_data")...
我正在使用rubyclassifiergem其分类方法返回根据训练模型分类的给定字符串的分数。分数是百分比吗?如果有,最大差值是100分吗? 最佳答案 这是概率的对数。对于大型训练集,实际概率是非常小的数字,因此对数更容易比较。从理论上讲,分数的范围从接近零的无穷小到负无穷大。10**score*100.0会给出实际概率,确实最大相差100。 关于ruby-贝叶斯分类器分数代表什么?,我们在StackOverflow上找到一个类似的问题: https://st
Anaconda+PyCharm+PyTorch(GPU)+虚拟环境声明一、安装Anaconda二、安装PyCharm三、创建虚拟环境并安装PyTorch四、关联虚拟环境五、致谢声明感谢姜小敏同学对我的支持、鼓励和鞭策!默认你的电脑上已经装有GPU,如果没有GPU,可以正常的进行各种下载安装操作,但是最终结果会有所不同。一、安装Anaconda首先,进入Anaconda官网,单击Download按钮,稍微等待即可下载安装包。下载好之后,双击打开安装包,进行一系列安装操作。建议安装路径全英文,并且一定要记住安装地址。此处不勾选第二项,因此之后需要人为配置环境变量。没啥用,不用勾选,就是跳出两个打
我想实现一个简单的贝叶斯分类系统来对短信进行基本的情感分析。欢迎提供在Ruby中实现的实用建议。也欢迎提出除贝叶斯之外的其他方法的建议。 最佳答案 IlyaGrigorik在BayesianClassifiers上的这篇博文中对这个问题给出了很好的答案。此外,您不妨看看ai4rrubygem用于贝叶斯分类器的一些替代方法。ID3是一个不错的选择,因为它提供了即使对机器学习技术没有任何真正了解的人也能“理解”的决策树。 关于ruby-在Ruby中实现贝叶斯分类器?,我们在StackOver
我有一个包含名称和日期的待办事项列表。我希望能够使用标题或日期对列表进行排序。我该怎么做?比较器只允许一种类型的排序。谢谢。 最佳答案 可以在比较器中实现更多逻辑,以便您可以抽象出一些排序逻辑:varCollection=Backbone.Collection.extend({model:myModel,order:'name'comparator:function(model){if(this.order==='name'){returnmodel.get('name');}else{returnmodel.get('date')
目录简介torch.nn.init.xavier_uniform_()语法作用举例参考结语简介Hello!非常感谢您阅读海轰的文章,倘若文中有错误的地方,欢迎您指出~ ଘ(੭ˊᵕˋ)੭昵称:海轰标签:程序猿|C++选手|学生简介:因C语言结识编程,随后转入计算机专业,获得过国家奖学金,有幸在竞赛中拿过一些国奖、省奖…已保研学习经验:扎实基础+多做笔记+多敲代码+多思考+学好英语! 唯有努力💪 本文仅记录自己感兴趣的内容torch.nn.init.xavier_uniform_()语法torch.nn.init.xavier_uniform_(tensor,gain=1.0)作用根据了解训练深度
我是js和D3的新手。我已经生成了各种热图,并想使用D3的on.mouseover更改图block的颜色。我可以显式更改颜色,但想使用CSS事件规则。可能很容易修复。任何帮助将不胜感激。完整代码如下。谢谢。MJ-HeatmapCountryByDistrict_Port_NmeHeatmapbody{font:10pxsans-serif;}.label{font-weight:bold;}.tile{shape-rendering:crispEdges;}.axispath,.axisline{fill:none;stroke:#000;shape-rendering:crispEd
一、报错信息之前写代码时碰到了这样一个错误:RuntimeError:Expectedtohavefinishedreductionintheprioriterationbeforestartinganewone.Thiserrorindicatesthatyourmodulehasparametersthatwerenotusedinproducingloss.Youcanenableunusedparameterdetectionby(1)passingthekeywordargumentfind_unused_parameters=Truetotorch.nn.parallel.Dist
文章目录任务效果原理图指令编码语音识别模块简介代码设计驱动舵机模块简介驱动主程序源代码任务题目:基于stm32蓝牙智能语音识别分类播报垃圾桶实现功能如下:语音识别根据使用者发出的指令自动对垃圾进行分类根据垃圾的种类实时播报垃圾的类型根据垃圾种类驱动对应的舵机进行转动(模拟垃圾桶打开,并在十秒钟自动复位,模拟垃圾桶关闭)OLED显示屏实时显示四种垃圾桶的状态蓝牙app可以控制垃圾桶开关,同时显示四种垃圾桶状态效果原理图指令编码语音识别模块简介LU-ASR01是一款低成本、低功耗、体积小、高性能的离线语音识别系统。本系统集成了语音识别、语音回复、IO控制(多信号输出)、串口输出、温湿度广播等功能。
