华为gre over ipsec隧道实验(附ssh无法登陆问题)
VPN:虚拟专用网络,旨在解决不同内网穿越公网实现互访的问题,主要实现途径是在公网中搭建一个隧道,用于传输跨公网的内网流量。说人话就是在家里能上公司内网 -_-
IPSEC VPN:是VPN的一种,通过IPSEC来加密内网流量,实现流量在公网中的安全传输
GRE OVER IPSEC VPN:旨在解决IPSEC VPN无法传输组播流量的问题,IPSEC加上GRE隧道可实现组播流量的可靠传输
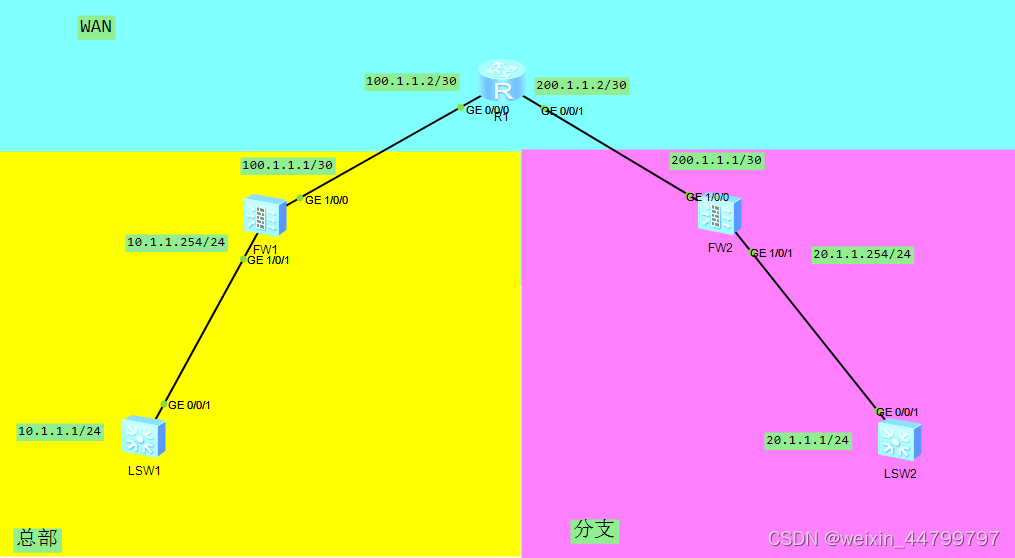
现总部需与分支打通GRE OVER IPSEC VPN,用于实现设备间的内网互通,要求:
1、所有设备可通过隧道实现内网连通
2、总部设备可ssh登陆分支设备
LSW1、LSW2:此处仅看做主机设备,只在上面配置地址与路由即可
LSW1:
//地址配置
interface Vlanif10
 ip address 10.1.1.1 255.255.255.0

//端口配置
interface GigabitEthernet0/0/1
 port link-type access
 port default vlan 10

//路由配置
ip route-static 0.0.0.0 0 10.1.1.254
FW1:
//地址配置(1/0/1口作为内网ssh地址,需打开ssh服务,此处打开ping服务方便进行测试)
interface GigabitEthernet1/0/1
 undo shutdown
 ip address 10.1.1.254 255.255.255.0
 service-manage ping permit
 service-manage ssh permit

interface GigabitEthernet1/0/0
 undo shutdown
 ip address 100.1.1.1 255.255.255.252
 service-manage ping permit

//路由配置
ip route-static 0.0.0.0 0 100.1.1.2

//安全域配置(内网口trust,外网口untrust)
firewall zone trust
 add interface GigabitEthernet1/0/1

firewall zone untrust
 add interface GigabitEthernet1/0/0

//安全策略配置(允许内网用户访问外网)
security-policy
 rule name trust==>untrust
  source-zone trust
  destination-zone untrust
  action permit

 rule name local==>any
  source-zone local
  action permit
//nat配置(此处采用easy-ip)
nat-policy
 rule name trust==>untrust
  source-zone trust
  destination-zone untrust
  action source-nat easy-ip
R1:
//地址配置
interface GigabitEthernet0/0/1
 ip address 200.1.1.2 255.255.255.252

interface GigabitEthernet0/0/0
 ip address 100.1.1.2 255.255.255.252
FW2:
//地址配置(1/0/1口作为内网ssh地址,需打开ssh服务,此处打开ping服务方便进行测试)
interface GigabitEthernet1/0/1
 undo shutdown
 ip address 20.1.1.254 255.255.255.0
 service-manage ping permit
 service-manage ssh permit

interface GigabitEthernet1/0/0
 undo shutdown
 ip address 200.1.1.1 255.255.255.252
 service-manage ping permit

//路由配置
ip route-static 0.0.0.0 0 200.1.1.2

//安全域配置(内网口trust,外网口untrust)
firewall zone trust
 add interface GigabitEthernet1/0/1

firewall zone untrust
 add interface GigabitEthernet1/0/0

//安全策略配置(允许内网用户访问外网)
security-policy
 rule name trust==>untrust
  source-zone trust
  destination-zone untrust
  action permit

 rule name local==>any
  source-zone local
  action permit
//nat配置(此处采用easy-ip)
nat-policy
 rule name trust==>untrust
  source-zone trust
  destination-zone untrust
  action source-nat easy-ip
LSW2:
//地址配置
interface Vlanif20
 ip address 20.1.1.1 255.255.255.0

//端口配置
interface GigabitEthernet0/0/1
 port link-type access
 port default vlan 20

//路由配置
ip route-static 0.0.0.0 0 20.1.1.254
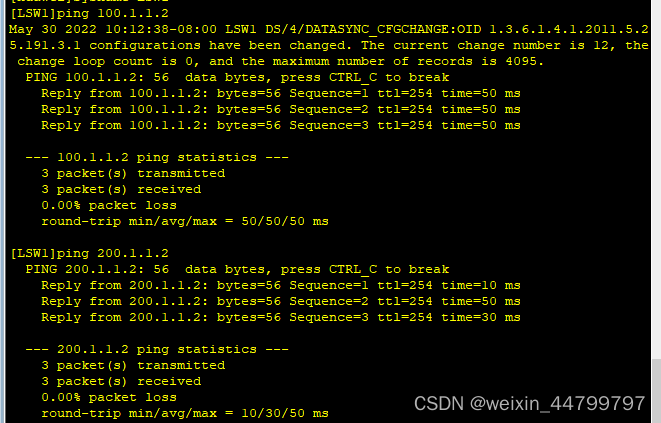
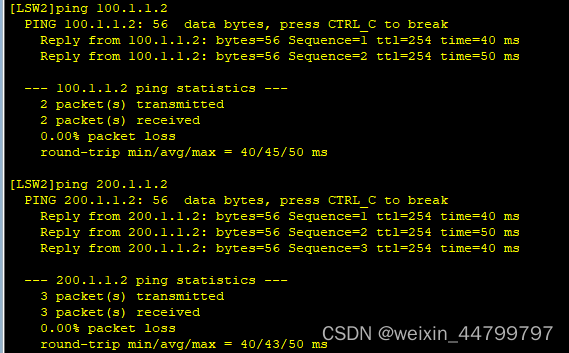
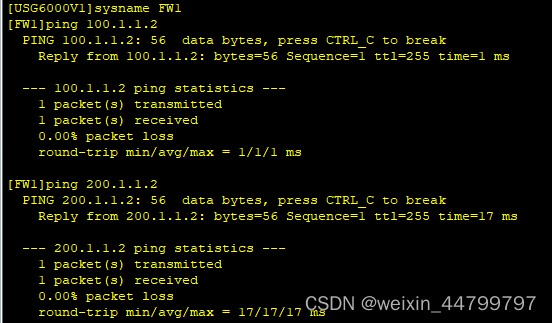
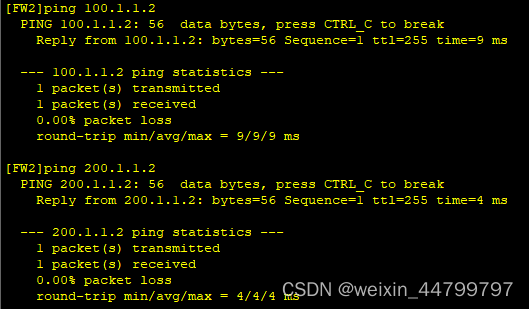
此时LSW1、LSW2、FW1、FW2应当能ping通100.1.1.2/200.1.1.2
前言:
1、首先我们应该知道,虚拟专用网络的搭建需要配置acl、ike proposal、ike peer、ipsec proposal、ipsec policy
2、其中ike peer中需要绑定ike proposal、预共享秘钥、本端对端的IP信息
———ipsec policy中需要绑定acl用于定义保护流量、ike peer、ipsec proposal
3、最后我们在接口调用ipsec policy即可
FW1:
//acl配置
acl number 3001
 rule 5 permit ip source 100.1.1.1 0 destination 200.1.1.1 0

//ike proposal配置
ike proposal 1
 encryption-algorithm aes-256
 dh group14
 authentication-algorithm sha2-256
 authentication-method pre-share
 integrity-algorithm hmac-sha2-256
 prf hmac-sha2-256

//ike peer配置(此处使用被动式连接,因此总部无需设置分支信息)
ike peer master
 pre-shared-key Admin@huawei.com               //预共享秘钥
 ike-proposal 1                                //绑定ike proposal
 local-id 100.1.1.1                            //本地local-id信息

//ipsec proposal配置
ipsec proposal 1
 esp authentication-algorithm sha2-256
 esp encryption-algorithm aes-256

//ipsec policy配置(此处采用模板配置)
ipsec policy-template temp 1                   //ipsec policy模板配置
 security acl 3001
 ike-peer master
 proposal 1

ipsec policy master 10 isakmp template temp    //应用ipsec policy模板

//tunnel口配置(tunnel口封装gre协议以传递内网流量)
interface Tunnel1
 ip address 30.1.1.1 255.255.255.252
 tunnel-protocol gre
 source 100.1.1.1
 destination 200.1.1.1
 service-manage ping permit

//安全域配置
firewall zone untrust
 add interface Tunnel1

//安全策略配置
security-policy
  rule name ipsec==>local              //放行分部来的ipsec请求
   source-zone untrust
   destination-zone local
   source-address 200.1.1.1 mask 255.255.255.255
   destination-address 100.1.1.1 mask 255.255.255.255
   action permit

  rule name fenbu==>trust                //放行分部访问进来的流量
   source-zone untrust
   destination-zone trust
   source-address 20.1.1.0 mask 255.255.255.0
   destination-address 10.1.1.0 mask 255.255.255.0
   action permit

//路由配置(因为分部tunnel口地址为30.1.1.2,因此总部访问分部内网需走tunnel口)
ip route-static 20.1.1.1 24 Tunnel 1

//nat-policy配置(总部访问分部内网的流量不应当被nat)
nat-policy
 rule name master==>slave
  source-zone trust
  destination-zone untrust
  source-address 10.1.1.0 mask 255.255.255.0
  destination-address 20.1.1.0 mask 255.255.255.0
  action no-nat

rule move master==>slave top            //将该策略置顶

//应用ipsec policy
interface GigabitEthernet1/0/0
 ipsec policy master
FW2:
//acl配置
acl number 3001
 rule 5 permit ip source 200.1.1.1 0 destination 100.1.1.1 0

//ike proposal配置
ike proposal 1
 encryption-algorithm aes-256
 dh group14
 authentication-algorithm sha2-256
 authentication-method pre-share
 integrity-algorithm hmac-sha2-256
 prf hmac-sha2-256

//ike peer配置(此处使用被动式连接,因此分部需要主动发起协商)
ike peer slave
 pre-shared-key Admin@huawei.com               //预共享秘钥
 ike-proposal 1                                //绑定ike proposal
 remote-id-type ip
 remote-id 100.1.1.1                           //对端IP信息
 remote-address 100.1.1.1
 local-id 200.1.1.1                            //本地local-id信息

//ipsec proposal配置
ipsec proposal 1
 esp authentication-algorithm sha2-256
 esp encryption-algorithm aes-256

//ipsec policy配置(此处不能采用模板配置)
ipsec policy slave 10 isakmp
 security acl 3001
 ike-peer slave
 proposal 1
 tunnel local applied-interface                 //这两条命令一定要配置
 sa trigger-mode auto

//tunnel口配置(tunnel口封装gre协议以传递内网流量)
interface Tunnel1
 ip address 30.1.1.2 255.255.255.252
 tunnel-protocol gre
 source 200.1.1.1
 destination 100.1.1.1
 service-manage ping permit

//安全域配置
firewall zone untrust
 add interface Tunnel1

//安全策略配置(放行总部来的ipsec回应)
security-policy
  rule name ipsec==>local
   source-zone untrust
   destination-zone local
   source-address 100.1.1.1 mask 255.255.255.255
   destination-address 200.1.1.1 mask 255.255.255.255
   action permit

  rule name zongbu==>trust                //放行总部访问进来的流量
   source-zone untrust
   destination-zone trust
   source-address 10.1.1.0 mask 255.255.255.0
   destination-address 20.1.1.0 mask 255.255.255.0
   action permit

//路由配置(因为分部tunnel口地址为30.1.1.1,因此分部访问总部内网需走tunnel口)
ip route-static 10.1.1.1 24 Tunnel 1

//nat-policy配置(分部访问总部内网的流量不应当被nat)
nat-policy
 rule name slave==>master
  source-zone trust
  destination-zone untrust
  source-address 20.1.1.0 mask 255.255.255.0
  destination-address 10.1.1.0 mask 255.255.255.0
  action no-nat

rule move slave==>master top             //将该策略置顶

//应用ipsec policy
interface GigabitEthernet1/0/0
 ipsec policy slave
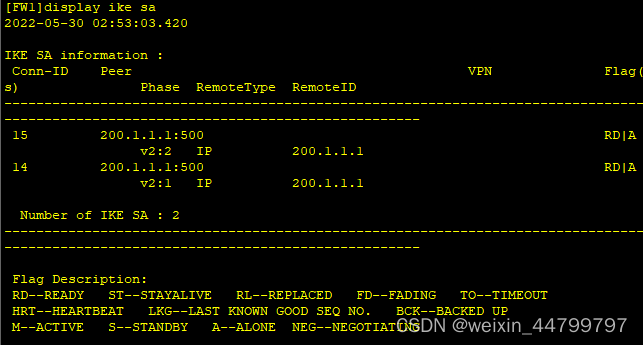
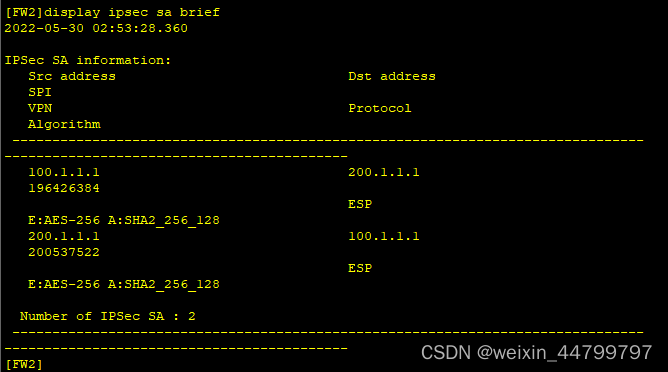
在FW1/2上运行display ike sa、display ipsec sa应当能看到已建立连接
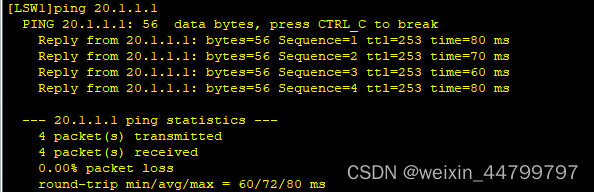
LSW1 ping LSW2:
注:假设在FW2上配置ssh服务,FW1使用20.1.1.254去ssh FW2
会产生如下问题:
FW1可以ping通20.1.1.254,却无法ssh到20.1.1.254,
解决方法:
在FW1/2的tunnel口下运行service-manage ssh permit即可
三分钟集成Tap防沉迷SDK(Unity版)一、SDK介绍基于国家对上线所有游戏必须增加防沉迷功能的政策下,TapTap推出防沉迷SDK,供游戏开发者进行接入;允许未成年用户在周五、六、日以及法定节假日晚上8:00-9:00进行游戏,防沉谜时间段进入游戏会弹窗进行提示!开发环境要求:Unity2019.4或更高版本iOS10或更高版本Android5.0(APIlevel21)或更高版本🔗Unity集成Demo参考链接🔗UnityTapSDK功能体验APK下载链接二、集成前准备1.创建应用进入开发者后台,按照提示开始创建应用;2.开通服务在使用TDS实名认证和防沉迷服务之前,需要在上面创建的应
起初:那不是错误区域的问题。在irb和数据库中,一切都很好。当我想在我的View中显示日期(created_at、updated_at和所有由我自己在每个模型中定义的日期)时,就会出现问题。我试图在application.rb中设置时区并从初始化程序中删除时间格式,但这并没有解决我的问题。Annotategem生成的架构信息:#created_at:datetime#updated_at:datetime#publish_at:datetime来自irb:1.9.2-p290:004>Time.zone=>(GMT+00:00)UTC1.9.2-p290:005>Time.zone.n
我想每10分钟执行一次cron作业,但我的系统只执行1小时。所以我正在寻找一种方法来做到这一点。我看过Timer和sleep但我不确定如何执行此操作,甚至不知道如何实现此操作。 最佳答案 看看http://rufus.rubyforge.org/rufus-scheduler/rufus-scheduler是一个用于调度代码片段(作业)的Rubygem。它了解在特定时间、在特定时间、每x次或仅通过CRON语句运行作业。rufus-scheduler不能替代cron/at,因为它在Ruby内部运行。
备份为250MB。我认为这不是很大,但问题似乎随着规模的增加而增加。从下面的备份gem登录。注意时间跨度;上传大约37分钟后,我收到了连接重置。[2015/10/3009:20:40][message]Storage::S3startedtransferring'2015.10.30.09.20.01.myapp_postgres.tar'tobucket'myapp-backups'.[2015/10/3009:57:06][error]ModelError:BackupforBackupPostgreSQL(myapp_postgres)Failed