目录
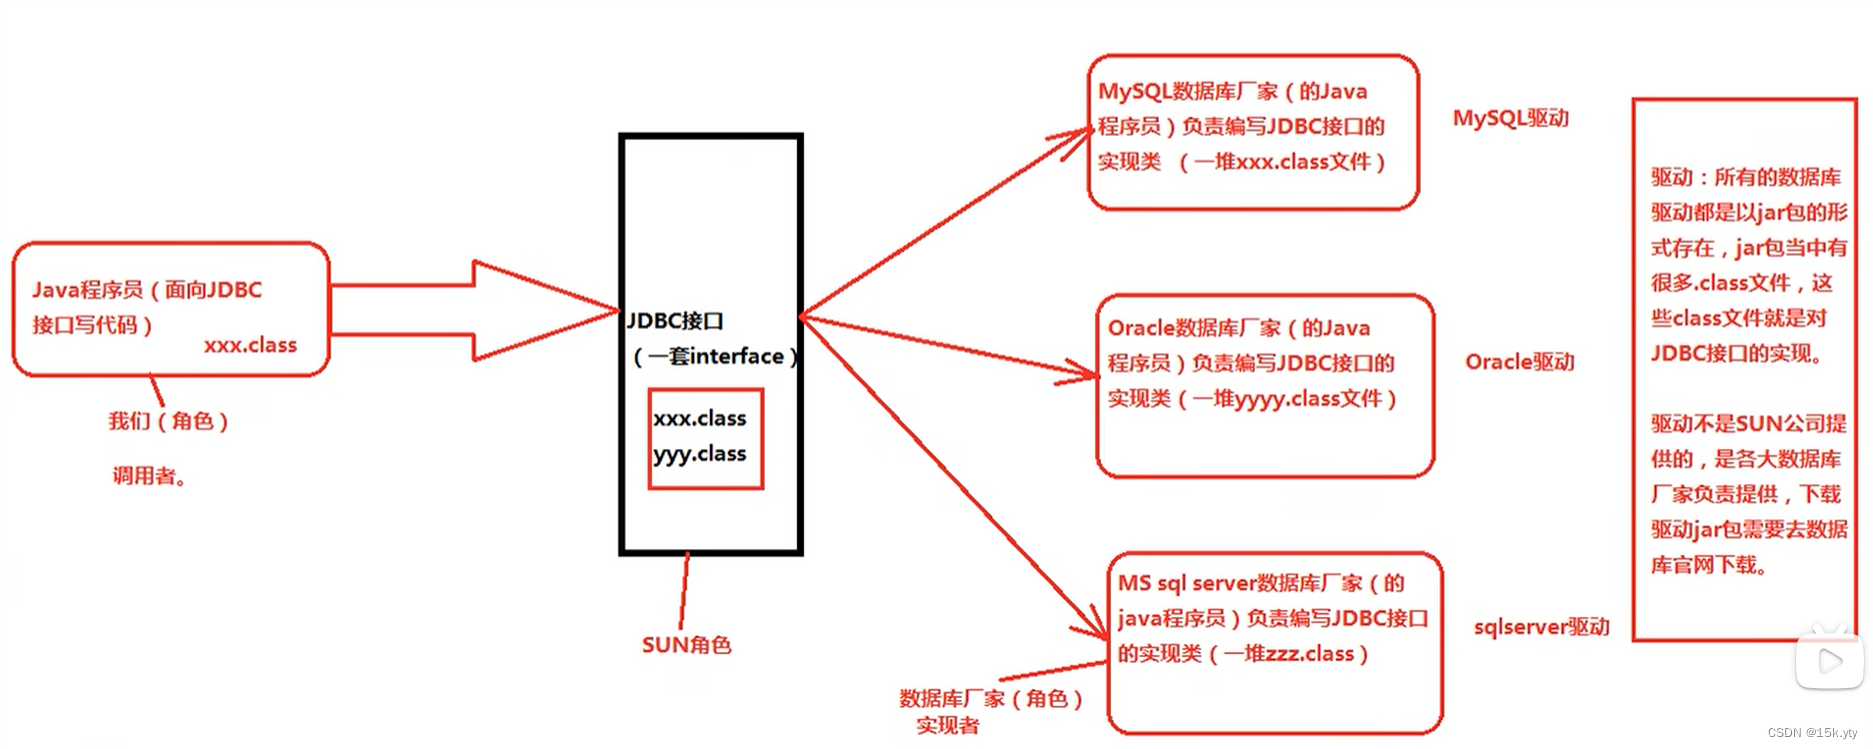
Java DataBase Conectivity(Java语言连接数据库)
JDBC是SUN公司制定的一套接口,在java.sql.*包,属于面向接口编程。
接口都有调用者和实现着,面向接口调用、面向接口写实现类,这都属于面向接口编程。
解耦合:降低程序的耦合度,提高程序的扩展力(耦合是指两个子类的关联程度)
多态机制就是典型的面向抽象编程(接口是抽象的)。
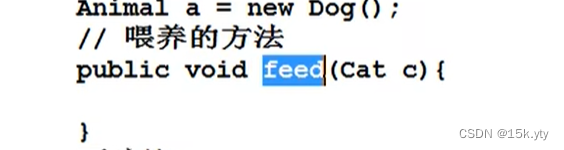
多态:父类型引用指向子类型对象
Animal是父类,cat、dog是子类
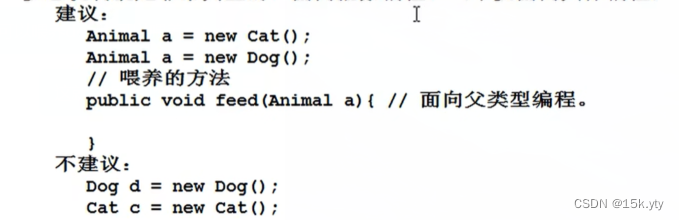
其中feed方法,写了cat只能喂养cat,写了dog只能喂养dog,但写animal既可以喂养dog也可以喂养cat。这就是面向抽象编程
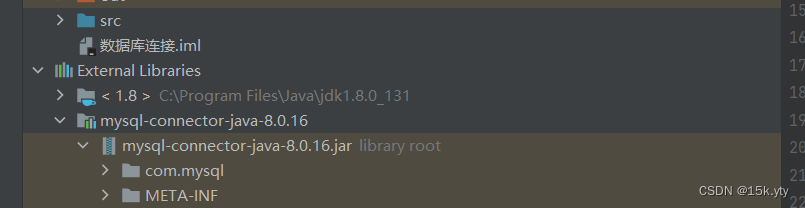
1.先从官网下载对应的驱动jar包
2.建立idea项目后

3.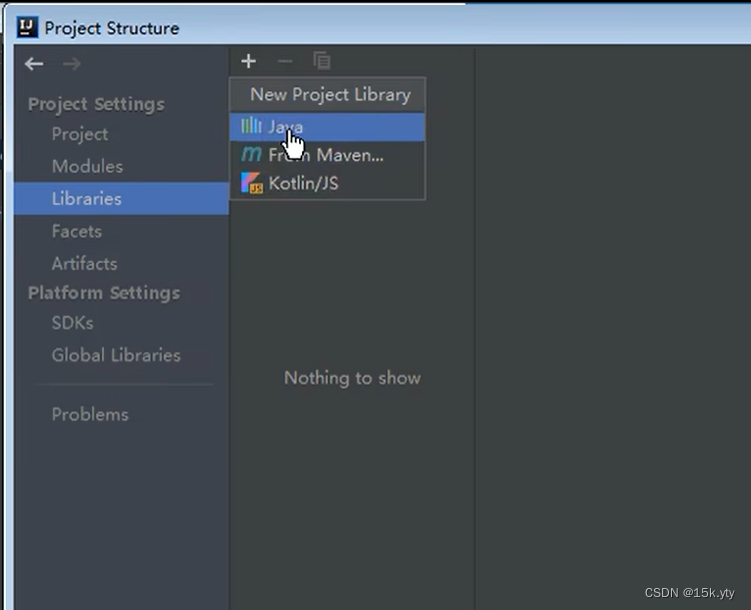
4.找到自己下载jar包的位置并选择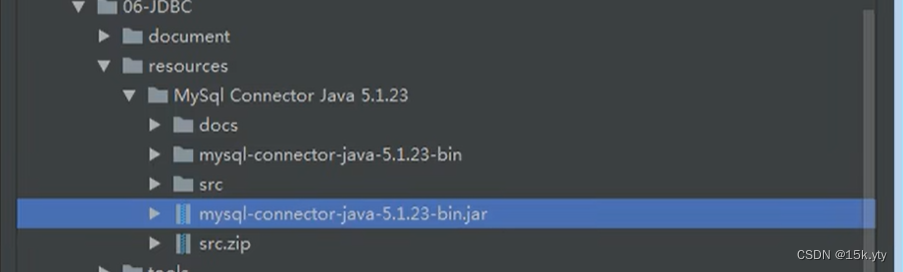
5.点击应用、OK后会看到导入到jar包
 五、JDBC编程六步概述

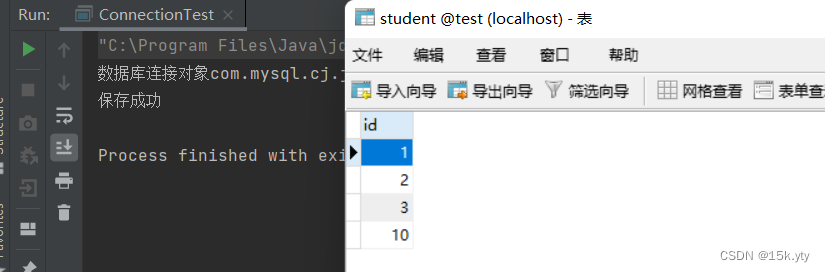
public class ConnectionTest {
    public static void main(String[] args)  {
        Connection conn = null;
        Statement stmt = null;


        try {
//            注册驱动
            Driver driver = new  com.mysql.cj.jdbc.Driver();
            DriverManager.registerDriver(driver  );
//获取链接
    //  127.0.0.1 主机地址表示本机,3306 数据库端口号,test:数据库名称 问号部分表示时区,有的数据库版本可不加
            String url = "jdbc:mysql://127.0.0.1:3306/test?useUnicode=true&characterEncoding=utf8&serverTimezone=GMT";
//root 数据库连接名
            String user= "root";
//数据库密码
            String password = "123456";
           conn = DriverManager.getConnection(url,user,password);
            System.out.println("数据库连接对象"+conn);
//            获取数据库操作对象(Statement专门执行SQL语句的)
         stmt = conn.createStatement();
//          执行SQL
             String sql = "insert into student(id) values(1)";
//专门执行DML语句返回值是数据库中记录条数
             int count = stmt.executeUpdate(sql);
            System.out.println(count == 1?"保存成功":"保存失败");
        } catch (Exception e) {
            e.printStackTrace();
//释放资源
//            为了保证资源一定释放。在finally语句块关闭资源并且从小到依次关闭,必须分开try
        }finally{
            if(stmt != null){
                try {
                    stmt.close();
                } catch (SQLException throwables) {
                    throwables.printStackTrace();
                }
            }
            if(conn != null){
                try {
                    conn.close();
                } catch (SQLException throwables) {
                    throwables.printStackTrace();
                }
            }
//通过coon连接对象开启stmt,就得先关闭stmt
       }
    }
 public static void main(String[] args) {
        Connection conn1 = null;
        Statement stat1 = null;
        try {
//            1.注册驱动
            DriverManager.registerDriver( new com.mysql.cj.jdbc.Driver());
//            2.获取链接
            conn1 = DriverManager.getConnection("jdbc:mysql://127.0.0.1:3306/test?useUnicode=true&characterEncoding=utf8&serverTimezone=GMT","root","123456");
//            3.获取数据库操作对象
             stat1 = conn1.createStatement();

//             4.执行SQL语句
//            String  str1 = "delete from student where id = 3";
//            String str1 = "insert into student(id) value (3)";
            String str1 ="update user_table set password = 'abc123',balance = '1000' where user = 'AA'";
            int count = stat1.executeUpdate(str1);
            //System.out.println(count == 1?"删除成功" :" 删除失败");

        }catch (SQLException e){
            e.printStackTrace();

        }finally {
            if (stat1 !=null){
                try {
                    stat1.close();
                } catch (SQLException throwables) {
                    throwables.printStackTrace();
                }
            }
            if (conn1 !=null) {
                try {
                    conn1.close();
                } catch (SQLException throwables) {
                    throwables.printStackTrace();
                }
            }
        }

} 4. 从属性资源文件中读取数据库信息
1.创建配置文件

2.配置文件内容
 注意:必须将配置文件放在src文件下
public static void main(String[] args) {
//        使用资源绑定器绑定属性配置文件
        ResourceBundle bundle = ResourceBundle.getBundle("jdbc1");
        String driver = bundle.getString("driver");
        String url = bundle.getString("url");
        String user = bundle.getString("user");
        String password = bundle.getString("password");

        Connection conn = null;
        Statement stat = null;
        try {
//            注册成功
            Class.forName(driver);
//            获取链接
            conn = DriverManager.getConnection(url,user,password);
//            获取数据库操作对象
            stat = conn.createStatement();
//            执行SQL语句
            String str = "insert into student(id) values(2)";
            int count = stat.executeUpdate(str);
            System.out.println(count == 1 ?"插入成功":"插入失败");
        } catch (Exception e) {
            e.printStackTrace();
        }finally {
//            释放资源
            if(stat != null){
                try {
                    stat.close();
                } catch (SQLException throwables) {
                    throwables.printStackTrace();
                }
            }
            if(conn != null){
                try {
                    conn.close();
                } catch (SQLException throwables) {
                    throwables.printStackTrace();
                }
            }
        }

    }
public static void main(String[] args) {
Statement stat = null;
Connection conn = null;
// rs封装查询结果集,有查询结果集必须带这句
ResultSet rs = null;
try {
// 注册成功
Class.forName("com.mysql.cj.jdbc.Driver");
// 获取链接
conn = DriverManager.getConnection("jdbc:mysql://127.0.0.1:3306/test?useUnicode=true&characterEncoding=utf8&serverTimezone=GMT","root","123456");
// 连接数据库操作对象
stat = conn.createStatement();
// 执行sql
String sal = "select name as n,id,email,birth from customers";
// int excuteUpdate(insert/delete/update)
// ResultSet excuteQuery(select)
rs = stat.executeQuery(sal);
// 处理查询结果集
/*boolean flag1 = rs.next();//next()表示指向标中数据下一行
if(flag1){
//如果光标指向的行有数据取数据,
//getstring方法特点:不管数据库中的数据类型是什么,都以String的形式取出
String name = rs.getString(1);//JDBC中所以下标从一开书。。
String id = rs.getString(2);
String email = rs.getString(3);
String birth = rs.getString(4);
System.out.println(name+","+id+","+email+","+birth);
}
*/
while(rs.next()){
/*String name = rs.getString("n");//没有别名可以直接写数据库表属性名
String id = rs.getString("id");
String email = rs.getString("email");
String birth = rs.getString("birth");
System.out.println(name+","+id+","+email+","+birth) ;
*/
//1234表示表列数,类型和数据库表属性类型相一致,优势:方便计算,如工资涨100可直接输出salary+100
String name = rs.getString(1);
int id = rs.getInt(2);
String email = rs.getString(3);
String photo = rs.getString(4);
System.out.println(name+","+id+","+email+","+"birth") ;
}
} catch (Exception e) {
e.printStackTrace();
}finally{
if(rs!=null){
try {
rs.close();
} catch (SQLException throwables) {
throwables.printStackTrace();
}
}
if(stat!=null){
try {
stat.close();
} catch (SQLException throwables) {
throwables.printStackTrace();
}
}
if(conn!=null){
try {
conn.close();
} catch (SQLException throwables) {
throwables.printStackTrace();
}
}
}
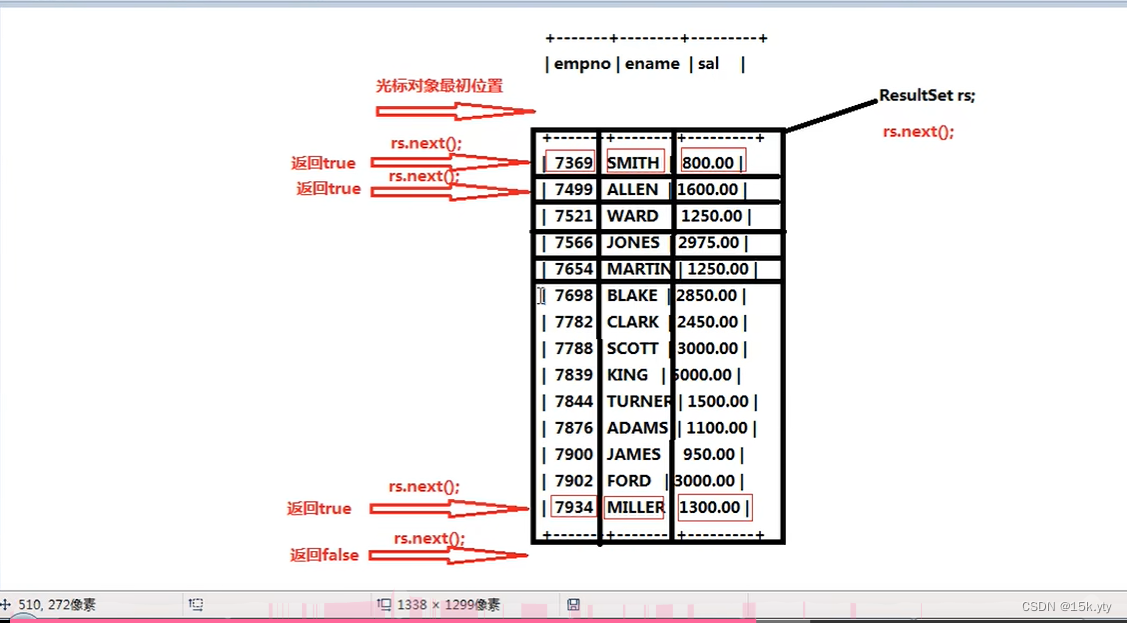
}next()方法
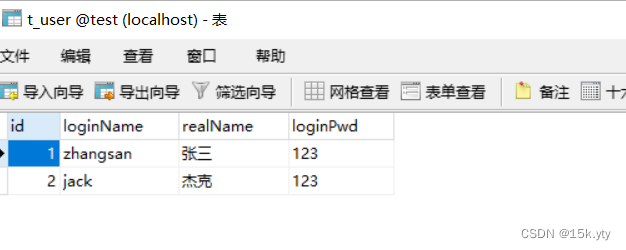
建立数据库表
public static void main(String[] args) {
// 初始化一个界面
Map<String,String> usserLoginInfo = initUI();
// 验证用户名和密码
boolean loginSuccess =login(usserLoginInfo);
// 最后输出结果
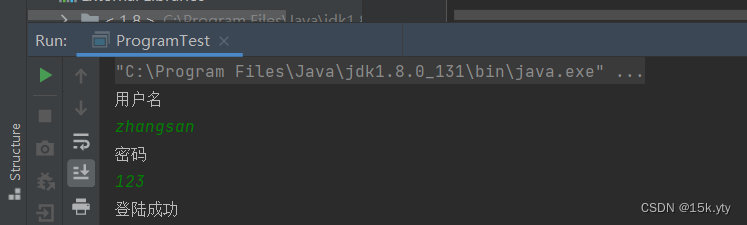
System.out.println(loginSuccess ? "登陆成功" :"登陆失败");
}
/**
*
* @param usserLoginInfo 用户登录信息
* @return false表示失败 true表示成功
*/
private static boolean login(Map<String, String> usserLoginInfo) {
boolean loginSuccess =false;
Statement stat = null;
Connection conn = null;
ResultSet rs = null;
String loginName = usserLoginInfo.get("loginName");
String loginPwd = usserLoginInfo.get("loginPwd");
try {
// 注册驱动
Class.forName("com.mysql.cj.jdbc.Driver");
// 获取链接
conn = DriverManager.getConnection("jdbc:mysql://127.0.0.1:3306/test?useUnicode=true&characterEncoding=utf8&serverTimezone=GMT","root","123456");
// 连接数据库操作对象
stat = conn.createStatement();
// 执行sql
String str = "select * from t_user where loginName = '"+loginName+"' and loginPwd = '"+loginPwd+"'";
rs = stat.executeQuery(str);
// 处理结果集
if(rs.next()){
loginSuccess = true;//如果查询到结果,赋予true
}
} catch (Exception e) {
e.printStackTrace();
}finally {
if(rs!=null){
try {
rs.close();
} catch (SQLException throwables) {
throwables.printStackTrace();
}
}
if(stat!=null){
try {
stat.close();
} catch (SQLException throwables) {
throwables.printStackTrace();
}
}
if(conn!=null){
try {
conn.close();
} catch (SQLException throwables) {
throwables.printStackTrace();
}
}
}
return loginSuccess;
}
/**
* 初始化用户界面
@return 用户输入的用户名和密码
*/
private static Map<String, String> initUI() {
Scanner s = new Scanner(System.in);
System.out.println("用户名");
String loginName = s.nextLine();
System.out.println("密码");
String loginPwd = s.nextLine();
// 用户名和密码都有了接下来组装一个MAP集合
Map<String,String> userLoginInfo1 = new HashMap<>();
userLoginInfo1.put("loginName",loginName);
userLoginInfo1.put("loginPwd",loginPwd);
return userLoginInfo1;
}
但当前程序存在问题 


(该程序将1=1恒成立编译到SQL语句,程序识别为TRUE即可登录进去)
解决SQL注入


 public static void main(String[] args) {
//        初始化一个界面
        Map<String,String> userLoginInfo =initUi();
//        验证用户名和密码
       boolean loginSuccess =  login(userLoginInfo);
        //        最后输出结果
        System.out.println(loginSuccess ? "登陆成功" :"登陆失败");
    }

    /**
     *
     * @param userLoginInfo 用户登录信息
     * @return false表示失败,true表示成功
     */
    private static boolean login(Map<String, String> userLoginInfo) {
        Connection conn = null;
        PreparedStatement ps = null;
        ResultSet rs = null;
        boolean loginSuccess =false;
        String loginName =  userLoginInfo.get("loginName");
        String loginPwd = userLoginInfo.get("loginPwd");

        try {
            Class.forName("com.mysql.cj.jdbc.Driver");

            conn = DriverManager.getConnection("jdbc:mysql://127.0.0.1:3306/test?useUnicode=true&characterEncoding=utf8&serverTimezone=GMT","root","123456");
  //程序执行到此处会发送SQL语句框子给DBMS,然后DBMS进行SQL语句的预先编译
            String str = "select * from t_user where loginName = ?  and loginPwd = ?";
            ps= conn.prepareStatement(str);
            ps.setString(1,loginName);
            ps.setString(2,loginPwd);
            rs=ps.executeQuery();
            if(rs.next()){
                loginSuccess = true;
            }
        } catch (Exception e) {
            e.printStackTrace();
        }finally {
            if(rs!=null){
                try {
                    rs.close();
                } catch (SQLException throwables) {
                    throwables.printStackTrace();
                }
            }
            if(ps!=null){
                try {
                    ps.close();
                } catch (SQLException throwables) {
                    throwables.printStackTrace();
                }
            }
            if(conn!=null){
                try {
                    conn.close();
                } catch (SQLException throwables) {
                    throwables.printStackTrace();
                }
            }
        }

        return loginSuccess;
    }

    /**
     * 初筛化用户界面
     * @return 用户输入的用户名和密码
     */

    private static Map<String, String> initUi() {
        Scanner s = new Scanner(System.in);

        System.out.println("用户名");
        String loginName = s.nextLine();
        System.out.println("密码");
        String loginPwd = s.nextLine();
        Map<String ,String > userLoginInfo = new HashMap<>();
        userLoginInfo.put("loginName",loginName);
        userLoginInfo.put("loginPwd",loginPwd);
        return userLoginInfo;


    }


使用自动提交则是一条SQL语句执行一次提交一次,发生异常时会导致数据丢失。如本案例111给222转账发生异常111丢失10000,222未收到10000;
 public static void main(String[] args) {


        Connection conn = null;
        PreparedStatement ps = null;
        ResultSet rs = null;

        try {
//            注册驱动
            Class.forName("com.mysql.cj.jdbc.Driver");
//            获取链接
            conn = DriverManager.getConnection("jdbc:mysql://127.0.0.1:3306/test?useUnicode=true&characterEncoding=utf8&serverTimezone=GMT","root","123456");
//将自动提交事务改成手动提交setAutoCommit(false);传FALSE表示禁用手动提交


            //            连接数据库操作对象
            String sal =  "update t_act set balance = ? where actno = ?  ";
            ps = conn.prepareStatement(sal);

            ps.setString(1,"10000");
            ps.setString(2,"111");
            int count = ps.executeUpdate();

//            添加空指针,查看是否会发生异常后转账钱数丢失
            String s =null;
            s.toString();

            ps.setString(1,"10000");
            ps.setString(2,"222");
            count += ps.executeUpdate();
            System.out.println(count == 2 ?"转账成功":"转账失败");
//程序只要能走到这说明程序没有异常,事务结束,手动提交数据


        } catch (Exception e) {

            e.printStackTrace();
        }finally {
            if(rs!=null){
                try {
                    rs.close();
                } catch (SQLException throwables) {
                    throwables.printStackTrace();
                }
            }
            if(ps!=null){
                try {
                    ps.close();
                } catch (SQLException throwables) {
                    throwables.printStackTrace();
                }
            }
            if(conn!=null){
                try {
                    conn.close();
                } catch (SQLException throwables) {
                    throwables.printStackTrace();
                }
            }
        }


    }
发生空指针异常 ,丢失10000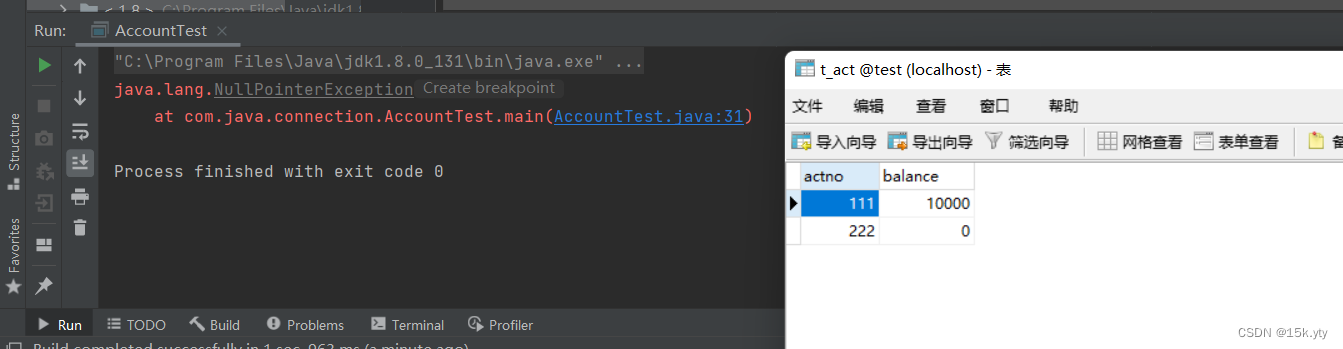
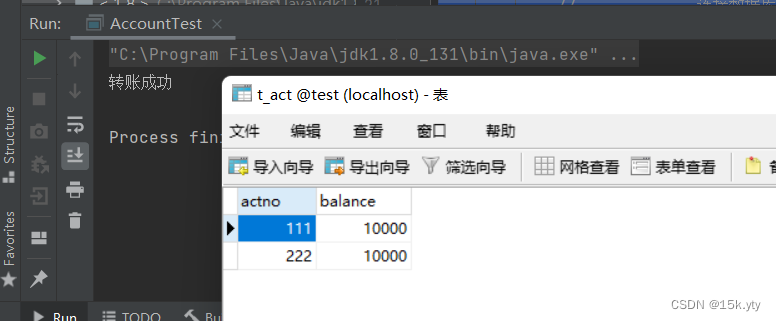
使用手动提交则是所有SQL语句执行完一起提交发生异常事务回滚数据不会丢失,发生异常时会导致数据丢失。如本案例111给222转账发生异常111还是20000,222是0;
 public static void main(String[] args) {


        Connection conn = null;
        PreparedStatement ps = null;
        ResultSet rs = null;

        try {
//            注册驱动
            Class.forName("com.mysql.cj.jdbc.Driver");
//            获取链接
            conn = DriverManager.getConnection("jdbc:mysql://127.0.0.1:3306/test?useUnicode=true&characterEncoding=utf8&serverTimezone=GMT","root","123456");
//将自动提交事务改成手动提交setAutoCommit(false);传FALSE表示禁用手动提交
            conn.setAutoCommit(false);//开启事务

            //            连接数据库操作对象
            String sal =  "update t_act set balance = ? where actno = ?  ";
            ps = conn.prepareStatement(sal);

            ps.setString(1,"10000");
            ps.setString(2,"111");
            int count = ps.executeUpdate();

//            添加空指针,查看是否会发生异常后转账钱数丢失
//            String s =null;
//            s.toString();

            ps.setString(1,"10000");
            ps.setString(2,"222");
            count += ps.executeUpdate();
            System.out.println(count == 2 ?"转账成功":"转账失败");
//程序只要能走到这说明程序没有异常,事务结束,手动提交数据
            conn.commit();//提交事务

        } catch (Exception e) {
//            为了保证数据的安全性,必须回滚事务
            if(conn !=null){
                try {
                    conn.rollback();//回滚事务
                } catch (SQLException throwables) {
                    throwables.printStackTrace();
                }
            }
            e.printStackTrace();
        }finally {
            if(rs!=null){
                try {
                    rs.close();
                } catch (SQLException throwables) {
                    throwables.printStackTrace();
                }
            }
            if(ps!=null){
                try {
                    ps.close();
                } catch (SQLException throwables) {
                    throwables.printStackTrace();
                }
            }
            if(conn!=null){
                try {
                    conn.close();
                } catch (SQLException throwables) {
                    throwables.printStackTrace();
                }
            }
        }


    }
发生 空指针异常情况
 不发生异常
不发生异常
封装后可直接调用,不用一遍一遍的写
public class DBUtil {
/**
 * 工具类的构造方法都是私有的
 * 应为工具类当中的方法都是静态的,不需要new对象,直接采纳类名调用
 */
private DBUtil(){}

//    静态代码块在类加载时执行,并且只执行一次
    static {
    try {
        Class.forName("com.mysql.cj.jdbc.Driver");
    } catch (ClassNotFoundException e) {
        e.printStackTrace();
    }
}
/**
 * 获取数据库连接对象
 * @return 连接对象
 * @thrown SQLException
 */
//工具类确实一般不处理异常  直接抛出  谁来调用你谁来try catch
public static Connection getConnection() throws SQLException {
    return DriverManager.getConnection("jdbc:mysql://127.0.0.1:3306/test?useUnicode=true&characterEncoding=utf8&serverTimezone=GMT","root","123456");

    }

    /**
     * 关闭资源
     * @param conn 连接对象
     * @param ps 数据库操作对象
     * @param rs 结果集
     */
    public static void close(Connection conn, Statement ps, ResultSet rs){
        if(rs!=null){
            try {
                rs.close();
            } catch (SQLException throwables) {
                throwables.printStackTrace();
            }
        }
        if(ps!=null){
            try {
                ps.close();
            } catch (SQLException throwables) {
                throwables.printStackTrace();
            }
        }
        if(conn!=null){
            try {
                conn.close();
            } catch (SQLException throwables) {
                throwables.printStackTrace();
            }
        }
    }
调用封装类
  public static void main(String[] args) {
        Connection conn =null;
        PreparedStatement ps = null;
        ResultSet rs = null;

        try {
//            获取链接
            conn = DBUtil.getConnection();
//            获取预编译操作对象
            String str = "select name from user where name like ?";
            ps = conn.prepareStatement(str);
            ps.setString(1,"_子%");
            rs = ps.executeQuery();
            while (rs.next()){
                System.out.println(rs.getString("name"));
            }


        } catch (Exception throwables) {
            throwables.printStackTrace();
        }finally {
            DBUtil.close(conn,ps,rs);
        }
    }
我主要使用Ruby来执行此操作,但到目前为止我的攻击计划如下:使用gemsrdf、rdf-rdfa和rdf-microdata或mida来解析给定任何URI的数据。我认为最好映射到像schema.org这样的统一模式,例如使用这个yaml文件,它试图描述数据词汇表和opengraph到schema.org之间的转换:#SchemaXtoschema.orgconversion#data-vocabularyDV:name:namestreet-address:streetAddressregion:addressRegionlocality:addressLocalityphoto:i
我正在使用Sequel构建一个愿望list系统。我有一个wishlists和itemstable和一个items_wishlists连接表(该名称是续集选择的名称)。items_wishlists表还有一个用于facebookid的额外列(因此我可以存储opengraph操作),这是一个NOTNULL列。我还有Wishlist和Item具有续集many_to_many关联的模型已建立。Wishlist类也有:selectmany_to_many关联的选项设置为select:[:items.*,:items_wishlists__facebook_action_id].有没有一种方法可以
我使用的是Firefox版本36.0.1和Selenium-Webdrivergem版本2.45.0。我能够创建Firefox实例,但无法使用脚本继续进行进一步的操作无法在60秒内获得稳定的Firefox连接(127.0.0.1:7055)错误。有人能帮帮我吗? 最佳答案 我遇到了同样的问题。降级到firefoxv33后一切正常。您可以找到旧版本here 关于ruby-无法在60秒内获得稳定的Firefox连接(127.0.0.1:7055),我们在StackOverflow上找到一个类
有时我需要处理键/值数据。我不喜欢使用数组,因为它们在大小上没有限制(很容易不小心添加超过2个项目,而且您最终需要稍后验证大小)。此外,0和1的索引变成了魔数(MagicNumber),并且在传达含义方面做得很差(“当我说0时,我的意思是head...”)。散列也不合适,因为可能会不小心添加额外的条目。我写了下面的类来解决这个问题:classPairattr_accessor:head,:taildefinitialize(h,t)@head,@tail=h,tendend它工作得很好并且解决了问题,但我很想知道:Ruby标准库是否已经带有这样一个类? 最佳
我正在尝试使用Curbgem执行以下POST以解析云curl-XPOST\-H"X-Parse-Application-Id:PARSE_APP_ID"\-H"X-Parse-REST-API-Key:PARSE_API_KEY"\-H"Content-Type:image/jpeg"\--data-binary'@myPicture.jpg'\https://api.parse.com/1/files/pic.jpg用这个:curl=Curl::Easy.new("https://api.parse.com/1/files/lion.jpg")curl.multipart_form_
无论您是想搭建桌面端、WEB端或者移动端APP应用,HOOPSPlatform组件都可以为您提供弹性的3D集成架构,同时,由工业领域3D技术专家组成的HOOPS技术团队也能为您提供技术支持服务。如果您的客户期望有一种在多个平台(桌面/WEB/APP,而且某些客户端是“瘦”客户端)快速、方便地将数据接入到3D应用系统的解决方案,并且当访问数据时,在各个平台上的性能和用户体验保持一致,HOOPSPlatform将帮助您完成。利用HOOPSPlatform,您可以开发在任何环境下的3D基础应用架构。HOOPSPlatform可以帮您打造3D创新型产品,HOOPSSDK包含的技术有:快速且准确的CAD
本教程将在Unity3D中混合Optitrack与数据手套的数据流,在人体运动的基础上,添加双手手指部分的运动。双手手背的角度仍由Optitrack提供,数据手套提供双手手指的角度。 01 客户端软件分别安装MotiveBody与MotionVenus并校准人体与数据手套。MotiveBodyMotionVenus数据手套使用、校准流程参照:https://gitee.com/foheart_1/foheart-h1-data-summary.git02 数据转发打开MotiveBody软件的Streaming,开始向Unity3D广播数据;MotionVenus中设置->选项选择Unit
文章目录一、概述简介原理模块二、配置Mysql使用版本环境要求1.操作系统2.mysql要求三、配置canal-server离线下载在线下载上传解压修改配置单机配置集群配置分库分表配置1.修改全局配置2.实例配置垂直分库水平分库3.修改group-instance.xml4.启动监听四、配置canal-adapter1修改启动配置2配置映射文件3启动ES数据同步查询所有订阅同步数据同步开关启动4.验证五、配置canal-admin一、概述简介canal是Alibaba旗下的一款开源项目,Java开发。基于数据库增量日志解析,提供增量数据订阅&消费。Git地址:https://github.co
我正在尝试在Rails上安装ruby,到目前为止一切都已安装,但是当我尝试使用rakedb:create创建数据库时,我收到一个奇怪的错误:dyld:lazysymbolbindingfailed:Symbolnotfound:_mysql_get_client_infoReferencedfrom:/Library/Ruby/Gems/1.8/gems/mysql2-0.3.11/lib/mysql2/mysql2.bundleExpectedin:flatnamespacedyld:Symbolnotfound:_mysql_get_client_infoReferencedf
文章目录1.开发板选择*用到的资源2.串口通信(个人理解)3.代码分析(注释比较详细)1.主函数2.串口1配置3.串口2配置以及中断函数4.注意问题5.源码链接1.开发板选择我用的是STM32F103RCT6的板子,不过代码大概在F103系列的板子上都可以运行,我试过在野火103的霸道板上也可以,主要看一下串口对应的引脚一不一样就行了,不一样的就更改一下。*用到的资源keil5软件这里用到了两个串口资源,采集数据一个,串口通信一个,板子对应引脚如下:串口1,TX:PA9,RX:PA10串口2,TX:PA2,RX:PA32.串口通信(个人理解)我就从串口采集传感器数据这个过程说一下我自己的理解,