文章目录
微信官方文档:https://developers.weixin.qq.com/miniprogram/dev/api/route/EventChannel.html
尚硅谷微信小程序开发:https://www.bilibili.com/video/BV12K411A7A2?p=1&vd_source=4c39d5508943c58ce334d714f68f2df7

官方API文档:https://developers.weixin.qq.com/miniprogram/dev/component/swiper.html
  <swiper
   class="banners"
   indicator-dots
   indicator-active-color="ivory"
   indicator-active-color="#d43c33"
   autoplay
  >
    <swiper-item>
      <image src="../../static/images/nvsheng.jpg" alt="" />
    </swiper-item>
    <swiper-item>
      <image src="../../static/images/nvsheng.jpg" alt="" />
    </swiper-item>
    <swiper-item>
      <image src="../../static/images/nvsheng.jpg" alt="" />
    </swiper-item>
    <swiper-item>
      <image src="../../static/images/nvsheng.jpg" alt="" />
    </swiper-item>
  </swiper>

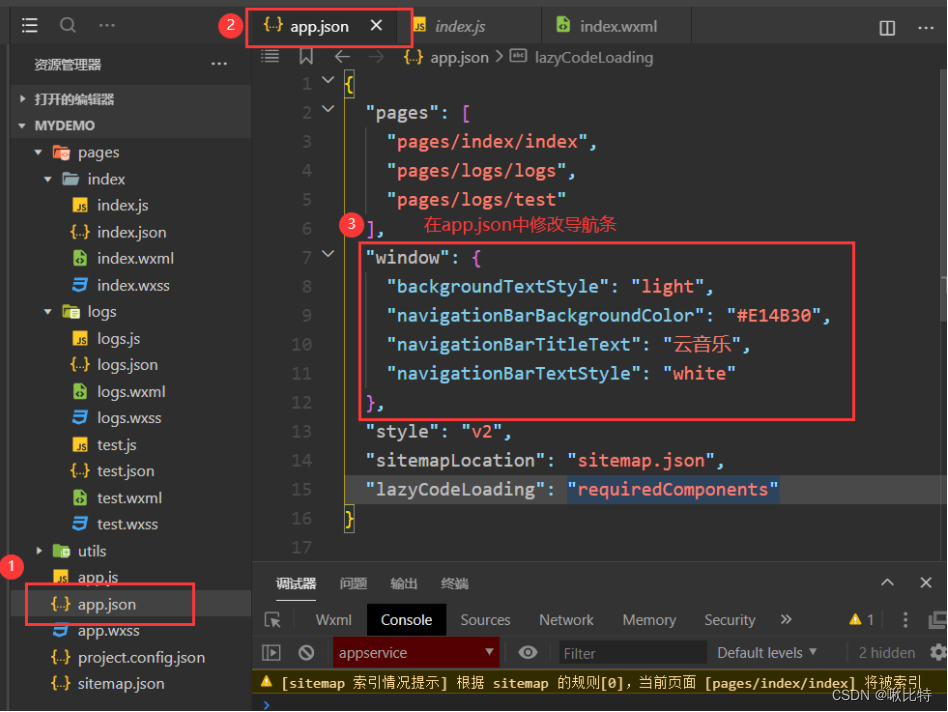
上面已经实现了静态页面的搭建,现在我们通过请求接口获取到轮播图。为了方便后续请求接口操作,我们将这部分代码进行封装(封装在utils/utils.js中),与vue类似,返回的是一个promise对象,但是是export出去的,因此不能使用解构赋值。
const publicRequest =(url,data={},methods='GET')=>{
  return new Promise((resolve,reject)=>{
    wx.request({
      url: url,
      data:data,
      methods:methods,
      success:(res)=> {
        console.log("请求成功!",res)
        resolve(res.data)
      },
      fail:(err)=>{
        console.log("请求失败",err)
        reject(err)
      }
    })
  })
}
请求banners
    let result = await util.publicRequest("http://localhost:3000/banner", {
      type: 2
    })
通过接口我们获取到了轮播图的图片,接下来我们对轮播图进行修改,使用wx:for来循环输出
<swiper
 class="banners"
 indicator-dots
 indicator-active-color="ivory"
 indicator-active-color="#d43c33"
 autoplay
>
    <swiper-item wx:for="{{banner}}" wx:key="item.index">
        <image src="{{item.pic}}" alt="" />
    </swiper-item>

</swiper>

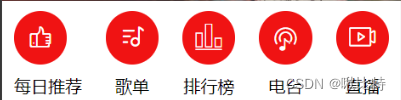
 <!-- 图标导航区域 -->
    <view class="navContainer">
        <view class="navItem">
            <text class="iconfont icon-meirituijian"></text>
            <text>每日推荐</text>
        </view>
        <view class="navItem">
            <text class="iconfont icon-gedan1"></text>
            <text class="">歌单</text>
        </view>
        <view class="navItem">
            <text class="iconfont icon-icon-ranking"></text>
            <text class="" >排行榜</text>
        </view>
        <view class="navItem">
            <text class="iconfont icon-diantai"></text>
            <text class="">电台</text>
        </view>
        <view class="navItem">
            <text class="iconfont icon-zhiboguankanliangbofangsheyingshexiangjixianxing"></text>
            <text class="">直播</text>
        </view>
    </view>
观察网易云音乐的推荐歌单部分,网易云音乐的这部分内容是类似于轮播图可以左右滑动的,这边我们使用scroll-view来实现。请求后端接口数据与轮播图一样就不赘述了,这边注意歌单的名字可能过长导致会出现重叠,因此我们需要对文本的溢出状态进行处理。
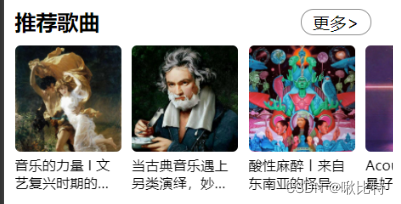
   <!-- 推荐歌曲 -->
    <view class="recommandSongContainer">
        <view
         class="title-more"
         selectable="false"
         space="false"
         decode="false"
        >
            <text class="title" selectable="false" space="false" decode="false">推荐歌曲</text>
            <text class="more">更多></text>
        </view>
        <!-- 具体歌单 -->
        <scroll-view
         class="recommandBox"
         scroll-x
         scroll-y="false"
         upper-threshold="50"
         lower-threshold="50"
         scroll-top="0"
         scroll-left="0"
         scroll-into-view=""
         scroll-with-animation="false"
         enable-back-to-top="false"
         bindscrolltoupper=""
         bindscrolltolower=""
         bindscroll=""
         enable-flex
        >
            <view
             class="scrollItem"
             hover-class="none"
             hover-stop-propagation="false"
             wx:for="{{scrollList}}"
            >
                <image class="" src="{{item.picUrl}}" />
                <text class="" selectable="false" space="false" decode="false">{{item.name}}</text>
            </view>
        </scroll-view>
    </view>
white-space: nowrap;
overflow: hidden;
text-overflow: ellipsis;
display: block;
overflow: hidden;
  display: -webkit-box;
  text-overflow: ellipsis;//超出省略号
  -webkit-box-orient: vertical;
  -webkit-line-clamp: 2;//控制显示的行数
移动端的网易云音乐中,各个排行榜是可以左右滑动的,单个的排行榜上下可滑动,我们使用scroll-view来实现。与之前的图标导航类似。
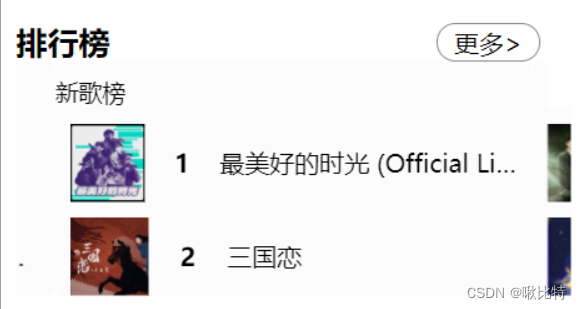
  <!-- 排行榜区域 -->
    <view class="topList">
        <view
         class="title-more"
         selectable="false"
         space="false"
         decode="false"
        >
            <text class="title" selectable="false" space="false" decode="false">排行榜</text>
            <text class="more">更多></text>
        </view>
        <!-- 内容主体区域 -->
        <swiper class="topList-body" circular   previous-margin="50rpx" next-margin="50rpx">
            <swiper-item class="topListItem" wx:for="{{topList}}">
                <view class="list-title">{{item.name}}</view>
                <view class="item-detail" wx:for="{{item.tracks}}" wx:for-index="idx" wx:for-item="itemName" wx:key="id">
                    <image src="{{itemName.al.picUrl}}" />
                    <text class="count">{{idx+1}}</text>
                    <text class="musicName">{{itemName.name}}</text>
                </view>
            </swiper-item>
        </swiper>
    </view>
 let resultArr = []
    while (index < 5) {
      let topLists = await util.publicRequest("http://localhost:3000/top/list", {
        idx: index++
      })
      let topListItem = {
        name: topLists.playlist.name,
        tracks: topLists.playlist.tracks.slice(0, 3)
      }
      resultArr.push(topListItem)
    }
    this.setData({
      topList: resultArr
    })
微信小程序通过三个事件共同作用实现了触摸滑动事件,即 bingtouchstart、bindtouchmove 和 bindtouchend 事件。如果对js移动端点击事件touchstart和touchend不太熟悉的,可以看一下这篇博客。(https://blog.csdn.net/paopaosama/article/details/82380524)
实现效果
TIP 小程序中背景图片background-image无法加载本地图片,只能加载网络图片或者是base64图片,可以使用
,然后使用z-index将图片置于底层从而实现背景图片的效果
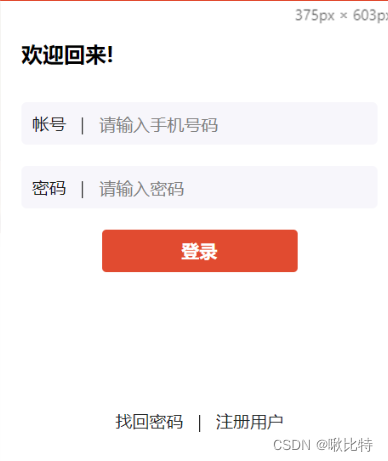
我们要实现简单的用户登录效果,这边使用到的接口地址是:/login/cellphone
调用例子:/login/cellphone?phone=xxx&password=yyy
在登录时候要对手机号进行验证,判断手机号是否输入正确。
  // 验证手机号规则
  phoneNumberRule(str) {
    var reg = /^(13[0-9]|14[01456879]|15[0-35-9]|16[2567]|17[0-8]|18[0-9]|19[0-35-9])\d{8}$/
    if (reg.test(str)) {
        return true
    } else {
        return false
    }
},
完成登录后使用wx.setStorageSync对用户信息进行缓存,完整的登录代码如下所示。
 async formSubmit(e) {
    let form_data = e.detail.value
    // 验证手机号
    if(!form_data.phone){
      wx.showToast({
        title: "手机号不能为空!",
        icon: 'none',
        duration: 2000//持续的时间
      })
      return
    }else if(!this.phoneNumberRule(form_data.phone)){
      wx.showToast({
        title: "请输入正确的手机号码!",
        icon: 'none',
        duration: 2000//持续的时间
      })
      return
    }else if(!form_data.password){
      wx.showToast({
        title: "密码不能为空!",
        icon: 'none',
        duration: 2000//持续的时间
      })
      return
    }
    let res = await util.publicRequest("http://localhost:3000/login/cellphone",form_data)
    // 登录失败返回
    if(res.code == 400){
      wx.showToast({
        title: "手机号错误",
        icon: 'none',
        duration: 2000//持续的时间
      })
      return
    }
    if (res.code != 200){
      wx.showToast({
        title: res.msg,
        icon: 'none',
        duration: 2000//持续的时间
      })
      return
    }
    // 登录成功操作,返回上一级
    // 缓存用户信息
    wx.setStorageSync('userInfo', JSON.stringify(res.profile))
    wx.showToast({
      title: "登录成功",
      icon: 'success',
      duration: 1000//持续的时间
    })

    setTimeout(()=>{
      wx.reLaunch({
        url: '/pages/personal/personal'
      })
    },1000)


  },
后续在获取信息时,需要登录,因此我们需要将cookies信息进行缓存。这里修改util.js中封装的请求函数。添加请求头,因为只有在登录时才缓存cookies,所以添加判断的isLogin
const publicRequest =(url,data={},methods='GET')=>{
  return new Promise((resolve,reject)=>{
    wx.request({
      url: url,
      data:data,
      methods:methods,
      header:{
        cookie:wx.getStorageSync('cookies')?wx.getStorageSync('cookies').find(item => item.indexOf('MUSIC_U') !== -1):''
      },
      success:(res)=> {
        if(data.isLogin){
          wx.setStorage({
            data: res.cookies,
            key: 'cookies',
          })
        }
        console.log("请求成功!",res)
        resolve(res.data)
      },
      fail:(err)=>{
        console.log("请求失败",err)
        reject(err)
      }
    })
  })
}
点击发送按钮,向输入的手机号码发送短信验证码,发送按钮文字发生改变进行倒计时,倒计时结束后显示重新发送
// 发送验证码
  async sendCode(){
    var phone = this.data.phone
    if(phone == ''){
      wx.showToast({
        title: "手机号码不能为空",
        icon: 'none',
        duration: 2000//持续的时间
      })
      return
    }
    let res = await util.publicRequest("http://localhost:3000/captcha/sent",{
      phone:this.data.phone
    })
    let t = 10;
    var time = setInterval(() => {
        t--;
        let str = ''
        if (t == 0) {
          str = '重新发送'
          clearInterval(time)
        }else{
          str = t+'s重新发送'
        }
        this.setData({
          btnData:str
        })
    }, 1000);
  }
登录成功跳转个人中心页,并类似于用户登录将用户信息缓存渲染。
async formSubmit(e) {
    let form_data = e.detail.value
    // 验证手机号
    if(!form_data.phone){
      wx.showToast({
        title: "手机号不能为空!",
        icon: 'none',
        duration: 2000//持续的时间
      })
      return
    }else if(!this.phoneNumberRule(form_data.phone)){
      wx.showToast({
        title: "请输入正确的手机号码!",
        icon: 'none',
        duration: 2000//持续的时间
      })
      return
    }else if(!form_data.password){
      wx.showToast({
        title: "密码不能为空!",
        icon: 'none',
        duration: 2000//持续的时间
      })
      return
    }else if (!form_data.captcha){
      wx.showToast({
        title: "验证码不能为空",
        icon: 'none',
        duration: 2000//持续的时间
      })
      return
    }else if(!form_data.nickname){
      wx.showToast({
        title: "用户昵称不能为空",
        icon: 'none',
        duration: 2000//持续的时间
      })
      return
    }

    let res_captcha = await util.publicRequest("http://localhost:3000/captcha/verify",{
      captcha:form_data.captcha,
      phone:form_data.phone
    })
    if(res_captcha.code != 200){
      wx.showToast({
        title: "验证码不正确",
        icon: 'none',
        duration: 2000//持续的时间
      })
      return
    }
    let res = await util.publicRequest("http://localhost:3000/register/cellphone",form_data)
    console.log(res)
    if(res.code == 200){
 // 注册成功操作,返回上一级
    // 缓存用户信息
    wx.setStorageSync('userInfo', JSON.stringify(res.profile))
    wx.showToast({
      title: "注册成功",
      icon: 'success',
      duration: 1000//持续的时间
    })

    setTimeout(()=>{
      wx.reLaunch({
        url: '/pages/personal/personal'
      })
    },1000)
        return
    }
    wx.showToast({
      title: res.msg,
      icon: 'none',
      duration: 2000//持续的时间
    })


  },
弹性盒子
scroll-view
  async getVideoList(){
    let data = await util.publicRequest("http://localhost:3000/video/group/list")
    this.setData({
      videoList:data.data.splice(0,14)
    })
  },
<scroll-view class="navScroll" scroll-x enable-flex>
    <view class="navItem " hover-class="none" hover-stop-propagation="false" wx:for="{{videoList}}" wx:key="item.index">
        <view class="navContent {{navId==item.id?'active':''}}" bindtap='clickTab' id="{{item.id}}">{{item.name}}</view>
    </view>
</scroll-view>
clickTab(e){
    var navId =e.currentTarget.id
    this.setData({
      navId:navId-0
    })
}
TIP:非number数据转成number数据 位移运算:data>>>0 右移0位会将非number数据强制转换成number 减0:
data-0 字符串减0 成整数
视频数据需要调用两个接口,一个是获取对应的分类下的视频列表,另一个是通过ID获取视频的播放地址,具体代码如下。
  async getVideoList(){
    let data = await util.publicRequest("http://localhost:3000/video/group/list")
    this.setData({
      videoList:data.data.splice(0,14),
      // navId:this.data.videoList[0].id-0
    })
    this.setData({
      navId:this.data.videoList[0].id-0
    })
    // 默认展示
    this.getVideo(this.data.videoList[0].id)
  },
  async getVideoUrl(id){
    let videoUrl = await util.publicRequest("http://localhost:3000/video/url",{id:id})
    return videoUrl.urls[0].url
  }
  ,
  async getVideo(id){
    let video = await util.publicRequest("http://localhost:3000/video/group",{id:id})
    // 关闭加载提示框
    wx.hideLoading()
    if(video.msg == '需要登录'){
      wx.showToast({
        title: '请先登录',
        icon: 'none',
        duration: 2000//持续的时间
      })
      setTimeout(()=>{
        wx.navigateTo({
          url: '../login/login',
        })
      },1000)
    }else{
      let index = 0
      // 请求分类下的视频
      let videos = video.datas.map(item =>{
        item.id = index++;
        this.getVideoUrl(item.data.vid).then(res=>{
          item['videoUrl'] = res;
        })
        // let videoUrl = await util.publicRequest("http://localhost:3000/video/url",{id:item.data.vid})
        return item;
      })
      this.setData({
        video:videos
      })

    }

  },
点击tab可以进行切换,需要修改之前的clickTab函数。
  clickTab(e){
    var navId =e.currentTarget.id
    this.setData({
      navId:navId-0,
      video:[]
    })
    wx.showLoading({
      title: '加载中',
    })
    this.getVideo(navId)
  },
当只需要简单的获取年月日之类的时候,直接利用Date()函数就行
var month=new Date().getFullYear()// 示例
console.log(new Date().getFullYear())// 年
console.log(new Date().getMonth()+1)// 月 注意+1
console.log(new Date().getDate())// 日
console.log(new Date().getHours())//小时
console.log(new Date().getMinutes())// 分钟
console.log(new Date().getSeconds())// 秒
console.log(new Date().getDay())//星期几
小程序的较多地方都需要时间戳的时候,可以封装一个函数来专门获取时间戳
function formatTime(date) {
  var year = date.getFullYear()
  var month = date.getMonth() + 1
  var day = date.getDate()
  var hour = date.getHours()
  var minute = date.getMinutes()
  var second = date.getSeconds()

  return [year, month, day].map(formatNumber).join('/')
}


function formatNumber(n) {
  n = n.toString()
  return n[1] ? n : '0' + n
}
getTime(){
    var date = new Date()
    this.setData({
      month:(date.getMonth()+1).toString().padStart(2,'0'),
      day:date.getDate().toString().padStart(2,'0')
    })
  },
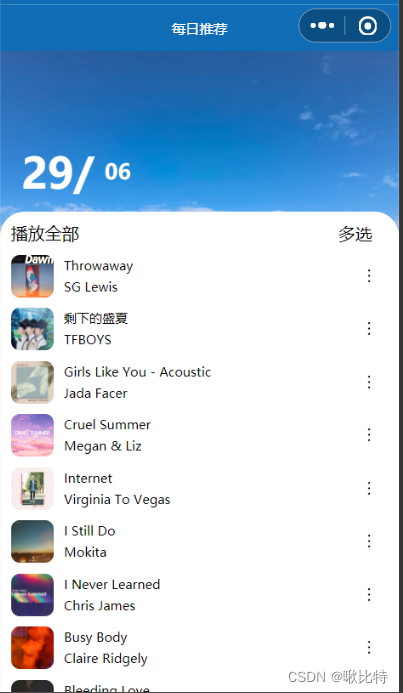
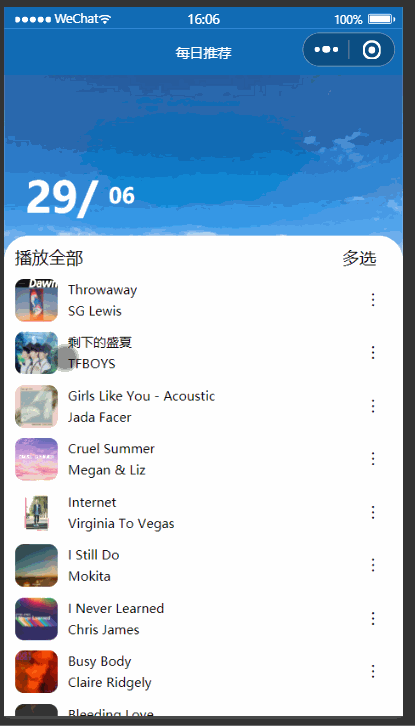
 async getSongList(){
    let songs = await util.publicRequest("http://localhost:3000/recommend/songs")
    if(songs.code == 200){
       this.setData({
         songList:songs.data.dailySongs
       })
    }
  },
将歌曲列表渲染到wxml文件中就基本实现我们要的效果了。
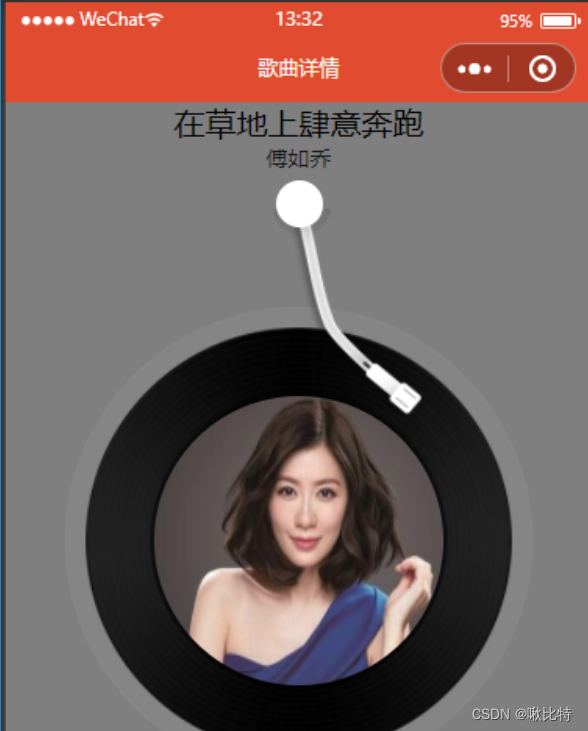
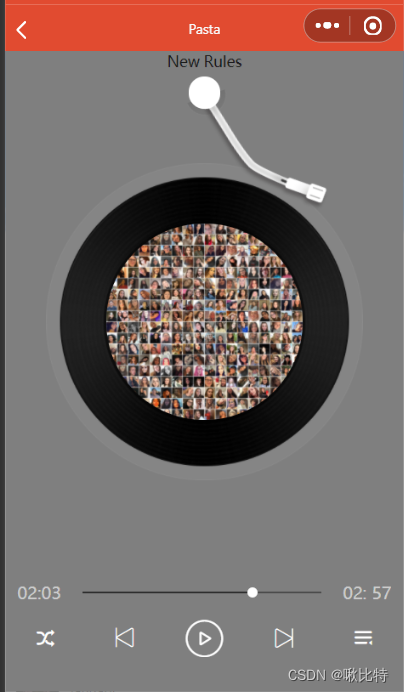
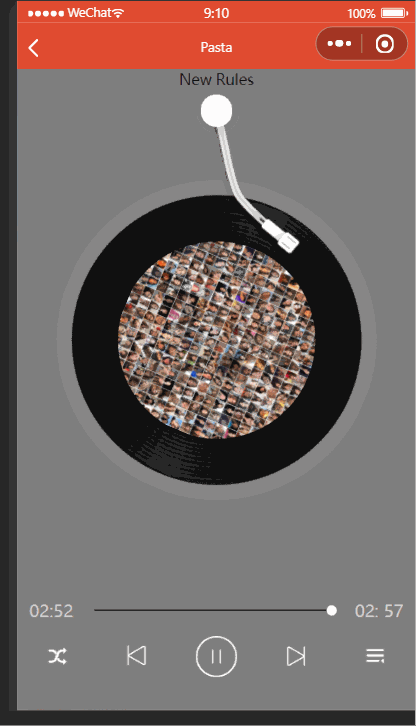
在音乐暂停播放时,摇杆应该抬起。为摇杆添加旋转动画。
transform: rotate(-20deg);
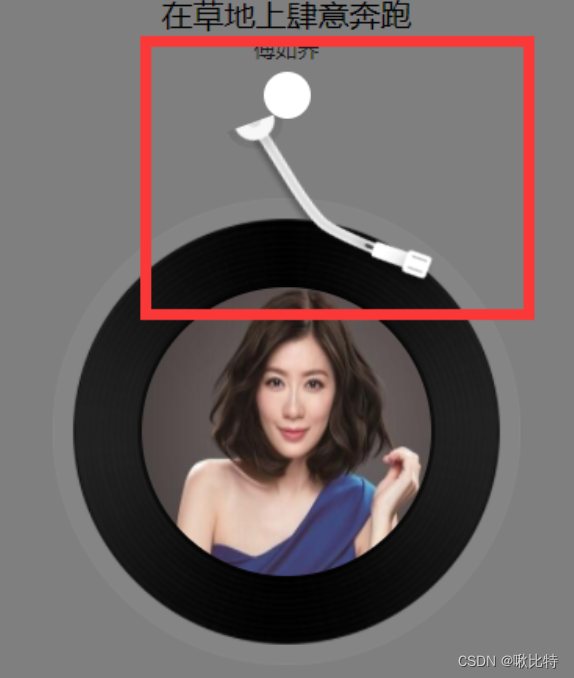
但是发现效果不尽如人意,摇杆与底座发生了分离。这是由于默认的旋转中心在正中心(50% 50%)处,为了达到我们要的效果,我们需要重新设置旋转的中心,这样就可以达到我们要的效果。
transform-origin:40rpx 0 ;
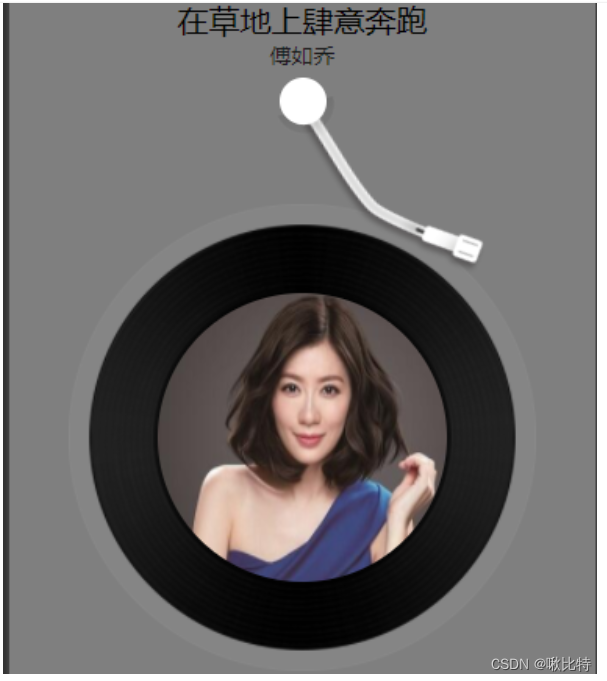
这样我们就可以实现磁盘的转动了
.disc-container-play{
  animation: rotate1 5s linear infinite;
}
@keyframes rotate1 {
  from{
    transform: rotate(0deg);
  }
  to {
      /*变换 transform;旋转 rotate */
      transform: rotate(360deg);
  }
}
在每日推荐页面使用自定义的属性来传递歌曲的详细信息
  go2songDetail(e){
    // 获取自定义的参数
    let song = e.currentTarget.dataset.song;
    wx.navigateTo({
      url: '../songDetail/songDetail?song='+JSON.stringify(song),
    })
  },
在歌曲详情页面中,onLoad函数的option中可以获取到传递过来的参数。如果在转JSON的过程中出现如下错误。这是由于原生小程序中路由传参,对参数的长度有限制,如果参数长度过长会自动截取

由于我们最终只是需要歌曲的ID因此在传参的时候,我们只需要传递一个musicId 就行。在歌曲详情页面中的onload函数,可以通过options获取到路由跳转传递的参数。
了解完路由跳转如何传递参数之后,接下来获取并渲染歌曲的详细信息,这边要用到的是/song/detail这个接口。观察返回来的数据,发现网易云的这个接口中,并没有歌曲的播放地址,我们还需要使用到/song/url来获取音乐url.
  async getSongDetail(){
    let res = await util.publicRequest("http://localhost:3000/song/detail",{
      ids:this.data.ids
    })
    this.setData({
      musicInfo:res.songs[0],
      musicUrlId:res.privileges[0].id
    })
    wx.setNavigationBarTitle({
      title: res.songs[0].name
    })
  },
  async getSongUrl(){
    let res = await util.publicRequest("http://localhost:3000/song/url",{
      id:this.data.musicUrlId
    })
    return res.data[0]
  },
要实现背景音乐播放需要声明一个全局唯一的背景音频管理器wx.getBackgroundAudioManager(),需要给音频管理器传递一个src以及title,这样音乐就能正常播放了。
  this.getSongUrl().then(item=>{
    this.bgAudioManager.src = item.url
  })
  this.bgAudioManager.title = this.data.musicInfo.name
如果用户操作系统的控制音乐播放/暂停的按钮,页面播放状态没有发生改变,从而导致播放状态不一致,这边需要使用到几个监听事件,监听音乐的播放和暂停。
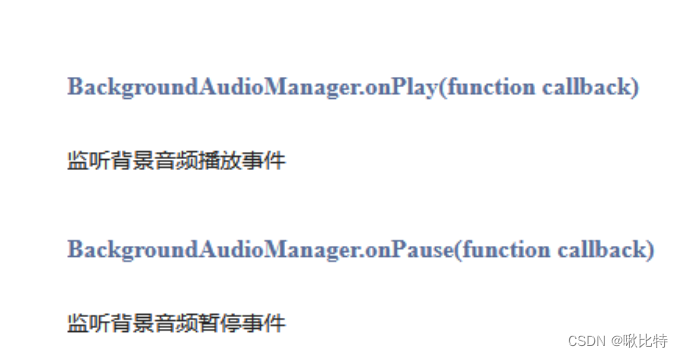
this.bgAudioManager.onPlay(()=>{
  this.changePlayState(true)//封装的修改音乐状态的函数
})
this.bgAudioManager.onPause(()=>{
  this.changePlayState(false)
})
在真机上进行调试的时候,会有一个小窗口,当点击小窗口的关闭按钮时也应该修改音乐的播放状态,将音乐停止播放,需要用到的是
BackgroundAudioManager.onStop(function callback)来监听音乐的停止事件。
    this.bgAudioManager.onStop(()=>{
      this.changePlayState(false)
    })
音乐播放时如果返回到每日推荐页面,然后重新点击原来播放的音乐,isPlay被重置为false,这会导致系统的播放状态与页面的播放状态不一致。
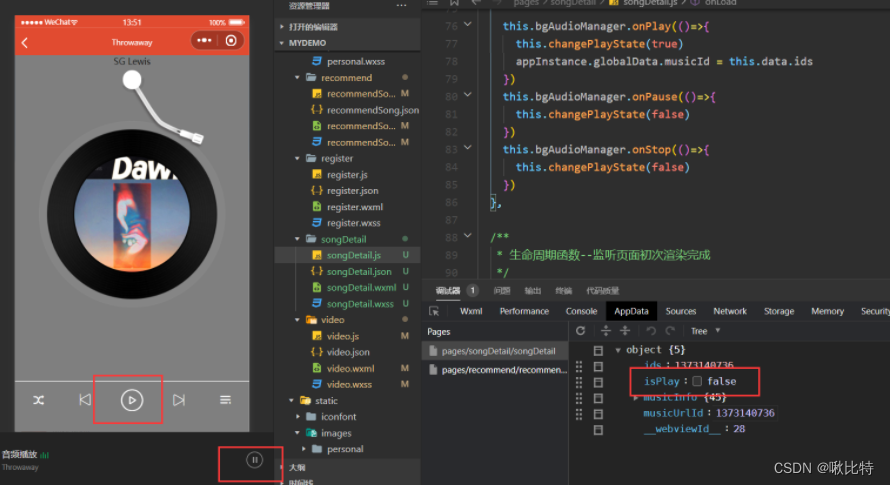
解决方法
设置两个全局变量musicId和isPlay,在onload函数中判断App.js定义的全局变量中的musicId与页面中的musicId是否相同来控制页面中歌曲的播放状态。注意:每次在修改页面中的isPlay的同时也要修改全局变量中的isPlay。
全局变量的获取方法:
// 获取全局实例
const appInstance = getApp()
// 获取全局变量
appInstance.globalData.musicId = this.data.ids
 //  判断当前页面音乐是否在播放
  if(appInstance.globalData.isPlay && appInstance.globalData.musicId==musicId){
    // 如果是播放的歌曲ID相同,则修改为true
    this.setData({
      isPlay:true
    })
  }
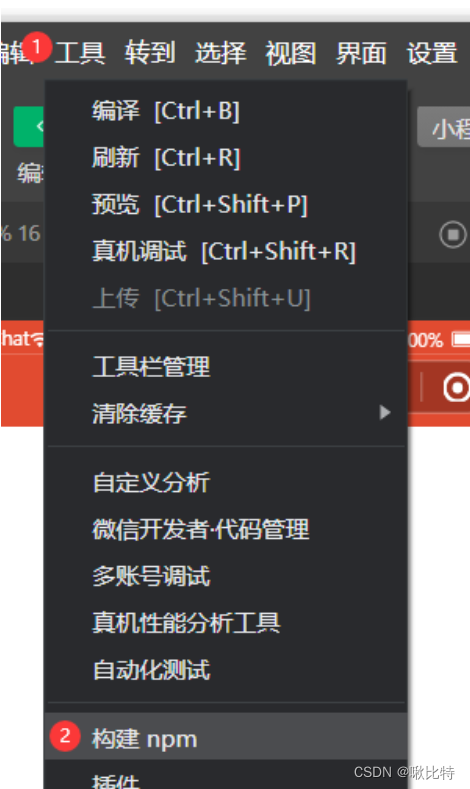
小程序使用npm包
初始化package.json npm init -y
勾选允许使用npm
下载npm包----pubsub-js
npm install pubsub-js
在页面中导入包的时候,如果出现如下报错:
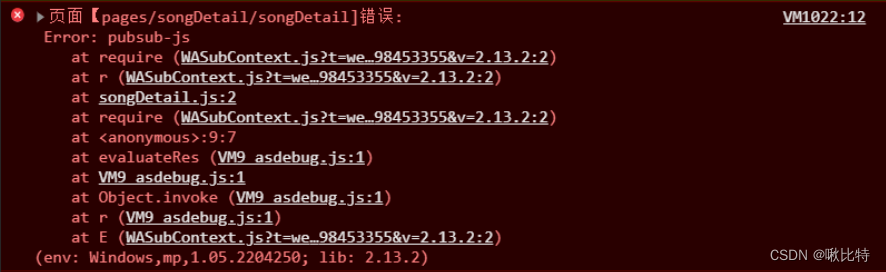
可以使用工具-构建npm将mode_modules中的内容添加到程序中的包,这样引入PubSub就不会报错了。
在上面一节的介绍中,我们对自定义事件的发布者和订阅者有了简单的了解。这一节中我们将使用PubSub来实现页面的通信。首先我们需要分清楚每日推荐和歌曲详情两个页面哪一个是订阅者,哪一个是发布者,发布者和订阅者哪一个应该先呢?答案是显而易见的,必须要先有发布者然后才能有订阅者,对应到我们的需求中,必须在歌曲详情页面中点击上一首/下一首的切歌才会和每日推荐页面进行通信。因此,我们需要在songDetail.js获取到是上一首还是下一首,然后将对应的类型传递给recommendSong.js获取到上一首/下一首歌曲的id并 传递给songDetail页面。
    // 在songDetail中点击上一首/下一首触发handleSwitch函数
    let type = event.currentTarget.id//存放操作类型
    PubSub.publish('switchType',type)//传递操作类型
// 在recommendSong中获取到传递过来的type
PubSub.subscribe('switchType',(msg,data)=>{
      // es6解构赋值,获取歌曲列表和初始化的下标值
      let {songList,index } = this.data
      if(data === 'pre'){
        index-=1
      }else{
        index +=1
      }
      // 判断Index的界限
      if(index===-1){
        index = songList.length-1
      }else if (index >=songList.length){
        index = 0
      }
      // 更新下标
      this.setData({
        index
      })
      // 传递歌曲ID
      let musicId = songList[index].id
      // 将获取的Music的id值发送歌曲详情页面
      PubSub.publish("musicID",musicId)
    })
// 在songDetail的handleSwitch函数中获取传递过来的musicID
PubSub.subscribe("musicID",(msg,data)=>{
      // 获取下一首歌曲的id
      let musicId = data
      //更新musicId
      this.setData({
        ids:musicId
      })
      // 获取歌曲详情
      this.getSongDetail()
      PubSub.unsubscribe("musicID")
    })
与之前一样,需要为背景音乐的管理实例添加src和title,这边将对应的函数进行了封装。
  async musicControl(isPlay,musicUrl){
    if(isPlay){
      if(!musicUrl){
        let res = await util.publicRequest("http://localhost:3000/song/url",{
          id:this.data.musicUrlId
        })
        musicUrl = res.data[0].url
        this.setData({
          musicLink:musicUrl
        })
      }
      this.bgAudioManager.src = musicUrl
      this.bgAudioManager.title = this.data.musicInfo.name
    }else{
      this.bgAudioManager.pause()
    }
  },
注:
这边的musicUrl存放的是音乐的播放地址,在同一首歌里我们切换音乐的播放状态会不断的请求接口,因此我们使用musicUrl进行存储从而达到优化性能的目的——只有当第一次播放歌曲的时候才请求接口的数据,减少了接口的访问次数。
//recommendSong.js
  if(data === 'pre'){
    index-=1
  }else if(data == 'next'){
    index +=1
  }else if(data == 'rand'){
    index = Math.floor((Math.random() * songList.length))
  }
我们可以通过两种方式来获取歌曲的总时长,一种是通过接口中的dt字段,单位是ms,可以通过dayjs插件来格式化时长,也可以自己写段代码进行格式化。另一种是使用背景音乐的实例的duration属性,单位是s。这里使用接口中的dt字段。
var dateStr = new Date(res.songs[0].dt);
var timeStr = dateStr.getMinutes().toString().padStart(2,'0') +': '+dateStr.getSeconds().toString().padStart(2,'0');
使用背景音乐实例的onTimeUpdate函数对音乐的播放进行监听。

与获取歌曲的总时长类似,只不过播放时间的格式化稍微麻烦了一点。在监听事件中实时的更新currentTime的值。
  let Time = parseInt(this.bgAudioManager.currentTime);

  let currentTime = parseInt(Time/60).toString().padStart(2,'0')+":"+(Time%60).toString().padStart(2,'0')
  this.setData({
    currentTime
  })

要实现随着播放时间的变化,进度条也跟着改变,我们需要动态计算和改变小圆球和进度条的left以及width对应值的大小。
// songDetail.js
this.setData({
leftPart:parseInt(this.bgAudioManager.currentTime/this.bgAudioManager.duration*100).toString()+'%'
})
// songDetail.wxml
<view class="processControl">
    <text>{{currentTime}}</text>
    <view class="barControl" hover-class="none" hover-stop-propagation="false">
      <view class="current-process" style=" width:{{leftPart}};" hover-class="none" hover-stop-propagation="false">
        <view class="audio-current" style=" left:{{leftPart}};"></view>
      </view>
    </view>
    <text>{{totalTime}}</text>
  </view>
  if(this.bgAudioManager.currentTime === this.bgAudioManager.duration){
    this.SwitchSong('next')
  }
我正在编写一个包含C扩展的gem。通常当我写一个gem时,我会遵循TDD的过程,我会写一个失败的规范,然后处理代码直到它通过,等等......在“ext/mygem/mygem.c”中我的C扩展和在gemspec的“扩展”中配置的有效extconf.rb,如何运行我的规范并仍然加载我的C扩展?当我更改C代码时,我需要采取哪些步骤来重新编译代码?这可能是个愚蠢的问题,但是从我的gem的开发源代码树中输入“bundleinstall”不会构建任何native扩展。当我手动运行rubyext/mygem/extconf.rb时,我确实得到了一个Makefile(在整个项目的根目录中),然后当
我已经在Sinatra上创建了应用程序,它代表了一个简单的API。我想在生产和开发上进行部署。我想在部署时选择,是开发还是生产,一些方法的逻辑应该改变,这取决于部署类型。是否有任何想法,如何完成以及解决此问题的一些示例。例子:我有代码get'/api/test'doreturn"Itisdev"end但是在部署到生产环境之后我想在运行/api/test之后看到ItisPROD如何实现? 最佳答案 根据SinatraDocumentation:EnvironmentscanbesetthroughtheRACK_ENVenvironm
我们的git存储库中目前有一个Gemfile。但是,有一个gem我只在我的环境中本地使用(我的团队不使用它)。为了使用它,我必须将它添加到我们的Gemfile中,但每次我checkout到我们的master/dev主分支时,由于与跟踪的gemfile冲突,我必须删除它。我想要的是类似Gemfile.local的东西,它将继承从Gemfile导入的gems,但也允许在那里导入新的gems以供使用只有我的机器。此文件将在.gitignore中被忽略。这可能吗? 最佳答案 设置BUNDLE_GEMFILE环境变量:BUNDLE_GEMFI
这似乎非常适得其反,因为太多的gem会在window上破裂。我一直在处理很多mysql和ruby-mysqlgem问题(gem本身发生段错误,一个名为UnixSocket的类显然在Windows机器上不能正常工作,等等)。我只是在浪费时间吗?我应该转向不同的脚本语言吗? 最佳答案 我在Windows上使用Ruby的经验很少,但是当我开始使用Ruby时,我是在Windows上,我的总体印象是它不是Windows原生系统。因此,在主要使用Windows多年之后,开始使用Ruby促使我切换回原来的系统Unix,这次是Linux。Rub
我正在玩HTML5视频并且在ERB中有以下片段:mp4视频从在我的开发环境中运行的服务器很好地流式传输到chrome。然而firefox显示带有海报图像的视频播放器,但带有一个大X。问题似乎是mongrel不确定ogv扩展的mime类型,并且只返回text/plain,如curl所示:$curl-Ihttp://0.0.0.0:3000/pr6.ogvHTTP/1.1200OKConnection:closeDate:Mon,19Apr201012:33:50GMTLast-Modified:Sun,18Apr201012:46:07GMTContent-Type:text/plain
无论您是想搭建桌面端、WEB端或者移动端APP应用,HOOPSPlatform组件都可以为您提供弹性的3D集成架构,同时,由工业领域3D技术专家组成的HOOPS技术团队也能为您提供技术支持服务。如果您的客户期望有一种在多个平台(桌面/WEB/APP,而且某些客户端是“瘦”客户端)快速、方便地将数据接入到3D应用系统的解决方案,并且当访问数据时,在各个平台上的性能和用户体验保持一致,HOOPSPlatform将帮助您完成。利用HOOPSPlatform,您可以开发在任何环境下的3D基础应用架构。HOOPSPlatform可以帮您打造3D创新型产品,HOOPSSDK包含的技术有:快速且准确的CAD
在应用开发中,有时候我们需要获取系统的设备信息,用于数据上报和行为分析。那在鸿蒙系统中,我们应该怎么去获取设备的系统信息呢,比如说获取手机的系统版本号、手机的制造商、手机型号等数据。1、获取方式这里分为两种情况,一种是设备信息的获取,一种是系统信息的获取。1.1、获取设备信息获取设备信息,鸿蒙的SDK包为我们提供了DeviceInfo类,通过该类的一些静态方法,可以获取设备信息,DeviceInfo类的包路径为:ohos.system.DeviceInfo.具体的方法如下:ModifierandTypeMethodDescriptionstatic StringgetAbiList()Obt
前言一般来说,前端根据后台返回code码展示对应内容只需要在前台判断code值展示对应的内容即可,但要是匹配的code码比较多或者多个页面用到时,为了便于后期维护,后台就会使用字典表让前端匹配,下面我将在微信小程序中通过wxs的方法实现这个操作。为什么要使用wxs?{{method(a,b)}}可以看到,上述代码是一个调用方法传值的操作,在vue中很常见,多用于数据之间的转换,但由于微信小程序诸多限制的原因,你并不能优雅的这样操作,可能有人会说,为什么不用if判断实现呢?但是if判断的局限性在于如果存在数据量过大时,大量重复性操作和if判断会让你的代码显得异常冗余。wxswxs相当于是一个独立
项目介绍随着我国经济迅速发展,人们对手机的需求越来越大,各种手机软件也都在被广泛应用,但是对于手机进行数据信息管理,对于手机的各种软件也是备受用户的喜爱小学生兴趣延时班预约小程序的设计与开发被用户普遍使用,为方便用户能够可以随时进行小学生兴趣延时班预约小程序的设计与开发的数据信息管理,特开发了小程序的设计与开发的管理系统。小学生兴趣延时班预约小程序的设计与开发的开发利用现有的成熟技术参考,以源代码为模板,分析功能调整与小学生兴趣延时班预约小程序的设计与开发的实际需求相结合,讨论了小学生兴趣延时班预约小程序的设计与开发的使用。开发环境开发说明:前端使用微信微信小程序开发工具:后端使用ssm:VU
@作者:SYFStrive @博客首页:HomePage📜:微信小程序📌:个人社区(欢迎大佬们加入)👉:社区链接🔗📌:觉得文章不错可以点点关注👉:专栏连接🔗💃:感谢支持,学累了可以先看小段由小胖给大家带来的街舞👉微信小程序(🔥)目录自定义组件-behaviors 1、什么是behaviors 2、behaviors的工作方式 3、创建behavior 4、导入并使用behavior 5、behavior中所有可用的节点 6、同名字段的覆盖和组合规则总结最后自定义组件-behaviors 1、什么是behaviorsbehaviors是小程序中,用于实现