1.1 概要
Spring 是非常流行和成功的 Java 应用开发框架,Spring Security 正是 Spring 家族中的
成员。Spring Security 基于 Spring 框架,提供了一套 Web 应用安全性的完整解决方
案。
正如你可能知道的关于安全方面的两个主要区域是“认证”和“授权”(或者访问控
制),一般来说,Web 应用的安全性包括用户认证(Authentication)和用户授权
(Authorization)两个部分,这两点也是 Spring Security 重要核心功能。
(1)用户认证指的是:验证某个用户是否为系统中的合法主体,也就是说用户能否访问
该系统。用户认证一般要求用户提供用户名和密码。系统通过校验用户名和密码来完成认
证过程。通俗点说就是系统认为用户是否能登录
(2)用户授权指的是验证某个用户是否有权限执行某个操作。在一个系统中,不同用户
所具有的权限是不同的。比如对一个文件来说,有的用户只能进行读取,而有的用户可以
进行修改。一般来说,系统会为不同的用户分配不同的角色,而每个角色则对应一系列的
权限。通俗点讲就是系统判断用户是否有权限去做某些事情。
1.2 历史
“Spring Security 开始于 2003 年年底,““spring 的 acegi 安全系统”。 起因是 Spring
开发者邮件列表中的一个问题,有人提问是否考虑提供一个基于 spring 的安全实现。
Spring Security 以“The Acegi Secutity System for Spring” 的名字始于 2013 年晚些
时候。一个问题提交到 Spring 开发者的邮件列表,询问是否已经有考虑一个机遇 Spring
的安全性社区实现。那时候 Spring 的社区相对较小(相对现在)。实际上 Spring 自己在
2013 年只是一个存在于 ScourseForge 的项目,这个问题的回答是一个值得研究的领
域,虽然目前时间的缺乏组织了我们对它的探索。
考虑到这一点,一个简单的安全实现建成但是并没有发布。几周后,Spring 社区的其他成
员询问了安全性,这次这个代码被发送给他们。其他几个请求也跟随而来。到 2014 年一
月大约有 20 万人使用了这个代码。这些创业者的人提出一个 SourceForge 项目加入是为
了,这是在 2004 三月正式成立。
在早些时候,这个项目没有任何自己的验证模块,身份验证过程依赖于容器管理的安全性
和 Acegi 安全性。而不是专注于授权。开始的时候这很适合,但是越来越多的用户请求额
外的容器支持。容器特定的认证领域接口的基本限制变得清晰。还有一个相关的问题增加
新的容器的路径,这是最终用户的困惑和错误配置的常见问题。
Acegi 安全特定的认证服务介绍。大约一年后,Acegi 安全正式成为了 Spring 框架的子项
目。1.0.0 最终版本是出版于 2006 -在超过两年半的大量生产的软件项目和数以百计的改
进和积极利用社区的贡献。
Acegi 安全 2007 年底正式成为了 Spring 组合项目,更名为"Spring Security"。
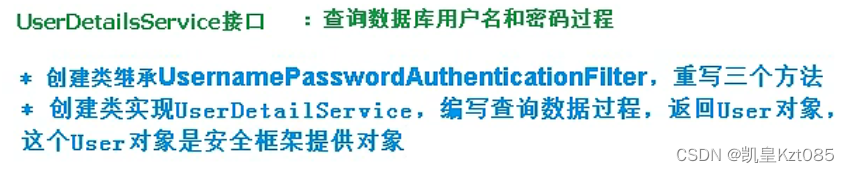
当什么也没有配置的时候,账号和密码是由Spring Security定义生成的。而在实际项目中账号和密码都是从数据库中查询出来的。所以我们要通过自定义逻辑控制认证逻辑
 编辑
编辑
数据加密的一个接口,用于返回User对象里面的密码加密
package com.lkjedu.boot.config;

import com.lkjedu.boot.service.MyUserDetailsService;
import org.springframework.beans.factory.annotation.Autowired;
import org.springframework.context.annotation.Bean;
import org.springframework.context.annotation.Configuration;
import org.springframework.security.config.annotation.authentication.builders.AuthenticationManagerBuilder;
import org.springframework.security.config.annotation.web.configuration.WebSecurityConfigurerAdapter;
import org.springframework.security.core.userdetails.UserDetailsService;
import org.springframework.security.crypto.bcrypt.BCryptPasswordEncoder;
import org.springframework.security.crypto.password.PasswordEncoder;

@Configuration
public class SecurityConfigTest extends WebSecurityConfigurerAdapter {
//    @Autowired
//    private UserDetailsService userDetailsService;
    @Autowired
    private MyUserDetailsService userDetailsService;


    @Override
    protected void configure(AuthenticationManagerBuilder auth) throws Exception {
        auth.userDetailsService(userDetailsService).passwordEncoder(password());
    }

    @Bean
    PasswordEncoder password() {
        return new BCryptPasswordEncoder();
    }
}
package com.lkjedu.boot.service;

import org.springframework.security.core.GrantedAuthority;
import org.springframework.security.core.authority.AuthorityUtils;
import org.springframework.security.core.userdetails.User;
import org.springframework.security.core.userdetails.UserDetails;
import org.springframework.security.core.userdetails.UserDetailsService;
import org.springframework.security.core.userdetails.UsernameNotFoundException;
import org.springframework.security.crypto.bcrypt.BCryptPasswordEncoder;
import org.springframework.stereotype.Service;

import java.util.List;

@Service()
public class MyUserDetailsService implements UserDetailsService {
    @Override
    public UserDetails loadUserByUsername(String username) throws UsernameNotFoundException {
        List<GrantedAuthority> auths = AuthorityUtils.commaSeparatedStringToAuthorityList("admin,ROLE_sale");
        //从查询数据库返回users对象,得到用户名和密码,返回
        return new User("user",
                new BCryptPasswordEncoder().encode("1234"),auths);
    }
}
整合MyBatisPlus完成数据库查询
 <!--mybatis-plus-->
 <dependency>
 <groupId>com.baomidou</groupId>
 <artifactId>mybatis-plus-boot-starter</artifactId>
 <version>3.0.5</version>
 </dependency>
 <!--mysql-->
 <dependency>
 <groupId>mysql</groupId>
 <artifactId>mysql-connector-java</artifactId>
 </dependency>
 <!--lombok 用来简化实体类-->
 <dependency>
 <groupId>org.projectlombok</groupId>
 <artifactId>lombok</artifactId>
 </dependency>
package com.lkjedu.boot.beans;

import com.baomidou.mybatisplus.annotation.TableName;
import lombok.AllArgsConstructor;
import lombok.Data;
import lombok.NoArgsConstructor;
import lombok.ToString;

@Data
@AllArgsConstructor
@NoArgsConstructor
@ToString
@TableName("User")
public class UserBean {
    private int id;
    private String user;
    private String password;
}
package com.lkjedu.boot.service;

import com.baomidou.mybatisplus.core.conditions.query.QueryWrapper;
import com.lkjedu.boot.beans.UserBean;
import com.lkjedu.boot.mapper.UserMapper;
import org.springframework.beans.factory.annotation.Autowired;
import org.springframework.security.core.GrantedAuthority;
import org.springframework.security.core.authority.AuthorityUtils;
import org.springframework.security.core.userdetails.User;
import org.springframework.security.core.userdetails.UserDetails;
import org.springframework.security.core.userdetails.UserDetailsService;
import org.springframework.security.core.userdetails.UsernameNotFoundException;
import org.springframework.security.crypto.bcrypt.BCryptPasswordEncoder;
import org.springframework.stereotype.Service;

import java.util.List;

@Service()
public class MyUserDetailsService implements UserDetailsService {

    @Autowired
    private UserMapper userMapper;


    @Override
    public UserDetails loadUserByUsername(String username) throws UsernameNotFoundException {
        QueryWrapper<UserBean> wrapper = new QueryWrapper<>();
        wrapper.eq("user",username);
        UserBean user = userMapper.selectOne(wrapper);

        if (user == null){
            throw new UsernameNotFoundException("用户名不存在!");
        }


        List<GrantedAuthority> auths = AuthorityUtils.commaSeparatedStringToAuthorityList("admin,ROLE_sale");
        //从查询数据库返回users对象,得到用户名和密码,返回
        return new User(user.getUser(),
                new BCryptPasswordEncoder().encode(user.getPassword()),auths);
    }
}
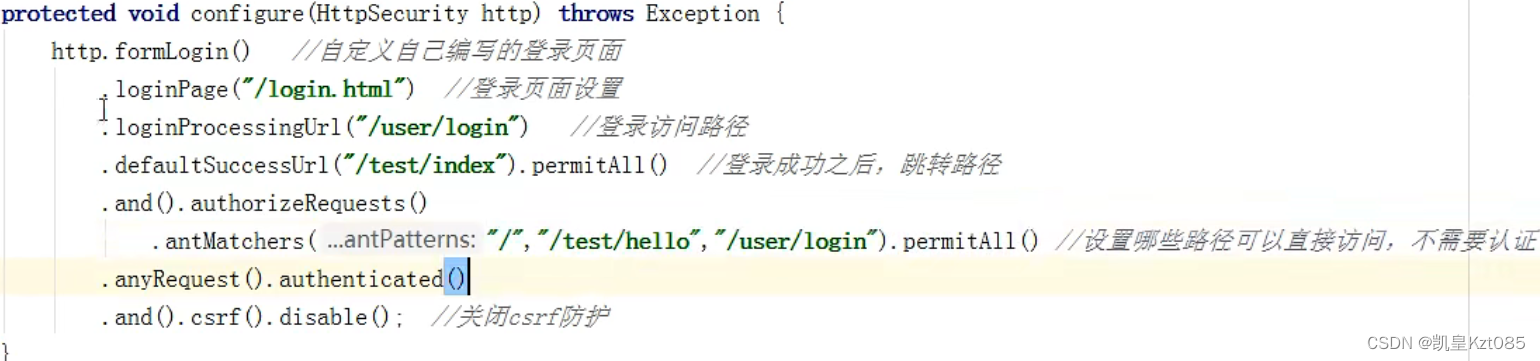
重写protected void configure(HttpSecurity http)方法:
 编辑
编辑
    @Override
    protected void configure(HttpSecurity http) throws Exception {
        http.formLogin()//自定义自己编辑的登录页面
                .loginPage("/login.html")//登录页面设置
                .loginProcessingUrl("/user/login")//登录访问路径
                .defaultSuccessUrl("/index").permitAll()//登录成功后跳转路径
                .and().authorizeHttpRequests()
                .antMatchers("/","/add","/user/login").permitAll()//设置那些路径可以直接访问不需要认证
                .antMatchers("/index").hasAuthority("admins")//当前用户只有,admins权限才能访问这个路径

                .anyRequest().authenticated()
                .and().csrf().disable();//关闭csrf保护

    }
第一个方法:hasAuthority:
第二个方法:hasAnyAuthority
如果当前的主体有任何提供的角色(给定的作为一个逗号分隔的字符串列表)的话,返回
true.
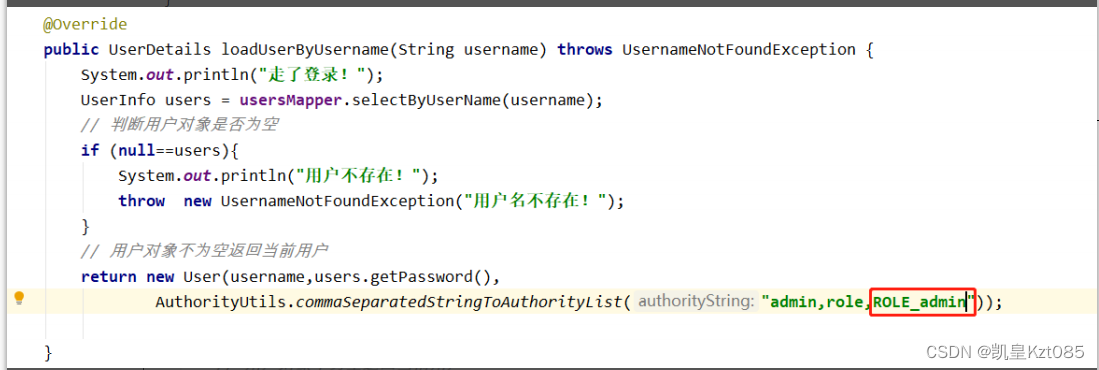
第三个方法:hasRole
如果用户具备给定角色就允许访问,否则出现 403。 如果当前主体具有指定的角色,则返回 true。因为底层源码是"ROLE_"拼接上role所以给用户权限必须加上"ROLE_"
底层源码:
 编辑
编辑
给用户添加角色:
 编辑
编辑
第四个方法:
hasAnyRole
配置没有权限跳转页面 编辑
编辑
判断是否具有角色,另外需要注意的是这里匹配的字符串需要添加前缀“ROLE_“。
使用注解先要开启注解功能!*@EnableGlobalMethodSecurity(securedEnabled=true)*
// 测试注解:
@RequestMapping("testSecured")
@ResponseBody
@Secured({"ROLE_normal","ROLE_admin"})
public String helloUser() {
return "hello,user";
}
@Secured({"ROLE_normal","ROLE_管理员"})
@PreAuthorize
先开启注解功能:@EnableGlobalMethodSecurity(prePostEnabled = true)
@PreAuthorize:注解适合进入方法前的权限验证,
@PreAuthorize 可以将登录用 户的 roles/permissions 参数传到方法中。
@RequestMapping("/preAuthorize")
@ResponseBody
//@PreAuthorize("hasRole('ROLE_管理员')")
@PreAuthorize("hasAnyAuthority('menu:system')")
public String preAuthorize(){
 System.out.println("preAuthorize");
return "preAuthorize";
}
@PostAuthorize
先开启注解功能: @EnableGlobalMethodSecurity(prePostEnabled = true)
@PostAuthorize 注解使用并不多,在方法执行后再进行权限验证,适合验证带有返回值
的权限.
@RequestMapping("/testPostAuthorize")
@ResponseBody
@PostAuthorize("hasAnyAuthority('menu:system')")
public String preAuthorize(){
 System.out.println("test--PostAuthorize");
return "PostAuthorize";
}
@PostFilter
@PostFilter :权限验证之后对数据进行过滤 留下用户名是 admin1 的数据
表达式中的 filterObject 引用的是方法返回值 List 中的某一个元素
@RequestMapping("getAll")
@PreAuthorize("hasRole('ROLE_管理员')")
@PostFilter("filterObject.username == 'admin1'")
@ResponseBody
public List<UserInfo> getAllUser(){
 ArrayList<UserInfo> list = new ArrayList<>();
 list.add(new UserInfo(1l,"admin1","6666"));
 list.add(new UserInfo(2l,"admin2","888"));
return list;
}
@PreFilter
@PreFilter: 进入控制器之前对数据进行过滤
@RequestMapping("getTestPreFilter")
@PreAuthorize("hasRole('ROLE_管理员')")
@PreFilter(value = "filterObject.id%2==0")
@ResponseBody
public List<UserInfo> getTestPreFilter(@RequestBody List<UserInfo>
list){
 list.forEach(t-> {
 System.out.println(t.getId()+"\t"+t.getUsername());
 });
return list;
}
在登录页面添加一个退出连接
<body>
登录成功<br>
<a href="/logout">退出</a>
</body>
在配置类中添加退出映射地址
http.logout().logoutUrl("/logout").logoutSuccessUrl("/index").permitAll
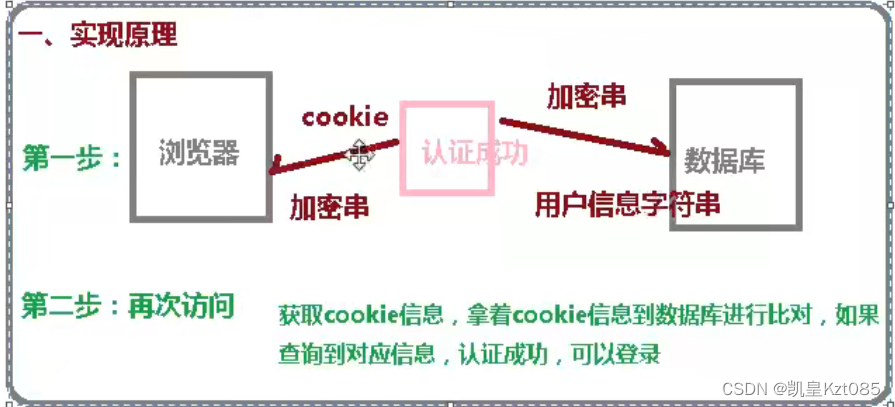
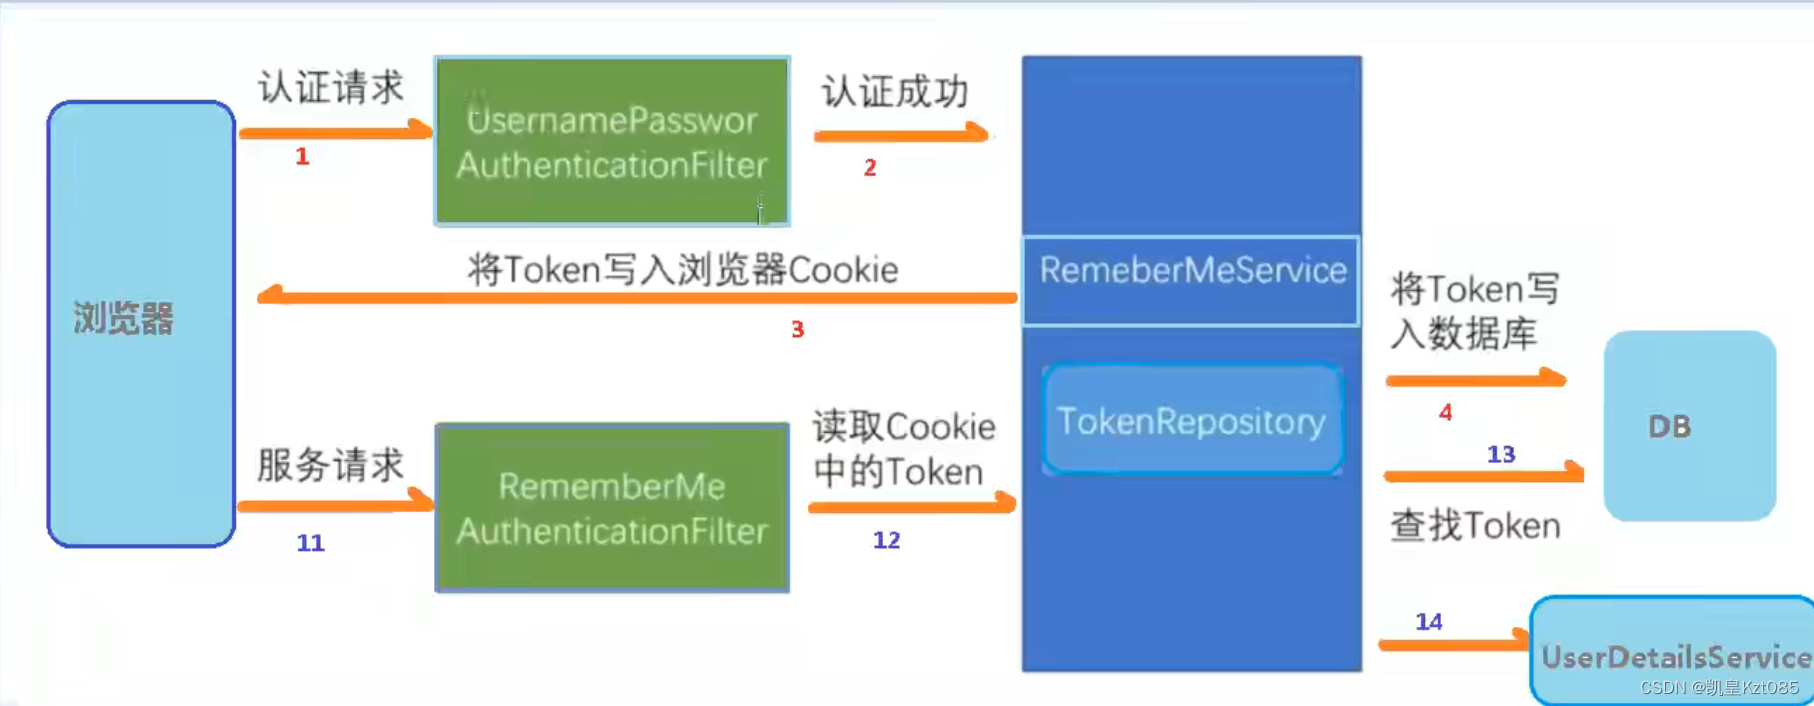
1.使cookie技术实现
2.使用SpringSecurity安全框架实现
 编辑
编辑
 编辑
编辑
本篇博文目录:一.SpringSecurity简介1.SpringSecurity2.SpringSecurity相关概念二.认证和授权1.认证(1)使用SpringSecurity进行简单的认证(SpringBoot项目中)(2)SpringSecurity的原理(3)SpringSecurity核心类(4)认证登入案例(JWT+SpringSecurity实现登入案例)2.授权(1)加入权限到Authentication中(2)SecurityConfig配置文件中开启注解权限配置(3)给接口中的方法添加访问权限(4)用户权限表的建立3.自定义失败处理(1)创建异常处理类(2)配置移除处理
目录springSecurity授权权限管理策略基于url的权限管理基于方法的权限管理将url权限管理设为动态会话管理会话并发管理会话失效处理禁止再次登录会话共享源码分析CSRF跨站请求伪造开启CSRF防御传统web开发前后端分离开启CSRF防护csrf防御过程CORS跨域问题springBoot解决跨域的三种方式springSecurity解决跨域springSecurity授权认证与授权解耦授权:据系统提前设置好的规则,给用户分配可以访问某一个资源的权限,用户根据自己所具有权限,去执行相应操作。GrantedAuthority应该如何理解呢?是角色还是权限?权限是具体一些操作,角色是一些权
问题描述在做项目的时候,使用SpringSecurity配置完系统的访问权限时,进行测试的时候,发现明明携带了访问该路径需要的权限标志,会一直提示说我们权限不足。这里我配置了AccessDeniedHandler,当SpringSecurity判断我们权限不足时,会抛出AccessDeniedException异常,然后执行AccessDeniedHandler中我们重写的的handle方法。解决实在想不出原因的时候,我开始着手从源码去探究报错的原因,于是我从网上找来了这张图,授权测试流程:如图所示,首页请求先会进入FilterSecurityInterceptor过滤器,将它作为断点的入口。
SpringBoot集成SpringSecurity+MySQL+JWT附源码,废话不多直接盘SpringBoot已经为用户采用默认配置,只需要引入pom依赖就能快速启动SpringSecurity。目的:验证请求用户的身份,提供安全访问优势:基于Spring,配置方便,减少大量代码内置访问控制方法permitAll()表示所匹配的URL任何人都允许访问。authenticated()表示所匹配的URL都需要被认证才能访问。anonymous()表示可以匿名访问匹配的URL。和permitAll()效果类似,只是设置为anonymous()的url会执行filter链中denyAll()表示所
说明SpringSecurityOAuth2单点登录昨天我发了一个单点登录版本的验证博客,到今天早上我再研究了一下,发现了一些问题:昨天那个单点登录是在每个模块的基础上做的,也就是说如果你想让每个模块都如认证中心认证,就要在每个模块里进行相关配置,这还不是最紧要的,你要想想,因为我们是通过注解的方式在对应的方法鉴权,这样的话就会导致我们每次访问这个方法的时候就要去认证中心请求一次,也就是鉴权一次,那么整个系统模块又多,路径又多,认证中心肯定是吃不消的啊.所以在这个基础上,就需要去将认证中心在第一次认证产生的token,交给前端,然后在GateWay里进行一个token的验证,这样子就避免我们每
特别注意:以下内容如果访问失败或有其他疑问,可先学习:SpringSecurity+oauth2+JWT实现统一授权和认证及项目搭建(一)1获取当前用户的信息代码为:Objectprincipal=SecurityContextHolder.getContext().getAuthentication().getPrincipal();但是,通过运行会发现principal的值只是用户名,没有用户信息,通过去看源码,才发现问题所在,以下是源码:源码类:DefaultUserAuthenticationConverter.java通过源码分析,发现这里的map只存储用户名,对此,如果要获取用户,
文章目录前言一、SpringSecurity简介二、Shiro和Security的对比2.1Shiro的特点2.2Security的特点2.3二者的相同点三、Security实现权限四、用户认证流程4.1认证接口分析前言Web应用的开发,安全是至关重要的,选择使用SpringSecurity是目前来说较为正确的选择。SpringSecurity框架起源于2003年年底acegi系统,起因是Spring开发者邮件列表中的一个问题,有人提问是否考虑提供一个基于Spring的安全实现。基于SpringBoot+MP+Redis+Vue实现的前后端分离的权限管理系统:https://gitee.com
一、SpringSecurity的功能简单介绍(1)简介SpringSecurity是针对Spring项目的安全框架,也是SpringBoot底层安全模块默认的技术选型,他可以实现强大的Web安全控制,对于安全控制,我们仅需要引入spring-boot-starter-security模块,进行少量的配置,即可实现强大的安全管理! 主要的几个类:webSecurityConfigurerAdapter:自定义Security策略AuthenticationManagerBuilder:自定义的认证策略@EnableWebSecurity:开启WebSecurity模式 Spring
SpringSecurity安全框架学习——@PreAuthorize的实现原理@PreAuthorize@EnableMethodSecurityMethodSecuritySelectorPrePostMethodSecurityConfiguration@PreAuthorize首先我们打开@PreAuthorize注解的源码,然后按住Ctrl并单击PreAuthorize,可以看到在EnableMethodSecurity注解中有引用(本文使用IDEA,后续不再复述)@EnableMethodSecurity查看EnableMethodSecurity源码,可以到,其引用了Method
springboot整合springsecurity+oauth2.0本文采用的springboot去整合springsecurity,采用oauth2.0授权认证,使用jwt对token增强。本文仅为学习记录,如有不足多谢提出。OAuth2简介OAuth2.0是用于授权的行业标准协议。OAuth2.0为简化客户端开发提供了特定的授权流,包括Web应用、桌面应用、移动端应用等。OAuth2相关名词解释Resourceowner(资源拥有者):拥有该资源的最终用户,他有访问资源的账号密码;Resourceserver(资源服务器):拥有受保护资源的服务器,如果请求包含正确的访问令牌,可以访问资源