目录
2.2 创建一个 Spring MVC 的 Spring BootController
3.4 Spring Boot 下的 Spring MVC(注解)
springboot是spring家族中的一个全新框架,用来简化spring程序的创建和开发过程。在以往我们通过SpringMVC+Spring+Mybatis框架进行开发的时候,我们需要配置web.xml,spring配置,mybatis配置,然后整合在一起,而springboot抛弃了繁琐的xml配置过程,采用大量默认的配置来简化我们的spring开发过程。
SpringBoot化繁为简,使开发变得更加的简单迅速。
自动配置、起步依赖、Actuator、命令行界面
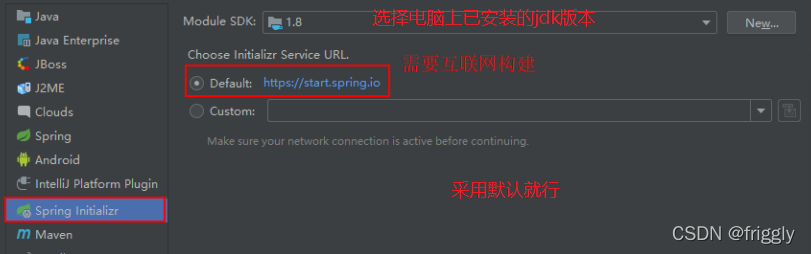
(1)创建一个 Module,选择类型为Spring Initializr 快速构建
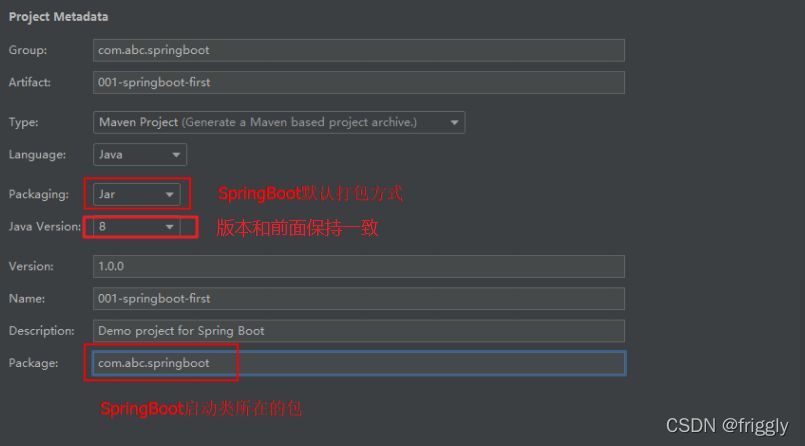
(2)设置 GAV 坐标及 pom 配置信息
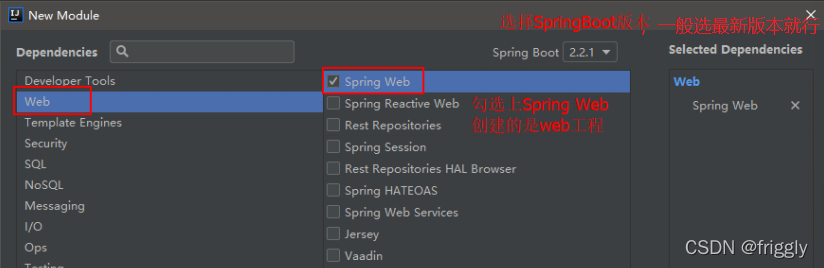
(3)选择 Spring Boot 版本及依赖
(4)设置模块名称、Content Root 路径及模块文件的目录,然后点击finish即可

(5)项目结构如下:
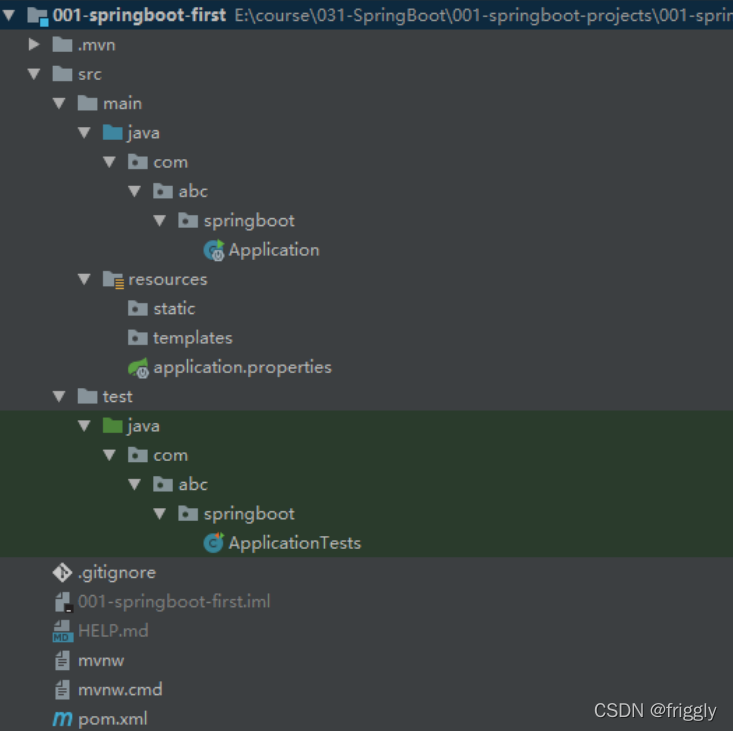
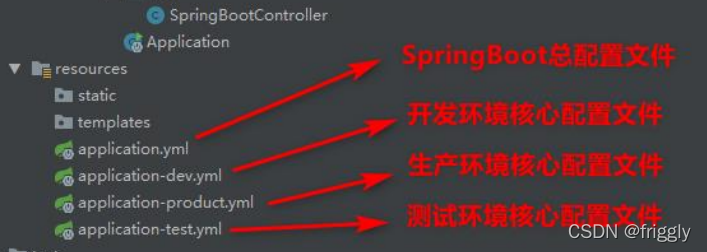
static:存放静态资源。如图片、CSS、JavaScript 等
templates:存放 Web 页面的模板文件
application.properties/application.yml 用于存放程序的各种依赖模块的配置信息,比如 服务端口,数据库连接配置等
.gitignore:使用版本控制工具 git 的时候,设置一些忽略提交的内容
Application.java:SpringBoot 程序执行的入口,执行该程序中的 main 方法,启动当前SpringBoot项目。
(6)对pom.xml文件进行解释
<?xml version="1.0" encoding="UTF-8"?>
<project xmlns="http://maven.apache.org/POM/4.0.0"
xmlns:xsi="http://www.w3.org/2001/XMLSchema-instance"
 xsi:schemaLocation="http://maven.apache.org/POM/4.0.0
http://maven.apache.org/xsd/maven-4.0.0.xsd">
 <modelVersion>4.0.0</modelVersion>
 <!--继承 SpringBoot 框架的一个父项目,所有自己开发的 Spring Boot 都必须的继承-->
 <parent>
     <groupId>org.springframework.boot</groupId>
     <artifactId>spring-boot-starter-parent</artifactId>
     <version>2.2.1.RELEASE</version>
     <relativePath/> <!-- lookup parent from repository -->
 </parent>

 <!--当前项目的 GAV 坐标-->
 <groupId>com.bjpowernode.springboot</groupId>
 <artifactId>002-springboot-springmvc</artifactId>
 <version>1.0.0</version>

 <!--maven 项目名称,可以删除-->
 <name>002-springboot-springmvc</name>
 <!--maven 项目描述,可以删除-->
 <description>Demo project for Spring Boot</description>

 <!--maven 属性配置,可以在其它地方通过${}方式进行引用-->
 <properties>
     <java.version>1.8</java.version>
 </properties>


 <dependencies>
 <!--SpringBoot 框架 web 项目起步依赖,通过该依赖自动关联其它依赖,不需要我们一个一个去添加
-->
     <dependency>
         <groupId>org.springframework.boot</groupId>
         <artifactId>spring-boot-starter-web</artifactId>
     </dependency>

 <!--SpringBoot 框架的测试起步依赖,例如:junit 测试,如果不需要的话可以删除-->
     <dependency>
         <groupId>org.springframework.boot</groupId>
         <artifactId>spring-boot-starter-test</artifactId>
         <scope>test</scope>
         <exclusions>
             <exclusion>
                 <groupId>org.junit.vintage</groupId>
                 <artifactId>junit-vintage-engine</artifactId>
             </exclusion>
         </exclusions>
     </dependency>
 </dependencies>

 <build>
     <plugins>
         <!--SpringBoot提供的打包编译等插件-->
         <plugin>
             <groupId>org.springframework.boot</groupId>
             <artifactId>spring-boot-maven-plugin</artifactId>
         </plugin>
     </plugins>
 </build>
</project> (1)创建SpringBootController 类
注意:新创建的类一定要位于 Application 同级目录或者下级目录,否则 SpringBoot 加
载不到。
package com.bjpowernode.springboot.web;
import org.springframework.stereotype.Controller;
import org.springframework.web.bind.annotation.RequestMapping;
import org.springframework.web.bind.annotation.ResponseBody;
@Controller
public class SpringBootController {
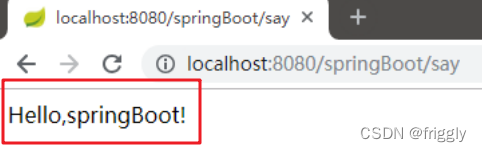
@RequestMapping(value = "/springBoot/say")
public @ResponseBody String say() {
return "Hello,springBoot!";
}
} (2)启动Application类中的main方法
通过在控制台的输出,可以看到启动 SpringBoot 框架,会启动一个内嵌的 tomcat,端
口号为 8080,上下文根为空 。

(3)在浏览器中输入 http://localhost:8080/springBoot/say进行访问
(1)spring-boot-starter-parent 是一个 Springboot 的父级依赖,开发 SpringBoot 程序都需
要继承该父级项目,它用来提供相关的 Maven 默认依赖,使用它之后,常用的 jar
包依赖可以省去 version 配置
(2)Spring Boot 提供了一些默认的jar 包的依赖,可查看该父级依赖的 pom 文件
(3)如果不想使用某个默认的依赖版本,可以通过 pom.xml 文件的属性配置覆盖各个
依赖项,比如覆盖 Spring 版本:
 <properties>
     <spring-framework.version>5.0.0.RELEASE</ spring-framework.version >
 </properties>
(4) @SpringBootApplication 注解是 Spring Boot 项目的核心注解,主要作用是开启
Spring 自动配置,如果在 Application 类上去掉该注解,那么不会启动 SpringBoot程序
(5)main 方法是一个标准的 Java 程序的 main 方法,是boot项目启动运行的入口
(6)@Controller 及 @ResponseBody 依然是我们之前的 Spring MVC,因为 Spring Boot
的里面依然是使用我们的 Spring MVC + Spring + MyBatis 等框架
(1).properties 文件(默认采用该文件)
通过修改 application.properties 配置文件,修改默认 tomcat 端口号及项目上下文件根:
#设置内嵌 Tomcat 端口号
server.port=9090

#配置项目上下文根
server.servlet.context-path=/003-springboot-port-context-path
页面显示结果:

(2) .yml 文件 :
项目名称:004-springboot-yml
yml 是一种 yaml 格式的配置文件,主要采用一定的空格、换行等格式排版进行配置。它能够直观的被计算机识别数据序列化格式,容易被人类阅读,yaml 类似于 xml,但是语法比 xml 简洁很多,值与前面的冒号配置项必须要有一个空格, yml 后缀也可以使用 yaml 后缀 。
注意:当两种格式配置文件同时存在时,使用的是.properties 配置文件。
(3)多环境配置(.properties方式)
在实际开发的过程中,我们的项目会经历很多的阶段(开发->测试->上线),每个阶段
的配置也会不同,例如:端口、上下文根、数据库等,那么这个时候为了方便在不同的环境
之间切换,SpringBoot 提供了多环境配置,具体步骤如下 :
项目名称:005-springboot-multi-environment
为每个环境创建一个配置文件,命名必须为 application-环境标识.properties|yml
application-dev.properties
#开发环境

#设置内嵌 Tomcat 默认端口号
server.port=8080

#设置项目的上下文根
server.servlet.context-path=/005-springboot-multi-environment-dev
application-product.properties
#生产环境

#配置内嵌 Tomcat 默认端口号
server.port=80

#配置项目上下文根
server.servlet.context-path=/005-springboot-multi-environment-product
application-test.properties
#测试环境

#配置内嵌 Tomcat 端口号
server.port=8081

#配置项目的上下文根
server.servlet.context-path=/005-springboot-multi-environment-test
在总配置文件 application.properties 进行环境的激活
#SpringBoot 的总配置文件

#激活开发环境
#spring.profiles.active=dev

#激活测试环境
#spring.profiles.active=test

#激活生产环境
spring.profiles.active=product
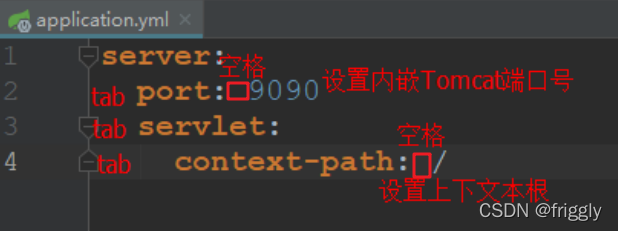
(4)多环境配置(.yml方式)
application-dev.yml
#设置开发环境配置

server:
 port: 8080 #设置 Tomcat 内嵌端口号
 servlet:
  context-path: /dev #设置上下文根
application-product.yml
#设置生产环境配置

server:
 port: 80
 servlet:
  context-path: /product
application-test.yml
#设置测试环境配置

server:
 port: 9090
 servlet:
  context-path: /test
在总配置文件 application.yml进行环境的激活
#springboot 总配置文件

#激活开发环境
#spring:
# profiles:
#  active: dev


#激活测试环境
#spring:
# profiles:
#  active: test

#激活生产环境
spring:
 profiles:
  active: product
(5)Spring Boot 自定义配置
在 SpringBoot 的核心配置文件中,除了使用内置的配置项之外,我们还可以在自定义配
置,然后采用如下注解去读取配置的属性值:
(A)@Value注解 用于逐个读取application.properties中的配置
案例演示:
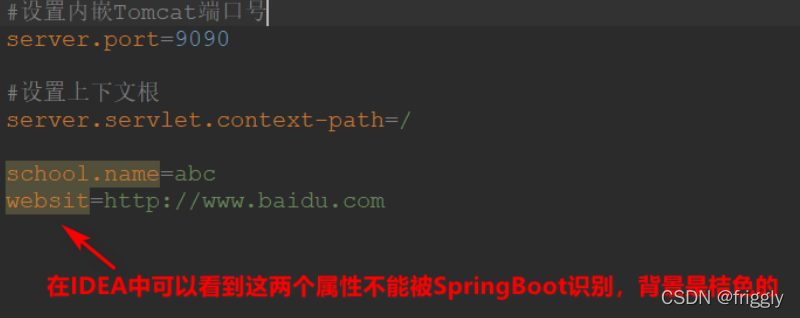
(1) 在核心配置文件 applicatin.properties 中,添加两个自定义配置项 school.name 和
website。在 IDEA 中可以看到这两个属性不能被 SpringBoot 识别,背景是桔色的 :
.properties方式
.yml方式
#设置端口号及上下文根
server:
port: 9090
servlet:
context-path: /
school:
name: ssm
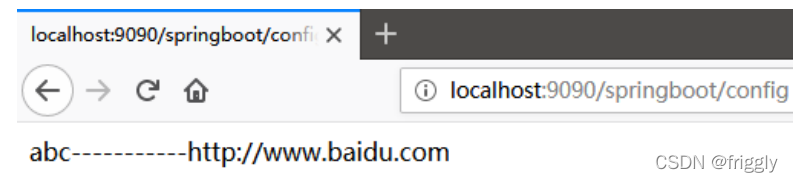
websit: http://www.baidu.com (2)在 SpringBootController 中定义属性,并使用@Value 注解或者自定义配置值,并对其方法进行测试
@Controller
public class SpringBootController {

 @Value("${school.name}")
 private String schoolName;

 @Value("${websit}")
 private String websit;

 @RequestMapping(value = "/springBoot/config")
 public @ResponseBody String say() {
 return schoolName + "------" + websit;
 }
}
(3)重新运行 Application,在浏览器中进行测试
(B)@ConfigurationProperties
作用:将整个文件映射成一个对象,用于自定义配置项比较多的情况 。
案例演示:
(1)在 com.abc.springboot.config 包下创建 ConfigInfo 类,并为该类加上 Component 和
ConfigurationProperties 注解,并在 ConfigurationProperties 注解中添加属性 prefix,可以区分同名配置 。
@Data
@Component
@ConfigurationProperties(prefix = "school")
public class ConfigInfo {

 private String name;

 private String websit;
}
(2)application.properties 配置文件
#设置内嵌 Tomcat 端口号
server.port=9090

#设置上下文根
server.servlet.context-path=/config

school.name=ssm
school.websit=http://www.baidu.com
(3)在 SpringBootController 中注入 ConfigInfo 配置类
@Autowired
private ConfigInfo configInfo;
(4)修改 SpringBootController 类中的测试方法
@RequestMapping(value = "/springBoot/config")
public @ResponseBody String say() {
 return configInfo.getName() + "=======" + configInfo.getWebsit();
}
(5)重新运行 Application,在浏览器中进行测试 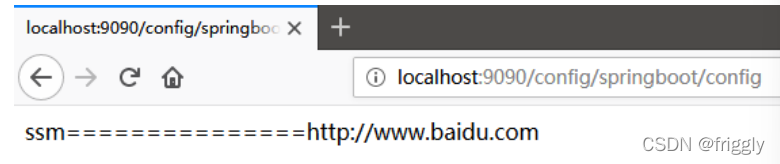
(C)警告解决
在 ConfigInfo 类中使用了 ConfigurationProperties 注解后,IDEA 会出现一个警告,不影响程序的执行。
点击 open documentnation 跳转到网页,在网页中提示需要加一个依赖,我们将这
个依赖拷贝,粘贴到 pom.xml 文件中 即可。
<!--解决使用@ConfigurationProperties 注解出现警告问题-->
<dependency>
  <groupId>org.springframework.boot</groupId>
  <artifactId>spring-boot-configuration-processor</artifactId>
  <optional>true</optional>
</dependency>
(D)中文乱码
如果在 SpringBoot 核心配置文件中有中文信息,会出现乱码:

(1)在 pom.xml 文件中配置以下依赖项
<!--引入 Spring Boot 内嵌的 Tomcat 对 JSP 的解析包,不加解析不了 jsp 页面-->
<!--如果只是使用 JSP 页面,可以只添加该依赖-->
<dependency>
 <groupId>org.apache.tomcat.embed</groupId>
 <artifactId>tomcat-embed-jasper</artifactId>
</dependency>

<!--如果要使用 servlet 必须添加该以下两个依赖-->
<!-- servlet 依赖的 jar 包-->
<dependency>
 <groupId>javax.servlet</groupId>
 <artifactId>javax.servlet-api</artifactId>
</dependency>
<dependency>
 <groupId>javax.servlet.jsp</groupId>
 <artifactId>javax.servlet.jsp-api</artifactId>
 <version>2.3.1</version>
</dependency>

<!--如果使用 JSTL 必须添加该依赖-->
<!--jstl 标签依赖的 jar 包 start-->
<dependency>
 <groupId>javax.servlet</groupId>
 <artifactId>jstl</artifactId>
</dependency>
(2)在 pom.xml 的 build 标签中要配置以下信息
SpringBoot 要求 jsp 文件必须编译到指定的 META-INF/resources 目录下才能访问,否则
访问不到。其实官方已经更建议使用模板技术。
<!--
 SpringBoot 要求 jsp 文件必须编译到指定的 META-INF/resources 目录下才能访问,否则访问
不到。
 其它官方已经建议使用模版技术
-->
<resources>
 <resource>
     <!--源文件位置-->
     <directory>src/main/webapp</directory>
     <!--指定编译到 META-INF/resources,该目录不能随便写-->
     <targetPath>META-INF/resources</targetPath>
     <!--指定要把哪些文件编译进去,**表示 webapp 目录及子目录,*.*表示所有文件-->
     <includes>
         <include>**/*.*</include>
     </includes>
 </resource>
</resources>
(3)在 application.properties 文件配置 Spring MVC 的视图展示为jsp,这里相当于 Spring MVC 的配置。
#SpringBoot 核心配置文件
#指定内嵌 Tomcat 端口号
server.port=8090

#配置 SpringMVC 视图解析器
#其中:/ 表示目录为 src/main/webapp
spring.mvc.view.prefix=/
spring.mvc.view.suffix=.jsp
(4)在 com.abc.springboot.controller 包下创建 JspController 类
@Controller
public class SpringBootController {

 @RequestMapping(value = "/springBoot/jsp")
 public String jsp(Model model) {

     model.addAttribute("data","SpringBoot 前端使用 JSP 页面!");

 return "index";
 }
}
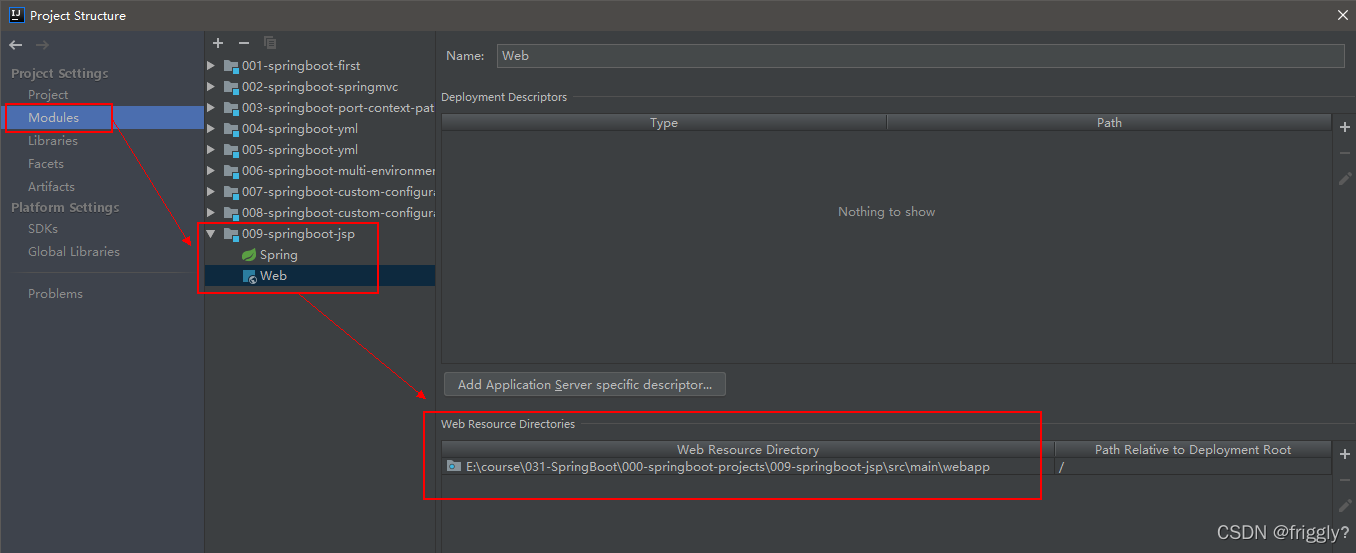
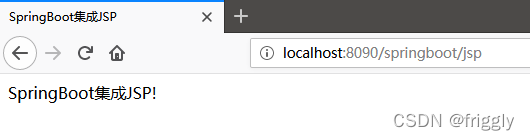
(5)在 src/main 下创建一个 webapp 目录,然后在该目录下新建index.jsp 页面
注意: 如果在webapp目录下右键,没有创建jsp的选项,可以在Project Structure中指定webapp为 Web Resource Directory 。
(6)在 index.jsp 中获取 Controller 传递过来的数据
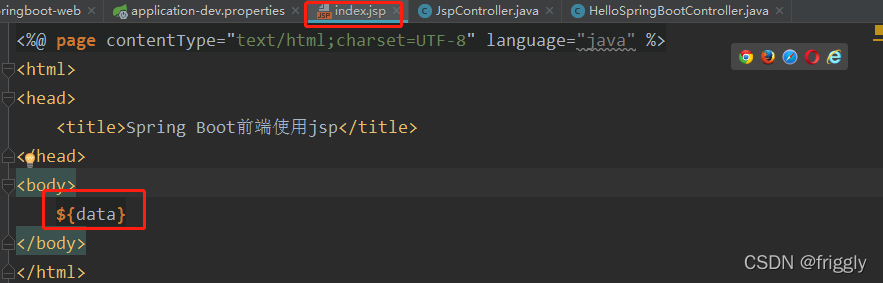
(7)重新运行 Application,通过浏览器访问测试
通过实际代码案例进行梳理:
通过 SpringBoot +MyBatis 实现对数据库学生表的查询操作的实现步骤:
(1)创建新的数据库springboot并向表中插入数据
(2)创建一个新的 SpringBoot 的 Module
创建项目的过程省略
(3)在 pom.xml 中添加相关 jar 依赖
<!--MyBatis 整合 SpringBoot 的起步依赖-->
<dependency>
 <groupId>org.mybatis.spring.boot</groupId>
 <artifactId>mybatis-spring-boot-starter</artifactId>
 <version>2.0.0</version>
</dependency>

<!--MySQL 的驱动依赖-->
<dependency>
 <groupId>mysql</groupId>
 <artifactId>mysql-connector-java</artifactId>
</dependency>
(4)在 Springboot 的核心配置文件 application.properties 中配置数据源
#配置内嵌 Tomcat 端口号
server.port=9090

#配置项目上下文根
server.servlet.context-path=/010-springboot-web-mybatis

#配置数据库的连接信息
#注意这里的驱动类有变化
spring.datasource.driver-class-name=com.mysql.cj.jdbc.Driver
spring.datasource.url=jdbc:mysql://localhost:3306/springboot?useUnicode=true&characterEncoding=UTF-8&useJDBCCompliantTimezoneShift=true&useLegacyDatetimeCode=false&serverTimezone=GMT%2B8

spring.datasource.username=root
spring.datasource.password=root
(5)开发代码(代码生成器)
使用 Mybatis 反向工程生成接口、映射文件以及实体 bean,具体步骤参见附录 1
(A)在 web 包下创建 StudentController 并编写代码
@Controller
public class StudentController {
@Autowired
private StudentService studentService;
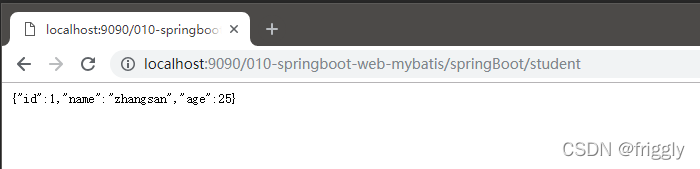
@RequestMapping(value = "/springBoot/student")
public @ResponseBody Object student() {
Student student = studentService.queryStudentById(1);
return student;
}
}
(B)在 service 包下创建 service 接口并编写代码
public interface StudentService {

 /**
 * 根据学生标识获取学生详情
 * @param id
 * @return
 */
 Student queryStudentById(Integer id);
}
(C)在 service.impl 包下创建 service 接口并编写代码
@Service
public class StudentServiceImpl implements StudentService {


 @Autowired
 private StudentMapper studentMapper;

 @Override
 public Student queryStudentById(Integer id) {
 return studentMapper.selectByPrimaryKey(id);
 }
}
(D)如果在 web 中导入 service 存在报错,可以尝试进行如下配置解决 
(E) 在 Mybatis 反向工程生成的 StudentMapper 接口上加一个 Mapper 注解
@Mapper 作用:mybatis 自动扫描数据持久层的映射文件及 DAO 接口的关系
@Mapper
public interface StudentMapper {
}
(F)默认情况下,Mybatis 的 xml 映射文件不会编译到 target 的 class 目录下,所
以我们需要在 pom.xml 文件中配置 resource 。
<resources>
 <resource>
 <directory>src/main/java</directory>
 <includes>
     <include>**/*.xml</include>
 </includes>
 </resource>
</resources>
(G)启动 Application 应用,浏览器访问测试运行
方式一:
(A)注释掉 StudentMapper 接口上的@Mapper 注解

(B)在运行的主类上添加注解包扫描MapperScan("com.abc.springboot.mapper")
@SpringBootApplication
@MapperScan("com.abc.springboot.mapper")
public class Application {
或
@SpringBootApplication
//Mybatis 提供的注解:扫描数据持久层的 mapper 映谢配置文件,DAO 接口上就不用加@Mapper
//basePackages 通常指定到数据持久层包即可
@MapperScan(basePackages = "com.abc.springboot.mapper")
public class Application {
方式二:
因为 SpringBoot 不能自动编译接口映射的 xml 文件,还需要手动在 pom 文件中指定,
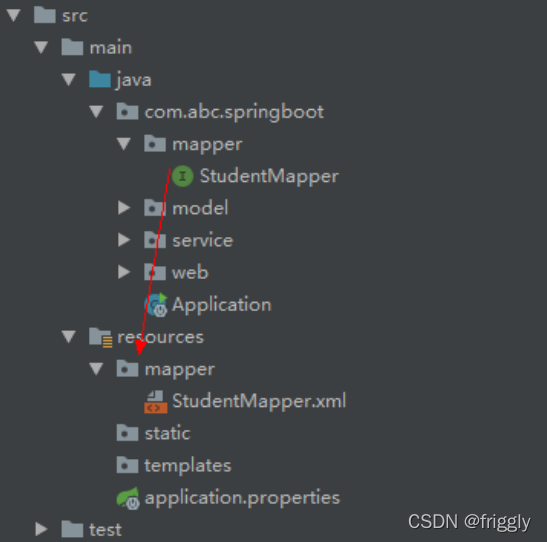
所以有的公司直接将映射文件直接放到 resources 目录下 ,在 resources 目录下新建目录 mapper 存放映射文件,将 StudentMapper.xml 文件移到resources/mapper 目录下:
在 application.properties 配置文件中指定映射文件的位置,这个配置只有接口和映
射文件不在同一个包的情况下,才需要指定:
# 指定 Mybatis 映射文件的路径
mybatis.mapper-locations=classpath:mapper/*.xml
springboot事务底层依然采用的是 Spring 本身提供的事务管理。
在上述案例的基础上,通过 SpringBoot +MyBatis 实现对数据库学生表的更新操作,在 service 层的方法中构建异常,查看事务是否生效:
(1)在 StudentController 中添加更新学生的方法
@RequestMapping(value = "/springboot/modify")
public @ResponseBody Object modifyStudent() {

 int count = 0;
 try {
 Student student = new Student();
 student.setId(1);
 student.setName("Jack");
 student.setAge(33);
 count = studentService.modifyStudentById(student);
 } catch (Exception e) {
 e.printStackTrace();
 return "fail";
 }

 return count;
}
(2)在 StudentService 接口中添加更新学生方法
int modifyStudentById(Student student);
(3)在 StudentServiceImpl 接口实现类中对更新学生方法进行实现,并构建一个异常,同时在该方法上加@Transactional 注解。
@Override
@Transactional //添加此注解说明该方法添加的事务管理
public int update(Student student) {

 int updateCount = studentMapper.updateByPrimaryKeySelective(student);

 System.out.println("更新结果:" + updateCount);

 //在此构造一个除数为 0 的异常,测试事务是否起作用
 int a = 10/0;

 return updateCount;
}
(4)在Application类上加@EnableTransactionManagement开启事务支持。
@EnableTransactionManagement 可选,但是业务方法上必须添加@Transactional 事务才生效
@SpringBootApplication
@MapperScan(basePackages = "com.abc.springboot.mapper")
@EnableTransactionManagement //开启事务支持(可选项,但@Transactional 必须添加)
public class Application {
springboot下的springMVC主要有以下注解:
(1)@Controller:Spring MVC 的注解,处理 http 请求
(2)@RestController :@Controller 与@ResponseBody 的组合注解
如果一个 Controller 类添加了@RestController,那么该 Controller 类下的所有方法都相当
于添加了@ResponseBody 注解 ,用于返回字符串或json数据。
创建 MyRestController 类,演示@RestController 替代@Controller + @ResponseBody
@RestController
public class MyRestController {
 @Autowired
 private StudentService studentService;

 @RequestMapping("/boot/stu")
 public Object stu(){
 return studentService.getStudentById(1);
 }
}
(3)@RequestMapping:支持 Get 请求,也支持 Post 请求 。
(4)@GetMapping :只支持 Get 请求,主要用于查询操作。
(5)@PostMapping:只支持Post请求,主要用于新增数据。
(6)@PutMapping:只支持put请求,主要用于修改数据
(7)@DeleteMapping:只支持delete请求,通常用与删除数据
(8)综合案例:
(A)创建一个 MVCController,里面使用上面介绍的各种注解接收不同的请求
//RestController 注解相当于加了给方法加了@ResponseBody 注解,所以是不能跳转页面的,只能返回字符串或者 json 数据
@RestController
public class MVCController {
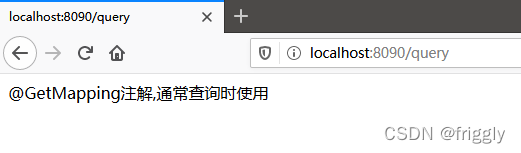
@GetMapping(value = "/query")
public String get() {
return "@GetMapping 注解,通常查询时使用";
}
@PostMapping(value = "/add")
public String add() {
return "@PostMapping 注解,通常新增时使用";
}
@PutMapping(value = "/modify")
public String modify() {
return "@PutMapping 注解,通常更新数据时使用";
}
@DeleteMapping(value = "/remove")
public String remove() {
return "@DeleteMapping 注解,通常删除数据时使用";
}
} (B)启动应用,在浏览器中输入不同的请求进行测试
(C)结合POSTMan工具测试其他请求类型

(1)简介
它是一种互联网软件设计的风格,它只是提出了一组客户端和服务器交互时的架构理念和设计原则,基于这种理念和原则设计的接口可以更简洁,更有层次。
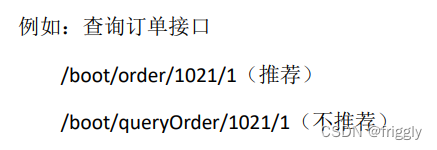
比如我们要访问一个 http 接口:http://localhost:8080/boot/order?id=1021&status=1
采用 RESTFul 风格则 http 地址为:http://localhost:8080/boot/order/1021/1
(2)开发RESTFUL,主要用到以下注解:
该项目集成了 MyBatis、spring、SpringMVC,通过模拟实现对学生的增删改查操作
pom.xml文件
<dependencies>
 <!--SpringBoot 框架 web 项目起步依赖-->
 <dependency>
     <groupId>org.springframework.boot</groupId>
     <artifactId>spring-boot-starter-web</artifactId>
 </dependency>

 <!--MyBatis 集成 SpringBoot 框架起步依赖-->
 <dependency>
     <groupId>org.mybatis.spring.boot</groupId>
     <artifactId>mybatis-spring-boot-starter</artifactId>
     <version>2.0.1</version>
 </dependency>
 <!--MySQL 驱动-->
 <dependency>
     <groupId>mysql</groupId>
     <artifactId>mysql-connector-java</artifactId>
 </dependency>
</dependencies>

<build>
 <!--指定配置资源的位置-->
 <resources>
     <resource>
         <directory>src/main/java</directory>
         <includes>
             <include>**/*.xml</include>
         </includes>
     </resource>
 </resources>

 <plugins>
     <!--mybatis 代码自动生成插件-->
     <plugin>
         <groupId>org.mybatis.generator</groupId>
         <artifactId>mybatis-generator-maven-plugin</artifactId>
         <version>1.3.6</version>
         <configuration>
             <!--配置文件的位置-->
             <configurationFile>GeneratorMapper.xml</configurationFile>
             <verbose>true</verbose>
             <overwrite>true</overwrite>
         </configuration>
     </plugin>

     <plugin>
         <groupId>org.springframework.boot</groupId>
         <artifactId>spring-boot-maven-plugin</artifactId>
     </plugin>
 </plugins>
</build>
application. properties核心配置文件
#配置内嵌 Tomcat 端口号
server.port=8090

#配置项目上下文根
server.servlet.context-path=/

#配置数据库的连接信息
#注意这里的驱动类有变化
spring.datasource.driver-class-name=com.mysql.cj.jdbc.Driver
spring.datasource.url=jdbc:mysql://localhost:3306/springboot?useUnicode=true&characterEncoding=UTF-8&useJDBCCompliantTimezoneShift=true&useLegacyDatetimeCode=false&serverTimezone=GMT%2B8

spring.datasource.username=root
spring.datasource.password=root
通过逆向工程生成 DAO
创建 RESTfulController
@RestController
public class RESTfulController {
/**
* 添加学生
* 请求地址:
http://localhost:9090/014-springboot-restful/springBoot/student/wangpeng/23
* 请求方式:POST
* @param name
* @param age
* @return
*/
@PostMapping(value = "/springBoot/student/{name}/{age}")
public Object addStudent(@PathVariable("name") String name, @PathVariable("age") Integer age) {
Map<String,Object> retMap = new HashMap<String, Object>();
retMap.put("name",name);
retMap.put("age",age);
return retMap;
}
/**
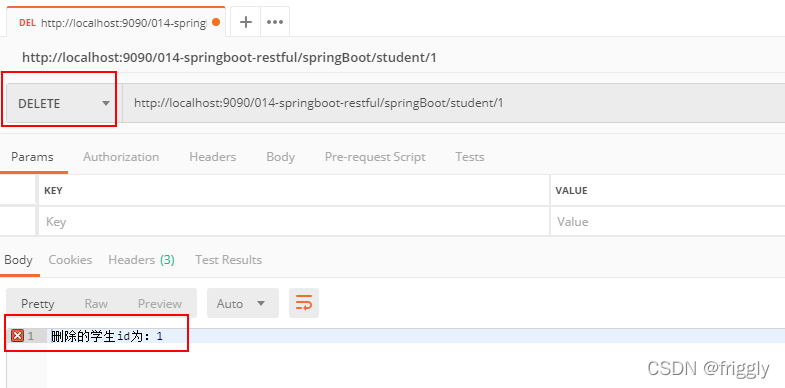
* 删除学生
* 请求地址:
http://localhost:9090/014-springboot-restful/springBoot/student/1
* 请求方式:Delete
* @param id
* @return
*/
@DeleteMapping(value = "/springBoot/student/{id}")
public Object removeStudent(@PathVariable("id") Integer id) {
return "删除的学生 id 为:" + id;
}
/**
* 修改学生信息
* 请求地址:
http://localhost:9090/014-springboot-restful/springBoot/student/2
* 请求方式:Put
* @param id
* @return
*/
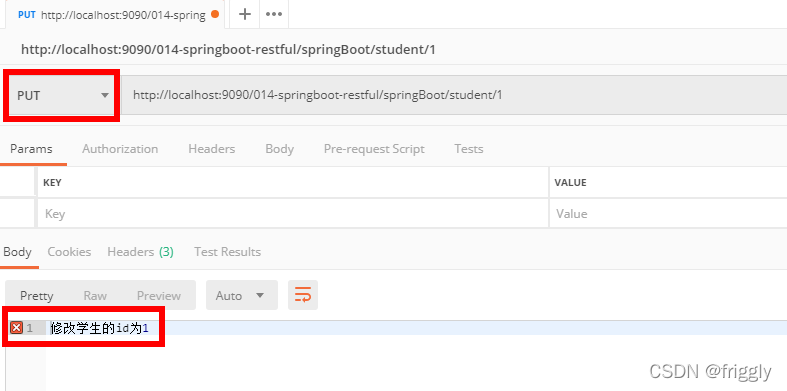
@PutMapping(value = "/springBoot/student/{id}")
public Object modifyStudent(@PathVariable("id") Integer id) {
return "修改学生的 id 为" + id;
}
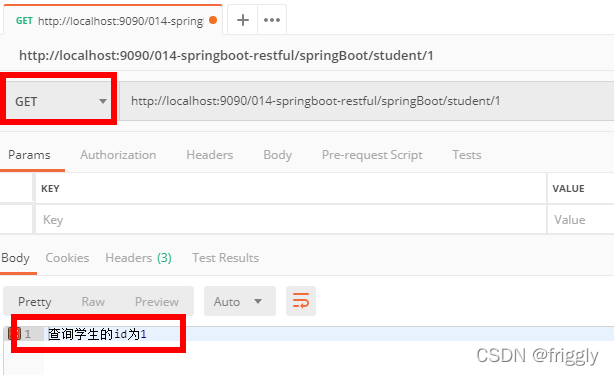
@GetMapping(value = "/springBoot/student/{id}")
public Object queryStudent(@PathVariable("id") Integer id) {
return "查询学生的 id 为" + id;
}
}
使用 Postman 模拟发送请求,进行测试 :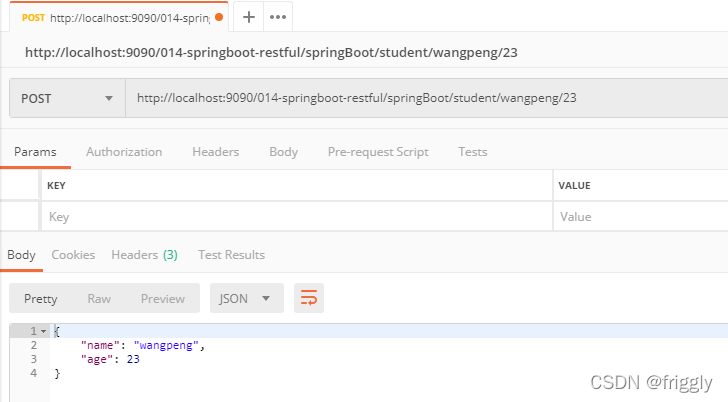
(4)请求冲突的问题
解决方案:<1>修改路径 <2>修改请求方式
创建 RESTfulController 类,结合 Postman 进行测试说明 :
@RestController
public class RESTfulController {

 /**
 * id:订单标识
 * status:订单状态
 * 请求路径:
http://localhost:9090/015-springboot-restful-url-conflict/springBoot/orde
r/1/1001
 * @param id
 * @param status
 * @return
 */
 @GetMapping(value = "/springBoot/order/{id}/{status}")
 public Object queryOrder(@PathVariable("id") Integer id, @PathVariable("status") Integer status) {

 Map<String,Object> map = new HashMap<String,Object>();

 map.put("id",id);
 map.put("status",status);

 return map;
 }

 /**
 * id:订单标识
 * status:订单状态
 * 请求路径:
http://localhost:9090/015-springboot-restful-url-conflict/springBoot/1/or
der/1001
 * @param id
 * @param status

 * @return
 */
 @GetMapping(value = "/springBoot/{id}/order/{status}")
 public Object queryOrder1(@PathVariable("id") Integer id, @PathVariable("status") Integer status) {
 Map<String,Object> map = new HashMap<String,Object>();

 map.put("id",id);
 map.put("status",status);

 return map;
 }

 /**
 * id:订单标识
 * status:订单状态
 * 请求路径:
http://localhost:9090/015-springboot-restful-url-conflict/springBoot/1001
/order/1
 * @param id
 * @param status
 * @return
 */
 @GetMapping(value = "/springBoot/{status}/order/{id}")
 public Object queryOrder2(@PathVariable("id") Integer id,
 @PathVariable("status") Integer status) {
 Map<String,Object> map = new HashMap<String,Object>();

 map.put("id",id);
 map.put("status",status);

 return map;
 }

 /**
 * id:订单标识
 * status:订单状态
 * 请求路径:
http://localhost:9090/015-springboot-restful-url-conflict/springBoot/1001
/order/1
 * @param id
 * @param status
 * @return
 */


 @PostMapping(value = "/springBoot/{status}/order/{id}")
 public Object queryOrder3(@PathVariable("id") Integer id,  @PathVariable("status") Integer status) {
 Map<String,Object> map = new HashMap<String,Object>();

 map.put("id",id);
 map.put("status",status);

 return map;
 }


 /**
 * query1 和 query2 两个请求路径会发生请求路径冲突问题
 * query3 与 query1 和 query2 发生请求冲突
 * 注意:虽然两个路径写法改变了,但是由于传递的两个参数都是 int 值,所以不知道该交给
哪个请求进行处理
 * 就会出现匹配模糊不清的异常,所以要想解决冲突,有两种方式:
 * 1.修改请求路径
 * 2.修改请求方式
 */
}
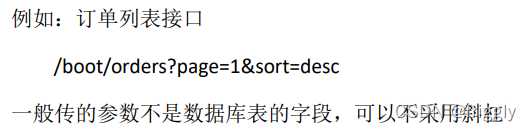
(5)RESTful 原则
完善根据学生 id 查询学生的功能:先从 redis 缓存中查找,如果找不到,再从数据库中
查找,然后放到 redis 缓存中。
具体实现步骤:
(A)首先通过 MyBatis 逆向工程生成实体 bean 和数据持久层 :
(B)在 pom.xml 文件中添加 redis 依赖
<!-- 加载 spring boot redis 包 -->
<dependency>
 <groupId>org.springframework.boot</groupId>
 <artifactId>spring-boot-starter-data-redis</artifactId>
</dependency>
(C)Spring Boot 核心配置文件application.properties 如下:
#配置内嵌 Tomcat 端口号
server.port=9090

#配置项目上下文根
server.servlet.context-path=/016-springboot-redis

#配置连接 MySQL 数据库信息
spring.datasource.url=jdbc:mysql://127.0.0.1:3306/springboot?useUnicode=true&characterEncoding=UTF8&useJDBCCompliantTimezoneShift=true&useLegacyDa
tetimeCode=false&serverTimezone=GMT%2B8
spring.datasource.driver-class-name=com.mysql.cj.jdbc.Driver
spring.datasource.username=root
spring.datasource.password=root

#配置 redis 连接信息
spring.redis.host=127.0.0.1
spring.redis.port=6379
#spring.redis.password=root
(D)启动redis服务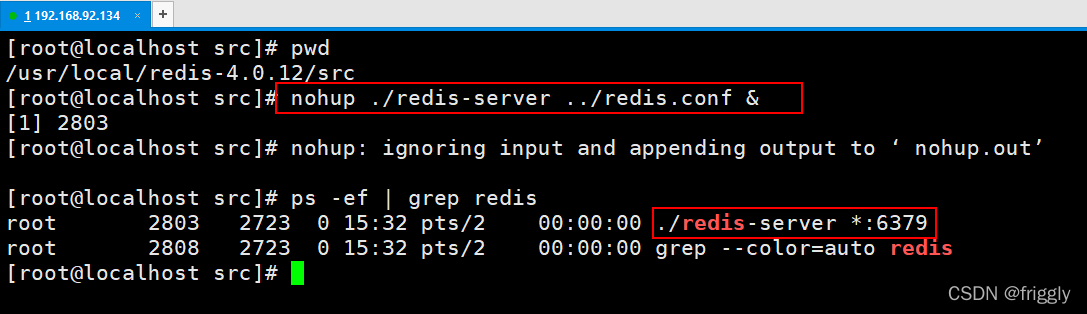
(E)RedisController类
@RestController
public class RedisController {
@Autowired
private StudentService studentService;
/**
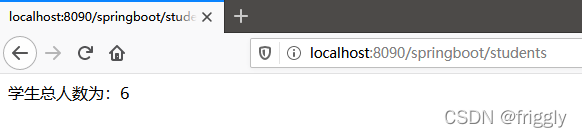
* 请求地址:
http://localhost:9090/016-springboot-redis//springboot/allStudentCount
* @param request
* @return
*/
@GetMapping(value = "/springboot/allStudentCount")
public Object allStudentCount(HttpServletRequest request) {
Long allStudentCount = studentService.queryAllStudentCount();
return "学生总人数:" + allStudentCount;
}
} (F)StudentService 接口
public interface StudentService {

 /**
 * 获取学生总人数
 * @return
 */
 Long queryAllStudentCount();
}
(G)在 StudentServiceImpl 中注入 RedisTemplate,并编写根据 id获取学生的方法
配置了上面的步骤,Spring Boot 将自动配置 RedisTemplate,在需要操作 redis 的类中注入 redisTemplate 即可。
注意:Spring Boot 帮我们注入 RedisTemplate 类,泛型里面只能写 <String, String>、<Object, Object>或者什么都不写。
@Service
public class StudentServiceImpl implements StudentService {

 @Autowired
 private StudentMapper studentMapper;

 @Autowired
 private RedisTemplate<Object,Object> redisTemplate;

 @Override
 public Long queryAllStudentCount() {

 //设置 redisTemplate 对象 key 的序列化方式
 redisTemplate.setKeySerializer(new StringRedisSerializer());

 //从 redis 缓存中获取总人数
 Long allStudentCount = (Long) redisTemplate.opsForValue().get("allStudentCount");
 //判断是否为空
 if ( allStudentCount==null) {
 //去数据库查询,并存放到 redis 缓存中

 allStudentCount = studentMapper.selectAllStudentCount();

redisTemplate.opsForValue().set("allStudentCount",allStudentCount,15,TimeUnit.SECONDS);
 }
 return allStudentCount;
 }
}
(H)StudentMapper 接口
@Mapper
public interface StudentMapper {
 /**
 * 获取学生总人数
 * @return
 */
 Long selectAllStudentCount();
}
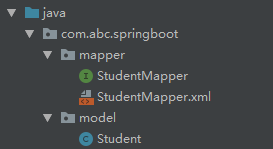
(I)StudentMapper 映射文件
<!--获取学生总人数-->
<select id="selectAllStudentCount" resultType="java.lang.Long">
 select count(*) from  t_student
</select>
(J)启动类 Application
在 SpringBoot 启动类上添加扫描数据持久层的注解并指定扫描包:
@SpringBootApplication
@MapperScan(basePackages = "com.abc.springboot.mapper")//扫描数据持久层
public class Application {
public static void main(String[] args) {
SpringApplication.run(Application.class, args);
}
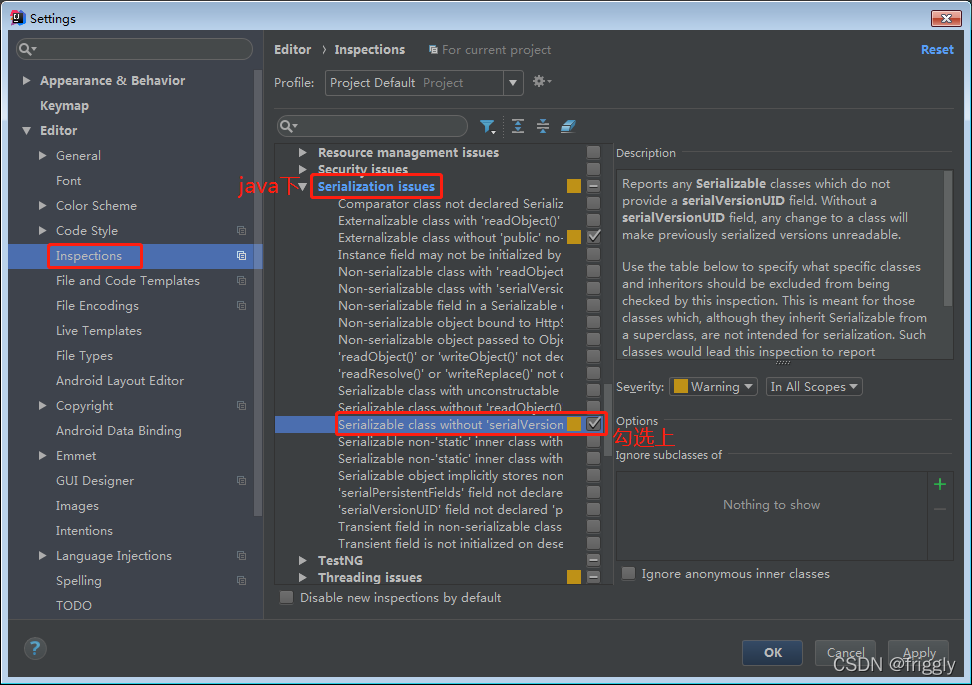
} (K)让 Student 类实现序列化接口(可选)
在类名上 Alt + 回车,如果没有提示生成序列化 id,那么需要做如下的配置 :

(L)启动 SpringBoot 应用,访问测试
Transformers开始在视频识别领域的“猪突猛进”,各种改进和魔改层出不穷。由此作者将开启VideoTransformer系列的讲解,本篇主要介绍了FBAI团队的TimeSformer,这也是第一篇使用纯Transformer结构在视频识别上的文章。如果觉得有用,就请点赞、收藏、关注!paper:https://arxiv.org/abs/2102.05095code(offical):https://github.com/facebookresearch/TimeSformeraccept:ICML2021author:FacebookAI一、前言Transformers(VIT)在图
我想开始使用“Sinatra”框架进行编码,但我找不到该框架的“MVC”模式。是“MVC-Sinatra”模式或框架吗? 最佳答案 您可能想查看Padrino这是一个围绕Sinatra构建的框架,可为您的项目提供更“类似Rails”的感觉,但没有那么多隐藏的魔法。这是使用Sinatra可以做什么的一个很好的例子。虽然如果您需要开始使用这很好,但我个人建议您将它用作学习工具,以对您来说最有意义的方式使用Sinatra构建您自己的应用程序。写一些测试/期望,写一些代码,通过测试-重复:)至于ORM,你还应该结帐Sequel其中(imho
按照目前的情况,这个问题不适合我们的问答形式。我们希望答案得到事实、引用或专业知识的支持,但这个问题可能会引发辩论、争论、投票或扩展讨论。如果您觉得这个问题可以改进并可能重新打开,visitthehelpcenter指导。关闭10年前。我一直在Rails上做两个项目,它们运行良好,但在这个过程中重新发明了轮子,自来水(和热水)和止痛药,正如我随后了解到的那样,这些已经存在于框架中。那么基本上,正确了解框架中所有智能部分的最佳方法是什么,这将节省时间而不是自己构建已经实现的功能?从第1页开始阅读文档?是否有公开所有内容的特定示例应用程序?一个特定的开源项目?所有的rails交通?还是完全
关闭。这个问题不符合StackOverflowguidelines.它目前不接受答案。我们不允许提问寻求书籍、工具、软件库等的推荐。您可以编辑问题,以便用事实和引用来回答。关闭4年前。Improvethisquestion我希望能够将模板化的YARD文档样式注释插入到我现有的Rails遗留应用程序中。目前它的评论很少。我想要具有指定参数的类header和方法header(通过从我假定的方法签名中提取)和返回值的占位符。在PHP代码中,我有一些工具可以检查代码并在适当的位置创建插入到代码中的文档header注释。在带有Ducktyping等的Ruby中,我确信诸如@params等类型之类
我尝试用Ruby设计一个基于Web的应用程序。我开发了一个简单的核心应用程序,在没有框架和数据库的情况下在六边形架构中实现DCI范例。核心六边形中有小六边形和网络,数据库,日志等适配器。每个六边形都在没有数据库和框架的情况下自行运行。在这种方法中,我如何提供与数据库模型和实体类的关系作为独立于数据库的关系。我想在将来将框架从Rails更改为Sinatra或数据库。事实上,我如何在这个核心Hexagon中实现完全隔离的rails和mongodb的数据库适配器或框架适配器。有什么想法吗? 最佳答案 ROM呢?(Ruby对象映射器)。还有
据我了解,Python的扭曲框架为网络通信提供了更高级别的抽象(?)。我正在寻找在Rails应用程序中使用与twisted等效的Ruby。 最佳答案 看看EventMachine.它不像Twisted那样广泛,但它是围绕事件驱动网络编程的相同概念构建的。 关于python-Ruby是否有相当于Python的扭曲框架作为网络抽象层?,我们在StackOverflow上找到一个类似的问题: https://stackoverflow.com/questions/9
如果您希望在Spring中启用定时任务功能,则需要在主类上添加 @EnableScheduling 注解。这样Spring才会扫描 @Scheduled 注解并执行定时任务。在大多数情况下,只需要在主类上添加 @EnableScheduling 注解即可,不需要在Service层或其他类中再次添加。以下是一个示例,演示如何在SpringBoot中启用定时任务功能:@SpringBootApplication@EnableSchedulingpublicclassApplication{publicstaticvoidmain(String[]args){SpringApplication.ru
软件特点部署后能通过浏览器查看线上日志。支持Linux、Windows服务器。采用随机读取的方式,支持大文件的读取。支持实时打印新增的日志(类终端)。支持日志搜索。使用手册基本页面配置路径配置日志所在的目录,配置后按回车键生效,下拉框选择日志名称。选择日志后点击生效,即可加载日志。windows路径E:\java\project\log-view\logslinux路径/usr/local/XX历史模式历史模式下,不会读取新增的日志。针对历史文件可以分页读取,配置分页大小、跳转。历史模式下,支持根据关键词搜索。目前搜索引擎使用的是jdk自带类库,搜索速度相对较低,优点是比较简单。2G日志全文搜
1.依赖导入org.springframework.bootspring-boot-starter-weborg.springframework.bootspring-boot-starter-validation2.validation常用注解@Null被注释的元素必须为null@NotNull被注释的元素不能为null,可以为空字符串@AssertTrue被注释的元素必须为true@AssertFalse被注释的元素必须为false@Min(value)被注释的元素必须是一个数字,其值必须大于等于指定的最小值@Max(value)被注释的元素必须是一个数字,其值必须小于等于指定的最大值@D
我想使用比Rails(Sinatra/Ramaze/Camping)更轻的框架,但我担心这样做我将无法使用许多以插件形式为Rails定制的共享库.这是一个主要问题,还是这些插件中的大多数都可以跨不同的Ruby框架使用?使用Ruby框架而不是Rails是否还有其他潜在的缺点? 最佳答案 您仍然可以使用gems在你提到的所有框架中,很多东西都是可重用的。想要交换一个新的ORM,没问题。想要一个花哨的shmacy语法高亮,没问题。Rails一直在大力插入摆脱旧的插件模型,转而使用gems。如果其他框架之一符合您的需求,最好使用它。请记住,