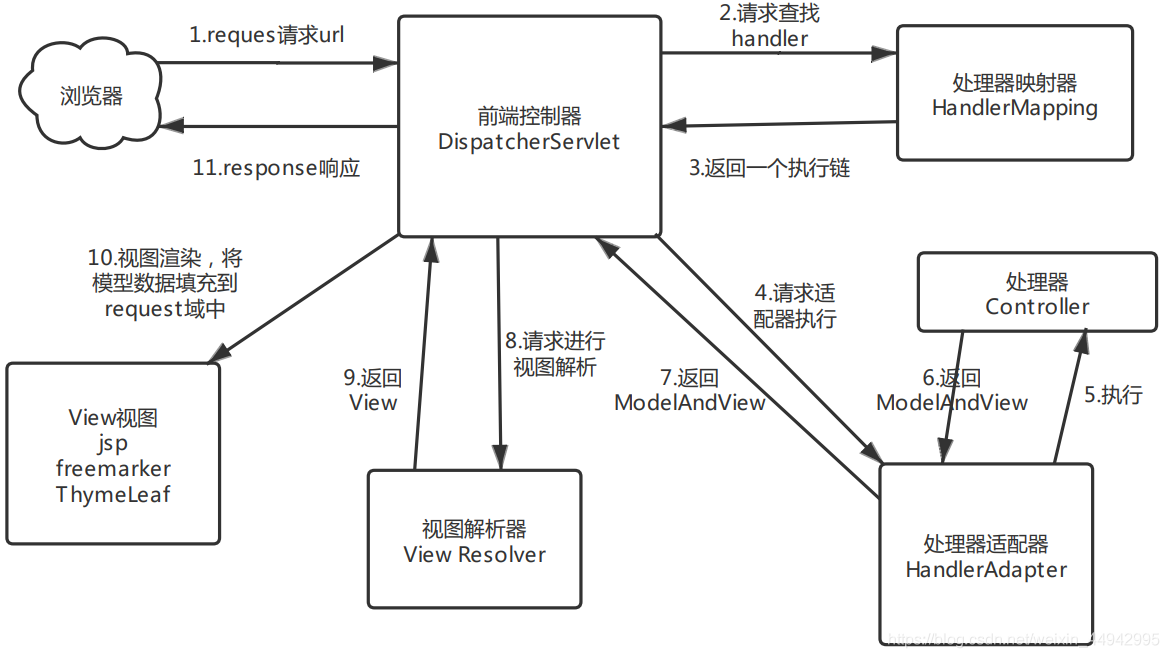
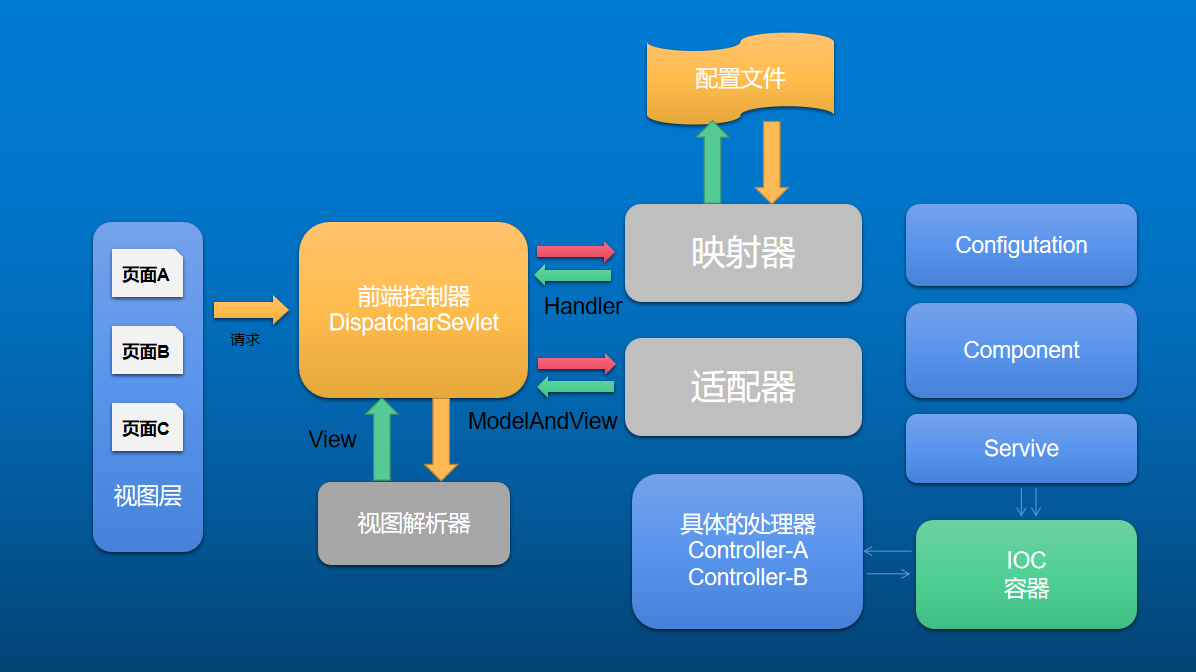
常用注解分类有如下:
1.项目配置注解
@SpringBootApplication
@ServletComponentScan
@MapperScan
2.Controller的表现层注解:
@controller
@Autowired
@CrossOrigin
@PathVariable
@RequestParam
@EnablCaching
@RestController
@RequestMapping
@ResponseBody
@GetMapping
@PutMapping
@PostMapping
@DeleteMapping
3.servcie业务层注解
@Service
@Resource
4.持久层注解
@Repository@Component@Transactional5.其他相关注解
@ControllerAdvice@Configuration@Bean@Value在spring boot中,摒弃了spring以往项目中大量繁琐的配置,遵循约定大于配置的原则,通过自身默认配置,极大的降低了项目搭建的复杂度。同样在spring boot中,大量注解的使用,使得代码看起来更加简洁,提高开发的效率。这些注解不光包括spring boot自有,也有一些是继承自spring的。
@SpringBootApplication是一个复合注解,包含了@SpringBootConfiguration,@EnableAutoConfiguration,@ComponentScan这三个注解这三个注解的作用分别为:
@SpringBootConfiguration:标注当前类是配置类,这个注解继承自@Configuration。并会将当前类内声明的一个或多个以@Bean注解标记的方法的实例纳入到srping容器中,并且实例名就是方法名。@EnableAutoConfiguration:是自动配置的注解,这个注解会根据我们添加的组件jar来完成一些默认配置,我们做微服时会添加spring-boot-starter-web这个组件jar的pom依赖,这样配置会默认配置springmvc 和tomcat。@ComponentScan:扫描当前包及其子包下被@Component,@Controller,@Service,@Repository注解标记的类并纳入到spring容器中进行管理。等价于context:component-scan的xml配置文件中的配置项@SpringBootApplication
public class Springboot2Application {
public static void main(String[] args) {
SpringApplication.run(Springboot2Application.class, args);
}
}
Servlet、Filter、Listener 可以直接通过 @WebServlet、@WebFilter、@WebListener 注解自动注册,这样通过注解servlet ,拦截器,监听器的功能而无需其他配置,所以这次相中使用到了filter的实现,用到了这个注解
spring-boot支持mybatis组件的一个注解,通过此注解指定mybatis接口类的路径,即可完成对mybatis接口的扫描。
@MapperScan("com.example.mapper")
@SpringBootApplication
public class Springboot2Application {

    public static void main(String[] args) {
        SpringApplication.run(Springboot2Application.class, args);
    }
}
表明这个类是一个控制器类,和@RequestMapping来配合使用拦截请求
@Controller
public class UserController {
    @RequestMapping("/view")
    public String view(){

        return "view";
    }
}
是spring的自动装配,这个个注解可以用到构造器,变量域,方法,注解类型上。当我们需要从bean 工厂中获取一个bean时,Spring会自动为我们装配该bean中标记为@Autowired的元素
public class UserController {

    @Autowired
    private UserService userService;

    @RequestMapping("/view")
    public String view(){
        userService.save();
        return "view";
    }
}
@CrossOrigin(origins = “”, maxAge = 1000) 这个注解主要是为了解决跨域访问的问题。这个注解可以为整个controller配置启用跨域,也可以在方法级别启用
路径变量注解,@RequestMapping中用{}来定义url部分的变量名
	private static final String  PAGE = "param";

	// @PathVariable的用法
	// 这里是@PathVariable注解的单个值路径使用方法
     @RequestMapping("/path/{id}")
     public ModelAndView pathTest1(@PathVariable(value = "id",required = false)int id){
         ModelAndView modelAndView = new ModelAndView();
         modelAndView.setViewName(PAGE);
         return modelAndView;
     }

    // 这里是@PathVariable注解的多个值路径使用方法
    @RequestMapping("/path/{id}/{username}/{password}")
    public ModelAndView pathTest2(@PathVariable(value = "id",required = false)int id,
                                 @PathVariable(value = "username",required = false)String username,
                                 @PathVariable(value = "password",required = false)String password){
        ModelAndView modelAndView = new ModelAndView();
        modelAndView.setViewName(PAGE);
        return modelAndView;
    }
用于将指定的请求参数赋值给方法中的形参。
有三个属性:
value:请求参数名(必须配置)required:是否必需,默认为 true,即 请求中必须包含该参数,如果没有包含,将会抛出异常(可选配置)defaultValue:默认值,如果设置了该值,required 将自动设为 false,无论你是否配置了required,配置了什么值,都是 false(可选配置) private static final String PAGE = "param";
// @RequestParam 的多参数方式使用
@RequestMapping("/param")
public ModelAndView paramTest(@RequestParam(value = "id",required = false,defaultValue = "0")int id,
@RequestParam(value = "username",required = false,defaultValue = "zhangsan")String username,
@RequestParam(value = "password",required = false,defaultValue = "123456")String password){
ModelAndView modelAndView = new ModelAndView();
modelAndView.addObject("id",id);
modelAndView.addObject("username",username);
modelAndView.addObject("password",password);
modelAndView.setViewName(PAGE);
return modelAndView;
// 访问的时候使用 http://localhost:8080/param?id=1&username=zhangsan&password=123456
}
@EnableCaching: 这个注解是spring framework中的注解驱动的缓存管理功能。自spring版本3.1起加入了该注解。其作用相当于spring配置文件中的cache manager标签。
@RestController 是@Controller 和@ResponseBody的结合,以json数据格式返回数据,一个类被加上@RestController 注解,数据接口中就不再需要添加@ResponseBody。更加简洁。
@RestController    // @Controller + @ResponseBody
@RequestMapping("/request")
public class RestUserController {

    @GetMapping("/get")
    public User restTest(){
        User user = new User(1,"zhangsan",20,"男");
        return user;
    }
第一种使用
1.用来拦截请求,默认拦截get和post请求
@RequestMapping("/adminDetele/{id}")
或
@RequestMapping(value="/adminDetele/{id}", method= RequestMethod.GET )
2.详细使用方法:
@RestController    // @Controller + @ResponseBody
@RequestMapping("/request")
public class RestUserController {

    @RequestMapper("/data1")
    public String save(){
        return "Hello Word"
    }
}
第二种使用
1.导入Freemarker的坐标
		<dependency>
            <groupId>org.springframework.boot</groupId>
            <artifactId>spring-boot-starter-freemarker</artifactId>
        </dependency>
2.配置application.yml的配置文件
# 配置视图解析器
spring:
  mvc:
    view:
      prefix: /
      suffix: .html
  # 配置freemarker插件  后缀
  freemarker:
    suffix: .html
    template-loader-path: classpath:/static/
3.使用@GetMapping注解配合视图解析器
@RestController
public class UserController {

    @RequestMapping("/view")
    public String view(){
        return "view";
    }
}
后端如果要返回json数据的话,需要配合@ResponseBody注解来完成
用于将HTTP GET请求映射到特定处理程序方法的注释。具体来说,@GetMapping是一个作为快捷方式的组合注释
@RequestMapping(method = RequestMethod.GET)。
@RestController
@RequestMapping("/request")
public class RestUserController {

    @GetMapping("/get")
    public User restTest(){
        User user = new User(1,"zhangsan",20,"男");
        return user;
    }
}
用于将HTTP POST请求映射到特定处理程序方法的注释。具体来说,@PostMapping是一个作为快捷方式的组合注释@RequestMapping(method = RequestMethod.POST)。
@RestController
@RequestMapping("/request")
public class RestUserController {

	@PostMapping("/addUser")
    public User addUser(@RequestBody User user){
        System.out.println(user);
        return user;
    }
}
类似的组合注解还有
@PutMapping、@DeleteMapping、@PatchMapping这个注解用来标记业务层的组件,我们会将业务逻辑处理的类都会加上这个注解交给spring容器管理,在需要使用的地方可使用@Autowired自动装配
@Service
public class ArticleServiceImpl implements ArticleService {}

@Controller
public class ArticleController {
    @Autowired
    ArticleService articleService;
}
@Resource和@Autowired一样都可以用来装配bean,都可以标注字段上,或者方法上。 @resource注解不是spring提供的,是属J2EE规范的注解。两个之前的区别就是匹配方式上有点不同,@Resource默认按照名称方式进行bean匹配,@Autowired默认按照类型方式进行bean匹配
@Service("userService")
public class UserServiceImpl implements UserService {}

@RestController
public class UserController {

    @Autowired
    @Qualifier("userService")
    @Resource(name = "userService")
    private UserService userService;
}
作为DAO对象,管理操作数据库的对象。@Component, @Service, @Controller, @Repository是spring注解,注解后可以被spring框架所扫描并注入到spring容器来进行管理
@Repository
public interface UserDao {}
通用注解,其他三个注解是这个注解的拓展,并且具有了特定的功能。通过这些注解的分层管理,就能将请求处理,义务逻辑处理,数据库操作处理分离出来,为代码解耦,也方便了以后项目的维护和开发
@Component
public class RedisUtils {

    @Autowired
    RedisTemplate<String, String> redisTemplate;

    public Object get(String key) {
        return redisTemplate.opsForValue().get(key);
    }
}
声明事务,可以添加在类上或者方法上。在spring boot中 不用再单独配置事务管理,一般情况是我们会在servcie层添加了事务注解,即可开启事务。要注意的是,事务的开启只能在public 方法上
//尽量放在业务层上
@Transactional
@RequestMapping("/test")
public String test(Upload upload){}
@ControllerAdvice 和 @ExceptionHandler 配合完成统一异常拦截处理
@RestControllerAdvice 是 @ControllerAdvice 和 @ResponseBody的合集,可以将异常以json的格式返回数据。
@ControllerAdvice
public class GlobalExceptionHandler {
    @Autowired
    RedisUtils redisUtils;

    @ExceptionHandler(value = Exception.class)
    public ModelAndView defaultErrorHandler(HttpServletRequest req, Exception e) throws Exception {
        ModelAndView mav = new ModelAndView();
        mav.addObject("exception", e);
        mav.addObject("url", req.getRequestURL());
//        mav.addObject("admin", redisUtils.get(Constant.USER));
        mav.setViewName("error");
        return mav;
    }

}
声明当前类为配置类,配合@Bean注解一起使用,可以作为导入插件。
@Configuration
public class MybatiPlusConfig{
    @Bean
    public MybatisPlusInterceptor mybatisPlusInterceptor() {
        MybatisPlusInterceptor interceptor = new MybatisPlusInterceptor();
        interceptor.addInnerInterceptor(new OptimisticLockerInnerInterceptor());
        return interceptor;
    }
}
大约一年前,我决定确保每个包含非唯一文本的Flash通知都将从模块中的方法中获取文本。我这样做的最初原因是为了避免一遍又一遍地输入相同的字符串。如果我想更改措辞,我可以在一个地方轻松完成,而且一遍又一遍地重复同一件事而出现拼写错误的可能性也会降低。我最终得到的是这样的:moduleMessagesdefformat_error_messages(errors)errors.map{|attribute,message|"Error:#{attribute.to_s.titleize}#{message}."}enddeferror_message_could_not_find(obje
电脑上可以截取图片吗?如果可以,该如何操作呢?相信很多小伙伴都只知道一两种截图的方式,知道的并不全面。其实,电脑上有多种方式截图的,而且非常方便。电脑怎么截图?今天我们就来教大家如何使用电脑截取图片的8种常用方式!操作环境:演示机型:Delloptiplex7050系统版本:Windows10方法一:系统自带截图具体操作:同时按下电脑的自带截图键【Windows+shift+S】,可以选择其中一种方式来截取图片:截屏有矩形截屏、任意形状截屏、窗口截屏和全屏截图。 方法二:QQ截图具体操作:在电脑登录QQ,然后同时按下【Ctrl+Alt+A】,可以任意截图你需要的界面,可以把截图的页面直接下载,
1.Scenes游戏场景文件夹用于放置unity的场景文件 2.Plugins插件文件夹用于放置unity的依赖文件,例如dll 3.Scripts脚本文件夹用于放置unity的c#脚本文件 4.Resources游戏资源文件夹用于放置unity的各种游戏资源,比如images,prefabs,同时只有放到Resources文件夹的游戏资源才能使用Resource.load(资源路径不加后缀)加载到游戏内存中进行使用 5.EditorUnity编辑器扩展脚本文件夹usingUnityEditor;这个名称空间就是Unity编辑器的名称空间这个名称空间提供了扩展Unity编辑器的各种类 【你所有
如果您希望在Spring中启用定时任务功能,则需要在主类上添加 @EnableScheduling 注解。这样Spring才会扫描 @Scheduled 注解并执行定时任务。在大多数情况下,只需要在主类上添加 @EnableScheduling 注解即可,不需要在Service层或其他类中再次添加。以下是一个示例,演示如何在SpringBoot中启用定时任务功能:@SpringBootApplication@EnableSchedulingpublicclassApplication{publicstaticvoidmain(String[]args){SpringApplication.ru
软件特点部署后能通过浏览器查看线上日志。支持Linux、Windows服务器。采用随机读取的方式,支持大文件的读取。支持实时打印新增的日志(类终端)。支持日志搜索。使用手册基本页面配置路径配置日志所在的目录,配置后按回车键生效,下拉框选择日志名称。选择日志后点击生效,即可加载日志。windows路径E:\java\project\log-view\logslinux路径/usr/local/XX历史模式历史模式下,不会读取新增的日志。针对历史文件可以分页读取,配置分页大小、跳转。历史模式下,支持根据关键词搜索。目前搜索引擎使用的是jdk自带类库,搜索速度相对较低,优点是比较简单。2G日志全文搜
1.依赖导入org.springframework.bootspring-boot-starter-weborg.springframework.bootspring-boot-starter-validation2.validation常用注解@Null被注释的元素必须为null@NotNull被注释的元素不能为null,可以为空字符串@AssertTrue被注释的元素必须为true@AssertFalse被注释的元素必须为false@Min(value)被注释的元素必须是一个数字,其值必须大于等于指定的最小值@Max(value)被注释的元素必须是一个数字,其值必须小于等于指定的最大值@D
Iparking停车收费管理系统-可商用介绍Iparking是一款基于springBoot的停车收费管理系统,支持封闭车场和路边车场,支持微信支付宝多种支付渠道,支持多种硬件,涵盖了停车场管理系统的所有基础功能。技术栈Springboot,MybatisPlus,Beetl,Mysql,Redis,RabbitMQ,UniApp功能云端功能序号模块功能描述1系统管理菜单管理配置系统菜单2系统管理组织管理管理组织机构3系统管理角色管理配置系统角色,包含数据权限和功能权限配置4系统管理用户管理管理后台用户5系统管理租户管理多租户管理6系统管理公众号配置租户公众号配置7系统管理操作日志审计日志8系统
一、获取当前时间1、current_date当前日期(年月日)Examples:SELECTcurrent_date;2、current_timestamp/now()当前日期(时间戳)Examples:SELECTcurrent_timestamp;二、从日期字段中提取时间1、year,month,day/dayofmonth,hour,minute,secondExamples:SELECTyear(now());其他的日期函数以此类推month:1day:12(当月的第几天)dayofmonth:12hour,minute,second:分别对应时分秒2、dayofweek、dayofm
一、Elasticsearch简介实际业务场景中,多端的查询功能都有很大的优化空间。常见的处理方式有:建索引、建物化视图简化查询逻辑、DB层之上建立缓存、分页…然而随着业务数据量的不断增多,总有那么一张表或一个业务,是无法通过常规的处理方式来缩短查询时间的。在查询功能优化上,作为开发人员应该站在公司的角度,本着优化客户体验的目的去寻找解决方案。本人有幸做过Tomcat整合solr,今天一起研究一下当前比较火热的Elasticsearch搜索引擎。Elasticsearch是一个非常强大的搜索引擎。它目前被广泛地使用于各个IT公司。Elasticsearch是由Elastic公司创建。它的代码位
有人能告诉我有没有办法将异常处理作为一种通用方法并在方法中使用它?让我进一步解释一下。例如我有以下方法defadd(num1,num2)beginnum1+num2rescueException=>eraiseeendenddefdivide(num1,num2)beginnum1/num2rescueException=>eraiseeendend如您所见,尽管我的方法只需要一行,但由于异常处理代码,该方法变得更大了。我正在寻找的是一个更slim的解决方案,比如(只是一个想法)defadd(num1,num2)num1+num2unlessraise_exceptionenddefd
