计算搜索中两点之间的距离有很多用例。 如果你正在处理地理数据,那么无论你从事何种业务,这都必然会出现。 然后,在对这些点进行排序时,你可能需要考虑距离,因为……好吧,为什么不呢?
所以这里有几种不同的方法可以做到这一点。 尽管我尝试尽可能详细地解释所有内容,但我假设你对 Elasticsearch (ES) 及其基本查询有初学者的了解。
对于这个例子,假设我们是一家食品配送初创公司。 也许是美团 或点评之类的东西。我们有一个移动应用程序,用户可以在其中输入他们的搜索词(即 “Chinese food”)。 然后,我们的应用程序会按照在我们的数据库中找到的随机顺序列出所有包含该术语的餐馆。
我们可能将每个场所的经纬度都保存在数据库中。如果不是,那么我们可能会计算每个场所的 geohash 并保存它。
然而,要开始充分利用 ES 的地理查询,我们应该将这些值转换为 geopoints。
方便的是,Elasticsearch 允许你以你碰巧保存的任何格式上传地理点:纬度/经度对象、geohashes、字符串、字符串数组、WKT POINT 基元等。 看一看:
// Geopoint as an object with 'lat' and 'lon' keys
"location": {
  "lat": 41.12,
  "lon": -71.34
}

// Geopoint as an array
"location": [ -71.34, 41.12 ] # [ long, lat ]

// Geopoint as a string
"location": "41.12,-71.34"

// Geopoint as a geohash
"location": "drm3btev3e86"

// Geopoint as an object using GeoJSON format
"location": {
  "type": "Point",
  "coordinates": [-71.34, 41.12] # [ long, lat ]
}

// Geopoint as a WKT POINT primitive
"location" : "POINT (-71.34 41.12)"
这里有几点需要注意:
首先,location 是一个任意名称,我们可以随意命名我们的地理点字段。
其次,我们需要在上传任何文件之前声明 location 字段的类型。 这是因为,除非我们明确告诉 Elasticsearch “41.12,-71.34” 是一个地理点,否则它会将其解释为文本。 同样,它会将 [-71.34, 41.12] 视为一个数字数组。
从 geopoint 文档中,让我指出两个非常重要的注释:
注意:一个点可以表示为一个 geohash。 Geohashes 是交错的纬度和经度位的 base32 编码字符串。 geohash 中的每个字符都会增加额外的 5 位精度。 所以 hash 值越长,它就越精确。 为了索引目的,geohashes 被翻译成纬度-经度对。 在此过程中仅使用前 12 个字符,因此在 geohash 中指定超过 12 个字符不会提高精度。 12 个字符提供 60 位,应该可以将可能的错误减少到小于 2cm。
有关 geohash 的更多描述,请阅读我之前的文章 “Elasticsearch:理解 Elastic Maps 中的 geohash 及其聚合”。
重要:以数组或字符串表示的地理点请注意,字符串地理点按纬度、经度排序,而数组 geopoints、GeoJSON 和 WKT 则按相反顺序排序:经度、纬度。
这是有历史原因的。 地理学家传统上将纬度写在经度之前,而最近为地理数据指定的格式(如 GeoJSON 和 Well-Known Text)将经度排序在纬度之前(东在北之前),以便与 x 在 y 之前排序的数学惯例相匹配。
每个字段都有一个类型(或 mapping),这很重要,因为每种类型的数据都需要以特定的方式存储,以便快速搜索。 Elasticsearch 可以在你上传新文档时动态生成映射,但有时需要显式声明它们。
对于我们的示例,让我们创建一个名为 establishments 的简单索引。
PUT establishments
{
  "mappings": {
    "properties": {
      "name": {
        "type": "text"
      },
      "location": {
        "type": "geo_point"
      }
    }
  }
}
请注意,我们在上面显示指明 location 字段为 geo_point 类型。如果我们不这么做,那么当我们写入文档时,location 字段会被自动映射为 text 类型的字段。这显然不是我们所需要的。
接下来,让我们创建一下 sample 文档,虽然是假设的一些位置点。我们使用如下的命令来写入 8 个文档:
POST _bulk
{ "create" : { "_index" : "establishments", "_id" : "1" } }
{ "name" : "Establishment 1", "location": {"lat": 40.7367026, "lon": -73.8028177}}
{ "create" : { "_index" : "establishments", "_id" : "2" } }
{ "name" : "Establishment 2", "location": {"lat": 40.7417101, "lon": -73.8083109}}
{ "create" : { "_index" : "establishments", "_id" : "3" } }
{ "name" : "Establishment 3", "location": {"lat": 40.7361652, "lon": -73.7904442}}
{ "create" : { "_index" : "establishments", "_id" : "4" } }
{ "name" : "Establishment 4", "location": {"lat": 40.7503261, "lon": -73.7791284}}
{ "create" : { "_index" : "establishments", "_id" : "5" } }
{ "name" : "Establishment 5", "location": {"lat": 40.7457094, "lon": -73.792518}}
{ "create" : { "_index" : "establishments", "_id" : "6" } }
{ "name" : "Establishment 6", "location": {"lat": 40.7393039, "lon": -73.8151344}}
{ "create" : { "_index" : "establishments", "_id" : "7" } }
{ "name" : "Establishment 7", "location": {"lat": 40.7464897, "lon": -73.8032898}}
{ "create" : { "_index" : "establishments", "_id" : "8" } }
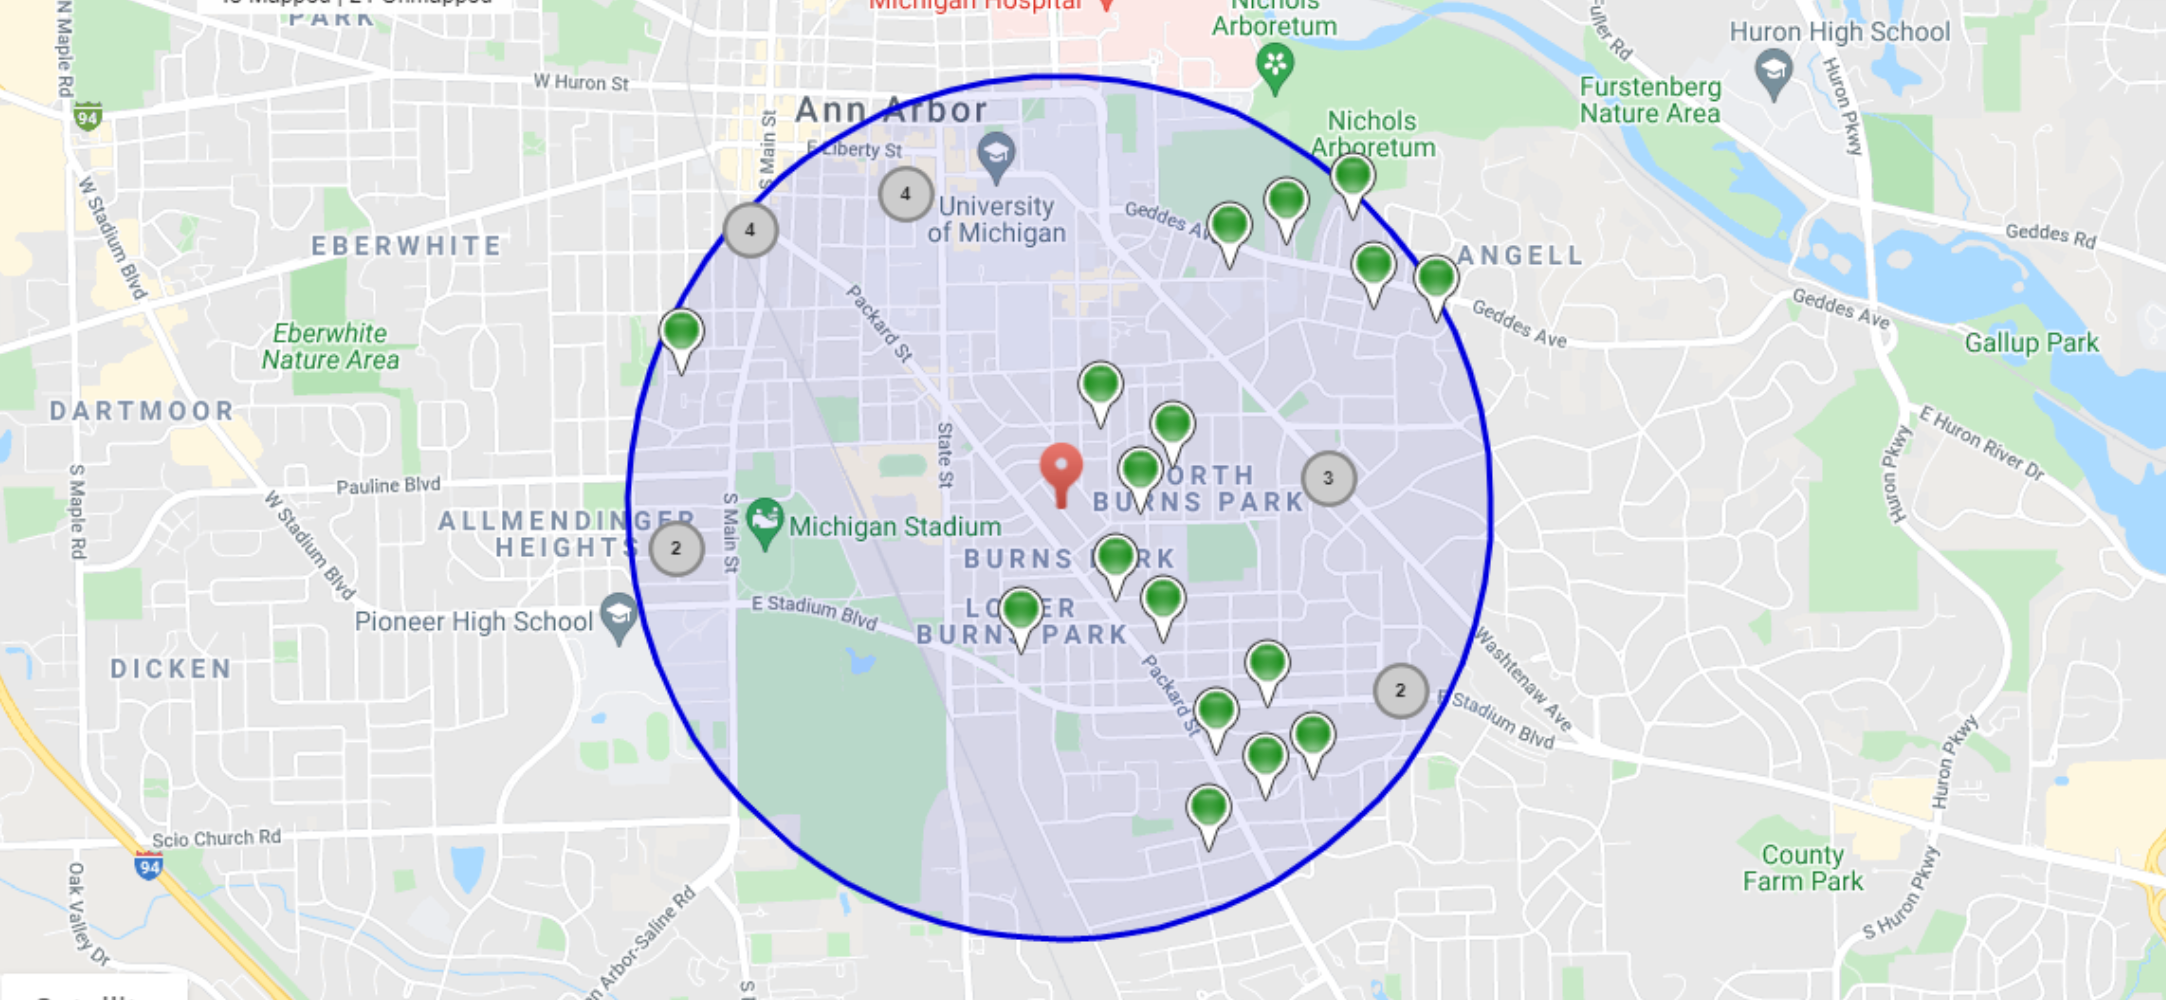
{ "name" : "Establishment 8", "location": {"lat": 40.7440512, "lon": -73.7823042}}这是我们的纽约皇后区地图,其中包含我们的八家场所(蓝色)和我们假设的客户(橙色):

为了说明问题方便,我们也使用 Elastic Maps 来显示我们的地图数据:
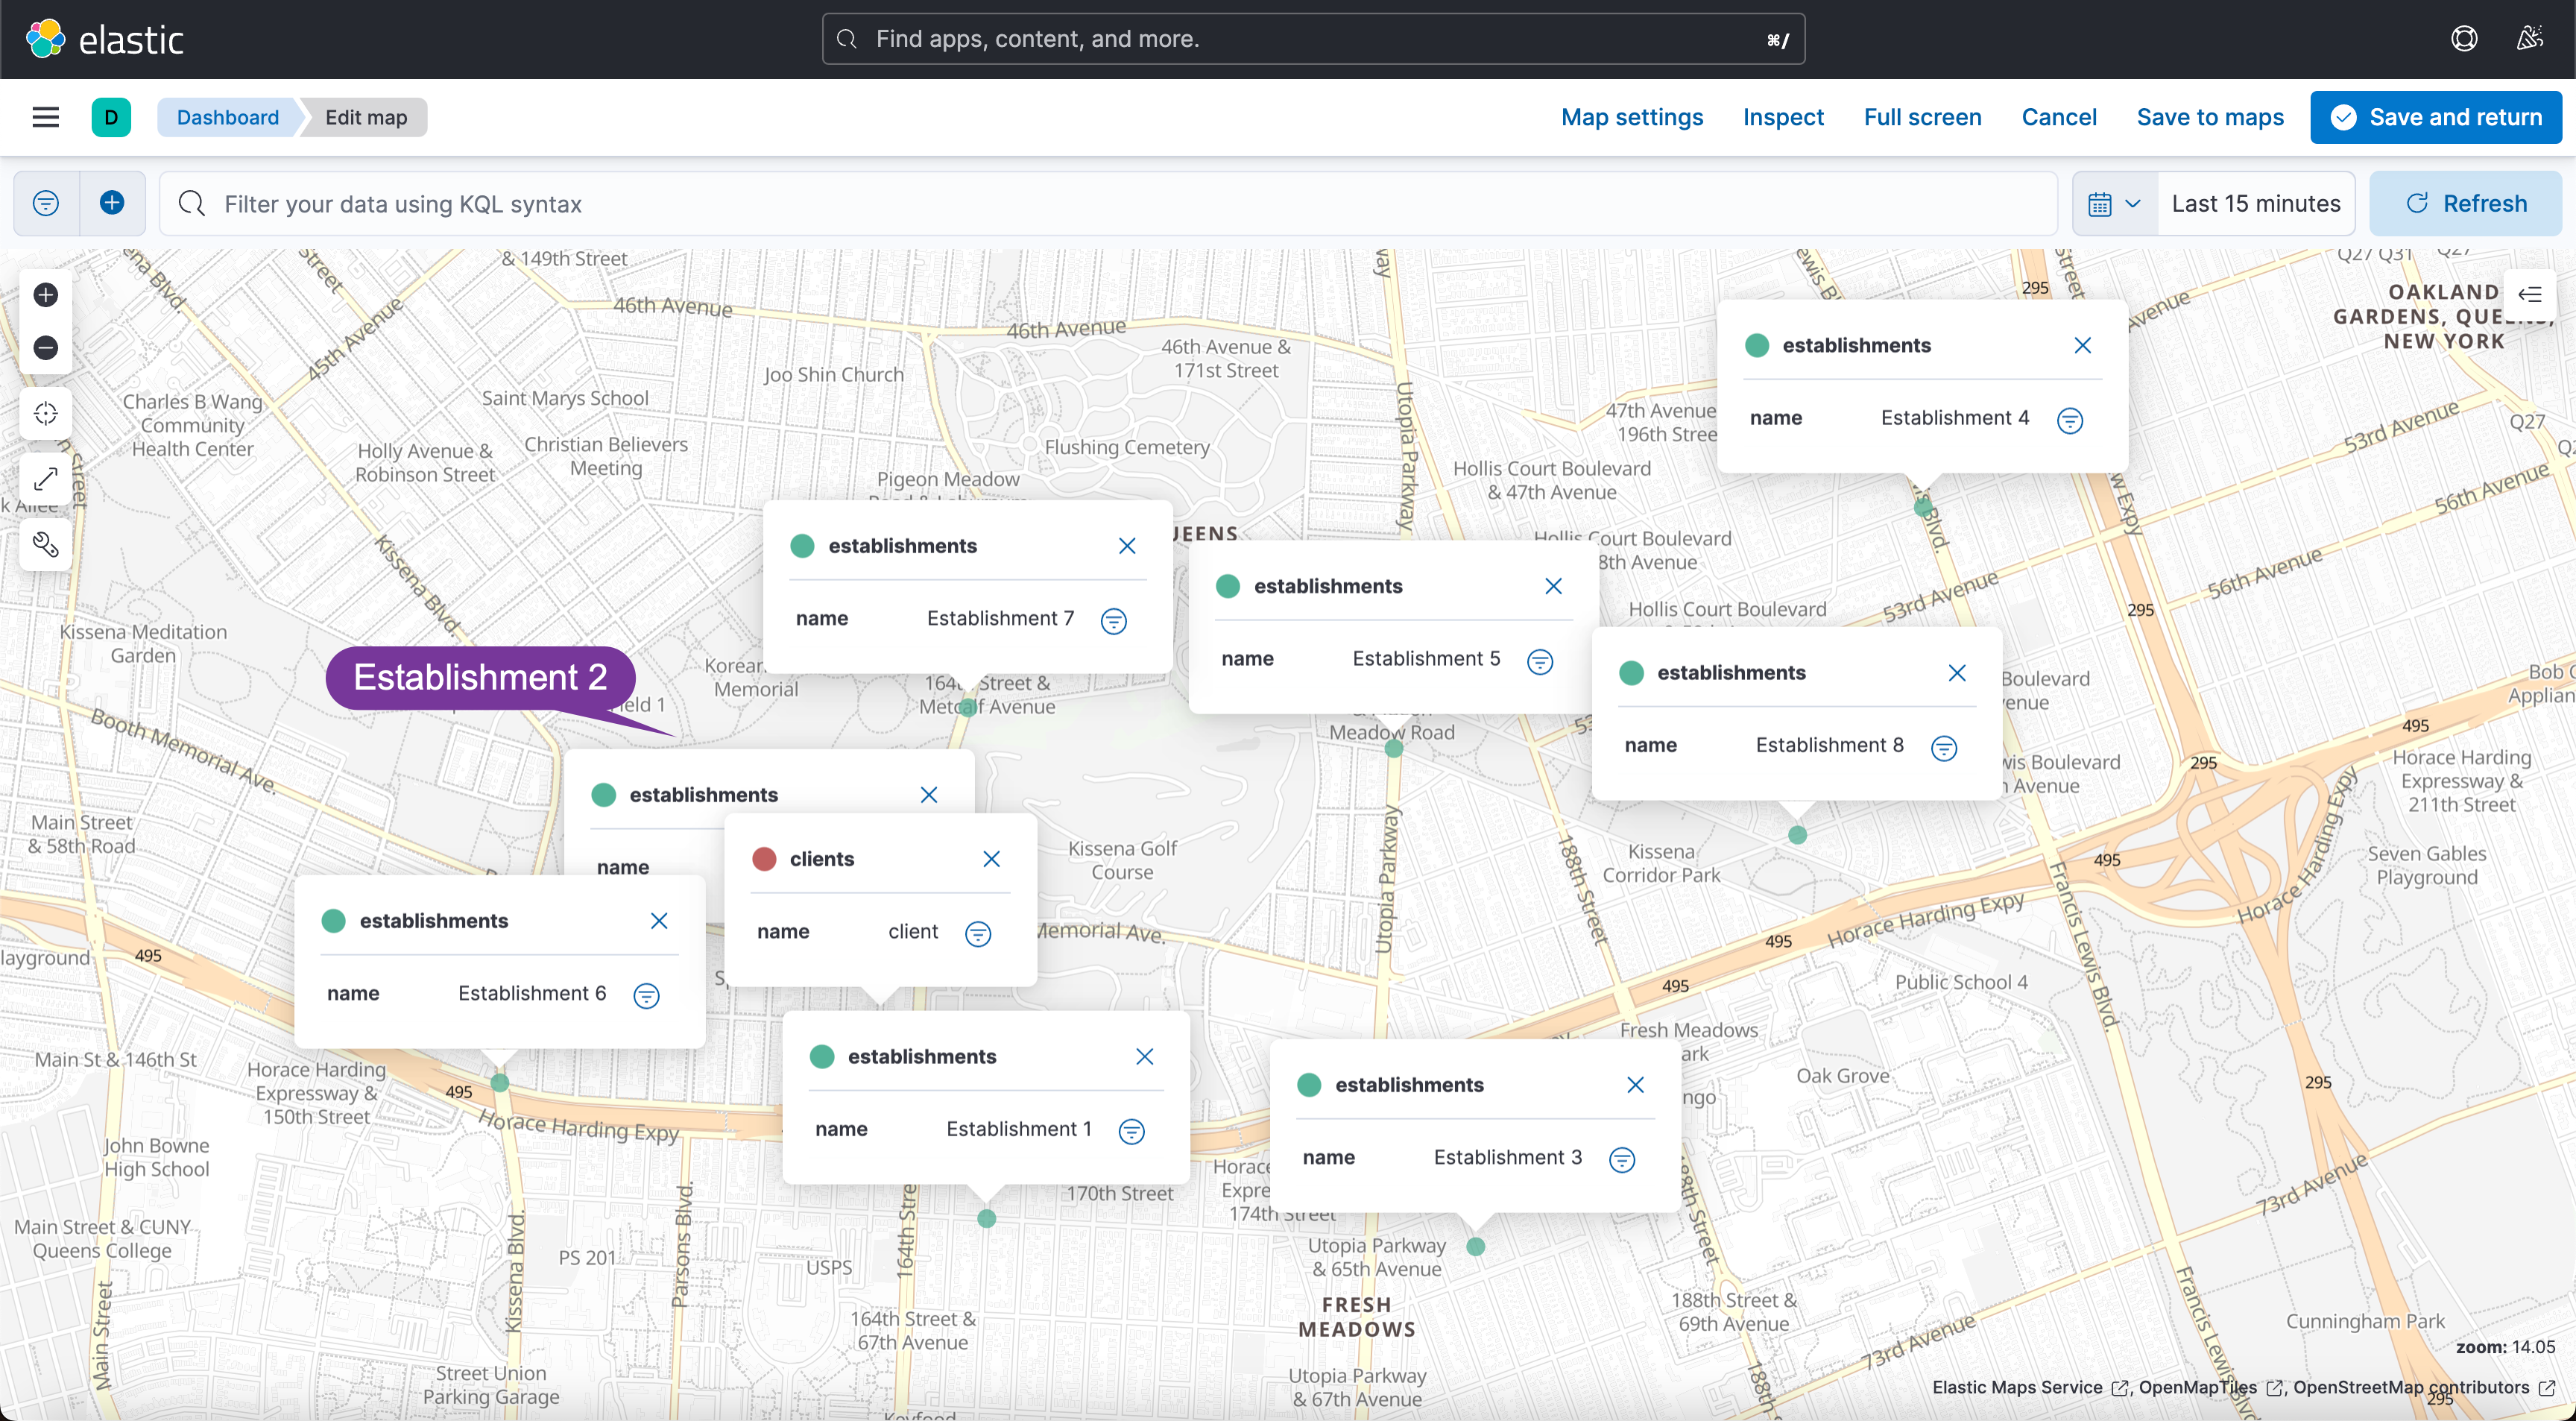
它们的相对位置如上图所示。
我们的首要任务是在客户和我们将从查询中返回的场所之间建立最大距离。 换句话说,我们应该只搜索客户一定半径范围内的场所。 我将把检索客户坐标的次要任务留给你,但我们肯定需要它们。
实际上有一个简单的 geo_distance 查询:
GET establishments/_search?filter_path=**.hits
{
  "query": {
    "bool": {
      "must": {
        "geo_distance": {
          "distance": "1km",    // radius or max_distance
          "location": {         // our geopoint field name
            "lat": 40.74049,    // client.lat
            "lon": -73.80549    // client.lon
          }
        }
      }
    }
  }
}我们可以使用各种单位来确定半径:英里、码、英尺、英寸、米、公里、厘米、毫米,甚至海里。 我们还可以用各种方式格式化我们的位置对象,就像我们第一次创建文档时所做的那样。
这是我们查询的结果:
{
  "hits": {
    "hits": [
      {
        "_index": "establishments",
        "_id": "1",
        "_score": 1,
        "_source": {
          "name": "Establishment 1",
          "location": {
            "lat": 40.7367026,
            "lon": -73.8028177
          }
        }
      },
      {
        "_index": "establishments",
        "_id": "2",
        "_score": 1,
        "_source": {
          "name": "Establishment 2",
          "location": {
            "lat": 40.7417101,
            "lon": -73.8083109
          }
        }
      },
      {
        "_index": "establishments",
        "_id": "6",
        "_score": 1,
        "_source": {
          "name": "Establishment 6",
          "location": {
            "lat": 40.7393039,
            "lon": -73.8151344
          }
        }
      },
      {
        "_index": "establishments",
        "_id": "7",
        "_score": 1,
        "_source": {
          "name": "Establishment 7",
          "location": {
            "lat": 40.7464897,
            "lon": -73.8032898
          }
        }
      }
    ]
  }
}
上面显示 1,2,6, 7 文档被搜索到,因为它们离客户在 1km 之内。
但是,如果你仔细查看我们上面的地图,你会注意到 Establishment 2 实际上离客户最近,因此我们的结果没有按距离排序。 默认情况下,Elasticsearch 按相关性分数对结果进行排序,相关性分数位于每个文档的 _score 字段中。
但是,你会注意到在上面的查询中,返回的所有场所都具有相同的相关性分数。 当每个文档都同样 “相关” 时,它们的顺序大多是随机的。 但是……为什么分数相同?
这是因为 geo_distance 查询是一种是或否类型的事情。 该场所要么在半径范围内,要么不在半径范围内。 所有四个场所都在半径内 “相等”,因此它们都具有相同的分数。
验证这一点的一种方法是在我们运行查询时使用 explain: true 参数:
GET establishments/_search
{
  "explain": true,
  "query": {
    "bool": {
      "must": {
        "geo_distance": {
          "distance": "1km",
          "location": {
            "lat": 40.74049,
            "lon": -73.80549
          }
        }
      }
    }
  }
}
上述命令返回的结果为:
{
  "took": 8,
  "timed_out": false,
  "_shards": {
    "total": 1,
    "successful": 1,
    "skipped": 0,
    "failed": 0
  },
  "hits": {
    "total": {
      "value": 4,
      "relation": "eq"
    },
    "max_score": 1,
    "hits": [
      {
        "_shard": "[establishments][0]",
        "_node": "tZLy82KRTaiCdpsbkEYnuA",
        "_index": "establishments",
        "_id": "1",
        "_score": 1,
        "_source": {
          "name": "Establishment 1",
          "location": {
            "lat": 40.7367026,
            "lon": -73.8028177
          }
        },
        "_explanation": {
          "value": 1,
          "description": "location:INTERSECTS:geometries([CIRCLE([40.74048997834325,-73.80549000576138] radius = 1000.0 meters)])",
          "details": []
        }
      },
      {
        "_shard": "[establishments][0]",
        "_node": "tZLy82KRTaiCdpsbkEYnuA",
        "_index": "establishments",
        "_id": "2",
        "_score": 1,
        "_source": {
          "name": "Establishment 2",
          "location": {
            "lat": 40.7417101,
            "lon": -73.8083109
          }
        },
        "_explanation": {
          "value": 1,
          "description": "location:INTERSECTS:geometries([CIRCLE([40.74048997834325,-73.80549000576138] radius = 1000.0 meters)])",
          "details": []
        }
      },
      {
        "_shard": "[establishments][0]",
        "_node": "tZLy82KRTaiCdpsbkEYnuA",
        "_index": "establishments",
        "_id": "6",
        "_score": 1,
        "_source": {
          "name": "Establishment 6",
          "location": {
            "lat": 40.7393039,
            "lon": -73.8151344
          }
        },
        "_explanation": {
          "value": 1,
          "description": "location:INTERSECTS:geometries([CIRCLE([40.74048997834325,-73.80549000576138] radius = 1000.0 meters)])",
          "details": []
        }
      },
      {
        "_shard": "[establishments][0]",
        "_node": "tZLy82KRTaiCdpsbkEYnuA",
        "_index": "establishments",
        "_id": "7",
        "_score": 1,
        "_source": {
          "name": "Establishment 7",
          "location": {
            "lat": 40.7464897,
            "lon": -73.8032898
          }
        },
        "_explanation": {
          "value": 1,
          "description": "location:INTERSECTS:geometries([CIRCLE([40.74048997834325,-73.80549000576138] radius = 1000.0 meters)])",
          "details": []
        }
      }
    ]
  }
}
explain 参数附加到每个文档,说明该文档的分数是如何计算的。 对于上面的查询,请注意每个文档都有相同的解释,因此得分相同。
然而,许多 Elasticsearch 查询都经过精心构造,以便第一个结果与用户最相关。 这可能意味着优先考虑名称和描述中包含确切关键字的场所,或最新的场所,或评级最高或评论最多的场所。
在我们的案例中,我们希望优先考虑离客户最近的地方。 这就是 distance_feature 查询的用途:
GET establishments/_search?filter_path=**.hits
{
  "query": {
    "bool": {
      "must": {
        "geo_distance": {
          "distance": "1km",    // radius or max_distance
          "location": {         // our geopoint field name
            "lat": 40.74049,    // client.lat
            "lon": -73.80549    // client.lon
          }
        }
      },
      "should": {
        "distance_feature": {
          "field": "location",  // our geopoint field name
          "pivot": "1km",       // radius or max_distance
          "origin": {
            "lat": 40.74049,    // client.lat
            "lon": -73.80549    // client.long
          }
        }
      }
    }
  }
}
这些是我们得到的结果,现在顺序不同(2、1、7、6)。 请注意,相关性分数不再相同。
{
  "hits": {
    "hits": [
      {
        "_index": "establishments",
        "_id": "2",
        "_score": 1.7851406,
        "_source": {
          "name": "Establishment 2",
          "location": {
            "lat": 40.7417101,
            "lon": -73.8083109
          }
        }
      },
      {
        "_index": "establishments",
        "_id": "1",
        "_score": 1.6767981,
        "_source": {
          "name": "Establishment 1",
          "location": {
            "lat": 40.7367026,
            "lon": -73.8028177
          }
        }
      },
      {
        "_index": "establishments",
        "_id": "7",
        "_score": 1.5908757,
        "_source": {
          "name": "Establishment 7",
          "location": {
            "lat": 40.7464897,
            "lon": -73.8032898
          }
        }
      },
      {
        "_index": "establishments",
        "_id": "6",
        "_score": 1.548491,
        "_source": {
          "name": "Establishment 6",
          "location": {
            "lat": 40.7393039,
            "lon": -73.8151344
          }
        }
      }
    ]
  }
}
在查询中添加一个 explain: true 参数,看看我们第一个结果的解释字段。 现在有两个单独计算的查询(该场所是否在客户端 1 公里半径范围内?以及该场所离客户端有多近?),文档的最终分数 (1.7851406) 是每个查询返回的分数之和 ( 1+0.78514063)。
distance_feature 计算比 geo_distance 计算稍微复杂一点,但它仍然很容易理解:
{
  "hits": {
    "hits": [
      {
        "_shard": "[establishments][0]",
        "_node": "tZLy82KRTaiCdpsbkEYnuA",
        "_index": "establishments",
        "_id": "2",
        "_score": 1.7851406,
        "_source": {
          "name": "Establishment 2",
          "location": {
            "lat": 40.7417101,
            "lon": -73.8083109
          }
        },
        "_explanation": {
          "value": 1.7851406,
          "description": "sum of:",
          "details": [
            {
              "value": 1,
              "description": "location:INTERSECTS:geometries([CIRCLE([40.74048997834325,-73.80549000576138] radius = 1000.0 meters)])",
              "details": []
            },
            {
              "value": 0.78514063,
              "description": "Distance score, computed as weight * pivotDistance / (pivotDistance + abs(distance)) from:",
              "details": [
                {
                  "value": 1,
                  "description": "weight",
                  "details": []
                },
                {
                  "value": 1000,
                  "description": "pivotDistance",
                  "details": []
                },
                {
                  "value": 40.74049,
                  "description": "originLat",
                  "details": []
                },
                {
                  "value": -73.80549,
                  "description": "originLon",
                  "details": []
                },
                {
                  "value": 40.74171009007841,
                  "description": "current lat",
                  "details": []
                },
                {
                  "value": -73.80831093527377,
                  "description": "current lon",
                  "details": []
                },
                {
                  "value": 273.6571662222462,
                  "description": "distance",
                  "details": []
                }
              ]
            }
          ]
        }
      },
      {
        "_shard": "[establishments][0]",
        "_node": "tZLy82KRTaiCdpsbkEYnuA",
        "_index": "establishments",
        "_id": "1",
        "_score": 1.6767981,
        "_source": {
          "name": "Establishment 1",
          "location": {
            "lat": 40.7367026,
            "lon": -73.8028177
          }
        },
        "_explanation": {
          "value": 1.6767981,
          "description": "sum of:",
          "details": [
            {
              "value": 1,
              "description": "location:INTERSECTS:geometries([CIRCLE([40.74048997834325,-73.80549000576138] radius = 1000.0 meters)])",
              "details": []
            },
            {
              "value": 0.67679805,
              "description": "Distance score, computed as weight * pivotDistance / (pivotDistance + abs(distance)) from:",
              "details": [
                {
                  "value": 1,
                  "description": "weight",
                  "details": []
                },
                {
                  "value": 1000,
                  "description": "pivotDistance",
                  "details": []
                },
                {
                  "value": 40.74049,
                  "description": "originLat",
                  "details": []
                },
                {
                  "value": -73.80549,
                  "description": "originLon",
                  "details": []
                },
                {
                  "value": 40.73670257348567,
                  "description": "current lat",
                  "details": []
                },
                {
                  "value": -73.80281777121127,
                  "description": "current lon",
                  "details": []
                },
                {
                  "value": 477.5456174201007,
                  "description": "distance",
                  "details": []
                }
              ]
            }
          ]
        }
      },
      {
        "_shard": "[establishments][0]",
        "_node": "tZLy82KRTaiCdpsbkEYnuA",
        "_index": "establishments",
        "_id": "7",
        "_score": 1.5908757,
        "_source": {
          "name": "Establishment 7",
          "location": {
            "lat": 40.7464897,
            "lon": -73.8032898
          }
        },
        "_explanation": {
          "value": 1.5908757,
          "description": "sum of:",
          "details": [
            {
              "value": 1,
              "description": "location:INTERSECTS:geometries([CIRCLE([40.74048997834325,-73.80549000576138] radius = 1000.0 meters)])",
              "details": []
            },
            {
              "value": 0.59087574,
              "description": "Distance score, computed as weight * pivotDistance / (pivotDistance + abs(distance)) from:",
              "details": [
                {
                  "value": 1,
                  "description": "weight",
                  "details": []
                },
                {
                  "value": 1000,
                  "description": "pivotDistance",
                  "details": []
                },
                {
                  "value": 40.74049,
                  "description": "originLat",
                  "details": []
                },
                {
                  "value": -73.80549,
                  "description": "originLon",
                  "details": []
                },
                {
                  "value": 40.746489660814404,
                  "description": "current lat",
                  "details": []
                },
                {
                  "value": -73.80328983999789,
                  "description": "current lon",
                  "details": []
                },
                {
                  "value": 692.403259865101,
                  "description": "distance",
                  "details": []
                }
              ]
            }
          ]
        }
      },
      {
        "_shard": "[establishments][0]",
        "_node": "tZLy82KRTaiCdpsbkEYnuA",
        "_index": "establishments",
        "_id": "6",
        "_score": 1.548491,
        "_source": {
          "name": "Establishment 6",
          "location": {
            "lat": 40.7393039,
            "lon": -73.8151344
          }
        },
        "_explanation": {
          "value": 1.548491,
          "description": "sum of:",
          "details": [
            {
              "value": 1,
              "description": "location:INTERSECTS:geometries([CIRCLE([40.74048997834325,-73.80549000576138] radius = 1000.0 meters)])",
              "details": []
            },
            {
              "value": 0.548491,
              "description": "Distance score, computed as weight * pivotDistance / (pivotDistance + abs(distance)) from:",
              "details": [
                {
                  "value": 1,
                  "description": "weight",
                  "details": []
                },
                {
                  "value": 1000,
                  "description": "pivotDistance",
                  "details": []
                },
                {
                  "value": 40.74049,
                  "description": "originLat",
                  "details": []
                },
                {
                  "value": -73.80549,
                  "description": "originLon",
                  "details": []
                },
                {
                  "value": 40.73930389713496,
                  "description": "current lat",
                  "details": []
                },
                {
                  "value": -73.81513447500765,
                  "description": "current lon",
                  "details": []
                },
                {
                  "value": 823.1840356327418,
                  "description": "distance",
                  "details": []
                }
              ]
            }
          ]
        }
      }
    ]
  }
}
在上面的分数说明中,你会为每个场所找到一个距离对象。 但这是获取两点之间距离的一种非常迂回的方式。 我不推荐它有几个原因:
还有其他几种方法可以做到这一点。
我们可以使用脚本在运行时生成新的 distance 字段。 公平警告:脚本查询通常比内置查询更昂贵,但如有必要,可以对其进行优化。 如果可以,尽量避免过早优化; Elasticsearch 确实快得惊人。
GET establishments/_search?filter_path=**.hits
{
  "script_fields" : {
    "distance" : {          // name of field you're generating
      "script" : {
        // value of the field you're generating
        "source": "doc['location'].arcDistance(params.lat,params.lon)",
        "params": {
          "lat": 40.74049,  // client.lat
          "lon": -73.80549  // client.lon
        }
      }
    }
  },
  "query": {
    "bool": {
      "must": {
        "geo_distance": {
          "distance": "1km",  // radius
          "location": {
            "lat": 40.74049,  // client.lat
            "lon": -73.80549  // client.lon
          }
        }
      },
      "should": {
        "distance_feature": {
          "field": "location",
          "pivot": "1km",     // radius
          "origin": {
            "lat": 40.74049,  // client.lat
            "lon": -73.80549  // client.lon
          }
        }
      }
    }
  }
}
arcDistance 函数内置于 Elasticsearch 并返回以米为单位的距离。 我们的结果现在告诉我们每个场所离客户有多远:
{
  "hits": {
    "hits": [
      {
        "_index": "establishments",
        "_id": "2",
        "_score": 1.7851406,
        "fields": {
          "distance": [
            273.6571662222462
          ]
        }
      },
      {
        "_index": "establishments",
        "_id": "1",
        "_score": 1.6767981,
        "fields": {
          "distance": [
            477.5456174201007
          ]
        }
      },
      {
        "_index": "establishments",
        "_id": "7",
        "_score": 1.5908757,
        "fields": {
          "distance": [
            692.403259865101
          ]
        }
      },
      {
        "_index": "establishments",
        "_id": "6",
        "_score": 1.548491,
        "fields": {
          "distance": [
            823.1840356327418
          ]
        }
      }
    ]
  }
}
对于分数不重要的情况,还有第三种选择。 sort 查询将按照所宣传的那样进行,并按照给定的标准对结果进行排序。 在我们的例子中,这个标准可以是客户和场所之间的距离。
GET establishments/_search?filter_path=**.hits
{
  "query": {
    "bool": {
      "must": {
        "geo_distance": {
          "distance": "1km",
          "location": {
            "lat": 40.74049,
            "lon": -73.80549
          }
        }
      }
    }
  },
  "sort" : [
    {
      "_geo_distance" : {
        "location" : {
          "lat" : 40.74049,
          "lon" : -73.80549
        },
        "order" : "asc",
        "unit" : "m",
        "mode" : "min"
      }
    }
  ]
}
这些是结果。 请注意,顺序与上面的查询 (2, 1, 7, 6) 相同,但每个文档的相关性分数现在为空。 另一方面,因为我们没有使用脚本,这个搜索可能会比上面的搜索更快。
{
  "hits": {
    "hits": [
      {
        "_index": "establishments",
        "_id": "2",
        "_score": null,
        "_source": {
          "name": "Establishment 2",
          "location": {
            "lat": 40.7417101,
            "lon": -73.8083109
          }
        },
        "sort": [
          273.6571662222462
        ]
      },
      {
        "_index": "establishments",
        "_id": "1",
        "_score": null,
        "_source": {
          "name": "Establishment 1",
          "location": {
            "lat": 40.7367026,
            "lon": -73.8028177
          }
        },
        "sort": [
          477.5456174201007
        ]
      },
      {
        "_index": "establishments",
        "_id": "7",
        "_score": null,
        "_source": {
          "name": "Establishment 7",
          "location": {
            "lat": 40.7464897,
            "lon": -73.8032898
          }
        },
        "sort": [
          692.403259865101
        ]
      },
      {
        "_index": "establishments",
        "_id": "6",
        "_score": null,
        "_source": {
          "name": "Establishment 6",
          "location": {
            "lat": 40.7393039,
            "lon": -73.8151344
          }
        },
        "sort": [
          823.1840356327418
        ]
      }
    ]
  }
}
就是这样! 感谢阅读,如果你对如何在 Elasticsearch 中按距离计算和排序有任何其他想法,请告诉我。
很好奇,就使用rubyonrails自动化单元测试而言,你们正在做什么?您是否创建了一个脚本来在cron中运行rake作业并将结果邮寄给您?git中的预提交Hook?只是手动调用?我完全理解测试,但想知道在错误发生之前捕获错误的最佳实践是什么。让我们理所当然地认为测试本身是完美无缺的,并且可以正常工作。下一步是什么以确保他们在正确的时间将可能有害的结果传达给您? 最佳答案 不确定您到底想听什么,但是有几个级别的自动代码库控制:在处理某项功能时,您可以使用类似autotest的内容获得关于哪些有效,哪些无效的即时反馈。要确保您的提
在控制台中反复尝试之后,我想到了这种方法,可以按发生日期对类似activerecord的(Mongoid)对象进行分组。我不确定这是完成此任务的最佳方法,但它确实有效。有没有人有更好的建议,或者这是一个很好的方法?#eventsisanarrayofactiverecord-likeobjectsthatincludeatimeattributeevents.map{|event|#converteventsarrayintoanarrayofhasheswiththedayofthemonthandtheevent{:number=>event.time.day,:event=>ev
我正在编写一个包含C扩展的gem。通常当我写一个gem时,我会遵循TDD的过程,我会写一个失败的规范,然后处理代码直到它通过,等等......在“ext/mygem/mygem.c”中我的C扩展和在gemspec的“扩展”中配置的有效extconf.rb,如何运行我的规范并仍然加载我的C扩展?当我更改C代码时,我需要采取哪些步骤来重新编译代码?这可能是个愚蠢的问题,但是从我的gem的开发源代码树中输入“bundleinstall”不会构建任何native扩展。当我手动运行rubyext/mygem/extconf.rb时,我确实得到了一个Makefile(在整个项目的根目录中),然后当
这是一道面试题,我没有答对,但还是很好奇怎么解。你有N个人的大家庭,分别是1,2,3,...,N岁。你想给你的大家庭拍张照片。所有的家庭成员都排成一排。“我是家里的friend,建议家庭成员安排如下:”1岁的家庭成员坐在这一排的最左边。每两个坐在一起的家庭成员的年龄相差不得超过2岁。输入:整数N,1≤N≤55。输出:摄影师可以拍摄的照片数量。示例->输入:4,输出:4符合条件的数组:[1,2,3,4][1,2,4,3][1,3,2,4][1,3,4,2]另一个例子:输入:5输出:6符合条件的数组:[1,2,3,4,5][1,2,3,5,4][1,2,4,3,5][1,2,4,5,3][
我已经构建了一些serverspec代码来在多个主机上运行一组测试。问题是当任何测试失败时,测试会在当前主机停止。即使测试失败,我也希望它继续在所有主机上运行。Rakefile:namespace:specdotask:all=>hosts.map{|h|'spec:'+h.split('.')[0]}hosts.eachdo|host|begindesc"Runserverspecto#{host}"RSpec::Core::RakeTask.new(host)do|t|ENV['TARGET_HOST']=hostt.pattern="spec/cfengine3/*_spec.r
我们的git存储库中目前有一个Gemfile。但是,有一个gem我只在我的环境中本地使用(我的团队不使用它)。为了使用它,我必须将它添加到我们的Gemfile中,但每次我checkout到我们的master/dev主分支时,由于与跟踪的gemfile冲突,我必须删除它。我想要的是类似Gemfile.local的东西,它将继承从Gemfile导入的gems,但也允许在那里导入新的gems以供使用只有我的机器。此文件将在.gitignore中被忽略。这可能吗? 最佳答案 设置BUNDLE_GEMFILE环境变量:BUNDLE_GEMFI
这似乎非常适得其反,因为太多的gem会在window上破裂。我一直在处理很多mysql和ruby-mysqlgem问题(gem本身发生段错误,一个名为UnixSocket的类显然在Windows机器上不能正常工作,等等)。我只是在浪费时间吗?我应该转向不同的脚本语言吗? 最佳答案 我在Windows上使用Ruby的经验很少,但是当我开始使用Ruby时,我是在Windows上,我的总体印象是它不是Windows原生系统。因此,在主要使用Windows多年之后,开始使用Ruby促使我切换回原来的系统Unix,这次是Linux。Rub
如何在Ruby中按名称传递函数?(我使用Ruby才几个小时,所以我还在想办法。)nums=[1,2,3,4]#Thisworks,butismoreverbosethanI'dlikenums.eachdo|i|putsiend#InJS,Icouldjustdosomethinglike:#nums.forEach(console.log)#InF#,itwouldbesomethinglike:#List.iternums(printf"%A")#InRuby,IwishIcoulddosomethinglike:nums.eachputs在Ruby中能不能做到类似的简洁?我可以只
是否可以在PyYAML或Ruby的Psych引擎中禁用创建anchor和引用(并有效地显式列出冗余数据)?也许我在网上搜索时遗漏了一些东西,但在Psych中似乎没有太多可用的选项,而且我也无法确定PyYAML是否允许这样做.基本原理是我必须序列化一些数据并将其以可读的形式传递给一个不是真正的技术同事进行手动验证。有些数据是多余的,但我需要以最明确的方式列出它们以提高可读性(anchor和引用是提高效率的好概念,但不是人类可读性)。Ruby和Python是我选择的工具,但如果有其他一些相当简单的方法来“展开”YAML文档,它可能就可以了。 最佳答案
我需要用任何语言编写一个算法,根据3个因素对数组进行排序。我以度假村为例(如Hipmunk)。假设我想去度假。我想要最便宜的地方、最好的评论和最多的景点。但是,显然我找不到在所有3个中都排名第一的方法。Example(assumingthereare20importantattractions):ResortA:$150/night...98/100infavorablereviews...18of20attractionsResortB:$99/night...85/100infavorablereviews...12of20attractionsResortC:$120/night