。功能要求为:一对一聊天,可以发送文字,图片,语音,文件,视频,含消息列表页。 暑假没事干来写篇博客复盘一下。框架和样式部分就是采用了colorUI 的组件,没啥好说的,这方面我也不会


<scroll-view class="cu-chat" scroll-y="true"  scroll-into-view="{{scrollId}}"
style="height:{{systemInfo.windowHeight - 50}}px;"enable-flex="true">
  <block wx:for="{{msgList}}" wx:key="index" wx:if="{{msgList!=[]}}">
    <view class="cu-chat">

      <!-- 我的部分 -->

      <!-- 文字 -->
      <block wx:if="{{item.creator == myOpenid && item.type == 'text'}}">
        <view class="cu-item self">
            <!-- 我的发送消息 -->
            <view class="main">
              <view class="content bg-green shadow" id="msg-{{index}}">
                <text>{{item.content}}</text>
              </view>
            </view>
            <!--我的头像  -->
            <view class="cu-avatar radius" style="background-image:url({{myUserInfo.avaUrl}});"></view>
        </view>
      </block>
      <!-- 图片 -->
      <block wx:if="{{item.creator == myOpenid && item.type == 'image'}}">
        <view class="cu-item self"  id="msg-{{index}}">
          <view class="main" bindtap="viewImage" data-url="{{item.content}}">
            <image src="{{item.content}}" class="radius" mode="widthFix"></image>
          </view>
          <view class="cu-avatar radius" style="background-image:url({{myUserInfo.avaUrl}});"></view>
        </view>
      </block>
      <!-- 视频 -->
      <block wx:if="{{item.creator == myOpenid && item.type == 'video'}}">
        <view class="cu-item self"  id="msg-{{index}}">
          <view class="main" bindtap="viewvideo" data-url="{{item.content}}">
            <video src="{{item.content}}" class="radius" mode="widthFix"></video>
          </view>
          <view class="cu-avatar radius" style="background-image:url({{myUserInfo.avaUrl}});"></view>
        </view>
      </block>
      <!-- 文件 -->
      <block wx:if="{{item.creator == myOpenid && item.type == 'file'}}">
        <view class="cu-item self"  id="msg-{{index}}">
          <view class="main" bindtap="viewFile" data-fileid="{{item.content.fileID}}">
            <view class="content" style="width: 500rpx;height: 200rpx;display: flex;justify-content: space-around;padding-left:30rpx;padding-right:40rpx;padding-top:0rpx">
              <view class="fileName" style="margin-right: 30rpx;">
                <view class="view" style="font-size: 30rpx; font-weight: 20rpx;">{{item.content.fileName}}</view>
              </view>
              <!-- 文件图标 -->
              <view class="image" >
                <image class="cu-avatar radius" style="background-image:url({{fileImg}});width:70rpx;height: 80rpx;"></image>
              </view>
            </view>
          </view>
          <view class="cu-avatar radius" style="background-image:url({{myUserInfo.avaUrl}});"></view>
        </view>
      </block>
      <!-- 语音 -->
      <block wx:if="{{item.creator == myOpenid && item.type == 'voice'}}">
        <view class="cu-item self"  id="msg-{{index}}">
          <view class="main" bindtap="voicePlay" data-voiceID="{{item.content.fileID}}">
            <view class="action text-bold text-grey">{{item.content.duration}}"</view>
            <view class="content bg-green shadow">
              <text class="cuIcon-sound text-xxl padding-right-xl" > </text>
            </view>
          </view>
          <!-- 头像 -->
          <view class="cu-avatar radius" style="background-image:url({{myUserInfo.avaUrl}});"></view>
        </view>
      </block>

      <!-- 他的部分 -->

      <!-- 文字 -->
      <block wx:if="{{item.creator !== myOpenid && item.type == 'text'}}">
        <view class="cu-item">
          <!-- 他的头像 -->
          <view class="cu-avatar radius" style="background-image:url({{hisUserInfo}});"></view>
          <!-- 他的消息 -->
          <view class="main">
            <view class="content shadow" id="msg-{{index}}">
              <text>{{item.content}}</text>
            </view>
          </view>
        </view>
      </block>
      <!-- 图片 -->
      <block wx:if="{{item.creator !== myOpenid && item.type == 'image'}}">
        <view class="cu-item"  id="msg-{{index}}">
          <!-- 他的头像 -->
          <view class="cu-avatar radius" style="background-image:url({{hisUserInfo}});"></view>
          <!-- 他的图片 -->
          <view class="main" bindtap="viewImage" data-url="{{item.content}}">
            <image src="{{item.content}}" class="radius" mode="widthFix"></image>
          </view>
        </view>
      </block>
      <!-- 视频 -->
      <block wx:if="{{item.creator !== myOpenid && item.type == 'video'}}">
        <view class="cu-item "  id="msg-{{index}}">
          <!-- 他的头像 -->
          <view class="cu-avatar radius" style="background-image:url({{hisUserInfo}});"></view>
          <view class="main" bindtap="viewvideo" data-url="{{item.content}}">
            <video src="{{item.content}}" class="radius" mode="widthFix"></video>
          </view>

        </view>
      </block>
      <!-- 文件 -->
      <block wx:if="{{item.creator !== myOpenid && item.type == 'file'}}">
        <view class="cu-item "  id="msg-{{index}}">
          <!-- 他的头像 -->
          <view class="cu-avatar radius" style="background-image:url({{hisUserInfo}});"></view>
          <!-- 他的文件 -->
          <view class="main"bindtap="viewFile" data-fileid="{{item.content.fileID}}">
            <view class="content" style="width: 500rpx;height: 200rpx;display: flex;justify-content: space-around;padding-left:30rpx;padding-right:40rpx;padding-top:0rpx">
              <view class="fileName" style="margin-right: 30rpx;">
                <view class="view" style="font-size: 30rpx; font-weight: 20rpx;">{{item.content.fileName}}</view>
              </view>
              <!-- 文件图标 -->
              <view class="image" >
                <image class="cu-avatar radius" style="background-image:url({{fileImg}});width:70rpx;height: 80rpx;"></image>
              </view>
            </view>
          </view>
        </view>
      </block>
      <!-- 语音 -->
      <block wx:if="{{item.creator !== myOpenid && item.type == 'voice'}}">
        <view class="cu-item" id="msg-{{index}}">
          <!-- 他的头像 -->
          <view class="cu-avatar radius" style="background-image:url({{hisUserInfo}});"></view>
          <!-- 他的消息 -->
          <view class="main"bindtap="voicePlay" data-voiceID="{{item.content.fileID}}">
            <view class="content shadow" >
              <text class="cuIcon-sound text-xxl padding-right-xl"></text>
            </view>
            <view class="action text-bold text-grey">{{item.content.duration}}"</view>
          </view>
        </view>
      </block>
    </view>
  </block>
</scroll-view>
浅浅地小讲一下
<scroll-view class="cu-chat" scroll-y="true"  scroll-into-view="{{scrollId}}"
style="height:{{systemInfo.windowHeight - 50}}px;"enable-flex="true">

</scroll-view>| scroll-into-view | string | 值应为某子元素id(id不能以数字开头)。设置哪个方向可滚动,则在哪个方向滚动到该元素 |
scrollId的值会在聊天内容发生变化时,变更为最后一条消息元素的id
msgList 是消息数组
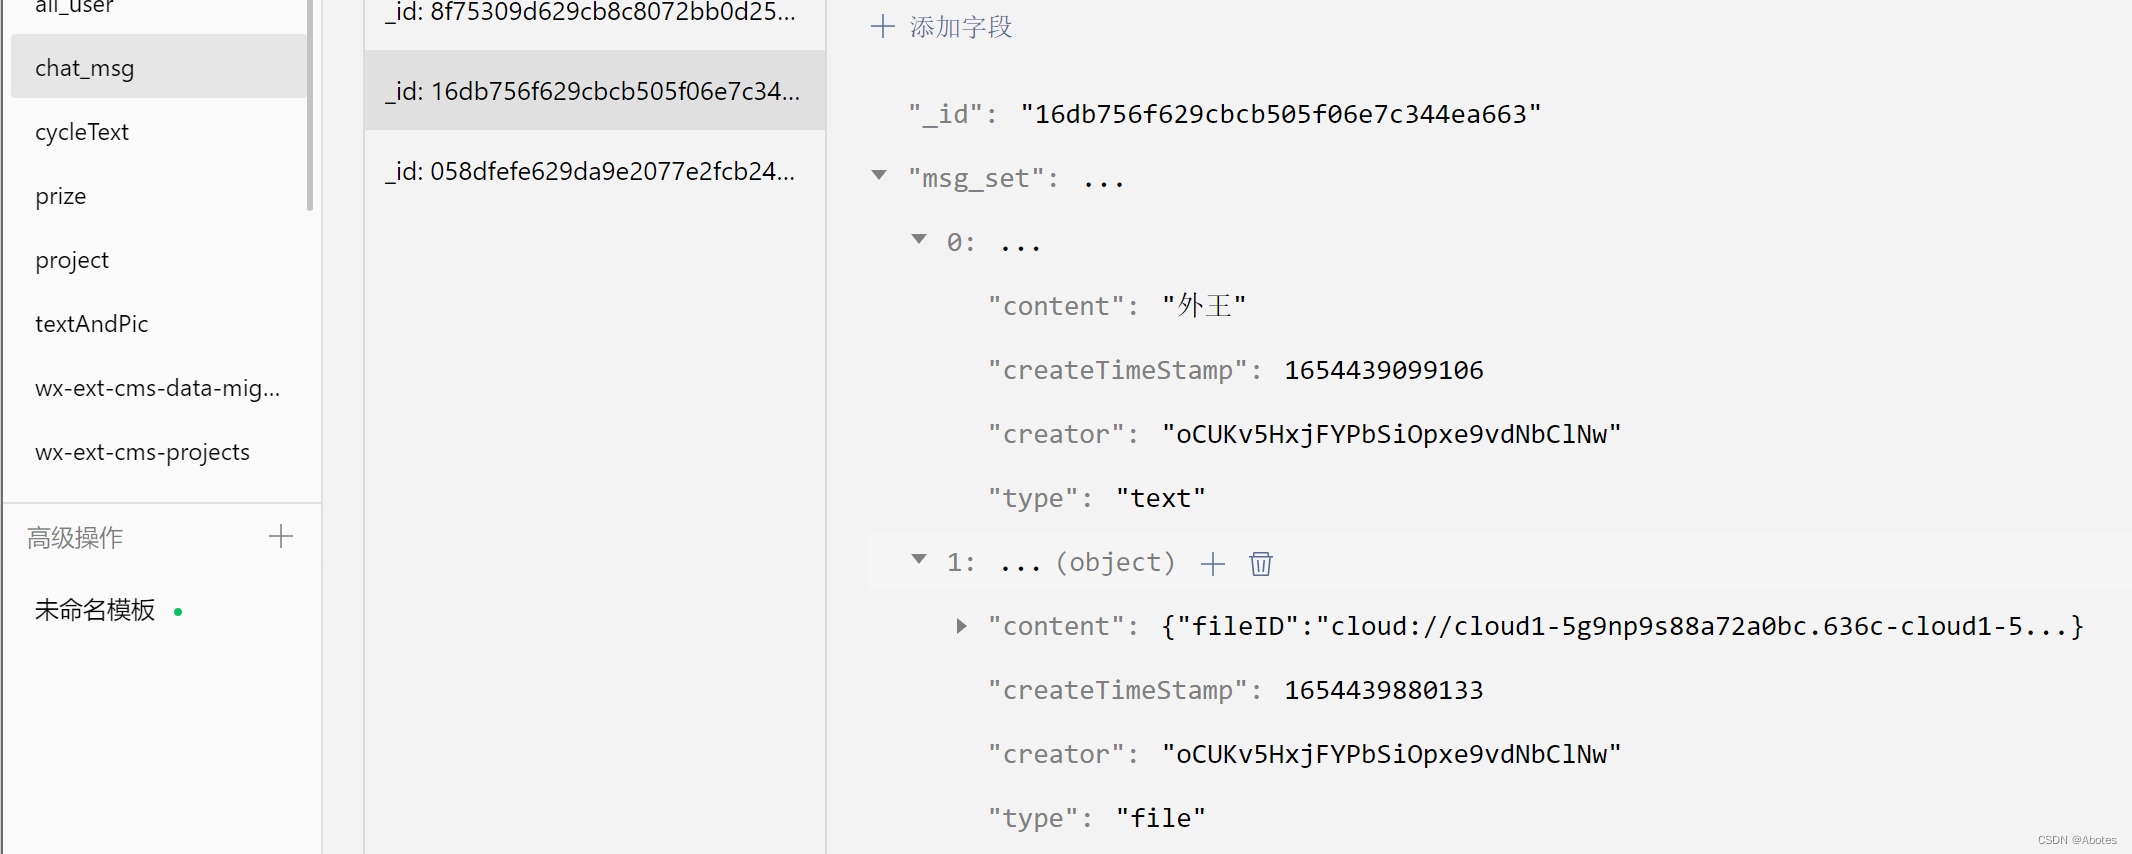
集合chat_msg储存了聊天数据(部分),其中一条记录保存一个会话房间的数据,下面为一条记录的示例
| _id | 自动生成 | |||||||
| session_id | 代码中用了唯一确定会话房间的字段, 志愿者用户首次联系负责人时将在chat_msg创建会话房间记录,生成session_id字段,session_id由负责人和志愿者的_openid连接而成) | |||||||
| msg_set | 会话房间的消息数组,数组成员为对象类型,按消息类型分类 | 消息对象属性&消息类型 | 文字 | 图片 | 视频 | 文件 | 语音 | |
|---|---|---|---|---|---|---|---|---|
| type | text | image | video | file | voice | |||
| content | 文字消息 | 云ID | ||||||
| creator | 消息创建者的_openid | |||||||
| createTimeStamp | 消息发送时的时间戳 | |||||||
下面是图片、文件、语音消息的点击事件
  //点击图片预览
  viewImage(e){
    var urls = [e.currentTarget.dataset.url]
    wx.previewImage({
      current: '', // 当前显示图片的http链接
      urls: urls, // 需要预览的图片http链接列表
      showmenu : true
    })
  },
  //打开文件
  viewFile(e){
    var fileid = e.currentTarget.dataset.fileid;//云文件fileID
    var that = this;
    wx.cloud.downloadFile({
      fileID: fileid,
    })
    .then((res)=>{
      console.log('res',res.tempFilePath);
      wx.openDocument({
        filePath: res.tempFilePath,
        showMenu: true,
      })
      .then(()=>{})
      .catch((err)=>{console.log('文件预览失败',err);})
    })
  },

  //播放录音(该页面的js文件中全局变量  有const innerAudioContext   =wx.createInnerAudioContext();//播放语音)
  voicePlay(e){
    innerAudioContext.stop();
    innerAudioContext.src = '';
    console.log(e.currentTarget.dataset.voiceid)
    let id = e.currentTarget.dataset.voiceid;
    innerAudioContext.src = id;
    innerAudioContext.onPlay(()=>{console.log('语音播放')});
    innerAudioContext.onError((res)=>{
      console.log(res.errMsg)
      console.log(res.errCode)
    })
    innerAudioContext.play();
}, <!-- 发送部分 -->
<view class="cu-bar foot input {{InputBottom!=0?'cur':''}}" style="bottom:{{InputBottom}}px">
<!-- +更多 -->
<view class="action" bindtap="showModal">
<text class="cuIcon-roundadd lg text-gray"></text>
</view>
<!-- text&voice -->
<view class="action" wx:if="{{inputMode == 'voice'}}" bindtap="switchInputMode">
<text class="cuIcon-keyboard lg text-grey"></text>
</view>
<view class="action" wx:if="{{inputMode=='text'}}"bindtap="switchInputMode">
<text class="cuIcon-sound text-grey"></text>
</view>
<!-- 文字输入框 -->
<input
hidden="{{inputMode=='voice'}}"
class="solid-bottom"
bindfocus="InputFocus"
bindblur="InputBlur"
adjust-position="{{false}}"
focus="{{false}}"
maxlength="300"
cursor-spacing="10"
value="{{inputContent}}"
bindinput="onInputContent"></input>
<!-- 语音按住区 -->
<view
hidden="{{inputMode=='text'}}"
class="middle-view"
bindtouchstart="RecordStart"
catch:touchmove="RecordMove"
bindtouchend="RecordEnd">{{voiceTip}}</view>
<!-- 发送按钮 -->
<button hidden="{{inputMode=='voice'}}"class="cu-btn bg-green shadow" bindtap="sendContent">发送</button>
</view>
<!-- 底部多选功能窗口 -->
<view class="cu-modal bottom-modal {{modalName=='bottomModal'?'show':''}}">
<view class="cu-dialog">
<view class="cu-bar bg-white">
<view class="action text-blue" bindtap="hideModal">取消</view>
</view>
<view class="padding-xl">
<view class="cu-list grid col-3">
<view class="cu-item" bindtap="sendPic">
<text class="cuIcon-pic lg text-gray"></text>
<text>图片</text>
</view>
<view class="cu-item" bindtap="sendVideo">
<text class="cuIcon-video lg text-gray"></text>
<text>视频</text>
</view>
<view class="cu-item" bindtap="sendFile">
<text class="cuIcon-send lg text-gray"></text>
<text>文件</text>
</view>
</view>
</view>
</view>
</view>
<!-- 录音中的图样 -->
<view class="voice-tip" hidden="{{!recording}}">
<view><image src="{{recordimg}}"></image></view>
<view>{{showtip}}</view>
</view>浅浅地小讲一下
inputMode这个变量用来表示当前的输入形式,如果是text显示文字输入框,如果是voice则显示语音输入框。bindtap="switchInputMode"这个点击事件用来切换输入方式。
发送的消息都会包装成msg对象作为对应云函数(lyc_consult -- sendMsg )的参数,经由云函数处理,写入数据库集合的对应记录中,其中文字和图片消息还会经过合法性检验。通过监听对应会话记录达到实时聊天。
  onLoad:async function (e) {
    loading=true;
    if(msgWatcher) await msgWatcher.close();
    console.log('进入会话页,携带会话号',e.session_id);
    console.log("hisUserInfo",e.hisUserInfo);
    this.data.sid = e.session_id;
    this.setData({
      hisUserInfo: e.hisUserInfo,
      myUserInfo:App.globalData.userInfo.userInfo,
    })
    var that=this;
    //获取系统信息,得到可用窗口高度
    wx.getSystemInfo({
      success: function (res) {
        that.setData({
          systemInfo: res,
        })
      }
    })
    //开启集合chat_msg.session_id的消息监听
    setTimeout(this.initWatcher,1000)
    //初始化录音器
    this.initRecord();
  },
  //消息监听器开启
  async initWatcher(){
    wx.showLoading({
      title: '加载中...',
      mask: true,
    })
    console.log('initWatcher函数执行,消息监听器开启');
    msgWatcher = await db.collection('chat_msg')
    .where({
      session_id : this.data.sid,
    })
    .watch({
      onChange:this.onChange.bind(this),
      onError:function(err){
        console.log("onError",err);
        wx.showModal({
          title: '提示',
          content: '数据监听失败',
          showCancel:false,
          confirmText:'重新加载',
          success (res) {
            if (res.confirm) {
              that.onLoad();
            }
          }
        })
      }
    })
  },
  //消息监听回调函数
  onChange(snapshot){
    console.log('onChange监听回调函数的snapshot',snapshot)
    //即时聊天
    this.sortRenderMsg(snapshot.docs[0].msg_set)
  },
  //对消息对象数组进行时间排序并渲染
  async sortRenderMsg(e){
    console.log('排序渲染函数执行');
    var list=e.sort(function(a,b){return a.createTimeStamp-b.createTimeStamp});
    await this.setData({
      msgList : list,
      scrollId: 'msg-'+(list.length-1)
    });
    if(loading==true){
      wx.hideLoading({
        complete: () => {loading=false},
      })
    }
  },
当会话房间有为读消息时,会有红点提示,且红点内数字即为未读消息条数。
由于只能志愿者主动去联系负责人,从而达到新开会话房间的行为,所以不必考虑有新的会话进来这种情况,只用监听已有的会话记录,负责人端则既需要考虑监听已有的会话房间,还要考虑监听负责人的会话房间数组的更新情况,及时显示首次来联系的志愿者消息。
  //监听我的所有项目会话(是否有项目负责人发来新消息)
    watch() {
    console.log('开启消息列表页的会话监听');
    var arr = sids;
    var that = this;
    watcher =
      db.collection('chat_msg')
        .where({
          session_id: _.in(arr),
        })
        .watch({
          onChange: this.onChange.bind(this),
          onError: function (err) {
            console.log("onError", err);
            if(loading==false){
              wx.hideLoading({
                complete: () => {loading=true},
              })
              }
            wx.showModal({
              title: '提示',
              content: '数据监听失败',
              showCancel:false,
              confirmText:'重新加载',
              success (res) {
                if (res.confirm) {
                  that.onShow();
                }
              }
            })
          }
        })

  },
  //监听回调函数
  onChange(snapshot) {
    console.log('消息列表页监听回调函数的snapshot', snapshot);
    const sessions = this.data.sessions;
    snapshot.docChanges.forEach(update);//对发生改变的会话记录进行了遍历
    function update(e) {
      const sid = e.doc.session_id;
      const index = sids.indexOf(sid);
      const msg_set = e.doc.msg_set;
      const len = msg_set.length;
      //如果该会话无任何消息,则跳出
      if (len == 0) return;
      const lastMsgTime = msg_set[len - 1].createTimeStamp;
      const leaveTimeStamp = sessions[index].leaveTimeST;
      let unReadNum = 0;
      if ((lastMsgTime > leaveTimeStamp) || (lastMsgTime == leaveTimeStamp)) {
        if (lastMsgTime == leaveTimeStamp) { unReadNum = 1; }
        if (lastMsgTime > leaveTimeStamp) {
          unReadNum = function () {
            let sum = 0;
            for (let x = len - 1 ; (msg_set[x].createTimeStamp > leaveTimeStamp) || (msg_set[x].createTimeStamp == leaveTimeStamp); --x) {
              ++sum;
            }
            console.log('sum',sum)
            return sum;
          }();
        }
        db.collection('all_user')
        .where({
          _openid: myOpenid,
          'mySession_ids.session_id': sid
        })
        .update({
          data: {
            'mySession_ids.$.unReadNum': parseInt(unReadNum)
          }
        })
        console.log('unReadNum',unReadNum)
      }
      else {
        console.log('会话' + sid + '无新消息');
      }
    }
    let that = this;
    setTimeout(f, 100)
    async function f() {
      await db.collection('all_user')
        .where({
          _openid: myOpenid
        })
        .get()
        .then((res) => {
          if (res.data.length) {
            that.setData({
              sessions: res.data[0].mySession_ids,
            });
            console.log('列表页渲染完成');
          }
        })

      if(loading==false){
      wx.hideLoading({
        complete: () => {loading=true},
      })
      }
    }
  },
开摆 这里是源码 https://gitee.com/YYCCbigbig/applet-chat-function.git
有用的话,点个赞吧
只是想确保我理解了事情。据我目前收集到的信息,Cucumber只是一个“包装器”,或者是一种通过将事物分类为功能和步骤来组织测试的好方法,其中实际的单元测试处于步骤阶段。它允许您根据事物的工作方式组织您的测试。对吗? 最佳答案 有点。它是一种组织测试的方式,但不仅如此。它的行为就像最初的Rails集成测试一样,但更易于使用。这里最大的好处是您的session在整个Scenario中保持透明。关于Cucumber的另一件事是您(应该)从使用您的代码的浏览器或客户端的角度进行测试。如果您愿意,您可以使用步骤来构建对象和设置状态,但通常您
前言一般来说,前端根据后台返回code码展示对应内容只需要在前台判断code值展示对应的内容即可,但要是匹配的code码比较多或者多个页面用到时,为了便于后期维护,后台就会使用字典表让前端匹配,下面我将在微信小程序中通过wxs的方法实现这个操作。为什么要使用wxs?{{method(a,b)}}可以看到,上述代码是一个调用方法传值的操作,在vue中很常见,多用于数据之间的转换,但由于微信小程序诸多限制的原因,你并不能优雅的这样操作,可能有人会说,为什么不用if判断实现呢?但是if判断的局限性在于如果存在数据量过大时,大量重复性操作和if判断会让你的代码显得异常冗余。wxswxs相当于是一个独立
项目介绍随着我国经济迅速发展,人们对手机的需求越来越大,各种手机软件也都在被广泛应用,但是对于手机进行数据信息管理,对于手机的各种软件也是备受用户的喜爱小学生兴趣延时班预约小程序的设计与开发被用户普遍使用,为方便用户能够可以随时进行小学生兴趣延时班预约小程序的设计与开发的数据信息管理,特开发了小程序的设计与开发的管理系统。小学生兴趣延时班预约小程序的设计与开发的开发利用现有的成熟技术参考,以源代码为模板,分析功能调整与小学生兴趣延时班预约小程序的设计与开发的实际需求相结合,讨论了小学生兴趣延时班预约小程序的设计与开发的使用。开发环境开发说明:前端使用微信微信小程序开发工具:后端使用ssm:VU
@作者:SYFStrive @博客首页:HomePage📜:微信小程序📌:个人社区(欢迎大佬们加入)👉:社区链接🔗📌:觉得文章不错可以点点关注👉:专栏连接🔗💃:感谢支持,学累了可以先看小段由小胖给大家带来的街舞👉微信小程序(🔥)目录自定义组件-behaviors 1、什么是behaviors 2、behaviors的工作方式 3、创建behavior 4、导入并使用behavior 5、behavior中所有可用的节点 6、同名字段的覆盖和组合规则总结最后自定义组件-behaviors 1、什么是behaviorsbehaviors是小程序中,用于实现
在Rails自动生成的功能测试(test/functional/products_controller_test.rb)中,我看到以下代码:classProductsControllerTest我的问题是:方法调用products()在哪里/如何定义?products(:one)到底是什么意思?看代码,大概意思是“创建一个产品”,但是它是如何工作的呢?注意我是Ruby/Rails的新手,如果这些是微不足道的问题,我深表歉意。 最佳答案 如果您查看test/fixtures文件夹,您会看到一个products.yml文件。这是在您创建
在我的一些Controller中,我有一个before_filter检查用户是否登录?用于CRUD操作。application.rbdeflogged_in?unlesscurrent_userredirect_toroot_pathendendprivatedefcurrent_user_sessionreturn@current_user_sessionifdefined?(@current_user_session)@current_user_session=UserSession.findenddefcurrent_userreturn@current_userifdefine
参考文章搭建文章gitte源码在线体验可以注册两个号来测试演示图:一.整体介绍 介绍SignalR一种通讯模型Hub(中心模型,或者叫集线器模型),调用这个模型写好的方法,去发送消息。 内容有: ①:Hub模型的方法介绍 ②:服务器端代码介绍 ③:前端vue3安装并调用后端方法 ④:聊天室样例整体流程:1、进入网站->调用连接SignalR的方法2、与好友发送消息->调用SignalR的自定义方法 前端通过,signalR内置方法.invoke() 去请求接口3、监听接受方法(渲染消息)通过new signalR.HubConnectionBuilder().on
提供3种Ubuntu系统安装微信的方法,在Ubuntu20.04上验证都ok。1.WineHQ7.0安装微信:ubuntu20.04安装最新版微信--可以支持微信最新版,但是适配的不是特别好;比如WeChartOCR.exe报错。2.原生微信安装:linux系统下的微信安装(ubuntu20.04)--微信适配的最好,反应最快,但是微信版本只到2.1.1,版本太老,很多功能都没有。3.深度deepin-wine6安装微信:ubuntu20.04+系统deepin-wine6安装新版微信--综合比较好,当前个人使用此种方法1个月,微信版本3.4;没什么大问题,尚可。一、WineHQ7.0安装微信
对传统的餐饮商家来说,小程序很好地解决了餐厅线下线上连接的问题,在引流获客、节约人力、营销宣传、塑造会员体系、改善消费体验等方面都有很大帮助。小程序点餐可以帮助餐饮企业节省一大把人力开支。一个包含扫码点单、菜品管理、优惠券推送、外卖配送的小程序,商家花几万元就能完成开发测试并投入。商家为什么要开通“扫码点餐”1.解决服务员不够用的问题。2.不怕顾客跑单漏单。3.在微信就能管理菜品、查看营业额。4.订单小票显示顾客桌号和已点菜品。5.可在“附近的小程序”找到您的门店。如今餐饮业常用的三种经营模式:1堂食点单模式客人通过小程序堂食点单。商家可以在微信扫码点餐小程序管理后台根据自己店内情况来设置不同
技术选型1,前端小程序原生MINA框架cssJavaScriptWxml2,管理后台云开发Cms内容管理系统web网页3,数据后台小程序云开发云函数云开发数据库(基于MongoDB)云存储4,人脸识别算法基于百度智能云实现人脸识别一,用户端效果图预览老规矩我们先来看效果图,如果效果图符合你的需求,就继续往下看,如果不符合你的需求,可以跳过。1-1,登录注册页可以看到登录页有注册入口,注册页如下我们的注册,需要管理员审核,审核通过后才可以正常登录使用小程序1-2,个人中心页登录成功以后,我们会进入个人中心页我们在个人中心页可以注册人脸,因为我们做人脸识别签到,需要先注册人脸才可以进行人脸比对,进