目录
打开字符串资源文件 strings.xml改应用标题名字(可不改)
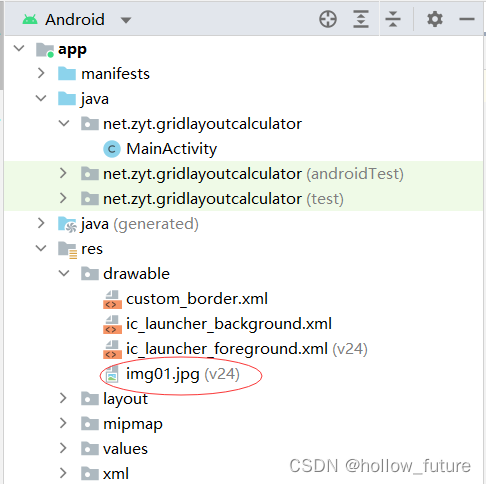
drawable目录里添加custom_border.xml
1.GridLayout布局使用虚细线将布局划分为行、列和单元格,也支持一个控件在行、列上都有交错排列。
2.可以自己设置布局中组件的排列方式
3.可以自定义网格布局有多少行、多少列
4.可以直接设置组件位于某行某列
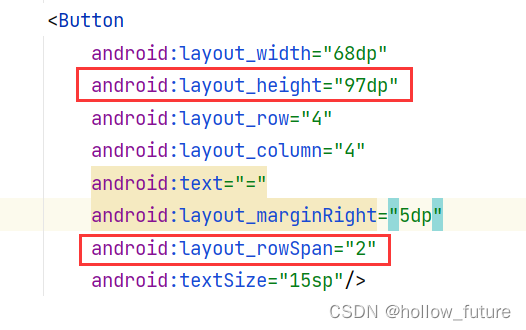
5.可以设置组件横跨几行或者几列
使用GridLayout类是ViewGroup子类
| 属性 | 含义 |
| rowCount | 行数 |
| columnCount | 列数 |
| layout_width | 布局宽度 |
| layout_height | 布局高度 |
| 属性 | 含义 |
| layout_row | 子控件在布局的行数 |
| layout_column | 子控件在布局的列数 |
| layout_rowSpan | 跨行数 |
| layout_columnSpan | 跨列数 |
strings.xml改应用标题名字(可不改)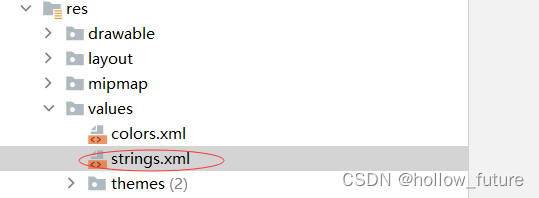

custom_border.xml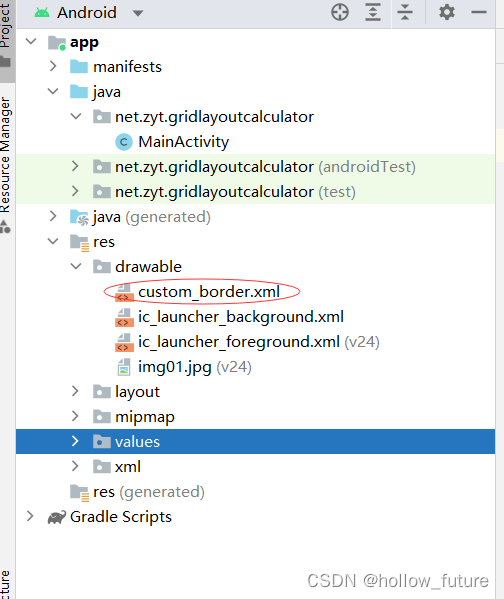
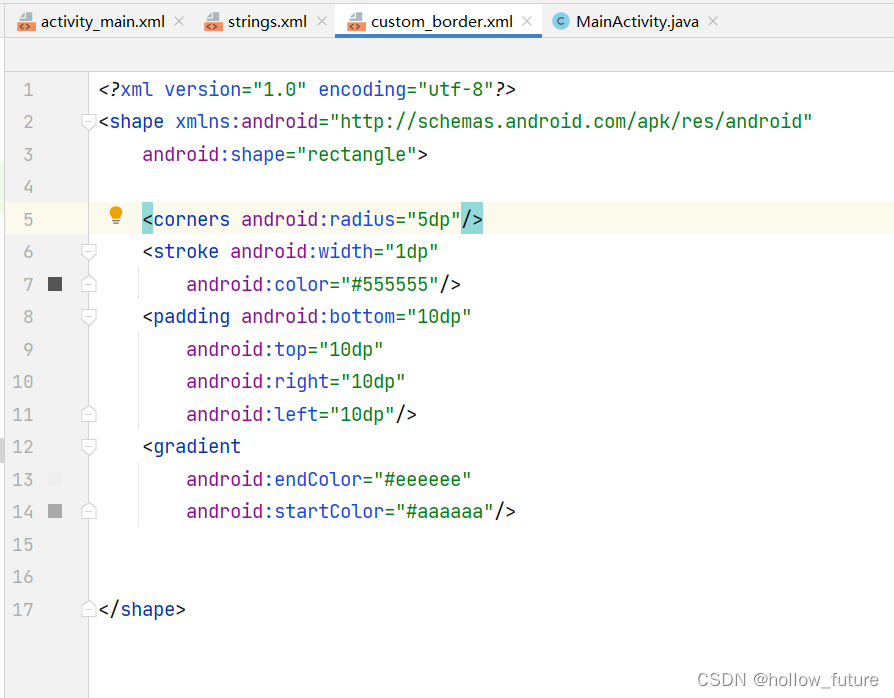 具体代码:
具体代码:<?xml version="1.0" encoding="utf-8"?>
<shape xmlns:android="http://schemas.android.com/apk/res/android"
android:shape="rectangle">
<corners android:radius="5dp"/>
<stroke android:width="1dp"
android:color="#555555"/>
<padding android:bottom="10dp"
android:top="10dp"
android:right="10dp"
android:left="10dp"/>
<gradient
android:endColor="#eeeeee"
android:startColor="#aaaaaa"/>
</shape>
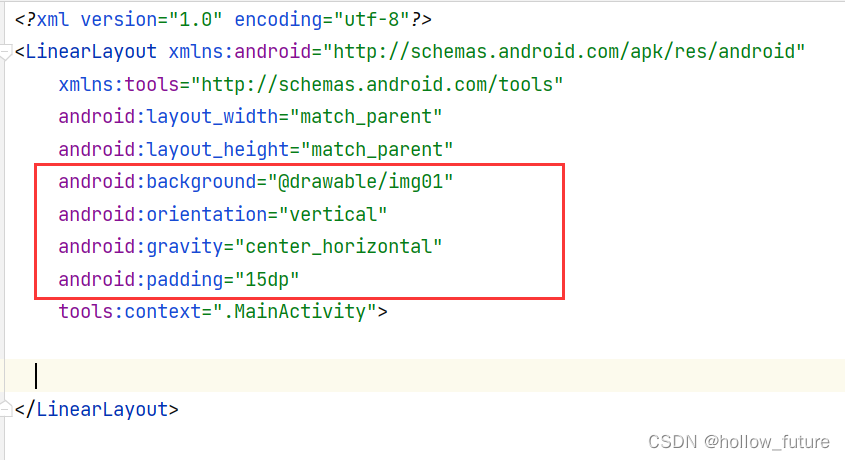
打开主布局资源文件 activity_main.xml把她的布局改为线性布局并添加修改一些属性
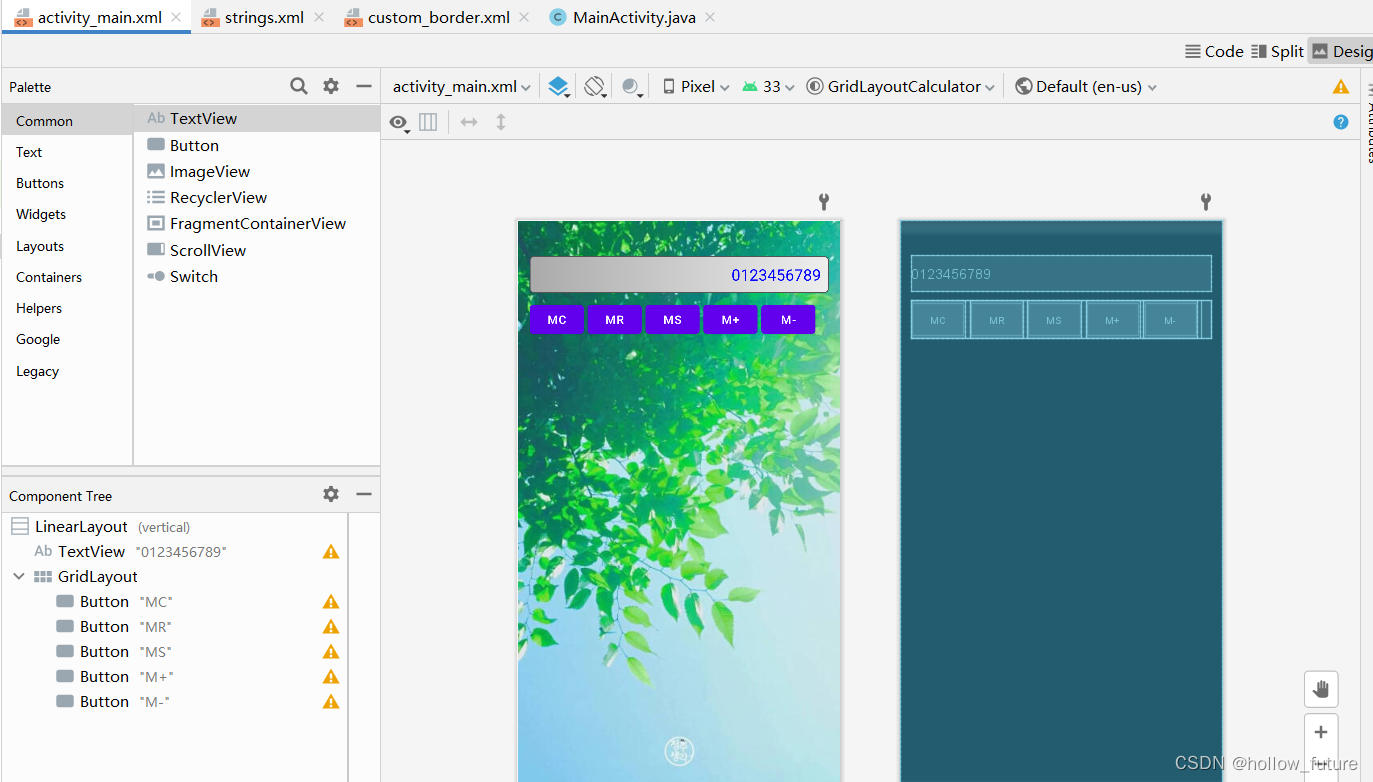
添加显示运算结果的标签,并设置相关属性

运行结果

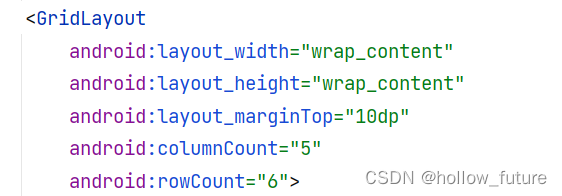
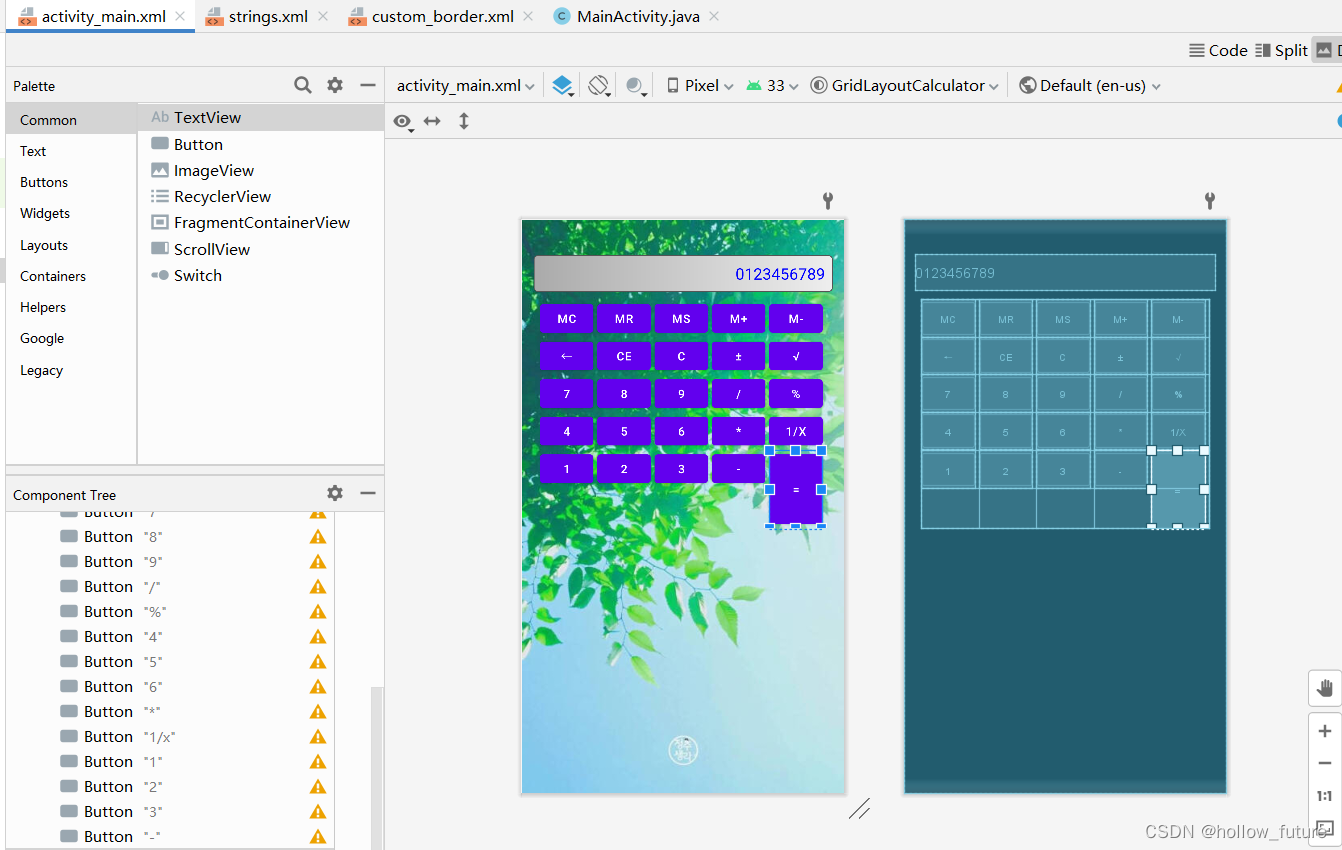
添加一个网格布局,设置为6行5列
添加第一行的五个按钮

查看结果
添加第二行按钮改变layout_row
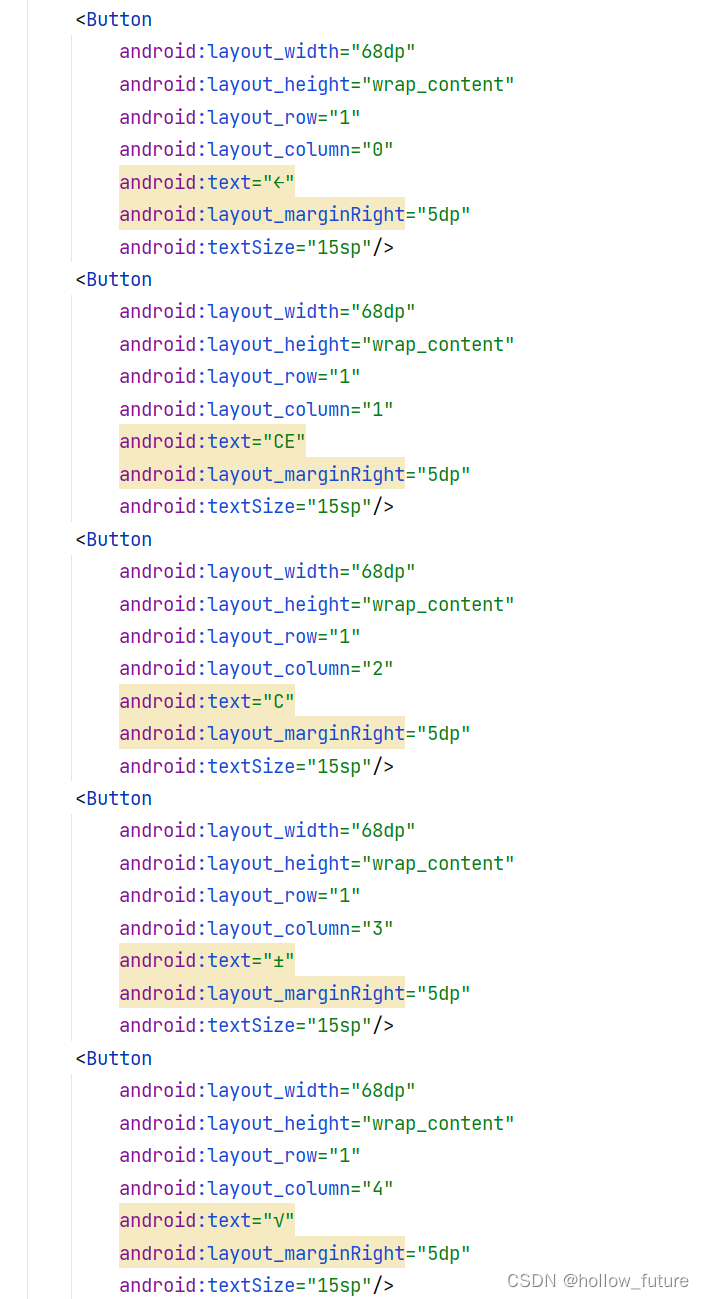
以此类推到第四行,第五行与前面类似不过应为最后一个等号按钮要和并行所以有一点差别
运行结果为:
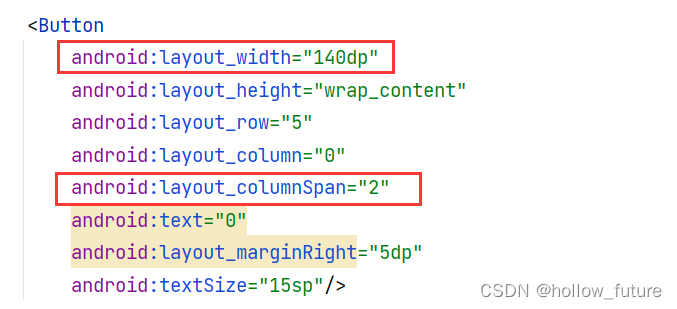
第六行也有一个合并两列的具体改动为:
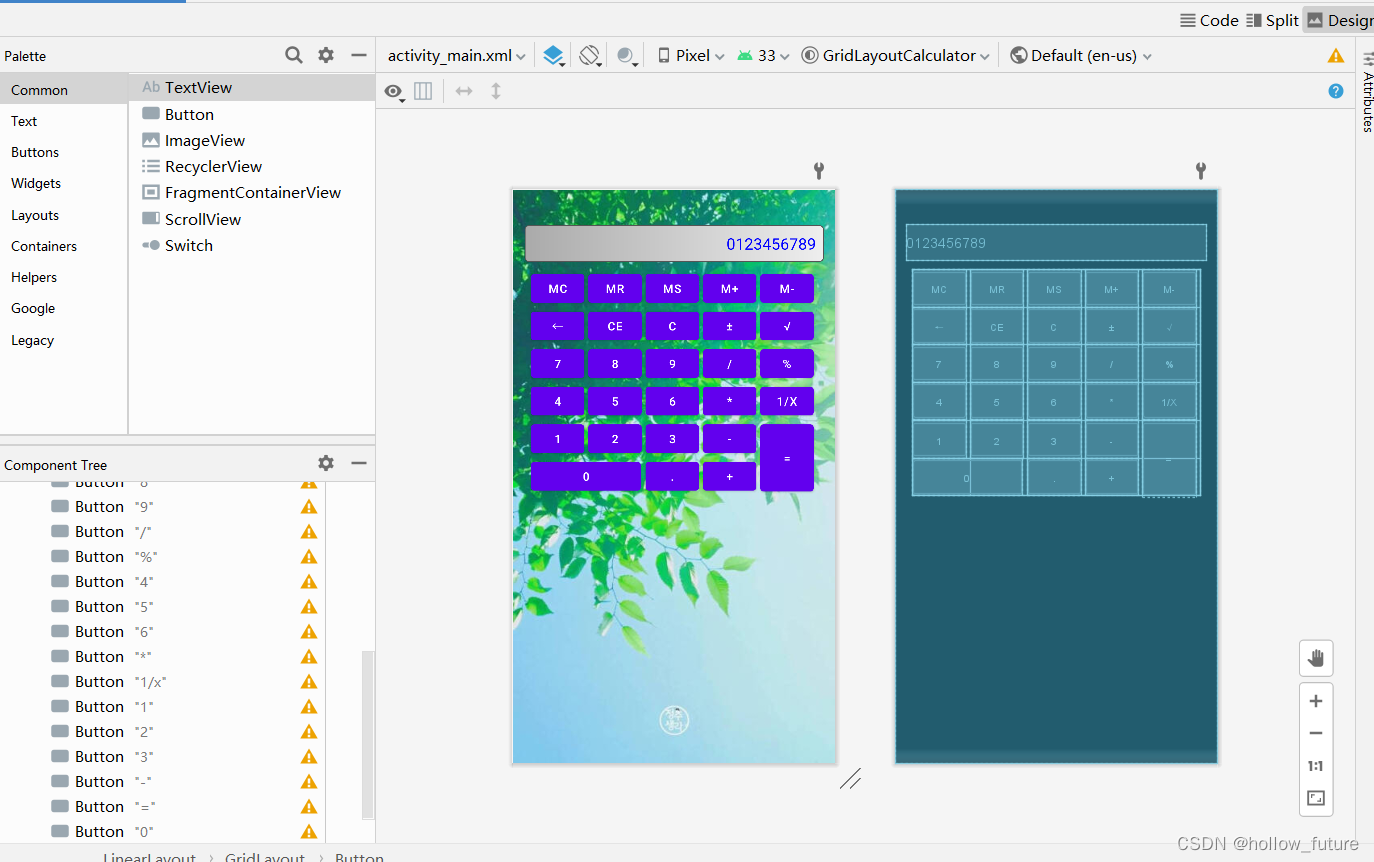
最后运行结果为:
<?xml version="1.0" encoding="utf-8"?>
<LinearLayout xmlns:android="http://schemas.android.com/apk/res/android"
    xmlns:tools="http://schemas.android.com/tools"
    android:layout_width="match_parent"
    android:layout_height="match_parent"
    android:background="@drawable/img01"
    android:orientation="vertical"
    android:gravity="center_horizontal"
    android:padding="15dp"
    tools:context=".MainActivity">

    <TextView
        android:layout_width="match_parent"
        android:layout_height="wrap_content"
        android:background="@drawable/custom_border"
        android:text="0123456789"
        android:gravity="right"
        android:textColor="#0000ff"
        android:layout_marginTop="30dp"
        android:textSize="20sp"/>
    <GridLayout
        android:layout_width="wrap_content"
        android:layout_height="wrap_content"
        android:layout_marginTop="10dp"
        android:columnCount="5"
        android:rowCount="6">
        <Button
            android:layout_width="68dp"
            android:layout_height="wrap_content"
            android:layout_row="0"
            android:layout_column="0"
            android:text="MC"
            android:layout_marginRight="5dp"
            android:textSize="15sp"/>
        <Button
            android:layout_width="68dp"
            android:layout_height="wrap_content"
            android:layout_row="0"
            android:layout_column="1"
            android:text="MR"
            android:layout_marginRight="5dp"
            android:textSize="15sp"/>
        <Button
            android:layout_width="68dp"
            android:layout_height="wrap_content"
            android:layout_row="0"
            android:layout_column="2"
            android:text="MS"
            android:layout_marginRight="5dp"
            android:textSize="15sp"/>
        <Button
            android:layout_width="68dp"
            android:layout_height="wrap_content"
            android:layout_row="0"
            android:layout_column="3"
            android:text="M+"
            android:layout_marginRight="5dp"
            android:textSize="15sp"/>
        <Button
            android:layout_width="68dp"
            android:layout_height="wrap_content"
            android:layout_row="0"
            android:layout_column="4"
            android:text="M-"
            android:layout_marginRight="5dp"
            android:textSize="15sp"/>
        <!--...................................-->

        <Button
            android:layout_width="68dp"
            android:layout_height="wrap_content"
            android:layout_row="1"
            android:layout_column="0"
            android:text="←"
            android:layout_marginRight="5dp"
            android:textSize="15sp"/>
        <Button
            android:layout_width="68dp"
            android:layout_height="wrap_content"
            android:layout_row="1"
            android:layout_column="1"
            android:text="CE"
            android:layout_marginRight="5dp"
            android:textSize="15sp"/>
        <Button
            android:layout_width="68dp"
            android:layout_height="wrap_content"
            android:layout_row="1"
            android:layout_column="2"
            android:text="C"
            android:layout_marginRight="5dp"
            android:textSize="15sp"/>
        <Button
            android:layout_width="68dp"
            android:layout_height="wrap_content"
            android:layout_row="1"
            android:layout_column="3"
            android:text="±"
            android:layout_marginRight="5dp"
            android:textSize="15sp"/>
        <Button
            android:layout_width="68dp"
            android:layout_height="wrap_content"
            android:layout_row="1"
            android:layout_column="4"
            android:text="√"
            android:layout_marginRight="5dp"
            android:textSize="15sp"/>
        <!--...................................-->

        <Button
            android:layout_width="68dp"
            android:layout_height="wrap_content"
            android:layout_row="2"
            android:layout_column="0"
            android:text="7"
            android:layout_marginRight="5dp"
            android:textSize="15sp"/>
        <Button
            android:layout_width="68dp"
            android:layout_height="wrap_content"
            android:layout_row="2"
            android:layout_column="1"
            android:text="8"
            android:layout_marginRight="5dp"
            android:textSize="15sp"/>
        <Button
            android:layout_width="68dp"
            android:layout_height="wrap_content"
            android:layout_row="2"
            android:layout_column="2"
            android:text="9"
            android:layout_marginRight="5dp"
            android:textSize="15sp"/>
        <Button
            android:layout_width="68dp"
            android:layout_height="wrap_content"
            android:layout_row="2"
            android:layout_column="3"
            android:text="/"
            android:layout_marginRight="5dp"
            android:textSize="15sp"/>
        <Button
            android:layout_width="68dp"
            android:layout_height="wrap_content"
            android:layout_row="2"
            android:layout_column="4"
            android:text="%"
            android:layout_marginRight="5dp"
            android:textSize="15sp"/>
        <!--...................................-->

        <Button
            android:layout_width="68dp"
            android:layout_height="wrap_content"
            android:layout_row="3"
            android:layout_column="0"
            android:text="4"
            android:layout_marginRight="5dp"
            android:textSize="15sp"/>
        <Button
            android:layout_width="68dp"
            android:layout_height="wrap_content"
            android:layout_row="3"
            android:layout_column="1"
            android:text="5"
            android:layout_marginRight="5dp"
            android:textSize="15sp"/>
        <Button
            android:layout_width="68dp"
            android:layout_height="wrap_content"
            android:layout_row="3"
            android:layout_column="2"
            android:text="6"
            android:layout_marginRight="5dp"
            android:textSize="15sp"/>
        <Button
            android:layout_width="68dp"
            android:layout_height="wrap_content"
            android:layout_row="3"
            android:layout_column="3"
            android:text="*"
            android:layout_marginRight="5dp"
            android:textSize="15sp"/>
        <Button
            android:layout_width="68dp"
            android:layout_height="wrap_content"
            android:layout_row="3"
            android:layout_column="4"
            android:text="1/x"
            android:layout_marginRight="5dp"
            android:textSize="15sp"/>
        <!--...................................-->

        <Button
            android:layout_width="68dp"
            android:layout_height="wrap_content"
            android:layout_row="4"
            android:layout_column="0"
            android:text="1"
            android:layout_marginRight="5dp"
            android:textSize="15sp"/>
        <Button
            android:layout_width="68dp"
            android:layout_height="wrap_content"
            android:layout_row="4"
            android:layout_column="1"
            android:text="2"
            android:layout_marginRight="5dp"
            android:textSize="15sp"/>
        <Button
            android:layout_width="68dp"
            android:layout_height="wrap_content"
            android:layout_row="4"
            android:layout_column="2"
            android:text="3"
            android:layout_marginRight="5dp"
            android:textSize="15sp"/>
        <Button
            android:layout_width="68dp"
            android:layout_height="wrap_content"
            android:layout_row="4"
            android:layout_column="3"
            android:text="-"
            android:layout_marginRight="5dp"
            android:textSize="15sp"/>
        <Button
            android:layout_width="68dp"
            android:layout_height="97dp"
            android:layout_row="4"
            android:layout_column="4"
            android:text="="
            android:layout_marginRight="5dp"
            android:layout_rowSpan="2"
            android:textSize="15sp"/>

        <!--...................................-->

        <Button
            android:layout_width="140dp"
            android:layout_height="wrap_content"
            android:layout_row="5"
            android:layout_column="0"
            android:layout_columnSpan="2"
            android:text="0"
            android:layout_marginRight="5dp"
            android:textSize="15sp"/>
        <Button
            android:layout_width="68dp"
            android:layout_height="wrap_content"
            android:layout_row="5"
            android:layout_column="2"
            android:text="."
            android:layout_marginRight="5dp"
            android:textSize="15sp"/>
        <Button
            android:layout_width="68dp"
            android:layout_height="wrap_content"
            android:layout_row="5"
            android:layout_column="3"
            android:text="+"
            android:layout_marginRight="5dp"
            android:textSize="15sp"/>


    </GridLayout>


</LinearLayout>
这里是Ruby新手。完成一些练习后碰壁了。练习:计算一系列成绩的字母等级创建一个方法get_grade来接受测试分数数组。数组中的每个分数应介于0和100之间,其中100是最大分数。计算平均分并将字母等级作为字符串返回,即“A”、“B”、“C”、“D”、“E”或“F”。我一直返回错误:avg.rb:1:syntaxerror,unexpectedtLBRACK,expecting')'defget_grade([100,90,80])^avg.rb:1:syntaxerror,unexpected')',expecting$end这是我目前所拥有的。我想坚持使用下面的方法或.join,
是否可以为特定(或所有)项目使用多个布局?例如,我有几个项目,我想对其应用两种不同的布局。一个是绿色的,一个是蓝色的(但是)。我想将它们编译到我的输出目录中的两个不同文件夹中(例如v1和v2)。我一直在玩弄规则和编译block,但我不知道这是怎么回事。因为,每个项目在编译过程中只编译一次,我不能告诉nanoc第一次用layout1编译,第二次用layout2编译。我试过这样的东西,但它导致输出文件损坏。compile'*'doifitem.binary?#don’tfilterbinaryitemselsefilter:erblayout'layout1'layout'layout2'
Unity自动旋转动画1.开门需要门把手先动,门再动2.关门需要门先动,门把手再动3.中途播放过程中不可以再次进行操作觉得太复杂?查看我的文章开关门简易进阶版效果:如果这个门可以直接打开的话,就不需要放置"门把手"如果门把手还有钥匙需要旋转,那就可以把钥匙放在门把手的"门把手",理论上是可以无限套娃的可调整参数有:角度,反向,轴向,速度运行时点击Test进行测试自己写的代码比较垃圾,命名与结构比较拉,高手轻点喷,新手有类似的需求可以拿去做参考上代码usingSystem.Collections;usingSystem.Collections.Generic;usingUnityEngine;u
项目介绍随着我国经济迅速发展,人们对手机的需求越来越大,各种手机软件也都在被广泛应用,但是对于手机进行数据信息管理,对于手机的各种软件也是备受用户的喜爱小学生兴趣延时班预约小程序的设计与开发被用户普遍使用,为方便用户能够可以随时进行小学生兴趣延时班预约小程序的设计与开发的数据信息管理,特开发了小程序的设计与开发的管理系统。小学生兴趣延时班预约小程序的设计与开发的开发利用现有的成熟技术参考,以源代码为模板,分析功能调整与小学生兴趣延时班预约小程序的设计与开发的实际需求相结合,讨论了小学生兴趣延时班预约小程序的设计与开发的使用。开发环境开发说明:前端使用微信微信小程序开发工具:后端使用ssm:VU
动漫制作技巧是很多新人想了解的问题,今天小编就来解答与大家分享一下动漫制作流程,为了帮助有兴趣的同学理解,大多数人会选择动漫培训机构,那么今天小编就带大家来看看动漫制作要掌握哪些技巧?一、动漫作品首先完成草图设计和原型制作。设计草图要有目的、有对象、有步骤、要形象、要简单、符合实际。设计图要一致性,以保证制作的顺利进行。二、原型制作是根据设计图纸和制作材料,可以是手绘也可以是3d软件创建。在此步骤中,要注意的问题是色彩和平面布局。三、动漫制作制作完成后,加工成型。完成不同的表现形式后,就要对设计稿进行加工处理,使加工的难易度降低,并得到一些基本准确的概念,以便于后续的大样、准确的尺寸制定。四、
我对如何计算通过{%assignvar=0%}赋值的变量加一完全感到困惑。这应该是最简单的任务。到目前为止,这是我尝试过的:{%assignamount=0%}{%forvariantinproduct.variants%}{%assignamount=amount+1%}{%endfor%}Amount:{{amount}}结果总是0。也许我忽略了一些明显的东西。也许有更好的方法。我想要存档的只是获取运行的迭代次数。 最佳答案 因为{{incrementamount}}将输出您的变量值并且不会影响{%assign%}定义的变量,我
给定一个nxmbool数组:[[true,true,false],[false,true,true],[false,true,true]]有什么简单的方法可以返回“该列中有多少个true?”结果应该是[1,3,2] 最佳答案 使用转置得到一个数组,其中每个子数组代表一列,然后将每一列映射到其中的true数:arr.transpose.map{|subarr|subarr.count(true)}这是一个带有inject的版本,应该在1.8.6上运行,没有任何依赖:arr.transpose.map{|subarr|subarr.in
给定两个大小相等的数组,如何找到不考虑位置的匹配元素的数量?例如:[0,0,5]和[0,5,5]将返回2的匹配项,因为有一个0和一个5共同;[1,0,0,3]和[0,0,1,4]将返回3的匹配项,因为0有两场,1有一场;[1,2,2,3]和[1,2,3,4]将返回3的匹配项。我尝试了很多想法,但它们都变得相当粗糙和令人费解。我猜想有一些不错的Ruby习惯用法,或者可能是一个正则表达式,可以很好地回答这个解决方案。 最佳答案 您可以使用count完成它:a.count{|e|index=b.index(e)andb.delete_at
Ruby中如何“一般地”计算以下格式(有根、无根)的JSON对象的数量?一般来说,我的意思是元素可能不同(例如“标题”被称为其他东西)。没有根:{[{"title":"Post1","body":"Hello!"},{"title":"Post2","body":"Goodbye!"}]}根包裹:{"posts":[{"title":"Post1","body":"Hello!"},{"title":"Post2","body":"Goodbye!"}]} 最佳答案 首先,withoutroot代码不是有效的json格式。它将没有包
目标我正在尝试计算自给定日期以来周的距离,而无需跳过任何步骤。我更喜欢用普通的Ruby来做,但ActiveSupport无疑是一个可以接受的选择。我的代码我写了以下内容,这似乎可行,但对我来说似乎还有很长的路要走。require'date'DAYS_IN_WEEK=7.0defweeks_sincedate_stringdate=Date.parsedate_stringdays=Date.today-dateweeks=days/DAYS_IN_WEEKweeks.round2endweeks_since'2015-06-15'#=>32.57ActiveSupport的#weeks