前言 : 上一节使用了创建Glsurfaceview 进行ioengl渲染,这一节 说明使用其他的渲染控件来进行opengl渲染
任务:通过传入surface,使用mediaplayer 把播放的视频流数据进行2d渲染。
1 SurfaceView TextureView GlSurfaceView如何拿到surface?
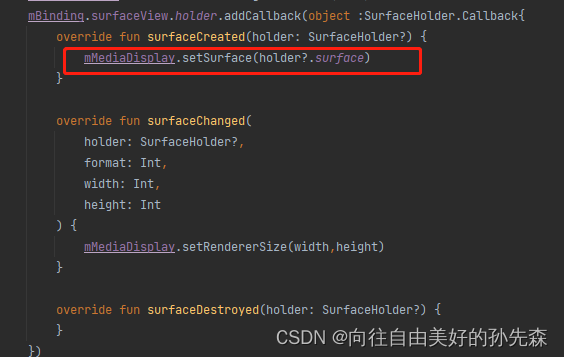
1 surfaceview:
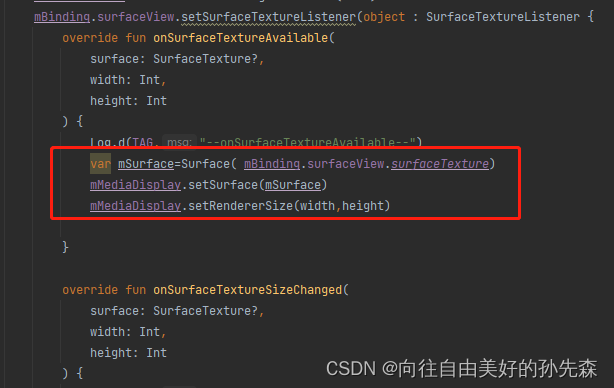
2 TextureView
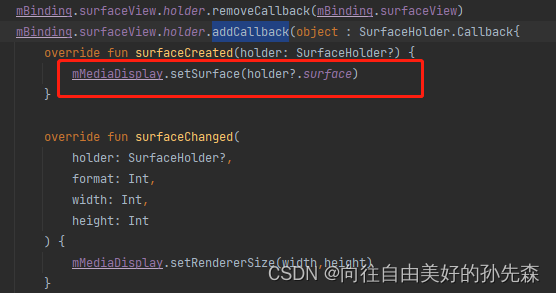
3 GlSurfaceView
其实它是继承surfaceview,所以方式一致,但是不同的是它内部自己进行addcallback,所以我们在外面要拿到surface,需要将glsurfaceview 内部的callback先进行注销;
2 创建opengl 环境
由于glsurfaceview 自己会创建环境,其他的场景就需要自己去收到创建opgles 环境。
EGLDisplay --系统显示 ID 或句柄,可以理解为一个前端的显示窗口
EGLConfig --Surface的EGL配置,可以理解为绘制目标framebuffer的配置属性
EGLContext--OpenGL ES 图形上下文,它代表了OpenGL状态机;如果没有它,OpenGL指令就没有执行的环境
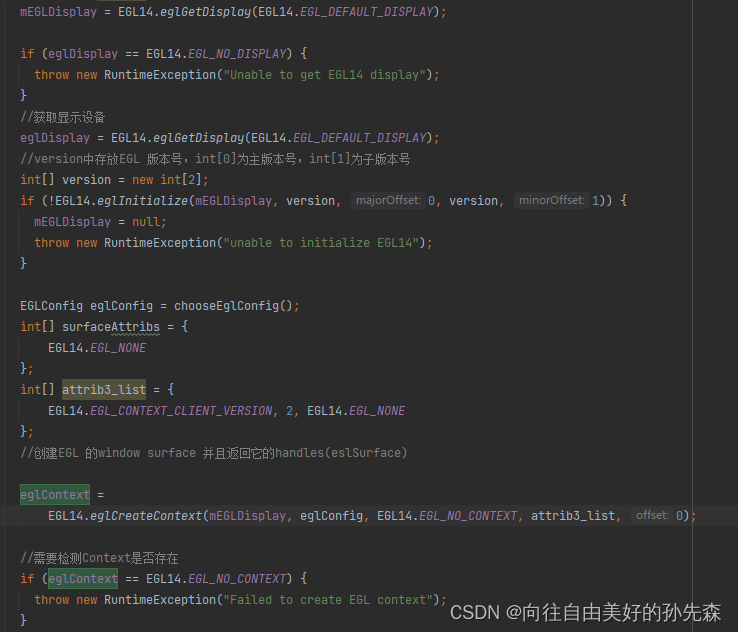
创建EglSurface --系统窗口或 frame buffer 句柄 ,可以理解为一个后端的渲染目标窗口。
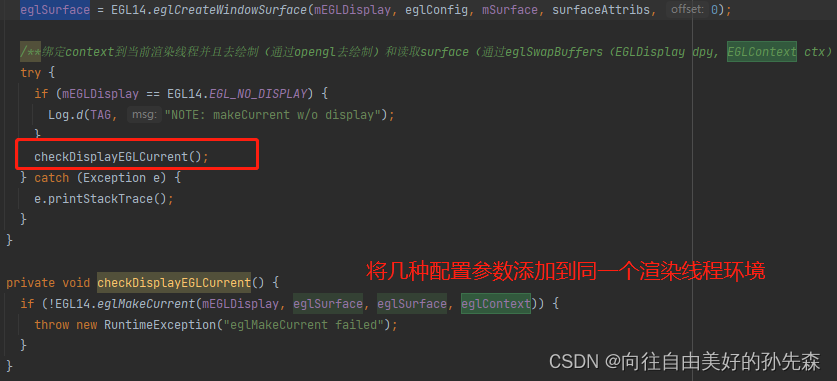
3 内部创建surface,提供给播放器
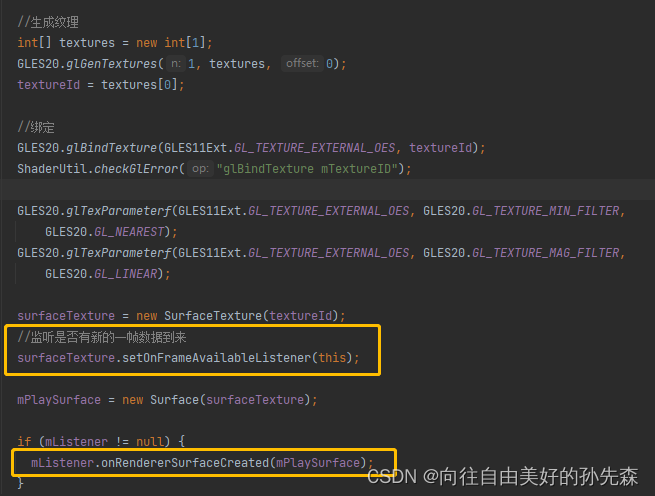
通过new SurfaceTexture实例,进行注册监听回调,然后通过SurfaceTexture来创建surface,提供给播放器,播放器用来加载。
为什么要新建一个surface,不是从渲染控件中拿到了surface?
这里的surface是提供给播放器进行显示的?但是我们需要的结果并不是要屏幕去直接渲染播放器的内容,而是去显示处理后的画面。所以给播放器的surface必然不能是渲染控件中的surface.
同时监听提供给播放器的surface的数据变化,有变化的时候需要去触发opengl去画。
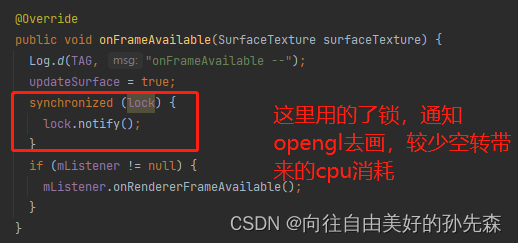
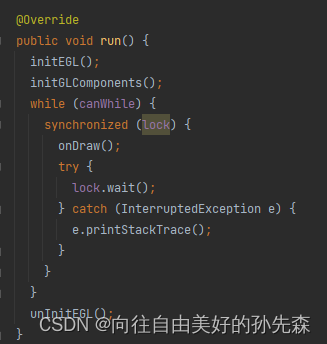
4 画的过程
ondraw画的方式跟glsurfaceview.Renderer中onDrawFrame()方法内容几乎一致。
区别点:需要手动调用eglSwapBuffers()
内部的前端缓冲(front-buffer)和后端缓冲(back-surface)。
后端缓冲用于存储渲染结果,前端缓冲则用于底层窗口系统,底层窗口系统将缓冲中的颜色信息显示到设备上。
5 注意的问题
在开发的过程出现了 渲染黑屏,但是全程没有报错。
问题:projectionMatrix 未初始化

Matrix.orthoM(projectionMatrix, 0, -1f, 1f, -1, 1, -1f, 1f);
通过一致变量(uniform修饰的变量)引用将一致变量值传入渲染管线。
location : uniform的位置。
count : 需要加载数据的数组元素的数量或者需要修改的矩阵的数量。
transpose : 指明矩阵是列优先(column major)矩阵(GL_FALSE)还是行优先(row major)矩阵(GL_TRUE)。
value : 指向由count个元素的数组的指针。
6 附上源码
import android.content.Context;
import android.graphics.SurfaceTexture;
import android.opengl.EGLConfig;
import android.opengl.EGLContext;
import android.opengl.EGLDisplay;
import android.opengl.EGLExt;
import android.opengl.EGLSurface;
import android.opengl.GLES11Ext;
import android.opengl.GLES20;
import android.opengl.Matrix;
import android.util.Log;
import android.view.Surface;
import java.nio.ByteBuffer;
import java.nio.ByteOrder;
import java.nio.FloatBuffer;
import android.opengl.EGL14;


public class SurfaceRenderer implements Runnable, SurfaceTexture.OnFrameAvailableListener {

  protected Surface mSurface;
  protected Surface mPlaySurface;
  private EGLContext eglContext;
  private EGLDisplay eglDisplay;
  private EGLDisplay mEGLDisplay = EGL14.EGL_NO_DISPLAY;
  private EGLSurface eglSurface;
  private Context context;

  private String TAG = "--SurfaceRenderer--";

  public SurfaceRenderer(Context context, Surface surface) {
    this.context = context;
    this.mSurface = surface;

    init();
  }


  public void setRenderSize(int screenWidth, int screenHeight) {
    this.screenWidth = screenWidth;
    this.screenHeight = screenHeight;
    Matrix.orthoM(projectionMatrix, 0, -1f, 1f, -1, 1, -1f, 1f);
  }

  /**
   * 生成的shader程序
   */
  private int programId;
  private int aPositionLocation;
  private int uMatrixLocation;
  private int uTextureSamplerLocation;
  private int aTextureCoordLocation;
  private int uSTMMatrixHandle;
  private boolean updateSurface = false;

  private SurfaceTexture surfaceTexture;
  private GLSurfaceRenderer.OnRendererListener mListener;
  private final float[] projectionMatrix = new float[16];
  /**
   * 纹理坐标
   */
  private int textureId;

  private float[] mSTMatrix = new float[16];
  private boolean mIs3d = true;

  private FloatBuffer vertexBuffer;
  private FloatBuffer vertexBuffer2;

  private FloatBuffer textureVertexBuffer;
  private FloatBuffer textureVertexBuffer2;

  private int screenWidth, screenHeight;
  private Object lock = new Object();
  // Core EGL

  /**
   * 是否需要进行绘制(draw)
   */
  private boolean canWhile = true;

  /**
   * 顶点坐标
   */
  private final float[] vertexData = {
      1f, -1f, 0f, -1f, -1f, 0f, 1f, 1f, 0f, -1f, 1f, 0f
  };
  private final float[] vertexData2 = {
      0f, -1f, 0f, -1f, -1f, 0f, 0f, 1f, 0f, -1f, 1f, 0f, 0f, 1f, 0f, 0f, 1f, 0f, 1f, 1f, 0f, 0f,
      -1f, 0f, 1f, -1f, 0f
  };
  /**
   * 纹理坐标
   */
  private final float[] textureVertexData = {
      1f, 0f, 0f, 0f, 1f, 1f, 0f, 1f
  };
  private final float[] textureVertexData2 = {
      1f, 0f, 0f, 0f, 1f, 1f, 0f, 1f, 0f, 1f, 0f, 1f, 1f, 1f, 0f, 0f, 1f, 0f
  };

  public void setOnRendererListener(GLSurfaceRenderer.OnRendererListener listener) {
    mListener = listener;
    if (surfaceTexture != null) {
      if (listener == null) {
        surfaceTexture.setOnFrameAvailableListener(null);
      }
    }
  }

  public void setEnable3DMode(boolean is3d) {
    this.mIs3d = is3d;
  }

  public void init() {
    vertexBuffer = ByteBuffer
        //4个字节
        .allocateDirect(vertexData.length * 4)
        .order(ByteOrder.nativeOrder())
        .asFloatBuffer()
        .put(vertexData);
    vertexBuffer.position(0);

    textureVertexBuffer = ByteBuffer
        //4个字节
        .allocateDirect(textureVertexData.length * 4)
        .order(ByteOrder.nativeOrder())
        .asFloatBuffer()
        .put(textureVertexData);
    textureVertexBuffer.position(0);

    vertexBuffer2 = ByteBuffer
        //4个字节
        .allocateDirect(vertexData2.length * 4)
        .order(ByteOrder.nativeOrder())
        .asFloatBuffer()
        .put(vertexData2);
    vertexBuffer2.position(0);

    textureVertexBuffer2 = ByteBuffer
        //4个字节
        .allocateDirect(textureVertexData2.length * 4)
        .order(ByteOrder.nativeOrder())
        .asFloatBuffer()
        .put(textureVertexData2);
    textureVertexBuffer2.position(0);
  }

  public void start() {
    ExecutorServiceUtil.getInstance().execute(this);
  }

  private void initEGL() {
    mEGLDisplay = EGL14.eglGetDisplay(EGL14.EGL_DEFAULT_DISPLAY);

    if (eglDisplay == EGL14.EGL_NO_DISPLAY) {
      throw new RuntimeException("Unable to get EGL14 display");
    }
    //获取显示设备
    eglDisplay = EGL14.eglGetDisplay(EGL14.EGL_DEFAULT_DISPLAY);
    //version中存放EGL 版本号,int[0]为主版本号,int[1]为子版本号
    int[] version = new int[2];
    if (!EGL14.eglInitialize(mEGLDisplay, version, 0, version, 1)) {
      mEGLDisplay = null;
      throw new RuntimeException("unable to initialize EGL14");
    }

    EGLConfig eglConfig = chooseEglConfig();
    int[] surfaceAttribs = {
        EGL14.EGL_NONE
    };
    int[] attrib3_list = {
        EGL14.EGL_CONTEXT_CLIENT_VERSION, 2, EGL14.EGL_NONE
    };
    //创建EGL 的window surface 并且返回它的handles(eslSurface)

    eglContext =
        EGL14.eglCreateContext(mEGLDisplay, eglConfig, EGL14.EGL_NO_CONTEXT, attrib3_list, 0);

    //需要检测Context是否存在
    if (eglContext == EGL14.EGL_NO_CONTEXT) {
      throw new RuntimeException("Failed to create EGL context");
    }
    eglSurface = EGL14.eglCreateWindowSurface(mEGLDisplay, eglConfig, mSurface, surfaceAttribs, 0);

    /**绑定context到当前渲染线程并且去绘制(通过opengl去绘制)和读取surface(通过eglSwapBuffers(EGLDisplay dpy, EGLContext ctx)来显示)*/
    try {
      if (mEGLDisplay == EGL14.EGL_NO_DISPLAY) {
        Log.d(TAG, "NOTE: makeCurrent w/o display");
      }
      checkDisplayEGLCurrent();
    } catch (Exception e) {
      e.printStackTrace();
    }
  }

  private void checkDisplayEGLCurrent() {
    if (!EGL14.eglMakeCurrent(mEGLDisplay, eglSurface, eglSurface, eglContext)) {
      throw new RuntimeException("eglMakeCurrent failed");
    }
  }

  /***
   *  选择一个你所期望的配置.
   * @return 一个与你所指定最相近的一个EGL 帧缓存配置.
   */
  private EGLConfig chooseEglConfig() {

    int[] attribList = {
        EGL14.EGL_BUFFER_SIZE, 32, EGL14.EGL_ALPHA_SIZE, 8, EGL14.EGL_BLUE_SIZE, 8,
        EGL14.EGL_GREEN_SIZE, 8, EGL14.EGL_RED_SIZE, 8, EGL14.EGL_RENDERABLE_TYPE,
        EGL14.EGL_OPENGL_ES2_BIT, EGL14.EGL_SURFACE_TYPE, EGL14.EGL_WINDOW_BIT, EGL14.EGL_NONE
    };
    EGLConfig[] configs = new EGLConfig[1];
    int[] numConfigs = new int[1];
    if (!EGL14.eglChooseConfig(mEGLDisplay, attribList, 0, configs, 0, configs.length, numConfigs,
        0)) {
      return null;
    }

    return configs[0];
  }

  /**
   * 为当前渲染的API创建一个渲染上下文
   *
   * @return a handle to the context
   */

  @Override
  public void run() {
    initEGL();
    initGLComponents();
    while (canWhile) {
      synchronized (lock) {
        onDraw();
        try {
          lock.wait();
        } catch (InterruptedException e) {
          e.printStackTrace();
        }
      }
    }
    unInitEGL();
  }

  private void unInitEGL() {
    Log.d(TAG, "unInitEGL");
    EGL14.eglMakeCurrent(eglDisplay, EGL14.EGL_NO_SURFACE, EGL14.EGL_NO_SURFACE,
        EGL14.EGL_NO_CONTEXT);
    EGL14.eglDestroySurface(eglDisplay, eglSurface);
    EGL14.eglDestroyContext(eglDisplay, eglContext);
    EGL14.eglTerminate(eglDisplay);
  }

  public void initGLComponents() {

    String vertexShader = ShaderUtil.readRawTextFile(context, R.raw.vetext_sharder);
    String fragmentShader = ShaderUtil.readRawTextFile(context, R.raw.fragment_sharder);
    programId = ShaderUtil.createProgram(vertexShader, fragmentShader);

    aPositionLocation = GLES20.glGetAttribLocation(programId, "aPosition");
    uMatrixLocation = GLES20.glGetUniformLocation(programId, "uMatrix");
    uSTMMatrixHandle = GLES20.glGetUniformLocation(programId, "uSTMatrix");
    uTextureSamplerLocation = GLES20.glGetUniformLocation(programId, "sTexture");
    aTextureCoordLocation = GLES20.glGetAttribLocation(programId, "aTexCoord");

    //生成纹理
    int[] textures = new int[1];
    GLES20.glGenTextures(1, textures, 0);
    textureId = textures[0];

    //绑定
    GLES20.glBindTexture(GLES11Ext.GL_TEXTURE_EXTERNAL_OES, textureId);
    ShaderUtil.checkGlError("glBindTexture mTextureID");

    GLES20.glTexParameterf(GLES11Ext.GL_TEXTURE_EXTERNAL_OES, GLES20.GL_TEXTURE_MIN_FILTER,
        GLES20.GL_NEAREST);
    GLES20.glTexParameterf(GLES11Ext.GL_TEXTURE_EXTERNAL_OES, GLES20.GL_TEXTURE_MAG_FILTER,
        GLES20.GL_LINEAR);

    surfaceTexture = new SurfaceTexture(textureId);
    //监听是否有新的一帧数据到来
    surfaceTexture.setOnFrameAvailableListener(this);

    mPlaySurface = new Surface(surfaceTexture);

    if (mListener != null) {
      mListener.onRendererSurfaceCreated(mPlaySurface);
    }
  }

  private void onDraw() {
    int len = 0;
    GLES20.glClear(GLES20.GL_DEPTH_BUFFER_BIT | GLES20.GL_COLOR_BUFFER_BIT);
    GLES20.glClearColor(0.0f, 0.0f, 0.0f, 0.0f);
    synchronized (this) {
      if (updateSurface) {
        //获取新数据
        surfaceTexture.updateTexImage();
        //让新的纹理和纹理坐标系能够正确的对应,mSTMatrix的定义是和projectionMatrix完全一样的。
        surfaceTexture.getTransformMatrix(mSTMatrix);
        updateSurface = false;
      }
    }

    //使用对应的program
    ShaderUtil.checkGlError("draw start");
    GLES20.glUseProgram(programId);
    ShaderUtil.checkGlError("glUseProgram");
    vertexBuffer2.position(0);

    GLES20.glUniformMatrix4fv(uMatrixLocation, 1, false, projectionMatrix, 0);
    GLES20.glUniformMatrix4fv(uSTMMatrixHandle, 1, false, mSTMatrix, 0);

    if (mIs3d) {
      //设置顶点坐标系
      vertexBuffer2.position(0);
      GLES20.glEnableVertexAttribArray(aPositionLocation);
      GLES20.glVertexAttribPointer(aPositionLocation, 3, GLES20.GL_FLOAT, false, 12, vertexBuffer2);

      //设置纹理坐标系
      textureVertexBuffer2.position(0);
      GLES20.glEnableVertexAttribArray(aTextureCoordLocation);
      GLES20.glVertexAttribPointer(aTextureCoordLocation, 2, GLES20.GL_FLOAT, false, 8,
          textureVertexBuffer2);

      len = vertexData2.length / 3;
    } else {
      //设置顶点坐标系
      vertexBuffer.position(0);
      GLES20.glEnableVertexAttribArray(aPositionLocation);
      GLES20.glVertexAttribPointer(aPositionLocation, 3, GLES20.GL_FLOAT, false, 12, vertexBuffer);

      //设置纹理坐标系
      textureVertexBuffer.position(0);
      GLES20.glEnableVertexAttribArray(aTextureCoordLocation);
      GLES20.glVertexAttribPointer(aTextureCoordLocation, 2, GLES20.GL_FLOAT, false, 8,
          textureVertexBuffer);

      len = vertexData.length / 3;
    }

    //激活纹理单元,默认第0个纹理单元
    GLES20.glActiveTexture(GLES20.GL_TEXTURE0);
    //将纹理对象ID绑定到当前活动的纹理单元0上的GL_TEXTURE_2D目标
    GLES20.glBindTexture(GLES11Ext.GL_TEXTURE_EXTERNAL_OES, textureId);

    GLES20.glUniform1i(uTextureSamplerLocation, 0);
    GLES20.glViewport(0, 0, screenWidth, screenHeight);
    //绘制4个点

    GLES20.glDrawArrays(GLES20.GL_TRIANGLE_STRIP, 0, len);
    ShaderUtil.checkGlError("glDrawArrays");
    EGL14.eglSwapBuffers(mEGLDisplay, eglSurface);
    if (mListener != null) {
      mListener.onRendererDrawFrame();
    }
  }

  @Override
  public void onFrameAvailable(SurfaceTexture surfaceTexture) {
    Log.d(TAG, "onFrameAvailable --");
    updateSurface = true;
    synchronized (lock) {
      lock.notify();
    }
    if (mListener != null) {
      mListener.onRendererFrameAvailable();
    }
  }

  public void release() {
    Log.d(TAG, "release");
    canWhile = false;
    updateSurface = false;
    synchronized (lock) {
      lock.notify();
    }
  }
}
动漫制作技巧是很多新人想了解的问题,今天小编就来解答与大家分享一下动漫制作流程,为了帮助有兴趣的同学理解,大多数人会选择动漫培训机构,那么今天小编就带大家来看看动漫制作要掌握哪些技巧?一、动漫作品首先完成草图设计和原型制作。设计草图要有目的、有对象、有步骤、要形象、要简单、符合实际。设计图要一致性,以保证制作的顺利进行。二、原型制作是根据设计图纸和制作材料,可以是手绘也可以是3d软件创建。在此步骤中,要注意的问题是色彩和平面布局。三、动漫制作制作完成后,加工成型。完成不同的表现形式后,就要对设计稿进行加工处理,使加工的难易度降低,并得到一些基本准确的概念,以便于后续的大样、准确的尺寸制定。四、
2022/8/4更新支持加入水印水印必须包含透明图像,并且水印图像大小要等于原图像的大小pythonconvert_image_to_video.py-f30-mwatermark.pngim_dirout.mkv2022/6/21更新让命令行参数更加易用新的命令行使用方法pythonconvert_image_to_video.py-f30im_dirout.mkvFFMPEG命令行转换一组JPG图像到视频时,是将这组图像视为MJPG流。我需要转换一组PNG图像到视频,FFMPEG就不认了。pyav内置了ffmpeg库,不需要系统带有ffmpeg工具因此我使用ffmpeg的python包装p
Transformers开始在视频识别领域的“猪突猛进”,各种改进和魔改层出不穷。由此作者将开启VideoTransformer系列的讲解,本篇主要介绍了FBAI团队的TimeSformer,这也是第一篇使用纯Transformer结构在视频识别上的文章。如果觉得有用,就请点赞、收藏、关注!paper:https://arxiv.org/abs/2102.05095code(offical):https://github.com/facebookresearch/TimeSformeraccept:ICML2021author:FacebookAI一、前言Transformers(VIT)在图
目前我正在使用这个正则表达式从YoutubeURL中提取视频ID:url.match(/v=([^&]*)/)[1]我怎样才能改变它,以便它也可以从这个没有v参数的YoutubeURL获取视频ID:http://www.youtube.com/user/SHAYTARDS#p/u/9/Xc81AajGUMU感谢阅读。编辑:我正在使用ruby1.8.7 最佳答案 对于Ruby1.8.7,这就可以了。url_1='http://www.youtube.com/watch?v=8WVTOUh53QY&feature=feedf'url
我正在寻找一个好的图形框架来用Ruby制作一个漂亮的2D游戏。我做了3个非常简单的测试,看看哪个图形Ruby框架在Gosu之间更快。和Rubygame.该测试创建了1000个“Square”类的实例,这些实例使用框架的方法以最简单的方式移动和绘制一个红色方block。第三个测试是同一件事,但在纯OpenGL实现中(没有任何框架)。这是结果:纯OPENGL(使用ruby-opengl)80Fps:alttexthttp://grab.by/JTMGOSU(使用ruby-opengl+gosu)46Fps:alttexthttp://grab.by/JTCRUBYGAME(使用ru
一、什么是web项目ui自动化测试?通过测试工具模拟人为操控浏览器,使软件按照测试人员的预定计划自动执行测试的一种方式,可以完成许多手工测试无法完成或者不易实现的繁琐工作。正确使用自动化测试,可以更全面的对软件进行测试,从而提高软件质量进而缩短迭代周期。二、构建测试用例的“九部曲”(一)创建流程包划分功能模块日常测试活动中,都会根据功能模块进行拆分,所以在设计器中我们可以通过创建流程包的方式来拆分需要测试的功能模块,如下图中操作创建一个电脑流程包并且取名为对应的功能模块名称,如果有多个功能模块就创建多个对应的流程包,实在RPA设计器有易用的图形可视化界面,方便管理较多的功能模块。(二)在流程包
目录需求基于JavaCV跨平台执行ffmpeg命令[^1]坑一内存不足坑二多个ffmpeg进程并行导致IO负载大,进而导致ioerror?坑三使用Java操作ffmpeg时,有时会卡死坑四Process的waitFor死锁问题及解决办法需求给透明背景的视频自动叠加一张背景图片基于JavaCV跨平台执行ffmpeg命令1我测试发现的本需求的最小依赖:dependency>groupId>org.bytedecogroupId>artifactId>ffmpeg-platform-gplartifactId>version>5.0-1.5.7version>dependency>核心代码:Stri
摘要本论文主要论述了如何使用Python技术开发一个短视频智能推荐,本系统将严格按照软件开发流程进行各个阶段的工作,采用B/S架构,面向对象编程思想进行项目开发。在引言中,作者将论述短视频智能推荐的当前背景以及系统开发的目的,后续章节将严格按照软件开发流程,对系统进行各个阶段分析设计。 短视频智能推荐的主要使用者分为管理员和用户,实现功能包括管理员:首页、个人中心、用户管理、热门视频管理、用户上传管理、系统管理,用户:首页、个人中心、用户上传管理、我的收藏管理,前台首页;首页、热门视频、用户上传、公告信息、个人中心、后台管理等功能。由于本网站的功能模块设计比较全面,所以使得整个短视频智能推荐信
基于ffmpeg的视频处理与MPEG的压缩试验ffmpeg介绍与基础知识对提取到的图像进行处理RGB并转化为YUV对YUV进行DCT变换对每个8*8的图像块进行进行量化操作ffmpeg介绍与基础知识ffmpeg是视频和图像处理的工具包,它的下载网址是https://ffmpeg.org/download.html。页面都是英文且下载正确的包的路径笔者找的时候还费点劲,这里记录一下也方便读者。选中这个Windows下的下午files,选择第一个这里有essential和full版本的,大家根据需要自行选择版本包下载下载好之后,在官网上下载ffmpeg的full包,一共300+MB解压,然后安装b
近年来,随着信息化时代的到来,三维全景拼接以视频监控领域为代表的智能硬件公司迅速崛起,随后全国各地在视频监控领域进行了大量的建设。但随着摄像头数量的增加,视频监控画面离散、庞杂、关联性差等诸多问题日渐凸显。如何优化现有视频技术,助力管理者或使用者有效、直观、准确地掌控现场实时动态,成为我国信息化前行路上面临的新课题。视频融合技术平台解决方案北京智汇云舟科技有限公司成立于2012年,专注于创新性的“视频孪生(实时实景数字孪生)”技术研发与应用。公司依托自研三维地理信息引擎(3DGIS),融合建筑信息模型(BIM)、视频监控(Video)、人工智能(AI)及物联网(IOT)等多种技术,并在此基础上
