[TOC](文章目录)
相信大多数人都有自己搭建博客网站的想法,本文就手把手一步一步的进行,最终结果类似如下样式:

软件选择成熟而免费的WordPress,WordPress是一款能让您建立出色网站、博客或应用程序的开源软件。
可充分利用超过55,000个插件扩展WordPress,以让您的网站满足需求。您可以增加网店、相册、邮件列表、论坛、统计分析等。
当然也有非常多的网站模板可用。

建网站,首先得有一个网上的空间,用于存放自己的网站。现在各种云都有相应的服务,一年也没多少钱,现在一般都有活动,如果是新用户建议买三年的。
dnf upgrade
dnf list php
我这里看到的是7.2版,版本过低,
php.x86_64 7.2.24-1.module_el8.2.0+313+b04d0a66 appstream
需要安装个新的。
dnf install -y https://rpms.remirepo.net/enterprise/remi-release-8.rpm
remi-release-8.rpm           0 kB/s |  26 kB     00:01
依赖关系解决。
=====================================================================================
软件包              架构               版本            仓库                 大小
=====================================================================================
安装:
 remi-release      noarch             8.4-1.el8.remi  @commandline         26 k
安装依赖关系:
 epel-release      noarch             8-11.el8        extras               24 k
会自动安装依赖epel-release,无需单独安装。
dnf module list php
结果类似如下:
CentOS Linux 8 - AppStream
Name        Stream        Profiles                       Summary
php         7.2 [d]       common [d], devel, minimal     PHP scripting language
php         7.3           common [d], devel, minimal     PHP scripting language
php         7.4           common [d], devel, minimal     PHP scripting language

Remi's Modular repository for Enterprise Linux 8 - x86_64
Name        Stream         Profiles                      Summary
php         remi-7.2       common [d], devel, minimal    PHP scripting language
php         remi-7.3       common [d], devel, minimal    PHP scripting language
php         remi-7.4       common [d], devel, minimal    PHP scripting language
php         remi-8.0       common [d], devel, minimal    PHP scripting language
php         remi-8.1       common [d], devel, minimal    PHP scripting language
可以看到已经有了8.0和8.1版本,官网现在8.1还是RC版,准备安装8.0。
期间会询问导入各种公钥,选择“y”即可。
dnf module enable php:remi-8.0
dnf install php
===================================================================================
 软件包            架构     版本                 仓库                  大小
===================================================================================
安装:
 php              x86_64   8.0.12-1.el8.remi     remi-modular         1.6 M
安装依赖关系:
 apr              x86_64   1.6.3-11.el8          AppStream            125 k
 apr-util         x86_64   1.6.1-6.el8           AppStream            105 k
 centos-logos-httpd noarch 85.8-1.el8            base                  75 k
 httpd            x86_64   2.4.37-39.module_el8  AppStream            1.4 M
 httpd-filesystem noarch   2.4.37-39.module_el8  AppStream             39 k
 httpd-tools      x86_64   2.4.37-39.module_el8  AppStream            106 k
 libsodium        x86_64   1.0.18-2.el8          epel                 162 k
 libxslt          x86_64   1.1.32-6.el8          base                 250 k
 mailcap          noarch   2.1.48-3.el8          base                  39 k
 mod_http2        x86_64   1.15.7-3.module_el8   AppStream            154 k
 oniguruma5php    x86_64   6.9.7.1-1.el8.remi    remi-safe            210 k
 php-common       x86_64   8.0.12-1.el8.remi     remi-modular         1.2 M
安装弱的依赖:
 apr-util-bdb     x86_64   1.6.1-6.el8           AppStream             25 k
 apr-util-openssl x86_64   1.6.1-6.el8           AppStream             27 k
 nginx-filesystem noarch   1:1.14.1-9.module_el8 AppStream             24 k
 php-cli          x86_64   8.0.12-1.el8.remi     remi-modular         4.7 M
 php-fpm          x86_64   8.0.12-1.el8.remi     remi-modular         1.6 M
 php-mbstring     x86_64   8.0.12-1.el8.remi     remi-modular         525 k
 php-opcache      x86_64   8.0.12-1.el8.remi     remi-modular         768 k
 php-pdo          x86_64   8.0.12-1.el8.remi     remi-modular         156 k
 php-sodium       x86_64   8.0.12-1.el8.remi     remi-modular          94 k
 php-xml          x86_64   8.0.12-1.el8.remi     remi-modular         238 k
启用模块流:
 httpd                     2.4
 nginx                     1.14

事务概要
================================================================================
安装  23 软件包
选择y,等待安装完成。
逐一执行下面命令安装扩展
dnf install php-mysql
dnf install php-gd
dnf install php-imagick
dnf install php-zip
输入命令查看php版本:
php -v
PHP 8.0.12 (cli) (built: Oct 19 2021 10:34:32) ( NTS gcc x86_64 )
Copyright (c) The PHP Group
Zend Engine v4.0.12, Copyright (c) Zend Technologies
    with Zend OPcache v8.0.12, Copyright (c), by Zend Technologies
dnf list mysql
mysql.x86_64 8.0.26-1.module_el8.4.0+915+de215114 appstream
版本8.0,直接安装。
输入安装命令,注意有“@”:
dnf install @mysql
依赖关系解决。
========================================================================================
 软件包         架构     版本              仓库                大小
========================================================================================
安装组/模块包:
 mysql-server  x86_64   8.0.26-1.module_el8.4.0+915+de215114   AppStream      25 M
安装依赖关系:
 ...省略....
安装模块配置档案:
 mysql/server
启用模块流:
 perl                   5.26
 perl-IO-Socket-SSL     2.066
 perl-libwww-perl       6.34

事务概要
========================================================================================
安装  54 软件包
选择y等待安装完成。
启动mysql
systemctl start mysqld
查看运行状态
systemctl status mysqld
设为开机启动
systemctl enable mysqld
运行配置向导
mysql_secure_installation
根据提示进行操作:
[root@localhost mysql]# mysql_secure_installation
## 默认已用空密码登录
Securing the MySQL server deployment.
Connecting to MySQL using a blank password.

##是否安装密码强度验证模块,看自己需求
VALIDATE PASSWORD COMPONENT can be used to test passwords
and improve security. It checks the strength of password
and allows the users to set only those passwords which are
secure enough. Would you like to setup VALIDATE PASSWORD component?
Press y|Y for Yes, any other key for No: no

## 设置root的密码
Please set the password for root here.
New password:
Re-enter new password:

## 是否删除匿名用户,可删
By default, a MySQL installation has an anonymous user,
allowing anyone to log into MySQL without having to have
a user account created for them. This is intended only for
testing, and to make the installation go a bit smoother.
You should remove them before moving into a production
environment.

Remove anonymous users? (Press y|Y for Yes, any other key for No) : y
Success.

## 默认情况下只允许本机访问,是否开启远程访问,按自己需求
Normally, root should only be allowed to connect from
'localhost'. This ensures that someone cannot guess at
the root password from the network.

Disallow root login remotely? (Press y|Y for Yes, any other key for No) : y
Success.

## 是否删除测试数据库,可删
By default, MySQL comes with a database named 'test' that
anyone can access. This is also intended only for testing,
and should be removed before moving into a production
environment.

Remove test database and access to it? (Press y|Y for Yes, any other key for No) : y
 - Dropping test database...
Success.

 - Removing privileges on test database...
Success.

## 是否立即重新加载刚才的配置,选择是
Reloading the privilege tables will ensure that all changes
made so far will take effect immediately.

Reload privilege tables now? (Press y|Y for Yes, any other key for No) : y
Success.
## 配置完毕
All done!
登录数据库
mysql -uroot -p
提示输入密码,输入刚设置的root的密码。
创建数据库,名称自己定,例如wordpress
create database wordpress;
查看现有数据库
show databases;
可以看到新建好的数据库
+--------------------+
| Database           |
+--------------------+
| information_schema |
| mysql              |
| performance_schema |
| sys                |
| wordpress          |
+--------------------+
5 rows in set (0.00 sec)
输入exit退出。
dnf list nginx
nginx.x86_64 1:1.14.1-9.module_el8.0.0+184+e34fea82 appstream
版本有点低,安装新版。
输入安装命令
dnf install http://nginx.org/packages/centos/8/x86_64/RPMS/nginx-1.20.2-1.el8.ngx.x86_64.rpm
==========================================================================================
软件包            架构       版本                        仓库                  大小
==========================================================================================
安装:
 nginx           x86_64     1:1.20.2-1.el8.ngx          @commandline          819 k

事务概要
==========================================================================================
安装  1 软件包
选择y等待安装完成。
查看是否已开放80端口,修改防火墙设置。某云需要修改安全组设置。
firewall-cmd --query-port=80/tcp
若返回no则未开放。
开放80端口命令:
firewall-cmd --zone=public --add-port=80/tcp --permanent
使设置生效:
firewall-cmd --reload
启动nginx
systemctl start nginx
查看运行状态
systemctl status nginx
会看到包含“ Active: active (running)”字样的成功提示。
设置开机自动启动
systemctl enable nginx
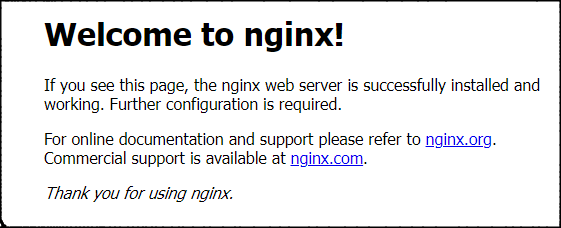
访问 http://服务器ip, 正常会是如下页面
修改nginx配置文件
cd /etc/nginx/conf.d
备份默认的配置文件
cp default.conf default.conf.bak
修改default.conf
vi default.conf
按"i"键,找到如下代码块,默认是注释状态,去掉#号,并修改为如下配置
    # pass the PHP scripts to FastCGI server listening on 127.0.0.1:9000
    #
    location ~ \.php$ {
        root           /usr/share/nginx/html/;
        fastcgi_pass   unix:/run/php-fpm/www.sock;
        fastcgi_index  index.php;
        fastcgi_param  SCRIPT_FILENAME  $document_root$fastcgi_script_name;
        include        fastcgi_params;
    }
fastcgi_pass对应php-fpm的监听配置, 配置文件为: /etc/php-fpm.d/www.conf,可查看验证。
; The address on which to accept FastCGI requests.
; Valid syntaxes are:
;   'ip.add.re.ss:port'    - to listen on a TCP socket to a specific IPv4 address on
;                            a specific port;
;   '[ip:6:addr:ess]:port' - to listen on a TCP socket to a specific IPv6 address on
;                            a specific port;
;   'port'                 - to listen on a TCP socket to all addresses
;                            (IPv6 and IPv4-mapped) on a specific port;
;   '/path/to/unix/socket' - to listen on a unix socket.
; Note: This value is mandatory.
listen = /run/php-fpm/www.sock
设置默认文件为index.php
    location / {
        root   /usr/share/nginx/html;
        index  index.php index.html index.htm;
    }
修改完毕后,按ESC,输入:wq保存并退出。
重启nginx:
systemctl restart nginx
nginx的默认网站目录在/usr/share/nginx/html/,访问并验证一下
cd /usr/share/nginx/html/
ll
可以看到两个html文件,即默认的“Welcome to nginx!”页面。
-rw-r--r--. 1 root root 494 5月  25 09:41 50x.html
-rw-r--r--. 1 root root 612 5月  25 09:41 index.html
可以删除默认的index.html文件
rm -r index.html
询问是否删除,输入y回车即可。
安装下载和解压工具,如果已安装则忽略
dnf install wget
dnf install tar
下载wordpress
wget https://cn.wordpress.org/latest-zh_CN.tar.gz
下载完成之后,解压
tar -zxvf latest-zh_CN.tar.gz
拷贝到当前目录
cp -R wordpress/* /usr/share/nginx/html/
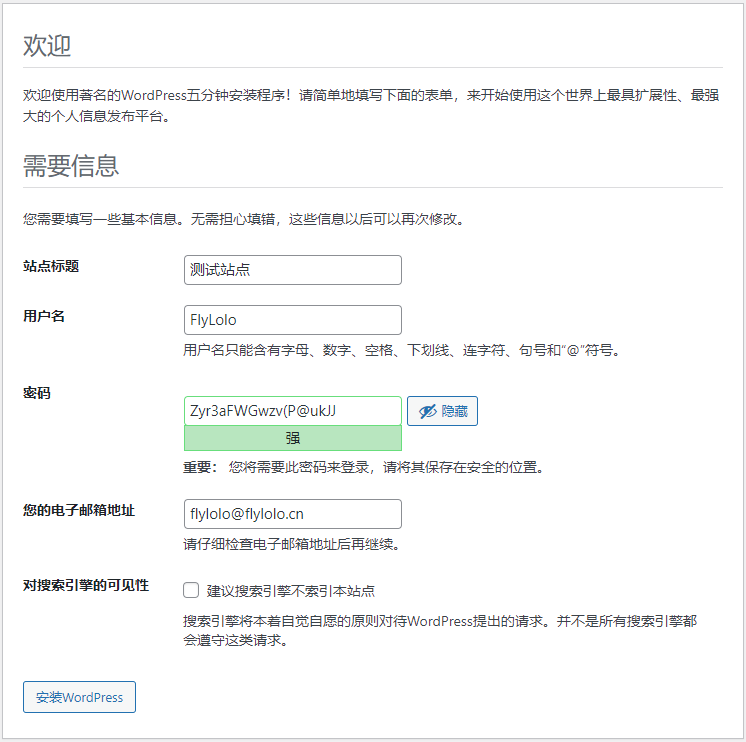
访问"http://服务器ip/wp-admin/install.php",可以看到如下页面:
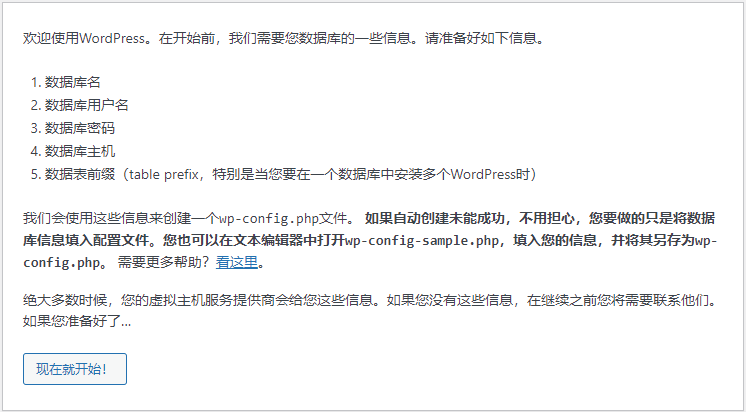
点击按钮开始配置:
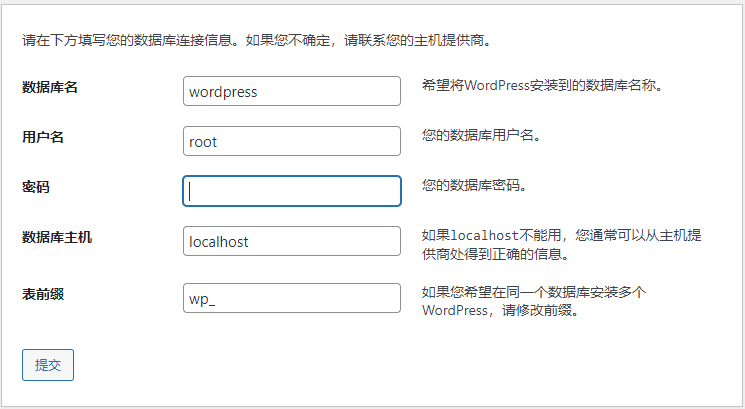
输入准备好的数据库相关信息。
如果提示无法写入wp-config.php,如下图
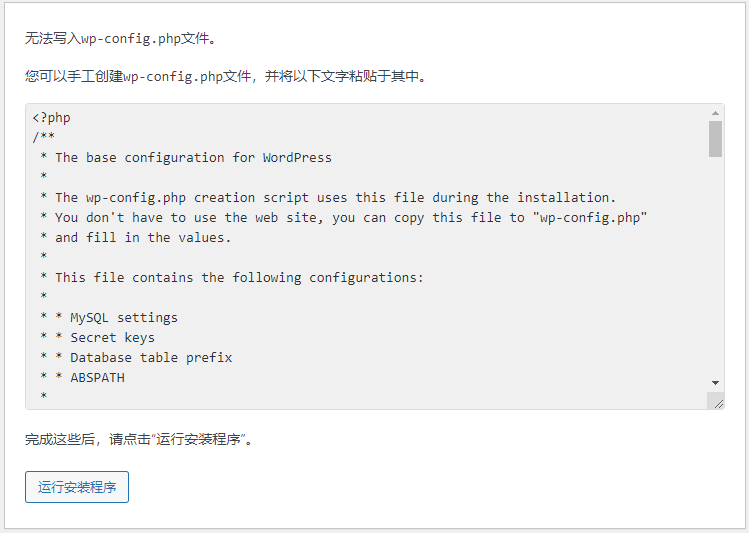
手动创建wp-config.php文件
cd /usr/share/nginx/html/
vi wp-config.php
按i键,粘贴网页中给出的文件内容。
按ESC,输入:wq回车保存。
继续安装,在新页面设置网站的相关信息
点击按钮开始安装。
安装成功后,访问http://服务器ip即可。
管理后台地址:http://服务器ip/wp-admin
以上就是今天要讲的内容,手把手讲述了一个个人博客网站的搭建,你学会了么。
Unity自动旋转动画1.开门需要门把手先动,门再动2.关门需要门先动,门把手再动3.中途播放过程中不可以再次进行操作觉得太复杂?查看我的文章开关门简易进阶版效果:如果这个门可以直接打开的话,就不需要放置"门把手"如果门把手还有钥匙需要旋转,那就可以把钥匙放在门把手的"门把手",理论上是可以无限套娃的可调整参数有:角度,反向,轴向,速度运行时点击Test进行测试自己写的代码比较垃圾,命名与结构比较拉,高手轻点喷,新手有类似的需求可以拿去做参考上代码usingSystem.Collections;usingSystem.Collections.Generic;usingUnityEngine;u
我正在为我的网站使用MiddlemanBloggem,但默认情况下,博客文章似乎需要位于/source中,这在查看vim中的树时并不是特别好并尝试在其中找到其他文件之一(例如模板)。通过查看文档,我看不出是否有任何方法可以移动博客文章,以便将它们存储在其他地方,例如blog_articles文件夹或类似文件夹。这可能吗? 最佳答案 将以下内容放入您的config.rb文件中。activate:blogdo|blog|blog.permalink=":year-:month-:day-:title.html"blog.sources=
我是Rails的新手,所以在这里需要一些帮助。我已经按照几个教程创建了一个带有评论甚至一些AJAX花哨功能的博客,我被困在一些我希望很容易的事情上。博客和评论的默认显示是先列出最早的。我如何反转它以在顶部显示最新条目和最新评论。真的不知道这是Controller还是模型的功能。我已经做了一些定制,所以如果有帮助的话,这里是Controller.rb文件的代码。评论ControllerclassCommentsController帖子管理员classPostsController[:index,:show]#GET/posts#GET/posts.xmldefindex@posts=Po
我是Ruby和Rails的新手,请多多包涵。我创建了一个非常简单的博客应用程序,其中包含帖子和评论。一切都很好。我的下一个问题是关于添加类别。我想知道最好的方法来做到这一点。由于我还没有看到太多关于Rails的东西,所以我想我会问的。明确地说,我希望一个帖子可以有多个类别,一个类别可以有多个帖子。最好的方法是创建一个“类别”表,然后使用帖子和类别模型来执行has_many:posts、has_many:categories吗?然后我还会设置routes.rb以便帖子嵌入类别下吗?或者有没有更简单的方法,只需在现有的帖子表中添加一个类别列?(在这种情况下,我想拥有多个类别会很困难)。
(二十二)-框架主入口main.py设计&log日志调用和生成1测试目的2测试需求3需求分析4详细设计4.1新建存放日志目录log4.1.1配置config.py中写入log的目录4.2`baseInfo.py`中加入日志4.3`test_gedit.py`中加入日志4.4主函数入口main.py中调用日志5调用日志主函数main.py源码6`baseInfo.py`源码7`test_gedit.py`源码8运行效果9目前框架结构1测试目的组织运行所有的测试用例,并调用日志模块,便于问题定位。
(1)为什么写这个话题(Why)读万卷书不如行千里路。这次搭建MQTT服务,遇到了一些误解,特此记录备忘。主要包括:(1)服务(Broker)的账户管理与网页管理平台的账户(2)与web应用的集成(Spring系)(2)ActiveMQ版本选择因为JAVA环境是JDK8,所以按兼容性考虑选择了ActiveMQ5.15的最后版本5.15.15。如果你是JDK11则可考虑ActiveMQ的最新版本5.17或5.18。ActiveMQ支持MQTTv3.1.1andv3.1。(3)ActiveMQ与web应用的集成主要介绍与Spring系的webapp集成(SpringBoot和SpringMVC)。
这篇文章,主要介绍如何使用SpringCloud微服务组件从0到1搭建一个微服务工程。目录一、从0到1搭建微服务工程1.1、基础环境说明(1)使用组件(2)微服务依赖1.2、搭建注册中心(1)引入依赖(2)配置文件(3)启动类1.3、搭建配置中心(1)引入依赖(2)配置文件(3)启动类1.4、搭建API网关(1)引入依赖(2)配置文件(3)启动类1.5、搭建服务提供者(1)引入依赖(2)配置文件(3)启动类1.6、搭建服务消费者(1)引入依赖(2)配置文件(3)启动类1.7、运行测试一、从0到1搭建微服务工程1.1、基础环境说明(1)使用组件这里主要是使用的SpringCloudNetflix
一、介绍一下vercelvercel是一个站点托管平台,提供CDN加速,同类的平台有Netlify和GithubPages,相比之下,vercel国内的访问速度更快,并且提供Production环境和development环境,对于项目开发非常的有用的,并且支持持续集成,一次push或者一次PR会自动化构建发布,发布在development环境,都会生成不一样的链接可供预览。但是vercel只是针对个人用户免费,teams是收费的首先vercel零配置部署,第二访问速度比github-page好很多,并且构建很快,还是免费使用的,对于部署个人前端项目路、接口服务非常方便vercel类似于git
存在哪些支持Rack的博客引擎?我想将一个免费博客部署到heroku并且需要比Wordpress.com或Blogerty提供的免费托管更多的可定制性。另外在另一篇文章中,有没有人尝试将Wordpress移植到Ruby? 最佳答案 以任何特殊顺序:==基于Racktotoruby-slippers基于toto==基于JekyllJekyllitselfOctopress在jekyll中写博客spinto杰基尔cmsprose杰基尔cms==基于Railstypo最古老的活跃之一,具有更多功能但更复杂enki对于黑客,基本代码simp
ChatGPT是一款引人注目的产品,它的突破性功能在各个领域都创造了巨大的需求。仅在发布后的两个月内,就累计了超过1亿的用户。它最突出的功能是能够在几秒钟内完成各种文案创作,包括论文、歌曲、诗歌、睡前故事和散文等。与流行的观点相反,ChatGPT可以做的不仅仅是为你写一篇文章,更有用的是它如何帮助指导您的写作过程和写作方法。接下来手把手教你利用ChatGPT辅助完成写作的五种方法。1.使用ChatGPT生成论文的观点在开始写作之前,我们需要让ChatGPT帮我们充实想法,找到论文切入点。当老师布置论文时,通常会给予学生一个提示,让他们可以自由地表达和分析。这时,我们需要找到论文的角度和思路,然