Tomcat启动分析,Spring容器初始化,Tomcat如何关联Spring容器?
(1)创建Maven程序,创建SpringBoot环境
(2)pom.xml导入SpringBoot的父工程和依赖
<!--导入SpringBoot父工程-规定写法-->
<parent>
    <artifactId>spring-boot-starter-parent</artifactId>
    <groupId>org.springframework.boot</groupId>
    <version>2.5.3</version>
</parent>
<dependencies>
    <!--导入web项目场景启动器:会自动导入和web开发相关的所有依赖[jar包]-->
    <dependency>
        <groupId>org.springframework.boot</groupId>
        <artifactId>spring-boot-starter-web</artifactId>
    </dependency>
</dependencies>
(3)创建主程序MainApp.java
package com.li.springboot;
import org.springframework.boot.SpringApplication;
import org.springframework.boot.autoconfigure.SpringBootApplication;
import org.springframework.context.ConfigurableApplicationContext;
/**
* @author 李
* @version 1.0
*/
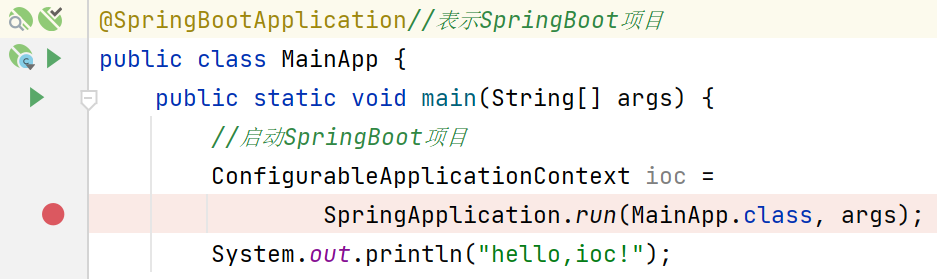
@SpringBootApplication//表示SpringBoot项目
public class MainApp {
public static void main(String[] args) {
//启动SpringBoot项目
ConfigurableApplicationContext ioc =
SpringApplication.run(MainApp.class, args);
}
}
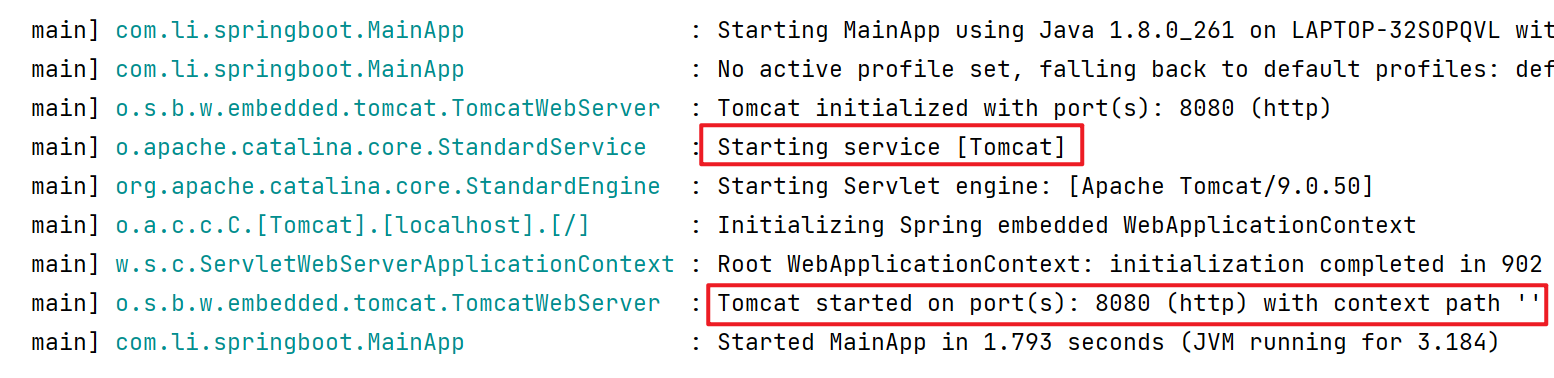
(4)启动项目,我们可以注意到Tomcat也随之启动了。
问题一:当我们执行run方法时,为什么会启动我们内置的tomcat?它的底层是如何实现的?
我们知道,如果在一个类上添加了注解@Configuration,那么这个类就会变成配置类;配置类中通过@Bean注解,可以将方法中 new 出来的Bean对象注入到容器中,该bean对象的id默认为方法名。
配置类本身也会作为bean注入到容器中


容器初始化的底层机制仍然是我们之前分析的Spring容器的机制(IO/文件扫描+注解+反射+集合+映射)
对比:
由前面的例子1中可以看到,当启动SpringBoot时,tomcat也会随之启动。那么问题来了:
SpringApplication.run()方法会完成两个重要任务:
(1)创建一个控制器
package com.li.springboot.controller;

import org.springframework.web.bind.annotation.RequestMapping;
import org.springframework.web.bind.annotation.RestController;

/**
 * @author 李
 * @version 1.0
 * HiController被标注后,作为一个控制器注入容器中
 */
@RestController//相当于@Controller+@ResponseBody
public class HiController {

    @RequestMapping("/hi")
    public String hi() {
        return "hi,HiController";
    }
}
(2)启动主程序MainApp.java,进行debug
(3)首先进入SpringApplication.java的run方法
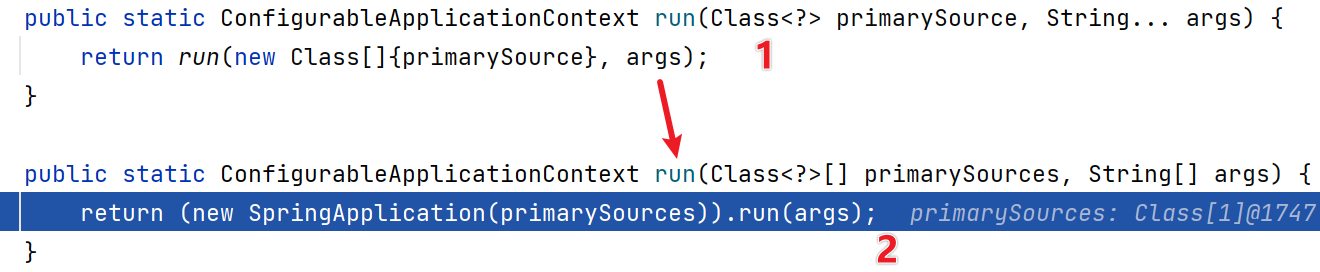
(4)点击step into,进入如下方法
public ConfigurableApplicationContext run(String... args) {
    ...
    try {
        ...
        context = this.createApplicationContext();//严重分析,创建容器
        context.setApplicationStartup(this.applicationStartup);
        this.prepareContext(bootstrapContext, context, environment, listeners, applicationArguments, printedBanner);
        this.refreshContext(context);//刷新应用上下文,比如初始化默认设置/注入相关bean/启动Tomcat
        this.afterRefresh(context, applicationArguments);
        stopWatch.stop();
        ...

    } catch (Throwable var10) {...}
    ...
}
(5)分别对 **createApplicationContext() **和 refreshContext(context) 方法进行分析:
(5.1)step into 进入 **createApplicationContext() ** 方法中:
//springApplication.java
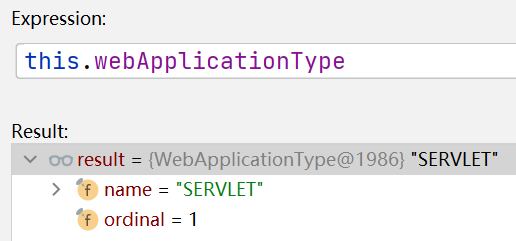
//容器类型很多,会根据你的this.webApplicationType创建对应的容器,默认this.webApplicationType
//的类型为SERVLET,也就是web容器(可以处理servlet)
protected ConfigurableApplicationContext createApplicationContext() {
return this.applicationContextFactory.create(this.webApplicationType);
}
(5.2)点击进入下一层
//接口 ApplicationContextFactory.java

//该方法根据webApplicationType创建不同的容器
ApplicationContextFactory DEFAULT = (webApplicationType) -> {
    try {
        switch(webApplicationType) {
        case SERVLET://默认进入这一分支,返回
                //AnnotationConfigServletWebServerApplicationContext容器
            return new AnnotationConfigServletWebServerApplicationContext();
        case REACTIVE:
            return new AnnotationConfigReactiveWebServerApplicationContext();
        default:
            return new AnnotationConfigApplicationContext();
        }
    } catch (Exception var2) {
        throw new IllegalStateException("Unable create a default ApplicationContext instance, you may need a custom ApplicationContextFactory", var2);
    }
};
总结:createApplicationContext()方法中创建了容器,但是还没有将bean注入到容器中。
(5.3)step into 进入 refreshContext(context) 方法中:
//springApplication.java
private void refreshContext(ConfigurableApplicationContext context) {
    if (this.registerShutdownHook) {
        shutdownHook.registerApplicationContext(context);
    }

    this.refresh(context);//核心,真正执行相关任务
}
(5.4)在this.refresh(context);这一步进入下一层:
//springApplication.java
protected void refresh(ConfigurableApplicationContext applicationContext) {
    applicationContext.refresh();
}
(5.5)继续进入下一层:
protected void refresh(ConfigurableApplicationContext applicationContext) {
    applicationContext.refresh();
}
(5.6)继续进入下一层:
//ServletWebServerApplicationContext.java
public final void refresh() throws BeansException, IllegalStateException {
    try {
        super.refresh();
    } catch (RuntimeException var3) {
        WebServer webServer = this.webServer;
        if (webServer != null) {
            webServer.stop();
        }

        throw var3;
    }
}
(5.7)在super.refresh();这一步进入下一层:
//AbstractApplicationContext.java

@Override
public void refresh() throws BeansException, IllegalStateException {
   synchronized (this.startupShutdownMonitor) {
      StartupStep contextRefresh = this.applicationStartup.start("spring.context.refresh");
     ...
      try {
        ...
         // Initialize other special beans in specific context subclasses.
         //在上下文的子类初始化指定的bean
         onRefresh(); //当父类完成通用的工作后,再重新用动态绑定机制回到子类
        ...
      }

      catch (BeansException ex) {...}

      finally {...}
   }
}
(5.8)在onRefresh();这一步step into,会重新返回上一层:
//ServletWebServerApplicationContext.java
protected void onRefresh() {
    super.onRefresh();

    try {
        this.createWebServer();//创建一个webserver,可以理解成创建我们指定的web服务-Tomcat
    } catch (Throwable var2) {
        throw new ApplicationContextException("Unable to start web server", var2);
    }
}
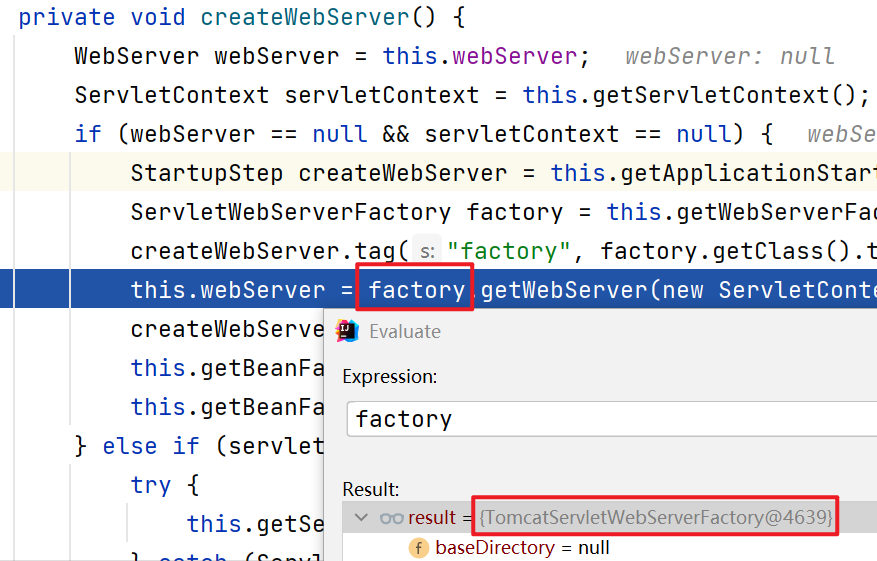
(5.9)在this.createWebServer();这一步step into:
//ServletWebServerApplicationContext.java

private void createWebServer() {
    WebServer webServer = this.webServer;
    ServletContext servletContext = this.getServletContext();
    if (webServer == null && servletContext == null) {
        StartupStep createWebServer = this.getApplicationStartup().start("spring.boot.webserver.create");
        ServletWebServerFactory factory = this.getWebServerFactory();
        createWebServer.tag("factory", factory.getClass().toString());
        this.webServer = factory.getWebServer(new ServletContextInitializer[]{this.getSelfInitializer()});//使用TomcatServletWebServerFactory创建一个TomcatWebServer
        createWebServer.end();
        this.getBeanFactory().registerSingleton("webServerGracefulShutdown", new WebServerGracefulShutdownLifecycle(this.webServer));
        this.getBeanFactory().registerSingleton("webServerStartStop", new WebServerStartStopLifecycle(this, this.webServer));
    } else if (servletContext != null) {
        try {
            this.getSelfInitializer().onStartup(servletContext);
        } catch (ServletException var5) {
            throw new ApplicationContextException("Cannot initialize servlet context", var5);
        }
    }

    this.initPropertySources();
}
(5.10)在this.webServer = factory.getWebServer(new ServletContextInitializer[]{this.getSelfInitializer()});这一步step into:
//TomcatServletWebServerFactory.java会创建Tomcat,并启动Tomcat

public WebServer getWebServer(ServletContextInitializer... initializers) {
    if (this.disableMBeanRegistry) {
        Registry.disableRegistry();
    }

    Tomcat tomcat = new Tomcat();//创建了Tomcat对象,下面是一系列的初始化任务
    File baseDir = this.baseDirectory != null ? this.baseDirectory : this.createTempDir("tomcat");
    tomcat.setBaseDir(baseDir.getAbsolutePath());
    Connector connector = new Connector(this.protocol);
    connector.setThrowOnFailure(true);
    tomcat.getService().addConnector(connector);
    this.customizeConnector(connector);
    tomcat.setConnector(connector);
    tomcat.getHost().setAutoDeploy(false);
    this.configureEngine(tomcat.getEngine());
    Iterator var5 = this.additionalTomcatConnectors.iterator();

    while(var5.hasNext()) {
        Connector additionalConnector = (Connector)var5.next();
        tomcat.getService().addConnector(additionalConnector);
    }

    this.prepareContext(tomcat.getHost(), initializers);
    return this.getTomcatWebServer(tomcat);
}
(5.11)在return this.getTomcatWebServer(tomcat);这一步step into:
//TomcatServletWebServerFactory.java

//这里做了端口校验,创建了TomcatWebServer
protected TomcatWebServer getTomcatWebServer(Tomcat tomcat) {
    return new TomcatWebServer(tomcat, this.getPort() >= 0, this.getShutdown());
}
(5.12)继续step into进入下一层
//TomcatServletWebServerFactory.java

public TomcatWebServer(Tomcat tomcat, boolean autoStart, Shutdown shutdown) {
    this.monitor = new Object();
    this.serviceConnectors = new HashMap();
    Assert.notNull(tomcat, "Tomcat Server must not be null");
    this.tomcat = tomcat;
    this.autoStart = autoStart;
    this.gracefulShutdown = shutdown == Shutdown.GRACEFUL ? new GracefulShutdown(tomcat) : null;
    this.initialize();//进行初始化,并启动tomcat
}
(5.13)this.initialize();继续step into:
//TomcatServletWebServerFactory.java

private void initialize() throws WebServerException {
    logger.info("Tomcat initialized with port(s): " + this.getPortsDescription(false));
    synchronized(this.monitor) {
        try {
            this.addInstanceIdToEngineName();
            Context context = this.findContext();
            context.addLifecycleListener((event) -> {
                if (context.equals(event.getSource()) && "start".equals(event.getType())) {
                    this.removeServiceConnectors();
                }

            });
            this.tomcat.start();//启动Tomcat!
            this.rethrowDeferredStartupExceptions();

            try {
                ContextBindings.bindClassLoader(context, context.getNamingToken(), this.getClass().getClassLoader());
            } catch (NamingException var5) {
            }

            this.startDaemonAwaitThread();
        } catch (Exception var6) {
            this.stopSilently();
            this.destroySilently();
            throw new WebServerException("Unable to start embedded Tomcat", var6);
        }

    }
}
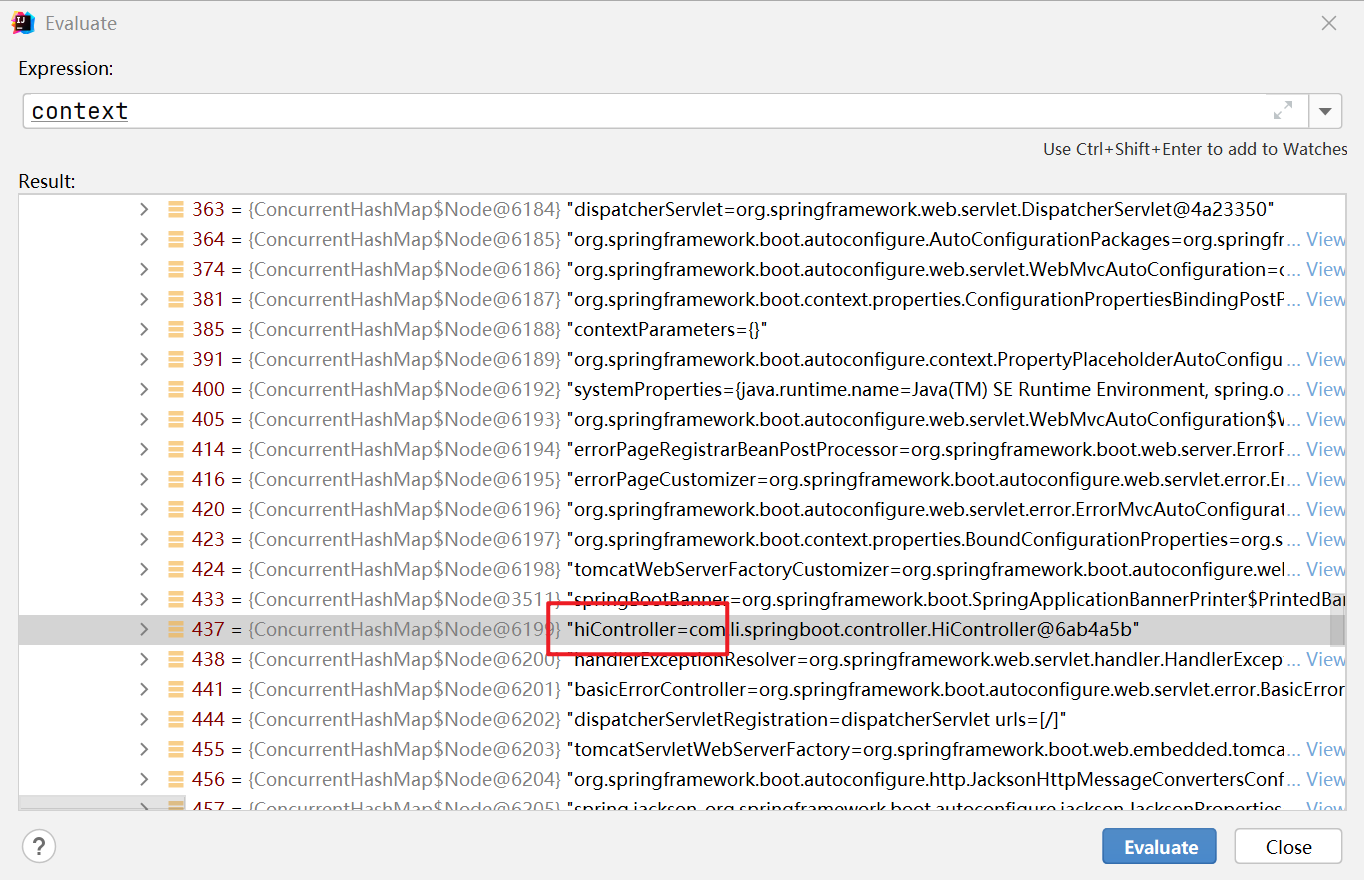
(6)一路返回上层,然后终于执行完refreshContext(context)方法,此时context为已经注入了bean
我有一个任务列表(名称、starts_at),我试图在每日View中显示它们(就像iCal)。deftodays_tasks(day)Task.find(:all,:conditions=>["starts_atbetween?and?",day.beginning,day.ending]end我不知道如何将Time.now(例如“2009-04-1210:00:00”)动态转换为一天的开始(和结束),以便进行比较。 最佳答案 deftodays_tasks(now=Time.now)Task.find(:all,:conditio
目录0专栏介绍1平面2R机器人概述2运动学建模2.1正运动学模型2.2逆运动学模型2.3机器人运动学仿真3动力学建模3.1计算动能3.2势能计算与动力学方程3.3动力学仿真0专栏介绍?附C++/Python/Matlab全套代码?课程设计、毕业设计、创新竞赛必备!详细介绍全局规划(图搜索、采样法、智能算法等);局部规划(DWA、APF等);曲线优化(贝塞尔曲线、B样条曲线等)。?详情:图解自动驾驶中的运动规划(MotionPlanning),附几十种规划算法1平面2R机器人概述如图1所示为本文的研究本体——平面2R机器人。对参数进行如下定义:机器人广义坐标
网站的日志分析,是seo优化不可忽视的一门功课,但网站越大,每天产生的日志就越大,大站一天都可以产生几个G的网站日志,如果光靠肉眼去分析,那可能看到猴年马月都看不完,因此借助网站日志分析工具去分析网站日志,那将会使网站日志分析工作变得更简单。下面推荐两款网站日志分析软件。第一款:逆火网站日志分析器逆火网站日志分析器是一款功能全面的网站服务器日志分析软件。通过分析网站的日志文件,不仅能够精准的知道网站的访问量、网站的访问来源,网站的广告点击,访客的地区统计,搜索引擎关键字查询等,还能够一次性分析多个网站的日志文件,让你轻松管理网站。逆火网站日志分析器下载地址:https://pan.baidu.
什么是0day漏洞?0day漏洞,是指已经被发现,但是还未被公开,同时官方还没有相关补丁的漏洞;通俗的讲,就是除了黑客,没人知道他的存在,其往往具有很大的突发性、破坏性、致命性。0day漏洞之所以称为0day,正是因为其补丁永远晚于攻击。所以攻击者利用0day漏洞攻击的成功率极高,往往可以达到目的并全身而退,而防守方却一无所知,只有在漏洞公布之后,才后知后觉,却为时已晚。“后知后觉、反应迟钝”就是当前安全防护面对0day攻击的真实写照!为了方便大家理解,中科三方为大家梳理当前安全防护模式下,一个漏洞从发现到解决的三个时间节点:T0:此时漏洞即0day漏洞,是已经被发现,还未被公开,官方还没有相
一、机器人介绍 此处是基于MATLABRVC工具箱,对ABB-IRB-1200型号的微型机械臂进行正逆向运动学分析,并利Simulink工具实现对机械臂进行具有动力学参数的末端轨迹规划仿真,最后根据机械模型设计Simulink-Adams联合仿真。 图1.ABBIRB 1200尺寸参数示意图ABBIRB 1200提供的两种型号广泛适用于各作业,且两者间零部件通用,两种型号的工作范围分别为700 mm 和 900 mm,大有效负载分别为 7 kg 和5 kg。 IRB 1200 能够在狭小空间内能发挥其工作范围与性能优势,具有全新的设计、小型化的体积、高效的性能、易于集成、便捷的接
目录一.大致如下常见问题:(1)找不到程序所依赖的Qt库version`Qt_5'notfound(requiredby(2)CouldnotLoadtheQtplatformplugin"xcb"in""eventhoughitwasfound(3)打包到在不同的linux系统下,或者打包到高版本的相同系统下,运行程序时,直接提示段错误即segmentationfault,或者Illegalinstruction(coredumped)非法指令(4)ldd应用程序或者库,查看运行所依赖的库时,直接报段错误二.问题逐个分析,得出解决方法:(1)找不到程序所依赖的Qt库version`Qt_5'
我想使用ruby-prof和JMeter分析Rails应用程序。我对分析特定Controller/操作/或模型方法的建议方法不感兴趣,我想分析完整堆栈,从上到下。所以我运行这样的东西:RAILS_ENV=productionruby-prof-fprof.outscript/server>/dev/null然后我在上面运行我的JMeter测试计划。然而,问题是使用CTRL+C或SIGKILL中断它也会在ruby-prof可以写入任何输出之前杀死它。如何在不中断ruby-prof的情况下停止mongrel服务器? 最佳答案
ruby1.9.3dev(2011-09-23修订版33323)[i686-linux]轨道3.0.20最近为什么在与DateTimeonRails相关的RSpecs项目上工作我发现在给定日期以下语句发出的值date.end_of_day.to_datetime和date.to_datetime.end_of_day虽然它们表示相同的日期时间,但比较时返回false。为了确认这一点,我打开了Rails控制台并尝试了以下操作1.9.3dev:053>monday=Time.now.monday=>2013-02-2500:00:00+05301.9.3dev:054>monday.cla
文章目录认识unity打包目录结构游戏逆向流程Unity游戏攻击面可被攻击原因mono的打包建议方案锁血飞天无限金币攻击力翻倍以上统称内存挂透视自瞄压枪瞬移内购破解Unity游戏防御开发时注意数据安全接入第三方反作弊系统外挂检测思路狠人自爆实战查看目录结构用il2cppdumper例子2-森林whoishe后记认识unity打包目录结构dll一般很大,因为里面是所有的游戏功能编译成的二进制码游戏逆向流程开发人员代码被编译打包到GameAssembly.dll中使用il2ppDumper工具,并借助游戏名_Data\il2cpp_data\Metadata\global-metadata.dat
在笔者前面有一篇文章《驱动开发:断链隐藏驱动程序自身》通过摘除驱动的链表实现了断链隐藏自身的目的,但此方法恢复时会触发PG会蓝屏,偶然间在网上找到了一个作者介绍的一种方法,觉得有必要详细分析一下他是如何实现的进程隐藏的,总体来说作者的思路是最终寻找到MiProcessLoaderEntry的入口地址,该函数的作用是将驱动信息加入链表和移除链表,运用这个函数即可动态处理驱动的添加和移除问题。MiProcessLoaderEntry(pDriverObject->DriverSection,1)添加MiProcessLoaderEntry(pDriverObject->DriverSection,