使用MediaPipe工具包进行开发
MediaPipe是一款由Google Research 开发并开源的多媒体机器学习模型应用框架,用于处理视频、音频等时间序列数据。这个跨平台架构使用于桌面/服务器、Android、iOS和嵌入式设备等。
我们使用MeidaPipe下的Solutions(方案特定的模型),共有16个Solutions:
1.solutions.pose
import mediapipe as mp
mp_pose = mp.solutions.pose
mediapipe姿态估计模块(.solutions.pose),将人体各个部位分成33个点(0-32)如下图1.
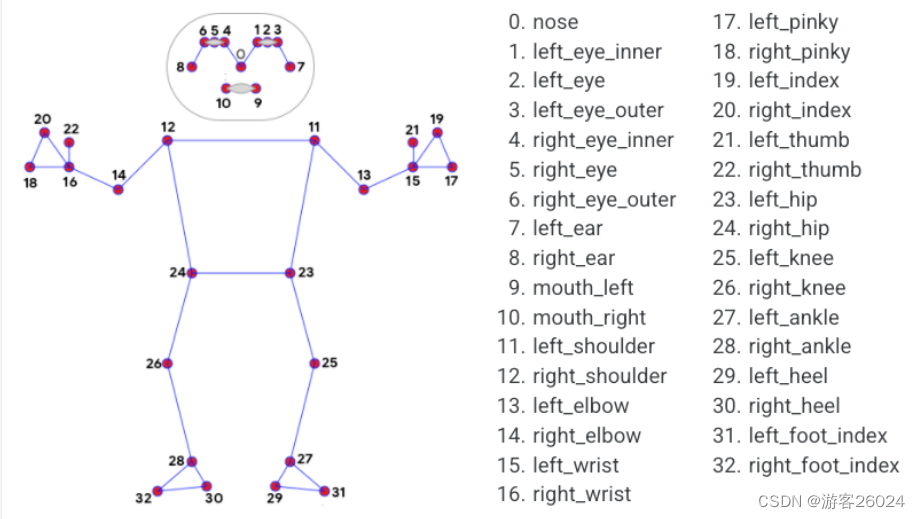
图1.
通常可以通过判断角度,来判断姿态是什么动作。如下图2. (具体动作识别判断:采集不同动作下的图片,然后通过姿态检测,根据角度对图像进行标注,将大量图像作为训练集进行学习,完成姿态行为识别判断。)
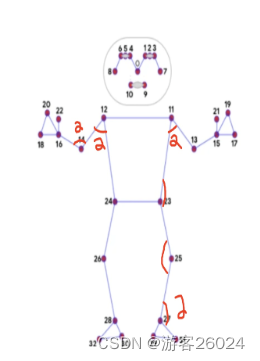
图2.
2.mp_pose.Pose()其参数:
static_image_mode 表示 静态图像还是连续帧视频
model_complexity 表示 人体姿态估计模型; 0 表示 速度最快,精度最低(三者之中);1 表示 速度中间,精度中间(三者之中);2 表示 速度最慢,精度最高(三者之中);
smooth_landmarks 表示 是否平滑关键点;
enable_segmentation 表示 是否对人体进行抠图;
min_detection_confidence 表示 检测置信度阈值;
min_tracking_confidence 表示 各帧之间跟踪置信度阈值;
 pose = mp_pose.Pose(static_image_mode=True,
                        model_complexity=1,
                        smooth_landmarks=True,
                        enable_segmentation=True,
                        min_detection_confidence=0.5,
                        min_tracking_confidence=0.5)
3.solutions.drawing_utils
绘图(可以绘制3D坐标,也可以直接在原图上绘制关键点,姿态)
drawing = mp.solutions.drawing_utils
...
drawing.draw_landmarks(img, results.pose_landmarks, mp_pose.POSE_CONNECTIONS)(原图基础上显示关键点,姿态)
drawing.plot_landmarks(results.pose_world_landmarks, mp_pose.POSE_CONNECTIONS)(3D)
之后的代码就是opencv相关
import cv2
import mediapipe as mp

if __name__ == '__main__':
    mp_pose = mp.solutions.pose
    pose = mp_pose.Pose(static_image_mode=True,
                        model_complexity=1,
                        smooth_landmarks=True,
                        # enable_segmentation=True,
                        min_detection_confidence=0.5,
                        min_tracking_confidence=0.5)
    drawing = mp.solutions.drawing_utils

    # read img BGR to RGB
    img = cv2.imread("1.jpg")
    img = cv2.cvtColor(img, cv2.COLOR_BGR2RGB)
    cv2.imshow("input", img)

    results = pose.process(img)
    drawing.draw_landmarks(img, results.pose_landmarks, mp_pose.POSE_CONNECTIONS)
    cv2.imshow("keypoint", img)

    drawing.plot_landmarks(results.pose_world_landmarks, mp_pose.POSE_CONNECTIONS)

    cv2.waitKey(0)
    cv2.destroyAllWindows()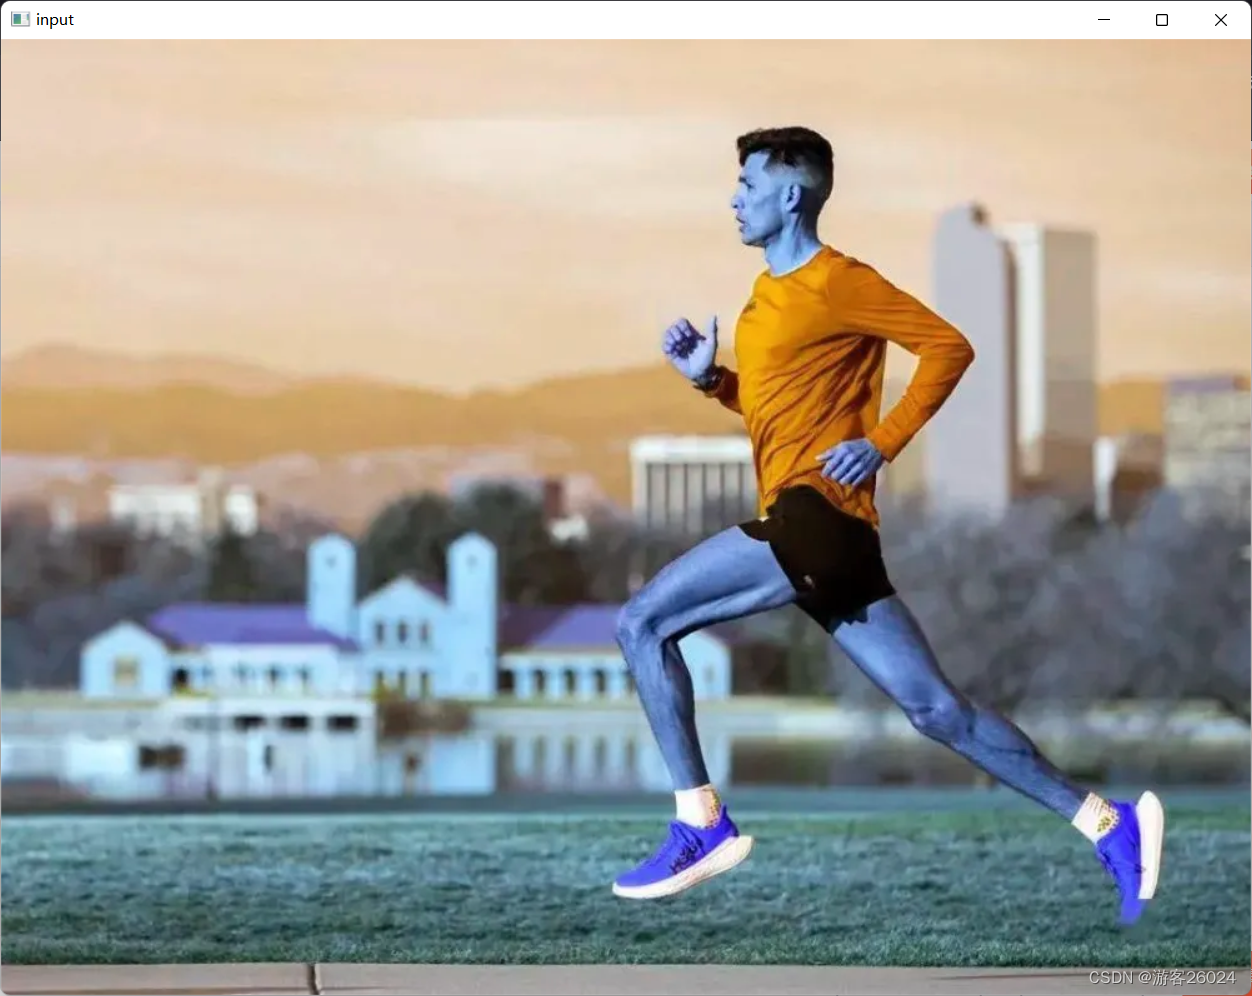
原图
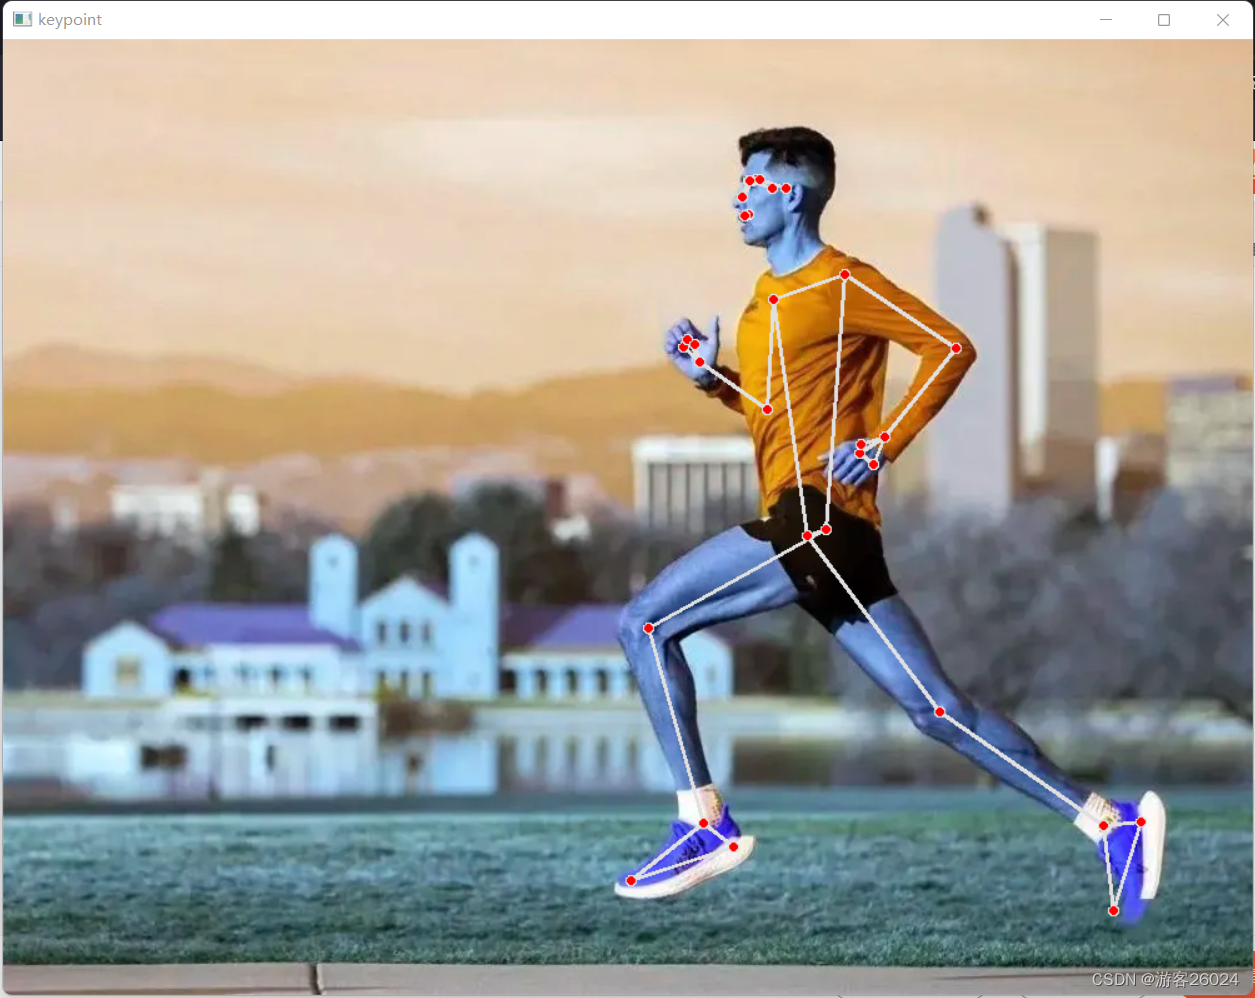
原图基础上显示关键点
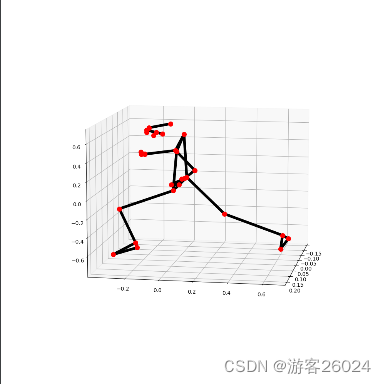
3D坐标
还是拿这个正在跑步的人举例。
代码
import cv2
import mediapipe as mp
import matplotlib.pyplot as plt

mp_pose = mp.solutions.pose

pose = mp_pose.Pose(static_image_mode=False,
                    model_complexity=0,
                    smooth_landmarks=True,
                    enable_segmentation=True,
                    min_detection_confidence=0.5,
                    min_tracking_confidence=0.5)
drawing = mp.solutions.drawing_utils

if __name__ == '__main__':
    img = cv2.imread('1.jpg')
    results = pose.process(img)
    print(results.pose_landmarks)
# results.pose_landmarks其中 所有关键点的检测结果可以从 results.pose_landmarks 看到如下;这是归一化之后的结果,若要还原,x得乘以宽度得到像素坐标;y得乘以高度得到像素坐标;z坐标的原点在人体左右两个髋关节的中点,方向如果离越近为负值,越远为正值。
landmark {
  x: 0.5913416743278503
  y: 0.17020824551582336
  z: -0.10148811340332031
  visibility: 0.9999819993972778
}
landmark {
  x: 0.5996149778366089
  y: 0.15227100253105164
  z: -0.11516246944665909
  visibility: 0.9999804496765137
}
landmark {
  x: 0.6029789447784424
  y: 0.15230441093444824
  z: -0.1152396947145462
  visibility: 0.9999819993972778
}
landmark {
  x: 0.6068712472915649
  y: 0.15244033932685852
  z: -0.11535673588514328
  visibility: 0.9999862909317017
}
landmark {
  x: 0.5956720113754272
  y: 0.15167823433876038
  z: -0.07190258055925369
  visibility: 0.9999619722366333
}
landmark {
  x: 0.5958214998245239
  y: 0.1511225700378418
  z: -0.07187224179506302
  visibility: 0.9999505281448364
}
landmark {
  x: 0.5961448550224304
  y: 0.15046393871307373
  z: -0.07175181061029434
  visibility: 0.9999566078186035
}
landmark {
  x: 0.6275932788848877
  y: 0.16257867217063904
  z: -0.12434940785169601
  visibility: 0.9999855756759644
}
landmark {
  x: 0.612525463104248
  y: 0.15917572379112244
  z: 0.07216572016477585
  visibility: 0.9999306201934814
}
landmark {
  x: 0.5972875952720642
  y: 0.1862889975309372
  z: -0.10227096825838089
  visibility: 0.9999692440032959
}
landmark {
  x: 0.592987596988678
  y: 0.18590152263641357
  z: -0.04587363451719284
  visibility: 0.9999159574508667
}
landmark {
  x: 0.6709297895431519
  y: 0.25625985860824585
  z: -0.19476133584976196
  visibility: 0.9999887943267822
}
landmark {
  x: 0.6155267357826233
  y: 0.27312740683555603
  z: 0.23764272034168243
  visibility: 0.9998886585235596
}
landmark {
  x: 0.76192706823349
  y: 0.32696548104286194
  z: -0.23866404592990875
  visibility: 0.9991742968559265
}
landmark {
  x: 0.6149069666862488
  y: 0.37373778223991394
  z: 0.3292929530143738
  visibility: 0.2991478443145752
}
landmark {
  x: 0.7010799646377563
  y: 0.4162237048149109
  z: -0.18799468874931335
  visibility: 0.9904139637947083
}
landmark {
  x: 0.5629619359970093
  y: 0.34696149826049805
  z: 0.2674705684185028
  visibility: 0.40632331371307373
}
landmark {
  x: 0.6892314553260803
  y: 0.43785160779953003
  z: -0.21043820679187775
  visibility: 0.9691246151924133
}
landmark {
  x: 0.5501535534858704
  y: 0.334354966878891
  z: 0.26719772815704346
  visibility: 0.36899450421333313
}
landmark {
  x: 0.6795801520347595
  y: 0.4296255111694336
  z: -0.19730502367019653
  visibility: 0.9676418304443359
}
landmark {
  x: 0.5508479475975037
  y: 0.3242868185043335
  z: 0.23829618096351624
  visibility: 0.37453970313072205
}
landmark {
  x: 0.6808692216873169
  y: 0.4231947660446167
  z: -0.17752741277217865
  visibility: 0.9631088972091675
}
landmark {
  x: 0.555029034614563
  y: 0.3278791904449463
  z: 0.2512615919113159
  visibility: 0.3893350064754486
}
landmark {
  x: 0.6576938033103943
  y: 0.5196953415870667
  z: -0.14214162528514862
  visibility: 0.9999549388885498
}
landmark {
  x: 0.6405556797981262
  y: 0.5202372074127197
  z: 0.14222070574760437
  visibility: 0.9999477863311768
}
landmark {
  x: 0.5241203904151917
  y: 0.6201881766319275
  z: -0.15834815800189972
  visibility: 0.9693808555603027
}
landmark {
  x: 0.7318142056465149
  y: 0.6902449727058411
  z: 0.11025446653366089
  visibility: 0.9495575428009033
}
landmark {
  x: 0.5604070425033569
  y: 0.815612256526947
  z: -0.03564663231372833
  visibility: 0.9501809477806091
}
landmark {
  x: 0.8767399191856384
  y: 0.8223288655281067
  z: 0.1430264711380005
  visibility: 0.9820705652236938
}
landmark {
  x: 0.5801612138748169
  y: 0.8386951684951782
  z: -0.026119956746697426
  visibility: 0.9103515148162842
}
landmark {
  x: 0.8959819078445435
  y: 0.875182569026947
  z: 0.14569874107837677
  visibility: 0.9787982106208801
}
landmark {
  x: 0.5071742534637451
  y: 0.875374436378479
  z: -0.06918345391750336
  visibility: 0.9140819907188416
}
landmark {
  x: 0.88722825050354
  y: 0.9008339643478394
  z: 0.09929685294628143
  visibility: 0.9545168280601501
}
调用
print(mp_pose.POSE_CONNECTIONS)

# mp_pose.POSE_CONNECTIONS
mp_pose.POSE_CONNECTIONS表示人体33个关键点如何连接的骨架
frozenset({(15, 21),
           (16, 20),
           (18, 20),
           (3, 7),
           (14, 16),
           (23, 25),
           (28, 30),
           (11, 23),
           (27, 31),
           (6, 8),
           (15, 17),
           (24, 26),
           (16, 22),
           (4, 5),
           (5, 6),
           (29, 31),
           (12, 24),
           (23, 24),
           (0, 1),
           (9, 10),
           (1, 2),
           (0, 4),
           (11, 13),
           (30, 32),
           (28, 32),
           (15, 19),
           (16, 18),
           (25, 27),
           (26, 28),
           (12, 14),
           (17, 19),
           (2, 3),
           (11, 12),
           (27, 29),
           (13, 15)})
调用
print(results.pose_landmarks.landmark[mp_pose.PoseLandmark.LEFT_EYE])
print(results.pose_landmarks.landmark[2])

# results.pose_landmarks.landmark[mp_pose.PoseLandmark.LEFT_EYE]
# or
# results.pose_landmarks.landmark[2]
查看左眼属性
x: 0.6029789447784424
y: 0.15230441093444824
z: -0.1152396947145462
visibility: 0.9999819993972778
调用左眼的x轴
print(results.pose_landmarks.landmark[2].x)

# results.pose_landmarks.landmark[2].x
查看左眼的x轴
0.6029789447784424还原左眼像素
    height, width, channels = img.shape
    print("x:{},y:{}".format(results.pose_landmarks.landmark[2].x * width,
                             results.pose_landmarks.landmark[2].y * height))

#(results.pose_landmarks.landmark[2].x * width,results.pose_landmarks.landmark[2].y * height)
查看左眼像素
x:602.9789447784424,y:116.5128743648529获取左眼真实坐标 (真实坐标位于人体左右两个髋关节的中点)
print(results.pose_world_landmarks.landmark[2])

# results.pose_world_landmarks.landmark[2]
查看
x: -0.1573336124420166
y: -0.6765229105949402
z: -0.09651455283164978
visibility: 0.9999819993972778核心思想都是将谷歌的pose_landmarks.landmark坐标提取出来,处理成python的列表数据格式
有两种方式获取三维坐标,可以测得每种方式的FPS
1.map
import time

import cv2
import numpy as np
import mediapipe as mp

mp_pose = mp.solutions.pose

pose = mp_pose.Pose(static_image_mode=False,
                    model_complexity=0,
                    smooth_landmarks=True,
                    enable_segmentation=True,
                    min_detection_confidence=0.5,
                    min_tracking_confidence=0.5)
drawing = mp.solutions.drawing_utils

# 提取x,y,z坐标
def get_x(each):
    return each.x

def get_y(each):
    return each.y

def get_z(each):
    return each.z


if __name__ == '__main__':
    t0 = time.time()
    img = cv2.imread('1.jpg')
    img = cv2.cvtColor(img, cv2.COLOR_BGR2RGB)
    results = pose.process(img)
    drawing.draw_landmarks(img, results.pose_landmarks, mp_pose.POSE_CONNECTIONS)
    coords = np.array(results.pose_landmarks.landmark)

    x = np.array(list(map(get_x, coords)))
    y = np.array(list(map(get_y, coords)))
    z = np.array(list(map(get_z, coords)))

    point = np.vstack((x, y, z)).T
    print("FPS: {}".format(str(int(1 / (time.time() - t0)))))
    print(point)
运行结果
FPS: 4
[[ 0.59134167  0.17020825 -0.10148811]
 [ 0.59961498  0.152271   -0.11516247]
 [ 0.60297894  0.15230441 -0.11523969]
 [ 0.60687125  0.15244034 -0.11535674]
 [ 0.59567201  0.15167823 -0.07190258]
 [ 0.5958215   0.15112257 -0.07187224]
 [ 0.59614486  0.15046394 -0.07175181]
 [ 0.62759328  0.16257867 -0.12434941]
 [ 0.61252546  0.15917572  0.07216572]
 [ 0.5972876   0.186289   -0.10227097]
 [ 0.5929876   0.18590152 -0.04587363]
 [ 0.67092979  0.25625986 -0.19476134]
 [ 0.61552674  0.27312741  0.23764272]
 [ 0.76192707  0.32696548 -0.23866405]
 [ 0.61490697  0.37373778  0.32929295]
 [ 0.70107996  0.4162237  -0.18799469]
 [ 0.56296194  0.3469615   0.26747057]
 [ 0.68923146  0.43785161 -0.21043821]
 [ 0.55015355  0.33435497  0.26719773]
 [ 0.67958015  0.42962551 -0.19730502]
 [ 0.55084795  0.32428682  0.23829618]
 [ 0.68086922  0.42319477 -0.17752741]
 [ 0.55502903  0.32787919  0.25126159]
 [ 0.6576938   0.51969534 -0.14214163]
 [ 0.64055568  0.52023721  0.14222071]
 [ 0.52412039  0.62018818 -0.15834816]
 [ 0.73181421  0.69024497  0.11025447]
 [ 0.56040704  0.81561226 -0.03564663]
 [ 0.87673992  0.82232887  0.14302647]
 [ 0.58016121  0.83869517 -0.02611996]
 [ 0.89598191  0.87518257  0.14569874]
 [ 0.50717425  0.87537444 -0.06918345]
 [ 0.88722825  0.90083396  0.09929685]]

Process finished with exit code 0
2.for
import time

import cv2
import numpy as np
import mediapipe as mp

mp_pose = mp.solutions.pose

pose = mp_pose.Pose(static_image_mode=False,
                    model_complexity=0,
                    smooth_landmarks=True,
                    enable_segmentation=True,
                    min_detection_confidence=0.5,
                    min_tracking_confidence=0.5)
drawing = mp.solutions.drawing_utils

point_x = []
point_y = []
point_z = []


# 提取x,y,z坐标
def get_x_y_z(each):
    point_x.append(each.x)
    point_y.append(each.y)
    point_z.append(each.z)
    return point_x, point_y, point_z


if __name__ == '__main__':
    t0 = time.time()
    img = cv2.imread('1.jpg')
    img = cv2.cvtColor(img, cv2.COLOR_BGR2RGB)
    results = pose.process(img)
    drawing.draw_landmarks(img, results.pose_landmarks, mp_pose.POSE_CONNECTIONS)
    coords = np.array(results.pose_landmarks.landmark)

    for index, each in enumerate(coords):
        x, y, z = get_x_y_z(each)
    point = np.vstack((x, y, z)).T
    print("FPS: {}".format(str(int(1 / (time.time() - t0)))))
    print(point)
运行结果
FPS: 4
[[ 0.59134167  0.17020825 -0.10148811]
 [ 0.59961498  0.152271   -0.11516247]
 [ 0.60297894  0.15230441 -0.11523969]
 [ 0.60687125  0.15244034 -0.11535674]
 [ 0.59567201  0.15167823 -0.07190258]
 [ 0.5958215   0.15112257 -0.07187224]
 [ 0.59614486  0.15046394 -0.07175181]
 [ 0.62759328  0.16257867 -0.12434941]
 [ 0.61252546  0.15917572  0.07216572]
 [ 0.5972876   0.186289   -0.10227097]
 [ 0.5929876   0.18590152 -0.04587363]
 [ 0.67092979  0.25625986 -0.19476134]
 [ 0.61552674  0.27312741  0.23764272]
 [ 0.76192707  0.32696548 -0.23866405]
 [ 0.61490697  0.37373778  0.32929295]
 [ 0.70107996  0.4162237  -0.18799469]
 [ 0.56296194  0.3469615   0.26747057]
 [ 0.68923146  0.43785161 -0.21043821]
 [ 0.55015355  0.33435497  0.26719773]
 [ 0.67958015  0.42962551 -0.19730502]
 [ 0.55084795  0.32428682  0.23829618]
 [ 0.68086922  0.42319477 -0.17752741]
 [ 0.55502903  0.32787919  0.25126159]
 [ 0.6576938   0.51969534 -0.14214163]
 [ 0.64055568  0.52023721  0.14222071]
 [ 0.52412039  0.62018818 -0.15834816]
 [ 0.73181421  0.69024497  0.11025447]
 [ 0.56040704  0.81561226 -0.03564663]
 [ 0.87673992  0.82232887  0.14302647]
 [ 0.58016121  0.83869517 -0.02611996]
 [ 0.89598191  0.87518257  0.14569874]
 [ 0.50717425  0.87537444 -0.06918345]
 [ 0.88722825  0.90083396  0.09929685]]

Process finished with exit code 0
FPS都差不多
之后显示成三维
import cv2
import time
import numpy as np
import open3d
import mediapipe as mp

mp_pose = mp.solutions.pose

pose = mp_pose.Pose(static_image_mode=False,
                    model_complexity=0,
                    smooth_landmarks=True,
                    enable_segmentation=True,
                    min_detection_confidence=0.5,
                    min_tracking_confidence=0.5)
drawing = mp.solutions.drawing_utils

point_x = []
point_y = []
point_z = []


# 提取x,y,z坐标
def get_x_y_z(each):
    point_x.append(each.x)
    point_y.append(each.y)
    point_z.append(each.z)
    return point_x, point_y, point_z


if __name__ == '__main__':
    img = cv2.imread('1.jpg')
    img = cv2.cvtColor(img, cv2.COLOR_BGR2RGB)
    results = pose.process(img)
    drawing.draw_landmarks(img, results.pose_landmarks, mp_pose.POSE_CONNECTIONS)
    coords = np.array(results.pose_landmarks.landmark)

    for index, each in enumerate(coords):
        x, y, z = get_x_y_z(each)
    point = np.vstack((x, y, z)).T
    # 3d点云 3维可视化
    point_cloud = open3d.geometry.PointCloud()
    points = open3d.utility.Vector3dVector(point)
    point_cloud.points = points
    open3d.visualization.draw_geometries([point_cloud])
运行结果
关键点3D交互式可视化
预测的关键点更加显著
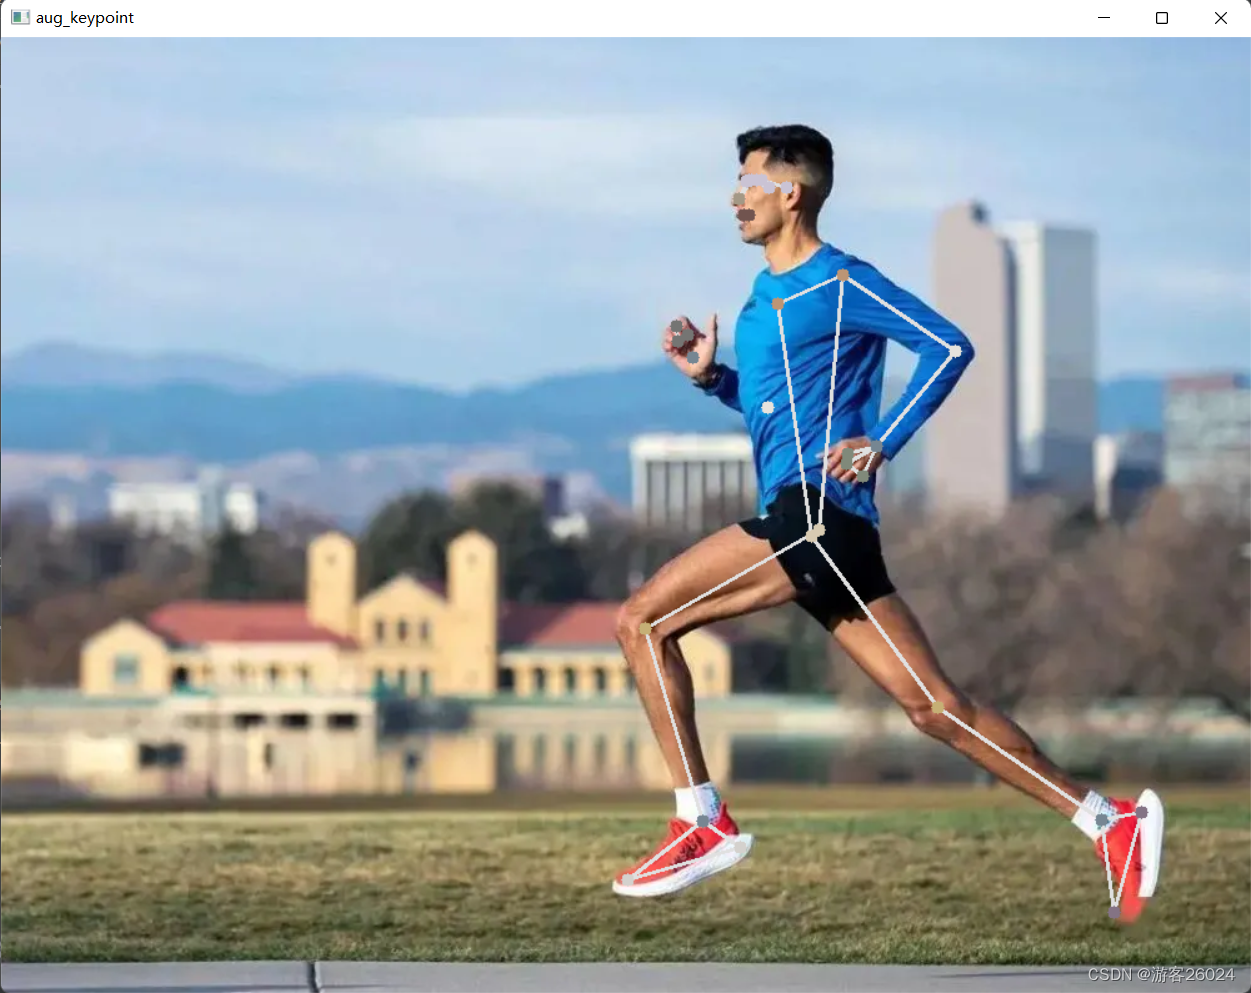
将各个关键点加粗成莫兰迪色
莫兰蒂色卡

因为现在的img通道是bgr,所以调色板的rgb顺序得对换以下
代码优化
import cv2
import numpy as np
import mediapipe as mp


mp_pose = mp.solutions.pose
pose = mp_pose.Pose(static_image_mode=True,
                    model_complexity=2,
                    smooth_landmarks=True,
                    min_detection_confidence=0.5,
                    min_tracking_confidence=0.5)
drawing = mp.solutions.drawing_utils

img = cv2.imread("1.jpg")
height, width, channels = img.shape

point_x = []
point_y = []


# 提取x,y坐标
def get_x_y(each):
    point_x.append(int(each.x * width))
    point_y.append(int(each.y * height))
    return point_x, point_y


if __name__ == '__main__':
    print("height:{}, width:{}".format(height, width))

    results = pose.process(img)
    drawing.draw_landmarks(img, results.pose_landmarks, mp_pose.POSE_CONNECTIONS)
    coords = np.array(results.pose_landmarks.landmark)

    for index, each in enumerate(coords):
        x, y = get_x_y(each)
    points = np.vstack((x, y)).T
    radius = 5
    for index, point in enumerate(points):
        # nose
        if index == 0:
            img = cv2.circle(img, (point[0], point[1]), radius, (133, 152, 164), -1)
        # shoulder
        elif index in [11, 12]:
            img = cv2.circle(img, (point[0], point[1]), radius, (117, 149, 188), -1)
        # hip joint
        elif index in [23, 24]:
            img = cv2.circle(img, (point[0], point[1]), radius, (177, 202, 215), -1)
        # elbow
        elif index in [13, 14]:
            img = cv2.circle(img, (point[0], point[1]), radius, (221, 227, 229), -1)
        # lap
        elif index in [25, 26]:
            img = cv2.circle(img, (point[0], point[1]), radius, (117, 175, 198), -1)
        # wrist and ankle
        elif index in [15, 16, 27, 28]:
            img = cv2.circle(img, (point[0], point[1]), radius, (146, 134, 118), -1)
        # left hand
        elif index in [17, 19, 21]:
            img = cv2.circle(img, (point[0], point[1]), radius, (122, 137, 128), -1)
        # right hand
        elif index in [18, 20, 22]:
            img = cv2.circle(img, (point[0], point[1]), radius, (115, 117, 117), -1)
        # left feet
        elif index in [27, 29, 31]:
            img = cv2.circle(img, (point[0], point[1]), radius, (205, 209, 212), -1)
        # right feet
        elif index in [28, 30, 32]:
            img = cv2.circle(img, (point[0], point[1]), radius, (132, 115, 132), -1)
        # mouth
        elif index in [9, 10]:
            img = cv2.circle(img, (point[0], point[1]), radius, (79, 84, 113), -1)
        # face and eye
        elif index in [1, 2, 3, 4, 5, 6, 7, 8]:
            img = cv2.circle(img, (point[0], point[1]), radius, (212, 195, 202), -1)
        # other
        else:
            img = cv2.circle(img, (point[0], point[1]), radius, (140, 47, 240), -1)

    cv2.imshow("aug_keypoint", img)
    cv2.waitKey(0)
    cv2.destroyAllWindows()
运行结果
算法核心:摄像头打开后估计人体姿态,10秒钟退出。
若觉得10秒太短,可修改:
if ((time.time() - t0) // 1) == 10:完整代码
import sys
import cv2
import time
import mediapipe as mp

mp_pose = mp.solutions.pose
drawing = mp.solutions.drawing_utils
pose = mp_pose.Pose(static_image_mode=False,
                    model_complexity=1,
                    smooth_landmarks=True,
                    enable_segmentation=True,
                    min_detection_confidence=0.5,
                    min_tracking_confidence=0.5)


def process_frame(img):
    results = pose.process(img)
    drawing.draw_landmarks(img, results.pose_landmarks, mp_pose.POSE_CONNECTIONS)
    return img


if __name__ == '__main__':
    t0 = time.time()
    cap = cv2.VideoCapture(0)
    cap.open(0)
    while cap.isOpened():
        success, frame = cap.read()
        if not success:
            raise ValueError("Error")
        frame = process_frame(frame)
        cv2.imshow("keypoint", frame)
        if ((time.time() - t0) // 1) == 10:
            sys.exit(0)
        cv2.waitKey(1)

    cap.release()
    cv2.destroyAllWindows()
此代码能正常运行,不展示运行结果!
算法核心:打开保存好的视频后估计人体姿态,视频读取完后退出。
完整代码
import os
import sys
import cv2
import mediapipe as mp

BASE_DIR = os.path.dirname((os.path.abspath(__file__)))
print(BASE_DIR)
sys.path.append(BASE_DIR)
mp_pose = mp.solutions.pose
drawing = mp.solutions.drawing_utils
pose = mp_pose.Pose(static_image_mode=False,
                    model_complexity=1,
                    smooth_landmarks=True,
                    enable_segmentation=True,
                    min_detection_confidence=0.5,
                    min_tracking_confidence=0.5)


def process_frame(img):
    results = pose.process(img)
    drawing.draw_landmarks(img, results.pose_landmarks, mp_pose.POSE_CONNECTIONS)
    return img


if __name__ == '__main__':
    video_dirs = os.path.join(BASE_DIR, "1.mp4")
    cap = cv2.VideoCapture(video_dirs)
    while cap.isOpened():
        success, frame = cap.read()
        if frame is None:
            break
        if success == True:
            frame = process_frame(frame)
            cv2.imshow("keypoint", frame)
        cv2.waitKey(1)

    cap.release()
    cv2.destroyAllWindows()
运行结果
原视频是最近报爆火的刘耕宏健身操。
人体姿态检测
在这个视频中证明此算法还是存在缺陷,因为视频中无法很好的将两人同时识别。
运用了上面所提及的莫兰迪色系,作为关键点的颜色。
完整代码
import cv2
import time
import numpy as np
from tqdm import tqdm
import mediapipe as mp

mp_pose = mp.solutions.pose
pose = mp_pose.Pose(static_image_mode=True,
                    model_complexity=2,
                    smooth_landmarks=True,
                    min_detection_confidence=0.5,
                    min_tracking_confidence=0.5)
drawing = mp.solutions.drawing_utils


def process_frame(img):
    height, width, channels = img.shape
    start = time.time()
    results = pose.process(img)
    if results.pose_landmarks:
        drawing.draw_landmarks(img, results.pose_landmarks, mp_pose.POSE_CONNECTIONS)
        coords = np.array(results.pose_landmarks.landmark)
        for index, each in enumerate(coords):
            cx = int(each.x * width)
            cy = int(each.y * height)
            cz = each.z
            radius = 5
            # nose
            if index == 0:
                img = cv2.circle(img, (cx, cy), radius, (133, 152, 164), -1)
            # shoulder
            elif index in [11, 12]:
                img = cv2.circle(img, (cx, cy), radius, (117, 149, 188), -1)
            # hip joint
            elif index in [23, 24]:
                img = cv2.circle(img, (cx, cy), radius, (177, 202, 215), -1)
            # elbow
            elif index in [13, 14]:
                img = cv2.circle(img, (cx, cy), radius, (221, 227, 229), -1)
            # lap
            elif index in [25, 26]:
                img = cv2.circle(img, (cx, cy), radius, (117, 175, 198), -1)
            # wrist and ankle
            elif index in [15, 16, 27, 28]:
                img = cv2.circle(img, (cx, cy), radius, (146, 134, 118), -1)
            # left hand
            elif index in [17, 19, 21]:
                img = cv2.circle(img, (cx, cy), radius, (122, 137, 128), -1)
            # right hand
            elif index in [18, 20, 22]:
                img = cv2.circle(img, (cx, cy), radius, (115, 117, 117), -1)
            # left feet
            elif index in [27, 29, 31]:
                img = cv2.circle(img, (cx, cy), radius, (205, 209, 212), -1)
            # right feet
            elif index in [28, 30, 32]:
                img = cv2.circle(img, (cx, cy), radius, (132, 115, 132), -1)
            # mouth
            elif index in [9, 10]:
                img = cv2.circle(img, (cx, cy), radius, (79, 84, 113), -1)
            # face and eye
            elif index in [1, 2, 3, 4, 5, 6, 7, 8]:
                img = cv2.circle(img, (cx, cy), radius, (212, 195, 202), -1)
            # other
            else:
                img = cv2.circle(img, (cx, cy), radius, (140, 47, 240), -1)
    else:
        fail = "fail detection"
        img = cv2.putText(img, fail, (25, 100), cv2.FONT_HERSHEY_SIMPLEX, 1, (0, 255, 0), 3)

    FPS = 1 / (time.time() - start)
    img = cv2.putText(img, "FPS" + str(int(FPS)), (25, 50), cv2.FONT_HERSHEY_SIMPLEX, 1, (0, 255, 0), 3)
    return img


def out_video(input):
    file = input.split("/")[-1]
    output = "out-" + file
    print("It will start processing video: {}".format(input))
    cap = cv2.VideoCapture(input)
    frame_count = int(cap.get(cv2.CAP_PROP_FRAME_COUNT))
    frame_size = (cap.get(cv2.CAP_PROP_FRAME_WIDTH), cap.get(cv2.CAP_PROP_FRAME_HEIGHT))
    # # create VideoWriter,VideoWriter_fourcc is video decode
    fourcc = cv2.VideoWriter_fourcc(*'mp4v')
    fps = cap.get(cv2.CAP_PROP_FPS)
    out = cv2.VideoWriter(output, fourcc, fps, (int(frame_size[0]), int(frame_size[1])))
    # the progress bar
    with tqdm(range(frame_count)) as pbar:

        while cap.isOpened():
            success, frame = cap.read()
            if not success:
                break
            try:
                frame = process_frame(frame)
                out.write(frame)
                pbar.update(1)
            except:
                print("ERROR")
                pass
    pbar.close()
    cv2.destroyAllWindows()
    out.release()
    cap.release()
    print("{} finished!".format(output))


if __name__ == '__main__':
    video_dirs = "1.mp4"
    out_video(video_dirs)
运行结果
pbar程序运行
人体关键点检测优化
很明显比之前的效果更好!
第一次做视频效果不太熟练还请见谅!
下一话
无论您是想搭建桌面端、WEB端或者移动端APP应用,HOOPSPlatform组件都可以为您提供弹性的3D集成架构,同时,由工业领域3D技术专家组成的HOOPS技术团队也能为您提供技术支持服务。如果您的客户期望有一种在多个平台(桌面/WEB/APP,而且某些客户端是“瘦”客户端)快速、方便地将数据接入到3D应用系统的解决方案,并且当访问数据时,在各个平台上的性能和用户体验保持一致,HOOPSPlatform将帮助您完成。利用HOOPSPlatform,您可以开发在任何环境下的3D基础应用架构。HOOPSPlatform可以帮您打造3D创新型产品,HOOPSSDK包含的技术有:快速且准确的CAD
本教程将在Unity3D中混合Optitrack与数据手套的数据流,在人体运动的基础上,添加双手手指部分的运动。双手手背的角度仍由Optitrack提供,数据手套提供双手手指的角度。 01 客户端软件分别安装MotiveBody与MotionVenus并校准人体与数据手套。MotiveBodyMotionVenus数据手套使用、校准流程参照:https://gitee.com/foheart_1/foheart-h1-data-summary.git02 数据转发打开MotiveBody软件的Streaming,开始向Unity3D广播数据;MotionVenus中设置->选项选择Unit
Unity自动旋转动画1.开门需要门把手先动,门再动2.关门需要门先动,门把手再动3.中途播放过程中不可以再次进行操作觉得太复杂?查看我的文章开关门简易进阶版效果:如果这个门可以直接打开的话,就不需要放置"门把手"如果门把手还有钥匙需要旋转,那就可以把钥匙放在门把手的"门把手",理论上是可以无限套娃的可调整参数有:角度,反向,轴向,速度运行时点击Test进行测试自己写的代码比较垃圾,命名与结构比较拉,高手轻点喷,新手有类似的需求可以拿去做参考上代码usingSystem.Collections;usingSystem.Collections.Generic;usingUnityEngine;u
之前说过10之后的版本没有3dScan了,所以还是9.8的版本或者之前更早的版本。 3d物体扫描需要先下载扫描的APK进行扫面。首先要在手机上装一个扫描程序,扫描现实中的三维物体,然后上传高通官网,在下载成UnityPackage类型让Unity能够使用这个扫描程序可以从高通官网上进行下载,是一个安卓程序。点到Tools往下滑,找到VuforiaObjectScanner下载后解压数据线连接手机,将apk文件拷入手机安装然后刚才解压文件中的Media文件夹打开,两个PDF图打印第一张A4-ObjectScanningTarget.pdf,主要是用来辅助扫描的。好了,接下来就是扫描三维物体。将瓶
目录前言滤波电路科普主要分类实际情况单位的概念常用评价参数函数型滤波器简单分析滤波电路构成低通滤波器RC低通滤波器RL低通滤波器高通滤波器RC高通滤波器RL高通滤波器部分摘自《LC滤波器设计与制作》,侵权删。前言最近需要学习放大电路和滤波电路,但是由于只在之前做音乐频谱分析仪的时候简单了解过一点点运放,所以也是相当从零开始学习了。滤波电路科普主要分类滤波器:主要是从不同频率的成分中提取出特定频率的信号。有源滤波器:由RC元件与运算放大器组成的滤波器。可滤除某一次或多次谐波,最普通易于采用的无源滤波器结构是将电感与电容串联,可对主要次谐波(3、5、7)构成低阻抗旁路。无源滤波器:无源滤波器,又称
@作者:SYFStrive @博客首页:HomePage📜:微信小程序📌:个人社区(欢迎大佬们加入)👉:社区链接🔗📌:觉得文章不错可以点点关注👉:专栏连接🔗💃:感谢支持,学累了可以先看小段由小胖给大家带来的街舞👉微信小程序(🔥)目录自定义组件-behaviors 1、什么是behaviors 2、behaviors的工作方式 3、创建behavior 4、导入并使用behavior 5、behavior中所有可用的节点 6、同名字段的覆盖和组合规则总结最后自定义组件-behaviors 1、什么是behaviorsbehaviors是小程序中,用于实现
动漫制作技巧是很多新人想了解的问题,今天小编就来解答与大家分享一下动漫制作流程,为了帮助有兴趣的同学理解,大多数人会选择动漫培训机构,那么今天小编就带大家来看看动漫制作要掌握哪些技巧?一、动漫作品首先完成草图设计和原型制作。设计草图要有目的、有对象、有步骤、要形象、要简单、符合实际。设计图要一致性,以保证制作的顺利进行。二、原型制作是根据设计图纸和制作材料,可以是手绘也可以是3d软件创建。在此步骤中,要注意的问题是色彩和平面布局。三、动漫制作制作完成后,加工成型。完成不同的表现形式后,就要对设计稿进行加工处理,使加工的难易度降低,并得到一些基本准确的概念,以便于后续的大样、准确的尺寸制定。四、
2022/8/4更新支持加入水印水印必须包含透明图像,并且水印图像大小要等于原图像的大小pythonconvert_image_to_video.py-f30-mwatermark.pngim_dirout.mkv2022/6/21更新让命令行参数更加易用新的命令行使用方法pythonconvert_image_to_video.py-f30im_dirout.mkvFFMPEG命令行转换一组JPG图像到视频时,是将这组图像视为MJPG流。我需要转换一组PNG图像到视频,FFMPEG就不认了。pyav内置了ffmpeg库,不需要系统带有ffmpeg工具因此我使用ffmpeg的python包装p
Transformers开始在视频识别领域的“猪突猛进”,各种改进和魔改层出不穷。由此作者将开启VideoTransformer系列的讲解,本篇主要介绍了FBAI团队的TimeSformer,这也是第一篇使用纯Transformer结构在视频识别上的文章。如果觉得有用,就请点赞、收藏、关注!paper:https://arxiv.org/abs/2102.05095code(offical):https://github.com/facebookresearch/TimeSformeraccept:ICML2021author:FacebookAI一、前言Transformers(VIT)在图
遍历文件夹我们通常是使用递归进行操作,这种方式比较简单,也比较容易理解。本文为大家介绍另一种不使用递归的方式,由于没有使用递归,只用到了循环和集合,所以效率更高一些!一、使用递归遍历文件夹整体思路1、使用File封装初始目录,2、打印这个目录3、获取这个目录下所有的子文件和子目录的数组。4、遍历这个数组,取出每个File对象4-1、如果File是否是一个文件,打印4-2、否则就是一个目录,递归调用代码实现publicclassSearchFile{publicstaticvoidmain(String[]args){//初始目录Filedir=newFile("d:/Dev");Datebeg

 https://blog.csdn.net/XiaoyYidiaodiao/article/details/125565738?spm=1001.2014.3001.5502