最近开始转TA,刚开始学习,资料比较杂乱,其中遇到的问题和一些计算方式,记录一下,后续会一直完善补充。
Shader "Example/URPUnlitShaderColor"
{
    Properties
    {
        [MainColor] _BaseColor("Base Color", Color) = (1, 1, 1, 1)
        [MainTexture] _BaseMap("Base Map", 2D) = "white"{}
    }

    SubShader
    {
        // SubShader Tags 定义何时以及在何种条件下执行某个 SubShader 代码块或某个通道。
        Tags { "RenderType" = "Opaque" "RenderPipeline" = "UniversalPipeline" }

        Pass
        {
            // 声明Pass名称,方便调用与识别
            Name "ForwardUnlit"
            // HLSL 代码块。Unity SRP 使用 HLSL 语言。
            HLSLPROGRAM
            // 此行定义顶点着色器的名称。
            #pragma vertex vert
            // 此行定义片元着色器的名称。
            #pragma fragment frag

            // Core.hlsl 文件包含常用的 HLSL 宏和函数的定义,还包含对其他 HLSL 文件(例如Common.hlsl、SpaceTransforms.hlsl 等)的 #include 引用。
            #include "Packages/com.unity.render-pipelines.universal/ShaderLibrary/Core.hlsl"

            // 结构定义将定义它包含哪些变量。此示例使用 Attributes 结构作为顶点着色器中的输入结构。
            struct Attributes
            {
                // positionOS 变量包含对象空间中的顶点
                float4 positionOS   : POSITION;
                // uv 变量包含给定顶点的纹理上的
                float2 uv           : TEXCOORD0;
                // 声明包含每个顶点的法线矢量的
                half3 normal        : NORMAL;
            };

            struct Varyings
            {
                // 此结构中的位置必须具有 SV_POSITION 语义。
                float4 positionHCS  : SV_POSITION;
                float2 uv           : TEXCOORD0;
                half3 normal        : NORMAL;

            };
            // 材质单独声明,使用DX11风格的新采样方法
            // 此宏将 _BaseMap 声明为 Texture2D 对象。
            TEXTURE2D(_BaseMap);
            // This macro declares the sampler for the _BaseMap texture.
            SAMPLER(sampler_BaseMap);

            // 要使 Unity 着色器 SRP Batcher 兼容,请在名为 UnityPerMaterial 的单个 CBUFFER 代码块中声明与材质相关的所有属性。
            // 有关 SRP Batcher 的更多信息 https://docs.unity3d.com/Manual/SRPBatcher.html
            CBUFFER_START(UnityPerMaterial)
                // 以下行声明了 _BaseColor 变量,以便可以在片元着色器中使用它。
                half4 _BaseColor;
                // 以下行声明 _BaseMap_ST 变量,以便可以在片元着色器中使用 _BaseMap 变量。为了使平铺和偏移有效,有必要使用 _ST 后缀。
                float4 _BaseMap_ST;
            CBUFFER_END

            // 顶点着色器定义具有在 Varyings 结构中定义的属性。vert 函数的类型必须与它返回的类型(结构)匹配。
            Varyings vert(Attributes IN)
            {
                // // 使用 Varyings 结构声明输出对象 (OUT)。
                Varyings OUT;
                //方法一
                // TransformObjectToHClip 函数将顶点位置从对象空间变换到齐次裁剪空间。
                OUT.positionHCS = TransformObjectToHClip(IN.positionOS.xyz);
                //方法二
                //GetVertexPositionInputs方法根据使用情况自动生成各个坐标系下的定点信息。
                //#include "Packages/com.unity.render-pipelines.universal/ShaderLibrary/ShaderVariablesFunctions.hlsl"
                // VertexPositionInputs vertexInput = GetVertexPositionInputs(input.positionOS.xyz);
                // OUT.positionHCS = vertexInput.positionCS;

                // TRANSFORM_TEX 宏执行平铺和偏移
                OUT.uv = TRANSFORM_TEX(IN.uv, _BaseMap);
                // 使用 TransformObjectToWorldNormal 函数将法线从对象空间变换到世界空间。此函数来自 Core.hlsl 中引用的SpaceTransforms.hlsl 文件。
                OUT.normal = TransformObjectToWorldNormal(IN.normal);
                return OUT;
            }

            half4 frag(Varyings IN) : SV_Target
            {
                // SAMPLE_TEXTURE2D 宏使用给定的采样器对纹理进行
                half4 color = SAMPLE_TEXTURE2D(_BaseMap, sampler_BaseMap, IN.uv);
                color*=_BaseColor;
                return color;
            }
            ENDHLSL
        }
    }
}
注意此时Properties中的属性,如果要开启SRP合批,需要放到CBUFFER代码块中。
 应用阶段准备的数据---->
顶点着色处理数据(返回值为处理后的数据)---->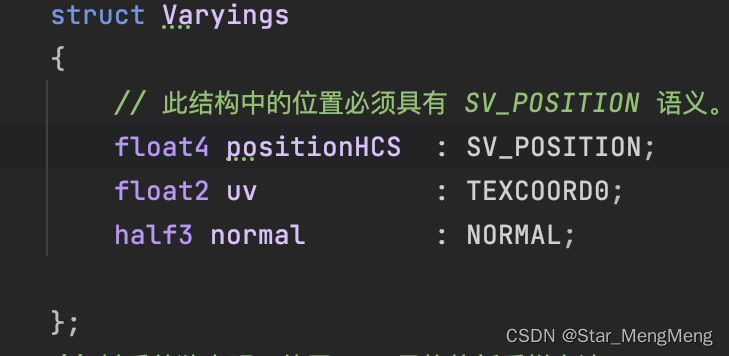 ------>
 片元着色器接收上一阶段的数据,return片元渲染结果
#include "Packages/com.unity.render-pipelines.universal/Shaders/LitInput.hlsl"
这里会把属性的变量包装,但属性名字需要和类库中的一致,库中默认属性:

此时就不需要自己在CBUFFER中声明属性了,对于Texture也不需要额外处理了,如:

注意Toggle(_AdditionalLights)里面的字段

声明shader_feature

通过#if xxx #endif判断

Shader "MyShader/BarkShader1"
{
   Properties
    {

        [MainColor] _BaseColor("Base Color", Color) = (1, 1, 1, 1)
        [MainTexture] _BaseMap("Base Map", 2D) = "white"{}
        _SpecColor("Specular", Color) = (1.0, 1.0, 1.0, 1.0)
        _Smoothness("Gloss", Range(8.0, 256)) = 20
    }

    SubShader
    {
        // URP的shader要在Tags中注明渲染管线是UniversalPipeline
      Tags { "RenderType" = "Opaque" "RenderPipeline" = "UniversalPipeline" }


        Pass
        {
            // 声明Pass名称,方便调用与识别
            Name "ForwardBlinPhong"

            HLSLPROGRAM

            // 声明顶点/片段着色器对应的函数
            #pragma vertex vert
            #pragma fragment frag

            #include "Packages/com.unity.render-pipelines.universal/ShaderLibrary/Core.hlsl"
            #include "Packages/com.unity.render-pipelines.universal/ShaderLibrary/Lighting.hlsl"
            //引用后,自动SRP合批,且不需要再声明TEXTURE2D(_BaseMap); SAMPLER(sampler_BaseMap);及CBUFFER_START
            #include "Packages/com.unity.render-pipelines.universal/Shaders/LitInput.hlsl"
            struct Attributes
            {
                float4 positionOS : POSITION;
                float3 normalOS   : NORMAL;
                float2 uv         : TEXCOORD0;
            };

            struct Varyings
            {
                float4 positionCS : SV_POSITION;
                float3 positionWS : POSITION_WS;
                float2 uv         : TEXCOORD0;
                float3 normalWS    : NORMAL_WS;
            };

            // 顶点着色器
            Varyings vert(Attributes input)
            {
                // GetVertexPositionInputs方法根据使用情况自动生成各个坐标系下的定点信息
                const VertexPositionInputs vertexInput = GetVertexPositionInputs(input.positionOS.xyz);

                Varyings output;
                output.uv = TRANSFORM_TEX(input.uv, _BaseMap);
                output.positionCS = vertexInput.positionCS;
                output.positionWS = vertexInput.positionWS;
                output.normalWS = TransformObjectToWorldNormal(input.normalOS);
                return output;
            }

            // 片段着色器
            half4 frag(Varyings input) : SV_Target
            {
                float4 output;

                real3 positionWS = input.positionWS;

                real3 normalWS = normalize(input.normalWS);
                Light mainLight = GetMainLight(); // 主光源
                real3 lightColor = mainLight.color; // 主光源颜色

                real3 lightDir = normalize(mainLight.direction); // 主光源方向
                real3 albedo = SAMPLE_TEXTURE2D(_BaseMap, sampler_BaseMap, input.uv) * _BaseColor;
                real3 viewDirectionWS = SafeNormalize(GetCameraPositionWS() - positionWS); // safe防止分母为0
                real3 h = SafeNormalize(viewDirectionWS + lightDir);
                real3 specular = pow(saturate(dot(h, input.normalWS)), _Smoothness) * lightColor * saturate(_SpecColor); // 高光
                real3 ambient = SampleSH(normalWS) * albedo; // 环境光

                real3 diffuse = saturate(dot(lightDir,normalWS)) * lightColor * albedo; // 漫反射

                output = real4(ambient + diffuse + specular, 1.0);
                return output;
                }
            ENDHLSL
        }
       // 一般在Buit-In管线里,我们只需要最后FallBack返回到系统的Diffuse Shader,管线就会去里面找到他处理阴影的Pass。但是在URP中,一个Shader中的所有Pass需要有一致的CBuffer,否则便会打破SRP Batcher,影响效率。
       // 而系统默认SimpleLit的Shader中的CBuffer内容和我的写的并不一致,所以我们需要把它阴影处理的Pass复制一份,并且删掉其中引用的SimpleLitInput.hlsl(相关CBuffer的声明在这里面)
          Pass
        {
            Name "ShadowCaster"
            Tags{"LightMode" = "ShadowCaster"}

            ZWrite On
            ZTest LEqual
            ColorMask 0
            Cull[_Cull]

            HLSLPROGRAM
            #pragma exclude_renderers gles gles3 glcore
            #pragma target 4.5

            // -------------------------------------
            // Material Keywords
            #pragma shader_feature_local_fragment _ALPHATEST_ON
            #pragma shader_feature_local_fragment _GLOSSINESS_FROM_BASE_ALPHA

            //--------------------------------------
            // GPU Instancing
            #pragma multi_compile_instancing
            #pragma multi_compile _ DOTS_INSTANCING_ON

            #pragma vertex ShadowPassVertex
            #pragma fragment ShadowPassFragment

            #include "Packages/com.unity.render-pipelines.universal/Shaders/LitInput.hlsl"
            #include "Packages/com.unity.render-pipelines.universal/Shaders/ShadowCasterPass.hlsl"
            ENDHLSL
        }
    }

}
如果希望每个光源都能够进行逐像素的漫反射和高光反射计算,那么我们就需要在片元着色器中遍历每一个光源,并进行和上面一样的光照计算
GetAdditionalLightsCount()能够获取到影响这个片段的附加光源数量,但是如果数量超过了URP中设定的附加光照上限,就会返回附加光照上限的数量。
GetAdditionalLight(lightIndex, IN.positionWS);方法会按照index去找到对应的光源,并根据提供的片段世界坐标位置计算光照和阴影衰减,并存储在返回的Light结构体内。
int pixelLightCount = GetAdditionalLightsCount();
for (int lightIndex = 0; lightIndex < pixelLightCount; ++lightIndex)
{
    Light light = GetAdditionalLight(lightIndex, IN.positionWS);
    diffuse += LightingLambert(light.color, light.direction, IN.normalWS);
    specular += LightingSpecular(light.color, light.direction, normalize(IN.normalWS), normalize(IN.viewDirWS), _SpecularColor, _Smoothness);
}Shader "MyShader/BarkShader"
{
Properties
{
[MainColor] _BaseColor("Base Color", Color) = (1, 1, 1, 1)
[MainTexture] _BaseMap("Base Map", 2D) = "white"{}
_BumpMap("Normal Map", 2D) = "bump"{}
_BumpScale("NormalScale",Float) = 1.0
_SpecColor("Specular", Color) = (1.0, 1.0, 1.0, 1.0)
_Smoothness("Gloss", Range(8.0, 256)) = 20
//添加一个Toggle判断
[Toggle(_AdditionalLights)] _AddLights ("AddLights", Float) = 0
[Toggle(_SpecColorToggle)] _SpecColorTog ("SpecColorToggle",Float) = 0
}
SubShader
{
// URP的shader要在Tags中注明渲染管线是UniversalPipeline
Tags { "RenderType" = "Opaque" "RenderPipeline" = "UniversalPipeline" }
Pass
{
// 声明Pass名称,方便调用与识别
Name "ForwardBlinPhong"
HLSLPROGRAM
// 声明顶点/片段着色器对应的函数
#pragma vertex vert
#pragma fragment frag
#pragma shader_feature _AdditionalLights
#pragma shader_feature _SpecColorToggle
#include "Packages/com.unity.render-pipelines.universal/ShaderLibrary/Core.hlsl"
#include "Packages/com.unity.render-pipelines.universal/ShaderLibrary/Lighting.hlsl"
//引用后,自动SRP合批,且不需要再声明TEXTURE2D(_BaseMap); SAMPLER(sampler_BaseMap);及CBUFFER_START
#include "Packages/com.unity.render-pipelines.universal/Shaders/LitInput.hlsl"
//
// TEXTURE2D(_BaseMap);
// SAMPLER(sampler_BaseMap);
// CBUFFER_START(UnityPerMaterial)
// float4 _BaseColor;
// float4 _BaseMap_ST;
// real _Smoothness;
// float4 _SpecColor;
// CBUFFER_END
struct Attributes
{
float4 positionOS : POSITION;
float3 normalOS : NORMAL;
float4 tangentOS : TANGENT;
float2 uv : TEXCOORD0;
};
struct Varyings
{
float4 positionCS : SV_POSITION;
float3 positionWS : POSITION_WS;
float2 uv : TEXCOORD0;
float3 normalWS : NORMAL_WS;
float4 tangentWS : TANGENT_WS;
};
// 顶点着色器
Varyings vert(Attributes input)
{
// GetVertexPositionInputs方法根据使用情况自动生成各个坐标系下的定点信息
const VertexPositionInputs vertexInput = GetVertexPositionInputs(input.positionOS.xyz);
const VertexNormalInputs vertexNormalInput = GetVertexNormalInputs(input.normalOS, input.tangentOS);
Varyings output;
real sign = input.tangentOS.w * GetOddNegativeScale();
output.uv = TRANSFORM_TEX(input.uv, _BaseMap);
output.positionCS = vertexInput.positionCS;
output.positionWS = vertexInput.positionWS;
output.normalWS = vertexNormalInput.normalWS;
output.tangentWS = real4(vertexNormalInput.tangentWS, sign);
return output;
//方案2
// output.positionCS = TransformObjectToHClip(input.positionOS.xyz);
// output.normalWS = TransformObjectToWorldNormal(input.normalOS);
}
// 片段着色器
half4 frag(Varyings input) : SV_Target
{
float4 output;
real3 positionWS = input.positionWS;
real sgn = input.tangentWS.w; // should be either +1 or -1
real3 bitangent = sgn * cross(input.normalWS.xyz, input.tangentWS.xyz);
real3 normalTS=UnpackNormalScale(SAMPLE_TEXTURE2D(_BumpMap,sampler_BumpMap,input.uv),_BumpScale);
real3 normalWS = mul(normalTS, real3x3(input.tangentWS.xyz, bitangent.xyz, input.normalWS.xyz));
// real3 normalWS = normalize(input.normalWS);
Light mainLight = GetMainLight(); // 主光源
real3 lightColor = mainLight.color; // 主光源颜色
real3 lightDir = normalize(mainLight.direction); // 主光源方向
real3 albedo = SAMPLE_TEXTURE2D(_BaseMap, sampler_BaseMap, input.uv) * _BaseColor;
real3 ambient = SampleSH(normalWS) * albedo; // 环境光
real3 diffuse = saturate(dot(lightDir,normalWS)) * lightColor * albedo; // 漫反射
output = real4(ambient+diffuse,1.0);
#if _SpecColorToggle
real3 viewDirectionWS = SafeNormalize(GetCameraPositionWS() - positionWS); // safe防止分母为0
real3 h = SafeNormalize(viewDirectionWS + lightDir);
real3 specular = pow(saturate(dot(h, input.normalWS)), _Smoothness) * lightColor * saturate(_SpecColor); // 高光
output = real4(ambient + diffuse + specular, 1.0);
#endif
// // return real4(ambient + diffuse + specular, 1.0);
# ifdef _AdditionalLights
int lightCount = GetAdditionalLightsCount();
for(int index = 0; index < lightCount; index++)
{
Light light = GetAdditionalLight(index, positionWS);
real3 lightColorx = light.color;
real3 lightDirx = normalize(light.direction);
albedo += SAMPLE_TEXTURE2D(_BaseMap, sampler_BaseMap, input.uv) * _BaseColor;
diffuse += saturate(dot(lightDirx,normalWS)) * lightColorx * albedo;
#if _SpecColorToggle
real3 hx = SafeNormalize(viewDirectionWS + lightDirx);
specular += pow(saturate(dot(hx, input.normalWS)), _Smoothness) * lightColorx * saturate(_SpecColor);
#endif
}
output = real4(ambient+diffuse,1.0);
#if _SpecColorToggle
output = real4(ambient + diffuse + specular, 1.0);
#endif
#endif
return output;
}
ENDHLSL
}
// 一般在Buit-In管线里,我们只需要最后FallBack返回到系统的Diffuse Shader,管线就会去里面找到他处理阴影的Pass。但是在URP中,一个Shader中的所有Pass需要有一致的CBuffer,否则便会打破SRP Batcher,影响效率。
// 而系统默认SimpleLit的Shader中的CBuffer内容和我的写的并不一致,所以我们需要把它阴影处理的Pass复制一份,并且删掉其中引用的SimpleLitInput.hlsl(相关CBuffer的声明在这里面)
Pass
{
Name "ShadowCaster"
Tags{"LightMode" = "ShadowCaster"}
ZWrite On
ZTest LEqual
ColorMask 0
Cull[_Cull]
HLSLPROGRAM
#pragma exclude_renderers gles gles3 glcore
#pragma target 4.5
// -------------------------------------
// Material Keywords
#pragma shader_feature_local_fragment _ALPHATEST_ON
#pragma shader_feature_local_fragment _GLOSSINESS_FROM_BASE_ALPHA
//--------------------------------------
// GPU Instancing
#pragma multi_compile_instancing
#pragma multi_compile _ DOTS_INSTANCING_ON
#pragma vertex ShadowPassVertex
#pragma fragment ShadowPassFragment
#include "Packages/com.unity.render-pipelines.universal/Shaders/LitInput.hlsl"
#include "Packages/com.unity.render-pipelines.universal/Shaders/ShadowCasterPass.hlsl"
ENDHLSL
}
}
}
声明属性Properties
_Cutoff("Cutoff",float)=0.5
片元着色器中计算
half4 baseMap = SAMPLE_TEXTURE2D(_BaseMap, sampler_BaseMap, input.uv);
clip(baseMap.a-_Cutoff);
注意baseMap的类型,需要是xxx4,才能有变量a
如果引用urp 的shader库,名字需要一致

必要参数

顶点着色器

片元着色器

(不计算时法线贴图时,直接real3 normalWS = normalize(input.normalWS);
1.了解监管机构已经卷到需要监控进程了,为了跟上通报步伐查了下资料,打算浅试一下camille,依据原作的文档初步了解到需要python3、adb、frida、模拟器(木木-已成功、夜神)、root手机,开始逐个尝试,记录一下所遇到的情况。 原作祭上:camille/use.mdatmaster·zhengjim/camille·GitHubhttps://www.cnblogs.com/zhengjim/p/15508738.html2.PythonPython38、pip更新电脑中如果有多个python环境的,记得改好名哦,不然会报错,我是配置了环境变量然后让38的置顶pip如果久没用了也
useState作为最常见的一个hook,在使用中总是会出现各种坑,最明显的就是useState更新异步的问题。比如我们把接口返回的数据,使用useState储存起来,但是当后面去改变这个数据的时候,每次拿到的都是上次的数据,无法实时更新。或者我们在函数内部使用setState,然后立即打印state,打印的结果还是第一次的state的值。比如下面的代码实例。const[data,setData]=useState('111');consthandleTest=()=>{console.log(data)//111setName('222')console.log(name)//111}原因:
个人名片:🐼作者简介:一名大二在校生🐻❄️个人主页:落798.🐼个人WeChat:落798.🕊️系列专栏:零基础学java-----重识c语言----计算机网络🐓每日一句:看淡一点在努力,你吃的苦会铺成你要的路!文章目录每日刷题30道1.如图所示是DHCP协议的运行过程,客户端从申请到获得IP地址的正确流程是哪一项?2.缺省情况下,OSPF外部路由属于以下哪一种类型?5.R1、R2、R3、R4运行OSPF,它们接口的DRPriority如图所示,假如设备同时启动,则_________被选举为DR。(请填写设备名称,例如R1)。6.以下关于IPv6重复地址检测的描述,错误的是哪一项?7.在WL
本文目录一、前言二、转换方式三、后语四、其他:node报错1、包默认C盘存放,而不是安装目录E盘2、正确的环境变量添加3、npminstall命令报错4、npminstall-gexpress报错没有权限一、前言由于想要把之前完成的微信小程序项目转换成uniapp项目,这样的话之后可以编译成其他平台的小程序、网页、安卓、IOS,所以开始了我的踩坑之旅。PS:安卓和IOS还是算了,主要弄其他小程序可以省很多功夫,但是各个平台不一样有的还是要自己来做,但是会省不少力气二、转换方式查看uniapp官方文档知道有工具可以转换,安装工具有两种方式,一种是装npm全局库、另一种是装HBuilderX插件,
虽然公司有运维,但也不能啥都靠他们,万一哪天环境出问题了,你不能一上来就找运维吧,丢脸脸~今天分享一套从零开始搭建一套kafka集群的笔记,我几乎帮你踩了所有的坑,你只需按步骤来,有手就行kafka依赖jdk和zookeeper环境开始之前再啰嗦一句,同样的教程,有人失败有人成功,失败的小伙伴大部门都是路径问题,所以,仔细点,不要慌安装jdk检查下你服务器有没有jdk,如下图就是装了的如果没装,出门右转,先把jdk搞完再回来接着看,linux安装jdk环境搭建zookeeper集群虽然kafka0.5.x以上版本已经集成了zk,但我们最好还是单独部署一套,两个原因1、kafka自带的zk是单机
上篇说到RK3588编译OpenCV,这篇记录一下跑通YOLOv5+DeepSORT的愉(chi)快(shi)历程.1.保证编译OpenCV时关联了ffmpeg如果本身缺少ffmpeg而编译了没有ffmpeg版本的OpenCV,则视频无法读取.解决方案参照CSDN,首先安装ffmpeg:sudoaptinstall-yffmpeg之后安装一堆dev:libavcodec-dev、libavformat-dev、libavutil-dev、libavfilter-dev、libavresample-dev、libswresample-dev、libswscale-dev这个时候再去编译OpenC
目录AD7705简介ADC芯片——AD7705最详细讲解(STM32)http://t.csdn.cn/UbXjw工程以及主要代码分享,另外,附带演示视频。AD7705简介模块对输入电压进行了0.5倍的分压,才进入芯片采集。一句话说明白,TM7705是一个外置16位分辨率双通道ADC芯片,SPI通信协议,采用Σ-∆转换技术。价格便宜,对标同型号AD7705,基本能直接替换,程序基本通用。AD7705和TM7705功能区别:AD7705是美国模拟器件公司生产的。15元左右。TM7705是深圳天微生产的,引脚和功能和AD7705完全兼容。可以替代AD7705。价格比进口的便宜几倍。5元左右。(1
我最近开始接触HLSL编程,我很好奇我正在做的一些事情实际上是如何工作的。例如,我这里有一个非常简单的着色器,可以将任何蓝绿色像素着色为红色。sampler2DmySampler;float4MyPixelShader(float2texCoords:TEXCOORD0):COLOR{float4Color;Color=tex2D(mySampler,texCoords.xy);if(Color.r==0&&Color.g==1.0&&Color.b==1.0){Color.r=1.0;Color.g=0.5;Color.b=0.5;}returnColor;}techniqueSim
之前在网上下的一个游戏一键端,主要用于个人游玩用的,没想到不知不觉的中了如题所示的这个Synaptics蠕虫病毒。 刚开始的2天电脑一开机后经常发现C盘爆满,连1B文件空间都不剩,甚是奇怪,但是也没意识到是什么事情,直到今天查看进程才看到有一个Synaptics的奇怪进程,顶着我所下的那个游戏的图标在运行,在全局搜索后发现隐藏在C:\ProgramData\Synaptics路径下。 后来经网上资料查找发现是一种蠕虫病毒,其原理如下:行动轨迹:一是:其在C:\ProgramData\Synaptics创建原始病毒文件夹,内含“WS”子文件夹[为空]和“Sy
环境准备服务器说明本次演示采用三台RockyLinux8.5版本服务器服务器IP备注es-master172.16.7.11主节点es-node01172.16.7.501节点es-node02172.16.7.1302节点内核版本[root@es-master~]#uname-aLinuxes-master4.18.0-348.20.1.el8_5.x86_64#1SMPThuMar1020:59:28UTC2022x86_64x86_64x86_64GNU/Linux修改系统名##主节点hostnamectlset-hostnamees-master##node1节点hostnamectl
